Thursday, 28 August 2014

August 2014 New Products {Darcy Wilkinson}

Good evening again folks, Leandra here to introduce the latest offering of stamps from Darcy. 

These lovely stamps were used a lot (by me!) when I demoed briefly at Stevenage recently - there are so many really great images which all work perfectly together in numerous ways. That's a winning combo in my book, and many watching the demos commented on how nice both sets are - difficult to choose a leader! {TIP:Just get both!}

Tonight Darcy talks you through both sets, and together with Helen Chilton they present you with some wonderful inspiration to kick start your muse into action! Enjoy!

Hi everyone, Darcy here. At last here it is the official launch night, I can finally share my new stamps with you in full!

These started as always with a page of doodles. I instinctively start with circles, bubbles, spots and hearts, and stamps develop from there. This time, the shapes turned into mainly flowers, but then I found myself sketching the feather... and so the theme of flowers and birds was born.

EDY09
Let's start with EDY09. This plate went through all kinds of changes, in fact I think only the bird, fence and quote are from the first draft. Quite often I have no clear image design in mind, the random doodles come first, just to get my finger muscles working. The flower head on the left was entirely different in early drafts, more of a real flower shape. I really liked the bubbly buds on the stem, but they didn't match with the petals and so taking inspiration from the buds the larger bubbly blooms came into being.


The spikey flower also started out quite differently. Each rendition was sent off to PA HQ for feedback, and over the course of about 4-5 drafts we eventually got close to the final placement, size and shape. My favourite image is the feather, I just love those gentle curves, it was the easiest and most relaxing image to draw. Somehow the repetition of those flowing lines is so peaceful. I do have a special place in my heart for that poor bedraggled birdie, his name is Neville. He is in need of some serious TLC, I do hope that some of you will give him a loving home.

EDY10
On plate EDY10 the heart shaped petals were the first ones that I doodled. If you are familiar with my very first stamp sets you will know my love of hearts, so creating a heart flower was natural. But after some feedback from Leandra, I plumped them out from their skinny early version resulting in a more generous area to colour in and a bigger flower head. I love the flock of birds, this is something I often doodle, so this was a great opportunity to have this made into a stamp. I know it is going to become a firm favourite of mine, both as a background in a muted colour and as a bolder image with black ink.

My favourite images on this plate are the two leaves, both of these contain my own handwriting, albeit very tiny. The text in the leaves is deliberately slanted to give the impression of veins. I have found that if you paint the background first with a bright green and then stamp the leaves, that addition of text really make the whole thing pop. The stones also contain some handwriting and various filler doodles, the shapes are placed so that you can repeat stamp and end up with a wall or border.

'Turn your face to the sun...' is a long time favourite quote of mine, I have used it many, many times; it has been a helpful reminder in difficult times. The other quote is one I found recently and fell in love with immediately, it is fun and quirky and sums up my attitude to art in general.

So there you have it, that is how the stamps were conceived and the amazing team at PA HQ turned my ideas into reality. However it is you guys who truly bring the images to life, you who breathe colour and personality into them, so I hope you have fun with them too.


by Darcy Wilkinson - Metal Butterfly

My first piece is an 8x8 grey/whiteboard, given the 'Fibralo' treatment to achieve a gorgeous blended background. I then stamped the flock of birds and created the top and bottom borders with the dry stone wall stamp.


The butterfly is made from pieces of metal card, each one painted, then stamped and coloured in before being shaped and glued into place.


Large blobs of matte gel support the underside of the wings and the body which give it a bold, dimensional appearance.


 by Darcy Wilkinson: Tick Tock

My second project started life as a pink and silver alarm clock, I rescued it from a charity shop where it looked unloved. I took it apart fully, painted, stamped and glued and then came the tricky part... Putting it back together.


Here it is all back as it should be, though much more colourful now. Yes it does still tick, and there were no leftover bits... though at one point I thought I may have killed it and the bag of assorted screws, washers and other bits did look daunting...who knew horology was so complicated lol


I really do love it now, it makes me smile. (Even though the first 2 days of loud ticking were a true test of my patience)


by Darcy Wilkinson: Miss Veronica

My third project is a big haired girl, I think you have come to expect seeing them now. Let me introduce 'Miss. Veronica' , she is painted onto heavy weight smoothy. Some of the images are stamped directly to the card and others are stamped onto painted tissue paper, cut out and glued on.


The sunglasses are made from metal card, lightly painted and stamped. As the piece is tilted the metal card really catches the light.


by Darcy Wilkinson: Bum Bag

Finally, I made this bag. A bunch of us recently went to V-festival, Chelmsford for a weekend enjoying loads of bands and comedy acts. While these bags are a blast from the past I did think it would come in handy. The whole thing is painted with Fresco paints and stamped, with a mash up of mine and Sara Naumann's new stamps. 


I love how my flowers change just depending on the colour used. This time they are done in Cherry from the new JoFY limited edition #2 paint set; this makes them look like poppies.

Painting the fabric does make it a little harder to manipulate the fabric, but not impossible, as you can see I managed to get in 3 pockets, all with zips.


I hope tonight's projects have given you some great ideas to explore. Next week I will share on my blog how I made them in more detail.

Darcy x


Wednesday, 27 August 2014

August 2014 New Products {Lin Brown}

Hi folks, Leandra back again for our 3rd night of the August 2014 new product launch. These are always exciting times for us after months of planning and preparation. Every 6 months when new releases are revealed the number of products we announce seems to get bigger and bigger as the PaperArtsy designer family grows bigger too.

Tonight it's the turn of my buddie Linda Brown. Lin and I decided it was time for some new Christmas phrases, so she did the hard work and pulled these quote plates together (ELB11/ ELB12), but of course, she also carved up a storm with some lovely new focal images too, and of course she has another Limited Edition Paint set which features gorgeous heritage-style winter-tone paints. Once you see them in action below I'm sure you'll be hooked!

Check out Lin's new products below, and I'll hand over to Lin herself....

ELB10
ELB11
ELB12
FFLB2 (Fresco Finish: Lin Brown Set 2)

"Hi Lin here, I am very excited to be able to share the official launch of my new winter stamps and limited edition paints. I absolutely love quotes and phrases, so I am delighted that I had the opportunity to have a few of my  favourites made into rubber and hope that they become your favourites too. I'm going to stop with the introductions now as I have A LOT to share this evening, I have a trio of trios for you..."

by Lin Brown: Christmas Bunting


"Our very own JOFY is extremely fond of bunting and I can honestly say that this first project was hugely influenced by Jo."


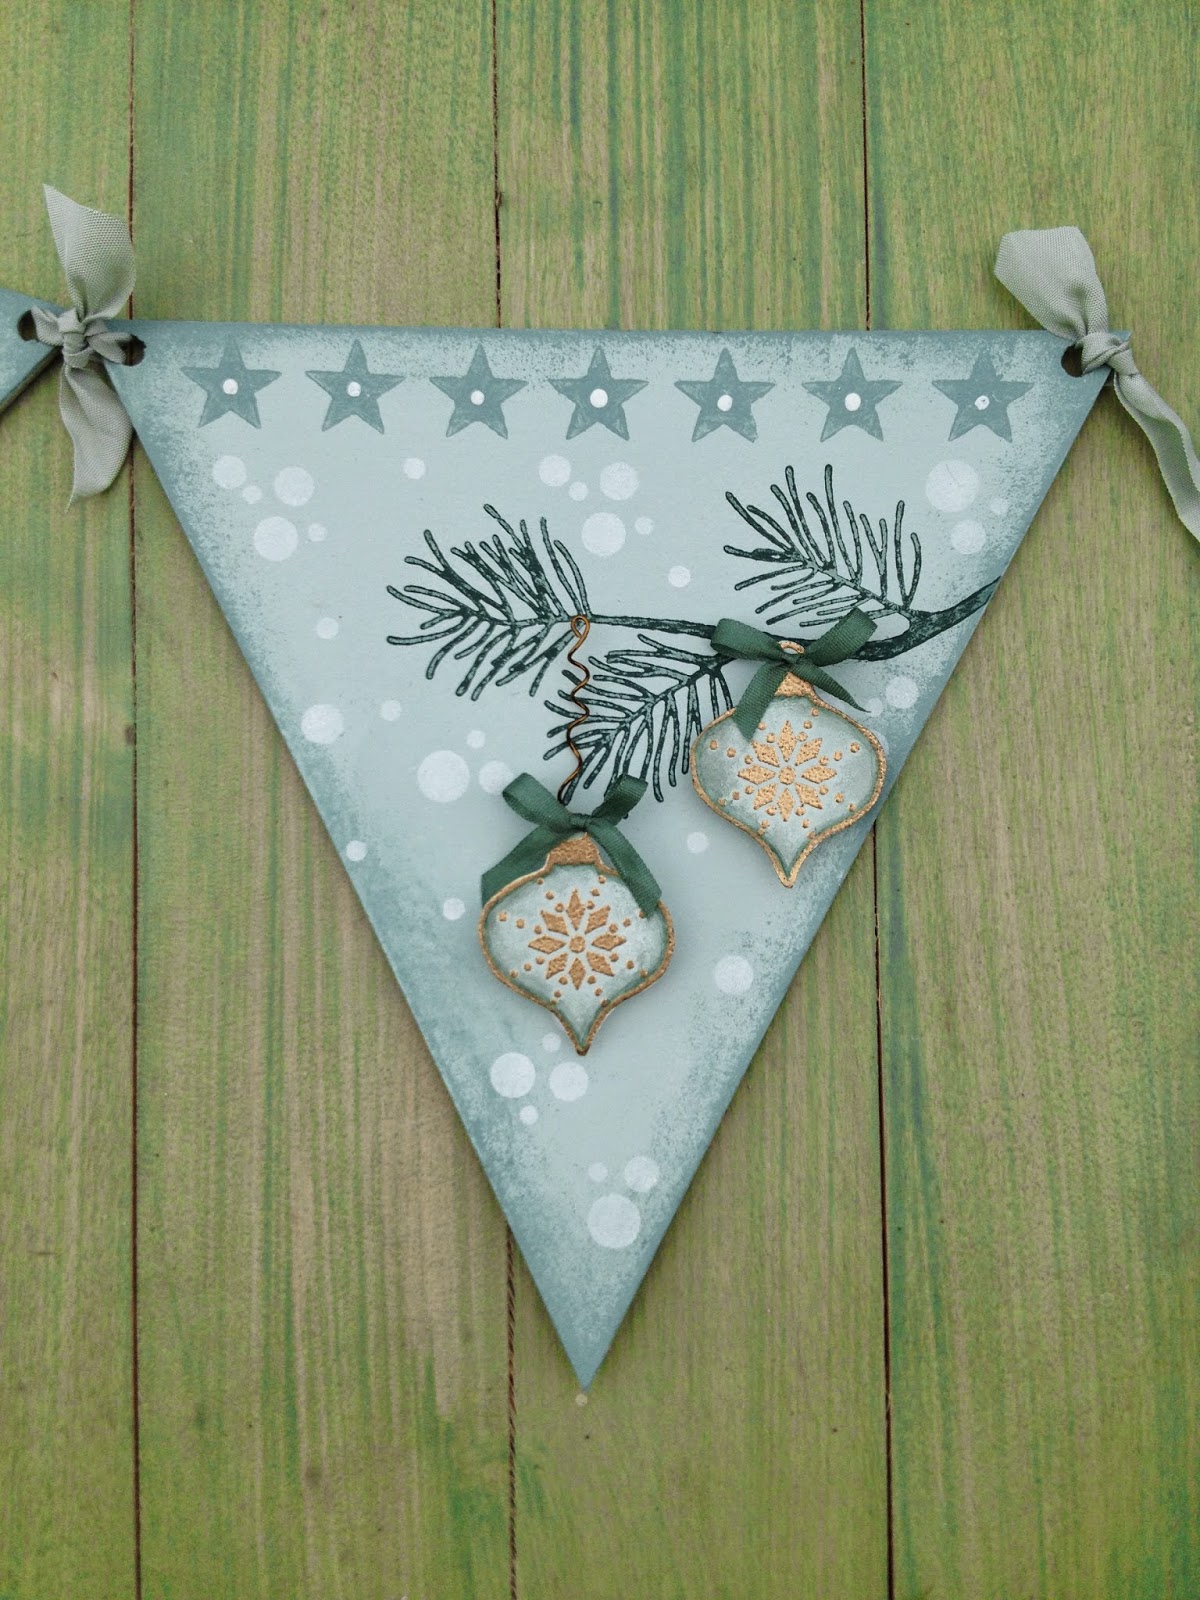
I used three pieces of  6" x 6" grey/whiteboard and cut three triangles. Before base coating them with Hint of Mint (one of my new Fresco colours), I hole-punched the top corners.


I created a new colour with some Hint of Mint and a few drops of Evergreen, I applied this generated colour to my new snowflake stamp (ELB10) with a small piece of Cut 'N' Dry Foam and printed carved snowflakes over one of my triangles.


I used the end of my paintbrush to add tiny dots of Snowflake paint (such an appropriate name!!!)


The background of  the centre-panel is finished so I'll come back to it in a bit....

Moving on to the two remaining triangles, I used just the star from my wordy Christmas tree (ELB11) to print a border of stars on each triangle, using my custom mixed colour.


With the Evergreen paint, I printed the 'greenery' (ELB10) and '25th' stamps (ELB11), then used some Snowflake to stencil some dots in the gaps through stencil PS001. I embossed the little bird with gold embossing powder before cutting him out and painting him with watered down paint.


For the right hand panel, I turned the 'greenery' stamp upside down so that I could print it from the opposite edge and repeated the techniques that I previously used but made two baubles instead of a bird.


Back to the centre panel. I really loved this background and didn't want to cover it up so a last minute decision to keep it simple achieved just that. I embossed the 'Noel' stamp (ELB11) and extended it a touch by cutting out each square and mounting on a painted piece of card.


I found the perfect colour ribbon to tie them all together but of course you could paint the ribbon yourself if nothing in your stash is quite right.


by Lin Brown: Christmas Tree Ornaments

"I decided to step away from the greens and move on to blue, in this case Marlin. It is a greyish blue and it does work beautifully with Hint of Mint."


I found some chipboard frames in my stash which I thought would look pretty good, these were from Bazzill but of course you could use any chipboard frames or even cut your own. I cut two small ovals from some heavy weight Smoothy card, this would become the centre piece for my double sided tree ornament.


Having stamped 'newsprint' images in black archival ink (HP1108, or HP1207) I painted the edges of the frame with Marlin and added a touch of random gold embossing, I sandwiched a piece of ribbon between the two frames, making a loop at the top. 


After painting both oval die cut shapes with Marlin and embossing one the trees from the row of trees from ELB10, I used some multi-medium (matte) to glue them back to back, sandwiching the ribbon between them.


Not wanting to waste anything, I used the middle piece of my frame to make another ornament. I sponged some Marlin on the edges of the oval with Cut 'N' Dry foam. Stamped the sprig of holly (ELB10) with Marlin and used a black pen to add some detail to the leaves. I used Wendy Vecchi's Cornflower Archival ink pad to stamp the bird and dipped the end of my paint brush in some ink from a gold Krylon pen to add the gold dots.


I stamped the bird again on some printed paper before cutting him out and layering over the original bird.


To complete my trio of ornaments, I die cut some grey/whiteboad with my Tim Holtz Movers and Shapers ticket die. It's the perfect size for this sentiment (ELB11).


by Lin Brown: Gift Tag Trio

"And last but not least, my trio of gift tags. I wanted to make these using my new Plum paint which also works beautifully with a Hint of Mint, which is fabulous as Hint of Mint could quite possibly be my new favourite colour!!!"


These tags are very simple, quick and easy which is exactly what you want at the busiest time of year. Having base coated my tags with Hint of Mint, I stamped the sprig of holly with Snowflake all over them to create a delicate background. 


Then using Jet Black Archival ink, I stamped the messages in the middle and filled in any gaps with a selection of stamps using Plum paint. A little Plum is also sponged around the edges of the tags....job done!!

"I'm sure this will give you some quick and easy makes to refer back to when the Christmas rush hits your home! Enjoy!"

~ Lin

Thank Lin, and congratulations on another great product release! When it comes to Christmas and all the time pressure we invariably place upon ourselves, some quick Xmas makes are ever so helpful!

To support Lin tonight, we have one of her biggest fans, Sue Carrington, who has also used all these new stamps to great effect, take a look below!


By Sue Carrington: XmasTag


I cut a tag from Smoothy Heavy card and painted it with Evergreen Fresco Finish paint, dried it off and then added a layer of CrackleGlaze. Once this was dry a top layer of Hint of Mint Fresco Finish was painted over it. I stamped the holly from the ELB 10 stamp set using Evergreen Fresco Finish paint.


The panel was cut from cardboard and I used Grunge Paste with the Lin Brown 001 stencil. I then painted it with Evergreen Fresco Finish paint and when dry, rubbed some Renaissance Treasure Gold over the top. 

The sentiment is stamped on to a piece of fabric that I’ve painted with Evergreen, then added a layer of Crackle Glaze and a top coat of Hint of Mint Fresco Finish. The bow is made from seam binding that I’ve painted with Plum Fresco Finish. I added a border of masking tape which I created a check design on and on top of that card that’s been stamped with the little tree from the ELB10 set.

by Sue Carrington: Xmas Card


I made a master sheet from Smoothy card that I first painted with Hint of Mint and then using masking tape created a checked design. I brayered over the top with Plum and Evergreen Fresco Finish paint. I cut a piece from this sheet to make the background.  I stamped the branch over the top corner using the stamp from the ELB10 set using Evergreen Fresco Finish paint.


The tree from the ELB 10 set has been stamped with Jet Black Archival ink and clear embossed onto a small piece of card from the master sheet, cut into a tag shape and I’ve ripped the bottom edge at an angle. This is mounted on card that has been painted with Evergreen  Fresco Finish. The word Noel has also been stamped and clear embossed then I’ve painted it using Plum Fresco Finish. I stamped a border using the stamp from the ELB 12 set and mounted it onto some masking tape used to make the master sheet. The small tree is made using shrink plastic and the stamp from the ELB10 set. I’ve added some lace and buttons to finish.

by Sue Carrington: Chunky board


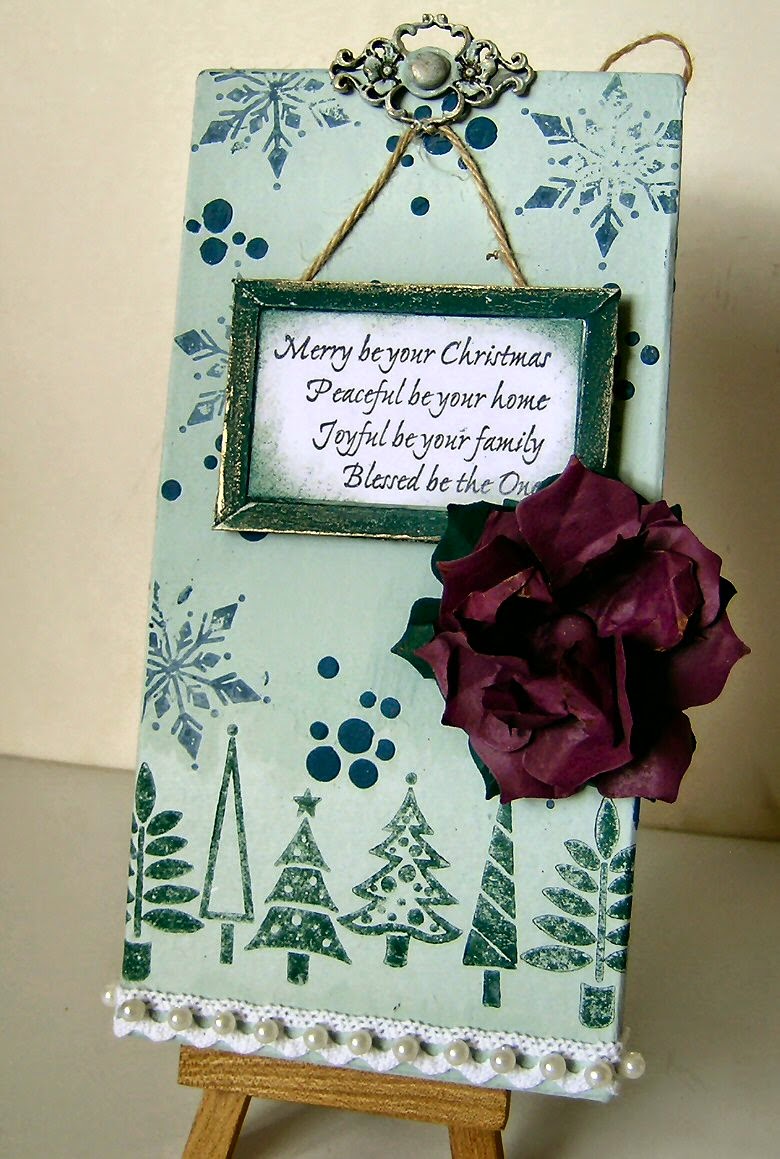
I painted the chunky board with Hint of Mint Fresco Finish. I then stamped the border of trees using Evergreen Fresco Finish onto some tissue paper. I painted over the back with more Hint of Mint Fresco Finish and stuck the border to the board. I stamped the snowflakes from the ELB 10 set with Marlin Fresco Finish and when dry, I washed over them using watered down Hint of Mint.  I mixed some Marlin Fresco Finish with Grunge Paste and added some dots using the Lin Brown 001 stencil.


The panel is made from cardboard and wooden coffee stirrers to make the frame. I painted it with Hint of Mint, then spread some CrackleGlaze over it and when dry, a coat of Evergreen Fresco Finish. I rubbed a little White Fire Treasure Gold around the edge. The sentiment is from the ELB12 stamp set and is stamped onto Smoothy card and I’ve sponged a little Evergreen Fresco Finish around the edge.  I then painted some Crunchy Paper with Evergreen and Plum Fresco Finish and die cut several flowers using the Scallop Flower die and layered them up, using a painted brad to hold everything together. The metal embellishment has been painted with Hint of Mint Fresco Finish and lightly brushed with WhiteFire Treasure Gold. 

Wow, more great inspirational ideas, huge thanks to Lin and Sue for another wonderful night of new products! Of course, as you are getting the swing of how this works now, we'll be back tomorrow with another returning designer, and of course more amazing projects! See you then! 

Leandra

Tuesday, 26 August 2014

August 2014 New Products {Ellen Vargo}

Leandra here again, and tonight I'd like to welcome back Ellen Vargo with some new stamp additions to her hand-carved series. 

Ellen's 'scratchy' stamps have proved very popular. Hand carving is usually associated with chunky designs but these super fine detail stamps are proving a real hit. I personally love using them to build up backgrounds stamping these images with pale frescos on top of dark frescos on anything from tissue to heavy weight cardstock. 

Ellen has her own set of ideas in the gorgeous bright colour palette that she loves to work with. Check them out below.

Here are her 3 new stamp sets and I'll hand over to Ellen to take it from here...

EEV07
EEV08
EEV09
Hello!  Ellen Vargo here - welcome to my launch night!  I've been waiting ever so patiently to be able to share my new stamp release with you and the night has finally come!  I've got three new stamp plates making their debut.  Two of them are building on a familiar theme, and the third is heading in a new direction.  Are you ready?  Here we go...

by Ellen Vargo: Scratchy Backgrounds


Just like the name says: these three beauties are designed for easy repeat-stamping to create large backgrounds quickly and easily.  Just line up the design to repeat and before you know it you'll have a large patterned background in no time!  Here's a framed abstract piece I made to show you how to line up the scratchy diamonds background...


I started with a background painted with my trusty brayer - I used snowflake, cheesecake, and yellow submarine.  I stamped the scratchy diamonds across the bottom of the painted paper using pale ochre archival ink.


On the bottom section, the stamp is oriented with one point at the top and two points at the bottom.


Then, for the top section, I turned the stamp upside down... so there are two points at the top and one point at the bottom.  Just line up the one point between the stamping from the bottom section and the pattern repeats perfectly!  I just *love* repeating patterns... I'm totally addicted.


Then, of course, I added loads more stamping and layers, including some textured metal card and some treasure gold, and added one lone focal point... a simple circle, but we'll get to that in a minute... here is a close up of the focal piece.


by Ellen Vargo: Small Scratchy Shapes

As you probably know, those scratchy shapes from EEV02 have become my "go-to" background - again playing on my love for repeating patterns, so I really wanted to design some new shapes.  

On this new set, EEV08, there are some mini shapes and new shapes that match EEV01, and some just for fun. Current absolute *favourite* is a tie between the scratchy chevron and the scratchy gothic-arch shape (I'm sure it has a proper name, but I don't know what it is... it looks like a pattern you would see in a stained glass window).


Here's a background that I made for an art journal page (more later) using the scratchy chevron. Because we're working with a single chevron, you can create the pattern in any location you want, or in multiple locations! You'll see more of this in a minute...hang in there!


by Ellen Vargo: Petals, Pods and Circles

Up until now, all of my stamp releases have been focused on images that are awesome for textures and backgrounds, or borders... so I wanted to create a stamp set that would begin to give some options for focal images... namely, FLOWERS!  Who doesn't love a beautiful flower, right?  

With this set, EEV09, you have lots of options on pattern, the flower centers, rounded petals or pointy petals, or you can even stamp over a different texture/pattern with that outline petal stamp!


Let's continue on with that art journal page shown above.... after my background was done, I stamped the scribble petal onto some painted papers, left overs from brayering and scraping paint, cut them out, and then arranged them into different shaped flowers.  I drew the flower stems by hand, added some collage tissue paper across the base, and stamped out a sentiment with a mini alpha stamp set.


Here's a closer shot at some of the flowers.  Notice on the smaller flowers I trimmed the flower center to match the size of the petals.


Below is a card set I made using stamps from all three plates... scratchy backgrounds, scratchy shapes, and petals/pods/circles... all of the backgrounds were done by scraping fresco paint onto Smoothy Heavyweight card with an old gift card.


Here are some closer pix of the individual cards.  The first one shows the pattern you get with that scratchy gothic shape for a background, and a 7-petal rounded flower.


This one shows the mini scratchy rectangle in the background, with a 5-petal rounded flower.


And the third one shows the mini scratchy circle in the background, with a 9-petal pointy flower!


And... one more thing... remember that framed abstract piece from the top of the post?  The focal image on that piece is one of the flower centers from EEV09.  Such a simple statement, but with that POP of red it becomes the focus of the piece.  I added a dimensional resin sticker to the top of the punched circle for some interest.


I hope you like the new stamps and have seen some interesting ways to use them in your projects.  I have found myself falling back in love with making cards, which is how my journey started.  Funny how things come full-circle.  I'll be sharing more projects here on the PA blog in the coming months, as well as on my own blog.  Hope to see you soon!

~ ellen


Wow it never ceases to amaze me how bright Ellen's choice of colours are, and they look just wonderful! Congrats on such great stamps Ellen! 

To support Ellen tonight we have some more gorgeous items from Jo MyhillJo generally uses a totally contrasting colour palette to Ellen; she loves subdued muted browns, and it's great to see such contrasting colour schemes with the same stamps!


by Jo Myhill: Chocolate lime flowers


I used Chatsworth paper and Cheesecake and Vanilla Fresco paint to create a background. I stamped the petals and circles from EEV09 in Tree Branch Archival ink.  I cut them out and glued six petals per circle together.


Then I layered up the circles and added a felt ball for the centre and ribbon covered wire for the stalk.  Gently curled the petals to create the most gorgeous flowers!


by Jo Myhill: Copper wall tile


I covered a square of white paper chipboard in Slate Fresco paint (JOFY limited Edition Paint set 2) and added a layer of Crackle Glaze.  Over the top of this I used a mixture of elephant and Snowflake to give subtle cracks.  Mixed the remainder of the Elephant with Grunge Paste, smoothed a layer on the middle and gently stamped the circle and oval 'scratchy' stamps to create a textured flower design in the paste.


When this was dry I highlighted the stamping with Slate Fresco and Spanish Topaz Treasure Gold.


by Jo Myhill: Distressed flowers concertina album


I covered a sheet of Chatsworth card in Cheesecake and Vanilla Fresco paint. I spritzed a mixture of Snowflake and Metallic Glaze to give a soft shimmer. I stamped the arch scratchy stamp in Honeydew paint and then the cross in Pebble and the oblong in Oregano Adirondack ink.


I cut the card into 12" x 4” strips and stuck them together to create pages.  Using a mixture of distressed photos and image transfers using Satin glaze I generated this photo album for a series of black and white flower images.

Fantastic ideas ladies! Ellen's new stamps are perfect for backgrounds, but both of you have also made some amazing focal points with them too. All these stamps are available now from your favourite PaperArtsy stockist, wherever in the world you might be! 

I wonder what new delights we have in store for you tomorrow? Everyday is so exciting! See you then!

~ Leandra