Tuesday, 3 August 2021

2021 Topic 9: Baubles & Bling with NEW JOFY {by Jo Firth-Young}

 2021 Topic 9: Baubles & Bling


If glittery restraint was an Olympic skill, Jo would definitely be up there in contention for medals. Her sparkly project is like a bling 'I spy' and she's ended up with a beautiful item anyone would love to display at Christmas.
~ Keren.

Hi everyone, it's Jo with you today to share with you a gorgeous Christmas box frame. 
As you know, the blog topic at the moment is 'Baubles and Bling' - I heard the word 'bling' and I was in!!  The chance to use sparkly things liberally on a project?! Yes please!
That said, I have been quite (very) restrained with my use of sparkly shiny elements, all used quite discreetly; all 7 types..lol! Well, this is a Christmas themed project and Christmas isn't Christmas without a bit or sparkle is it?!


I used an up-cycled wood box frame for the outer substrate of my project; the original print on the box was quite dark so to block this out I covered the entire surface in book pages, overlapping to the inside of the frame where the project will be fixed. 

This is a relatively simple project built up with several layers of stenciling & stamped images.. the overall effect is lovely especially when the light catches elements and the glazes and sparkles reflect the light.


I cut a square panel of chipboard/greyboard 1cm smaller than the internal measurement of the frame - this is the inner substrate of the project.

I planned a cool colour scheme for the project and instead of reaching for my preferred pale background colours I started with a darker blue. I applied Calypso and Snowflake paint onto the board with a sponge using a circular/clouding motion which created a subtle blended effect - darker at the top and lighter towards the bottom.


NB:  In the photo above you can see tabs of masking tape on either side of the board - I attached these so that the panel can be lifted in and out of the frame while working on it.


The background has several layers of stenciling.  I used PS275 and Metallic Glaze (bling #1) to add large snowflakes all over the panel.


For the next layer I used PS273 and Sea Glass paint to add a line of hanging stars - using a dabbing motion to achieve a full coverage of paint.


In the photo above I've tilted the board so you can see how the layers work together, the Metallic Glaze catches the light when tilted which is a lovely effect.


The final stenciled layer used the large bauble shapes on PS273 to create silhouette (ghost-like) baubles - I lightly swirled Snowflake paint through these shapes so the paint is slightly transparent and allows other images to show through. 


When I make a project that sits within a frame I will often place it in the frame to see how it looks (the reason for the masking tape tabs in an earlier photo). After seeing the board within the frame I decided the background needed 'something' so I added some splats of white (concentrating them across the top edge) to give the effect of snow.
I used a white pencil to draw hanging cords for the 'ghost' baubles and to add a highlight around the edges (a pencil gave a softer line, a white pen would've been too bright/opaque).


The main motifs for the box frame are the large hanging baubles on the newly released JOFY104. (available exclusively from PaperArtsy stockists - follow this link for a retailer list at the bottom of the post) They were going to look great hanging in the recess of the wood frame!
 

I stamped the baubles twice onto wood grain printed paper (using a stamping platform - such a useful tool !!)


Then onto painted card stock (Aqua Duck Egg & Pistachio), using a clouding motion so the finished effect was softer, not solid. (Happy accident:  I used the same sponge to apply the Aqua Duck Edge paint as I had for the Metallic Glaze stenciling, it resulted in a lovely shimmery finish to the Aqua Duck Egg painted surface! Happy accident!). You can see it in the photo below where I'm adding shading using a coloured pencil.


I cut out and assembled all the stamped images adding painted and paper-pieced details. Above is a photo of the finished baubles (on the panel). I shaded the bottom edges of the painted baubles using a coloured pencil to give them shape. I painted the snowflake details in a contrast colour: Aqua Duck Egg on the Pistachio baubles, White Fire (bling #2) on the wood grain and Aqua Duck Egg baubles, self-adhesive gems (bling #3) in snowflake centres and white pen highlights on all baubles.


Shading with coloured pencils makes a big difference in shaping the baubles.


This photo above shows how I suspended the baubles in the box frame.  I pierced through the hole on each stamped and threaded it with a metallic cord (I'm counting that as bling #4). Using a box frame means that baubles can be suspended/mounted at different depths from the back of the frame to give the effect they are dangling.
The board itself is raised off the inside of the frame on layers of 3d foam. You can see the varying levels in the photo above - some on 1 layer of 3d foam, some on 2.


For the ornaments that are mounted furthest away from the back panel I created a square tube of acetate and cut lengths to suit the bauble. You can see one in the photo above - its approximately 1cm square, the added bonus of using acetate is its transparency and lack of weight.

I attached all the ornaments to the base board and the threads were folded over the top the  board and secured behind (the acetate mounted baubles were attached to the underside of the top edge of the box frame).


With the base panel centered inside the frame and secured in place I added a few final details.


I stamped the words from JOFY104 along the edges of the frame leaving space for a bit more bling - a nice touch of white 'frosty' glitter on the corners (bling #5).


I die cut snowflakes from glitter paper (bling #6) and added some tiny spots of glitter glue  (bling #7) for a touch of twinkle dotted amongst the matte snow splatters.


One of the last details I added was to sketch around the painted panel with a white pen - this softened the edge and created a 'frosted' look - similar to the corner of frosted pane of glass.


This project could be reconfigured for many other substrates - art journal pages, greeting cards (see my July product release post for more examples of those), tags, canvasses - and in lots of other colour schemes; so many options.

I hope you're inspired to try it.... remember to have fun with it!  Use as many baubles as you can fit, use as many colours as you'd like - and don't skimp on the glitters!  As always I look for forward to seeing what you make!

Take care.

Jo

Website: www.jofy.co.uk
Pinterest: @jofyjo
Facebook: JoFY Jamboree! group
Twitter: @jofyjo
Instagram: @jofyjo

Teaching dates - ONLINE workshops
21.08.21  The Artistic Stamper, www.theartisticstamper.com ....Fabulously Festive

28.08.21  Loobi Crafts, www.loobicrafts.co.uk ...Wonderfully Wintery 

Sunday, 1 August 2021

2021 Topic 9: Baubles & Bling with LPC/EAB {by Alison Bomber}

 2021 Topic 9: Baubles & Bling


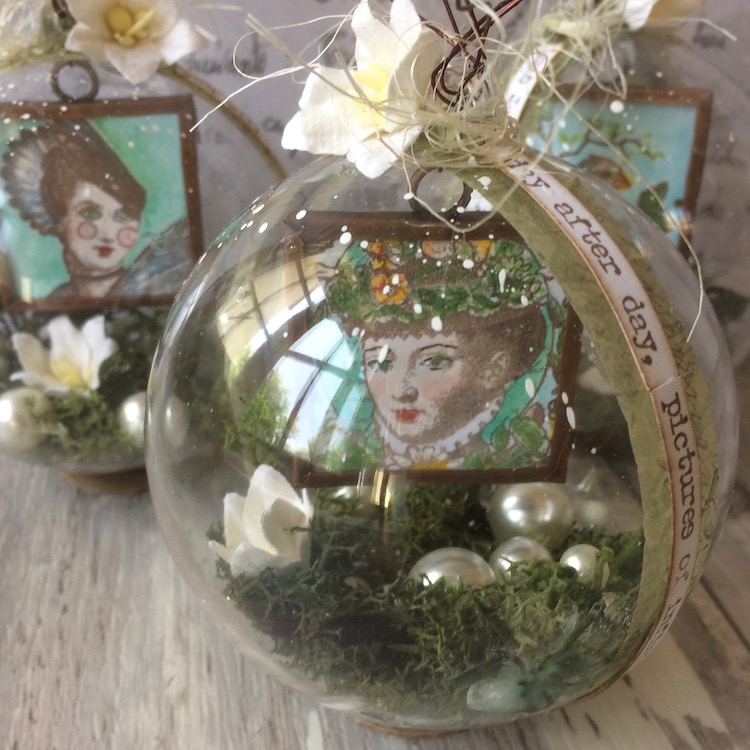
Creativity is often about making decisions in the midst of altering plans, and Alison has proved that despite a different direction, something even better can emerge. With some suspended Elizabethan lovelies, crumpled wire and clever bauble holders, she's bound to inspire you with these beautiful baubles.
~ Keren.

Hello all, it's Alison here from Words and Pictures and I'm here with a hybrid project that I really love, and which all came about by accident!  Okay, full disclosure and cards on table... I originally thought I was going to be part of the Nature's Treasures theme from a fortnight ago. I had to recalibrate when it turned out I was actually creating for Baubles & Bling (not my comfort zone!).

But the change of direction when I'd already started planning meant I ended up with these beautiful baubles with a touch of nature's own bling (and yet again another impossible-to-photograph-project - forgive the reflections, they are part of the joy!).

I'd already been thinking of creating some jewel-like Elizabethan miniatures with the intricate Lynne Perrella images full of natural imagery, and then I thought I would surround them with more of nature's treasures - moss, eggs, feathers and so on.

When I realised I was going to have to bling it up, I had a slight panic attack, until I remembered some clear plastic baubles which I'd ordered one Christmas, full of plans to make decorations with them.  Happily, I didn't get round to that at the time, so there they were in the stash just begging to be used.

I couldn't see any reason why I shouldn't still have some of nature's treasures... the moss and some flowers, but I exchanged the eggs for shiny pearl baubles and some beaded stamens nestled in the moss.

But there's work to do before we get to all that... first of all, my Elizabethan miniatures.  I chose images from one of Lynne Perrella's latest releases, LPC47.


I stamped them using my stamping platform so that I could paint them and then re-stamp for the detail.


I stamped first in Archival Pebble Beach and then did my colouring in with paint and ink.

You can see what a difference the final stamping makes (done in Archival Ground Espresso) and it also means you relax while you're painting if you know it can all be retrieved later!

I used a simple palette of fairly bright colours of Fresco Chalk Acrylics, along with some Salvaged Patina Distress Ink, sometimes mixed with the paints, to create the translucent glow of the background skies.  Here they are - Vintage Lace and Peachy Keen, mostly for the skin tones, Scottish Salmon, Banana, Pistachio, Lawn, and Pool.


I wanted brights partly to capture the jewel-like quality of Elizabethan miniatures, but also because I knew the pictures would eventually need to make an impact even through the curved surface of the baubles.  I was pretty happy with how they looked so far...

I've been hoarding some Idea-ology Memory Frames, and they came to the surface as I was unpacking into my new craft space.  Perfect for framing the tiny portraits - I just had to choose exactly where to make the cuts.

I was sad to lose so much of the imagery, but I do think they look delicious in the metal frames.

And for the reverse of each frame, I used some printed papers and added snippets of the quotes I was planning to use around the outside of each bauble.  (It also meant that if the round-the-outside plan didn't work, I would already have some words in place to go with my pictures... talk about hoping for the best while planning for the worst!)

The words are all from one of my newest quote collections EAB21 Nature Edition.


I used some very fine wire to hang up the frames within the plastic baubles.  I experimented to make sure the baubles would close even with the wire in the way.  It took a bit of persuasion, but once I knew it would work, I set about filling the baubles with nature's treasures... oops... I mean, with some more baubles and bling.  

So how do you make sure that your round baubles don't roll all over the place while you're trying to work out where the baubles and flowers and beaded stamens should go?  Easy... (after half an hour of trying to balance them and lean them against things and cursing loudly when they roll away).  You cut slices from the inside of the paper towel roll you've just used up and use them as egg cups.

Around the rim of the baubles, I wanted to have the full versions of the quote snippets on the inside.

I stamped my three quotes in Archival Ground Espresso and trimmed them to single lines, then applied them over "ribbons" of this lovely green washi tape to give them a bit more presence.

You have to lift and turn the baubles to read the entirety of the quotes, but they are very tactile objects - and sturdier than they look - so that's not a problem.

But because you can't see the whole of a quote in one photo, let me share them with you in turn so you know what words go with which pictures... the first is Nature is painting for us, day after day, pictures of infinite beauty.

Next there is Nature's music is never over; her silences are pauses, not conclusions.

And finally Look deep into nature, and then you will understand everything better.  You'll notice that in the end I did glue some supports to the bottoms of the baubles, subtle bases which mean they can stand as well as hang.

The toppings echo nature's bling from inside the baubles, with some extra wire added to augment the wire used to hang the frames inside.  

The wire is both sculptural and structural - you can hang these up by those wiry handles.

And of course there had to be some white spatter to finish things off!


So there you have the results of my journey from Nature's Treasures to Baubles and Bling.

My original Elizabethan miniature portraits are still there, and the moss and the flowers, but the upgrade from eggs to pearls, and the hanging of the portraits inside the baubles would never have happened if I hadn't had to change horses in the middle of the race.


It's good to take a step outside your comfort zone every now and then.  And good to have to change direction and problem-solve.  You almost always end up somewhere exciting, somewhere that you would never have planned to be in the first place.  I hope you like these as much as I do, and that they'll give you some ideas for how to combine the things you love with other ingredients for a brand new look.

Thanks so much for stopping by today and happy crafting all.

Blog: Words and Pictures
Facebook: Words & Pictures
Instagram: w0rdsandp1ctures
Pinterest: butterfly crafter