Wednesday, 4 October 2017

2017 #14 Glitter: Midnight Fairy Garden with EDY {by Dounia Large}

2017 Topic 14: Glitter

So here are 2 words you don't expect to see in the same sentence: Grunge-Paste and Glitter! Enter Dounia stage right, a very creative crafter...if anyone can combine these two ingredients - she can!


Bonjour, it's Dounia from France here, joining you with a project all about the whimsical and invasive fairy dust known as glitter, and particularly how to trap it!

As the saying goes, between glitter and me, it's complicated... I greatly admire crafters who can create beautiful projects where glitter is fun and cute while staying tasteful but I am incapable of emulating them. I don't know how or when to stop and it generally ends in a eye-watering explosion of colors. I'm also a messy crafter and rather clumsy person which, mixed with glitter, is a recipe for disaster, or at least for adding sparkles to your wardrobe for weeks on end (not always the most professional look...). With this project, I'll share a few of the tricks I use to avoid these problems and still get my glitter fix!

A well known way to try and limit glitter's drive to get everywhere is to trap it in a medium, generally a transparent one (ah, glitter glue). My first idea when seeing this topic was "what about Grunge Paste?" (to be fair it's a frequently recurring question in my crafting). Grunge Paste can be tinted, textured, stamped into, sanded, etc, wouldn't it be great with added sparkle?


It is great. I used my oldest pot of Grunge Paste, which is a bit dry, so I could add a fair amount of Fesco acrylic paint to tint it, then folded in the mix a truly impressive amount of glitter in diverse colors. I begun by stenciling the branches and flowers from Darcy's PS030 stencil before filling the rest of the background, working in reverse.


I then sanded back the layer of Grunge Paste to reveal the stenciled images. It was initially very slow and I was not looking forward to several hours of sanding! Fortunately I had the idea of spritzing water on the paste and everything became much easier. Apart from the gloop. Seriously, this process produced so much gloop I begun to save it and use it in other projects...


The result is really worth it with a very smooth finished surface (except where I was a bit too enthusiastic and begun attacking the board...) The Grunge Paste is so matte, it provides a great contrast that emphasizes the glitter while toning it a bit down.


For the focal images, I chose the flower and circle from Darcy's set EDY19. The designs go perfectly with the stencil without being completely coordinated, offering a lot of possibilities.


I used the stamps to make masks and stencilled around them with so more Grunge Paste, Fresco paints and glitter mix. The idea was to define recessed areas to be later filled with more glittery goodness... But first I had to address the previously mentioned explosion of colors!

This was done with black watercolor, in 2 or 3 layers to better control the shade. The Grunge Paste takes the ink beautifully but not the plastic glitter, creating a star-filled night scene. I loved this step; with just a few strokes of a brush, everything instantly became more subtle and classy, like a shimmering black evening dress.


The recesses were filled with mica and holographic flakes, embossing powders and more glitter, embeded in embossing enamel. As PaperArtsy's stamps are made of high quality rubber, I was able to stamp directly into the hot melted UTE for a maximum of texture. I love that technique, the reveal when you lift the stamp is always so satisfying and awe-inducing!


VoilĂ ! A few simple ideas on how to make a very glittery but somewhat subtle project! I really like the contrast between the matte, glossy and shiny parts of this piece. I wasn't sure how the glitter would hold up to the sanding but the mix with the Grunge paste works really well. It could easily be used just for some stenciled elements instead of the whole background, like flowers on a page or Christmas decorations on a card! I'll certainly try it again, maybe with other sizes and shapes of glitter for a different look.

I hope this inspires you to put some sparkle in your life. Happy crafting!
Dounia x

Blog: http://doudoulina.over-blog.com/

Well you totally bossed that Dounia! I love how it sanded back too! and despite all the elbow grease required, it was certainly worth the effort. Stamping into glue is the icing on the cake - whatever will you come up with next! It is always so much fun to read your posts! 

~ Leandra


We always hope that you  learn something interesting from our blog. 

Our creative team love to read your comments so much, so please take time to let them know you've been inspired!  

Why not join our 2-weekly challenge by blogging your create response to the current topic and link it here?

The current topic link Topic 14:Glitter will close 17:00 (London Time) Sunday, 15th October 2017, and the winner will be announced 2 hours later at 19:00.

All links go in the draw to win a £50 voucher to spend on products of your choice from the PaperArtsy online store.

Monday, 2 October 2017

2017 #14 Glitter: Sparkly Cards with ZA {by Chris Cresswell}

2017 Topic 14: Glitter


We kick of a new topic with a big bang tonight as Chris gets sparkled up and ready for some Christmas action! Watch for the lolly-pop sticks! Lots to see here !


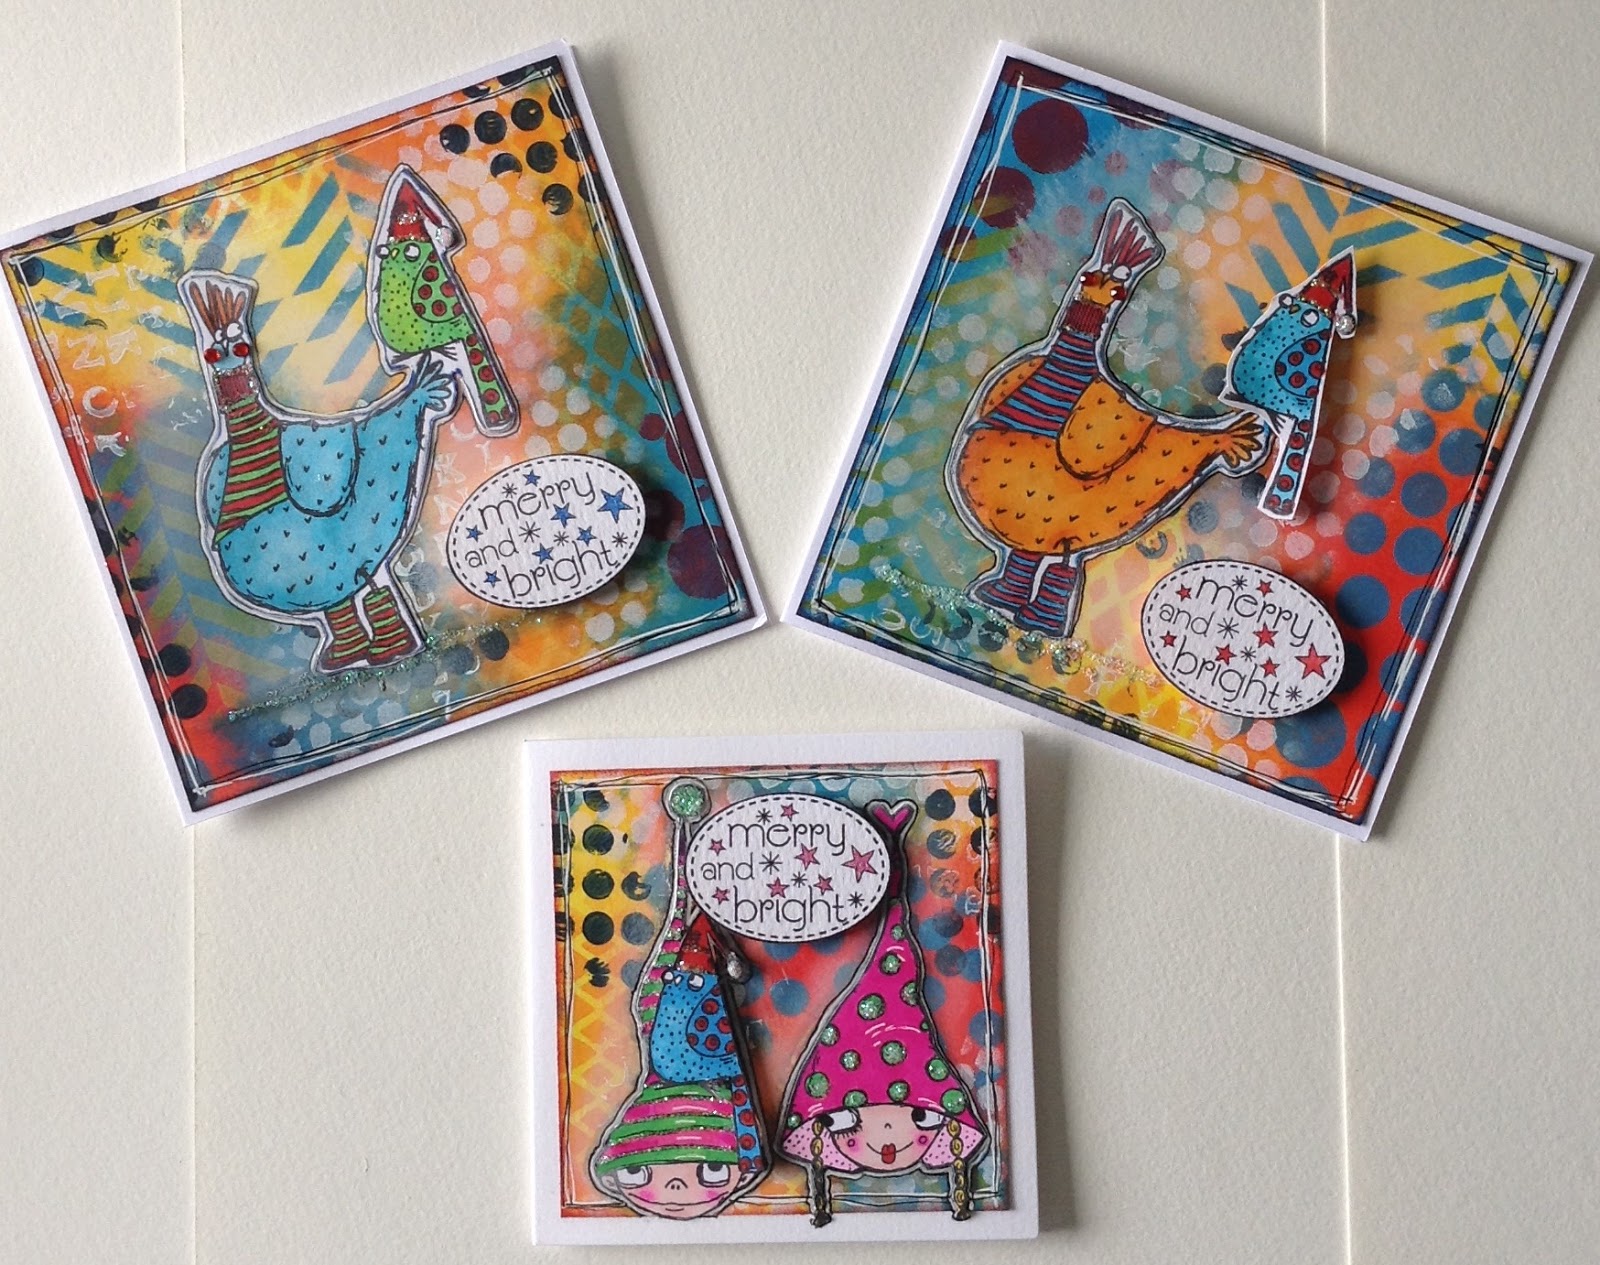
Hi everyone, it's Chris Cresswell (aka Artmadnana) with you tonight, and I'd like to share with you some children's Christmas cards that I made recently using the gorgeous, new Christmas stamps from 'elenazinski art', for this new theme on 'Glitter'. 

Now I am not usually a 'Glitter girl' as my main interest area is art journaling. However, I do make an exception at Christmas, especially with five gorgeous Grandfairies to make Christmas and Birthday cards for. So, it was with these in mind, I asked to use the new Zinski stamp sets. 


The quirky, cute images are just perfect for the children's cards I had in mind.I ended up making far more than I needed because they are such fun to use! The images are so beautifully drawn that they lend themselves to quick, simple cards. I will show a couple of examples on here tonight, and if you are interested in seeing how I created the others pop over to my blog for more info here: loopsandlines.blogspot.co.uk.


This was the final line-up. I have used different media for the various backgrounds: for some I've used my beautiful stash of Pion Christmas papers, for others I've used an art journaled masterboard and Paperartsy Fresco chalk paints, for a couple I used Distress Oxide ink pads, and finally, I made some cards using simple dies. All of these were quick and easy and didn't need much thinking about. For all of the stamped images I've coloured using Copic alcohol ink markers as these add colour quickly and effortlessly. And lots of glitter.

As soon as I saw the totem pole character figures on set ZA19...


I thought of lolly/popsicle sticks. They are so cute. Then I thought of using a pop-up card with the images popping up when you open the card. These are easy to make on a Score board. YouTube/Pinterest has lots of different examples. I haven't used glitter since last Christmas, so it was great fun selecting different products to create a glittery result. I ended up choosing: Ranger's Stickles in Crystal and Xmas Red; DecoArt Glamour Dust; Suze Weinberg's Beadazzles, Electric Slide; Cosmic Shimmer Glitter jewels and Jones Tones Diamintina, and adhering them to the card with a ZIG 2-way glue pen. All of these stamped images are from two of the new sets: ZA17, ZA19.


The only problem with glitter, of course, is it gets everywhere. Each time I hoover up, I'm still finding glitter on the carpet two weeks after these were completed!


This is the 'before' photo. Once I'd made and assembled the pop-up cards, I painted the extra wide lolly sticks using: Mermaid, London Bus, and Granny Smith Fresco chalk paints. 


All my granddaughters love bright colours so I wanted the backgrounds in the next set of cards to be bright, fun and lively. What better then than to create an art journaled masterboard, so I could make several from one sheet of PaperArtsy Smoothy 240gms card.


I love adding lots of layers of stenciling, using the colours from the first layer then adding Fresco Chalk Snowflake and Midnight to allow the colours to pop. This created a vibrant background so I knew I was going to have a problem making sure it didn't dominate the wonderfully, quirky images I intended to stamp on top. 


I achieved this by drawing around each stamped image with black and white gel pens and also dry brushing a little of the Fresco Chalk Snowflake around the images. I think it worked! I also used some of my 'Wink of Stella' glittery pens over the images but its not easy to depict that in the photos. I so love that chicken, I had to use him twice!


Here I've been a bit cheeky and used a couple of images from two previous Zinski stamp sets: ZA02 and ZA07, to adapt a quirky tree into a bauble and a little 'monster' into an angel. I hope Elena doesn't mind! 


I've used a lot of glitter on these cards, mainly due to a previous technique not working in the way I'd hoped. I used Kay Carley's new stencil: PS070 to create a base layer with 3D gloss gel, hoping that the gloss would resist the oxides on top and leave pretty white snowflakes showing through. No such luck, but you live and learn! Once the layer of oxides had been placed on top, I replaced the stencil over the raised gloss gel, dabbed on the glue then sprinkled the glitter over the top.  A bit OTT, but my granddaughters will love them!


These final four cards were made with various dies (something else I don't use very often) and some gorgeous Crafty Notions glittery foil. But, if you want to know how I made these, you will have to pop over to my blog.  I really think that's quite enough glitter for one night!

I hope you have been inspired to seek out your own glittery jars from all your stash and start creating your own wonderful Christmas cards. If you have children/grandchildren to make for, you really can't choose better stamped images than these gorgeous Zinski sets this Christmas! All available from the stockists listed below. I have lots of ideas for gift tags and wrapping paper with these stamps too! Until next time...
Chris Cresswell

Blog: loopsandlines.blogspot.co.uk
Facebook: Chris Cresswell
Twitter: artmadnana
Instagram:artmadnana
Pinterest: Chris Cresswell

Awesome! What an amazing array of ideas! You really have got a head starton the rest of us for Christmas! I love your bauble-leaves and crystallised popsicle stick people !! Brilliant!


We always hope that you  learn something interesting from our blog. 

Our creative team love to read your comments so much, so please take time to let them know you've been inspired!  

Why not join our 2-weekly challenge by blogging your create response to the current topic and link it here?

The current topic link Topic 14:Glitter will close 17:00 (London Time) Sunday, 15th October 2017, and the winner will be announced 2 hours later at 19:00.

All links go in the draw to win a £50 voucher to spend on products of your choice from the PaperArtsy online store.

Sunday, 1 October 2017

2017 Topic 14: Glitter {Intro and Challenge}

 2017 Topic 14: Glitter

Well hello everyone, Darcy here, and a brand new topic for you. Today we embrace all things glittery and sparkly, go on you know you want to..

Before we start, let's see who won the Topic 13: Metal Challenge...

The winner is: Jane  from Dizzycrafter
Email Darcy to claim your prize. Darcydotneedles@gmail.com

So where do we think the love of glitter comes from? the glam 70's perhaps, or maybe the roaring 20's? is it just the thing of childhood art sessions? nope, it is so much older, we have been shimmering for thousands of years.  In fact our oldest civilisations were using mica flakes in red, white and black in their cave paintings. I wonder if they wore lurex?

After that the ancient Egyptians, Chinese, Greek and Romans were all fascinated with reflective qualities and used a bit of shimmer whenever they could, in makeup, clothing and home decor. Makeup was a little different back then, Cleopatra made hers from crushed up beetles. 

Lime Crime
In the 1930's modern glitter came into being, it is ground up plastic with a very fine coating of aluminium or other reflective substance, this is then coloured. Glitter aficionados may tell you that glass glitter is the only true form, but it is sharp and impractical for heavy handling and no good at all for children to use. so for most glitterati it is the plastic type that is used, this is available in countless sizes, colours, shapes and grades. Glitter can be found in very fine powder form both for edible and non edible purposes, chunkier fragments, suspended in glues and shaped into sequins. 

Martha Stewart
Glitter ruled the 70's 80's and 90's, on clothing, art, home decor, stationery, faces etc, By the millennium the shine had faded a little, but it has never gone away completely, and never will as you will know if you have ever spilled a full tub of glitter.. there is something quite magical about a forever sparkly carpet. 

If you have a sparkly carpet then why not sparkly wine glasses to match.

Glitter is often seen as a sure sign the festive season has arrived, but we are a little way off that yet. Autumn colours are stunning when glitter is added, those deep reds, oranges and purples become magical. 

Lucy Meek
Using the same rich tones this card is beautiful in its simplicity, a few liquid pearls add just enough shimmer to lift these neutral colours. 

Lisa Addesa


Liquid pearls are a shimmering paint that can be a wonderfully subtle way to add shine to your project. 

The original glitter that is mica flakes, are ground up to make mica powders, these can be brushed over textures to give fabulous highlights. Here they are brushed over glimmer mist sprays to give a double whammy of sparkle. 


Creating Keepsakes
The next size up is very fine glitter, it works perfectly here suspended in resin for these potion bottles. 


Sarah


This card using fine glitter and the packing tape method, click through on the name to find out about this super easy technique. 


If the thought of having to control super fine glitter makes your knees wobble then have no fear the hard work is done for you with the availability of glitter card, all you need to do is cut out some pretty shapes and you are good to go. 


The letters on this fun layout were precut, but you could die cut them yourself from glitter card or cut plain letters and cover them in glitter to add real impact to a scrapbook page


Next up is glitter glue, we all used it as a child and now there is the grown up version in the form of Stickles, hands up, who is a self confessed stickles addict? * Darcy raises hand sheepishly*

This card uses stunning colours for the stamping and colouring and then a final layer of gold stickles was applied here and there to add punch. 


Here Tim Holtz uses distress stickles on an Easter Bunny for a slightly less blingy but still eye catching effect. 


Now for embossing powder, some of which has the most sparkly of sparkly glitter added to it. here is a nifty video showing how to trap WOW embossing glitters inside clear melt it powder to create ornaments. 


Slightly larger glitter and resin works beautifully in jewellery, these are so pretty. 


I adore these glittered feathers, I think they are my favourite sample this week, so beautiful and elegant. 


These dresses are watercolours, but you could achieve this result with a stamped dress too, colour in your stamp very lightly and add your glitter , perhaps for a sweet sixteen card, or for a graduation. 


For a fun home decor piece take a plain white canvas and add your glitter to the bottom half, then string some fairy lights behind for this simple but effective statement piece.


Finally I could not resist this glitter drip, like shiny lava tumbling down the side of this building in Iceland. This was created by artist Theresa Himmer and comprises of oversized metal sequins. I would love this on my house. 


There are so many more ways to add glitter and glitz, what about glittered brads or buttons, adding a glitter border by sprinkling glitter over double sided tape! You can add sequins, sequin waste, lurex fabric, you can dip and dab and dot your way to glitter heaven. Try making a shaker card or a snow globe, whatever you do, have fun and glitter your world. 

Don't forget to follow Darcy and Leandra's Pinterest boards if this topic pushes your buttons, you will see plenty more examples to whet your appetite there! I am really looking forward to seeing what you create over the next 2 weeks!

~ Darcy


We hope that you  learn something interesting from our blog. Our bloggers deeply appreciate your comments so much, so please take time to let them know you've been inspired! Why not join our challenge by blogging your interpretation of the current topic and link it here?

The current topic link will close 17:00 (London Time) Sunday, Oct 15th 2017, and the winner will be announced 2 hours later at 19:00.

All links go in the draw to win a £50 voucher to spend on products of your choice from the PaperArtsy online store.


Challenge Guidelines

  • The challenge is a for you to show how you are inspired by the current blog topic. We encourage you to play with us and explore your personal creative style.
  • Please mention which PA blog post inspired you and and why (link directly to that post). Please don't link to the home page of your blog because then no-one can track back to easily find the original post.
  • We prefer your challenge blog post is created exclusive to our challenge, but if our topic fits perfectly with another challenge, then you may link to both if appropriate.
  • You are most welcome to use stamps/ products/ substrates you have to hand from a variety of companies, we do not expect you to exclusively use PA products - it's lovely when you do though!
  • You can enter as many times as you like. We don't want to restrict your creativity! 
NB. Link closes at 17:00 Sunday Oct 15th 2017   (London Time)

Prize: The winner will receive a £50 credit voucher to be redeemed on the PaperArtsy Website. The credit voucher includes VAT and postage. We request that one of your purchases is an A5 rubber stamp. You can add any other items to your basket, but the final total should not exceed £50. It's your responsibility to claim your prize coupon from Darcy. 
email: darcydotneedles@gmail.com

NEW Challenge/ winner: Each fortnight on Sunday, the winner will be announced at 19:00 (London time). In the same post, the link for the next fortnight will be posted. 

Good Luck! If you have any questions, don't hesitate to ask!

Saturday, 30 September 2017

2017 #13 Metallics: Weeping Over Lost Time [By Keren Baker}

2017 Topic 13: Colour Study: Metallics


I am always amazed at how Keren seems to pull something out of the bag with her innovative creative ideas. Life sure is a box of chocolates, and in this post she shares how a pick and mix of metallic products come together in a very clever arrangement!


Hi everyone, it's Keren Baker with you today, and I'd like to share with you a piece of artistic expression about lost time.

I wanted to use different types of metallic product and inserted as many as I could in this relatively small piece. It's less about technique, more about playing with products, trying to make images fit into a theme and trying watercolouring with metallic pens.


I'll explain the piece briefly so you understand what's going on! The eye (in which has numerals or time at the centre) is crying. She's weeping for lost time and wasted time (hence the numbers- be that seconds, minutes or years). The crowns are representing that fact that she thought she was in control of her life, when in fact, she was carried by circumstance and swayed by meaningless events. Now you've had a chance to digest that ;-) I'll explain what I've used and what I enjoyed! 


I began with an image from Hot Pick 1502 


and started to sketch out an eye. I wanted the numerals to be in the iris, which meant I had to make the eye be in proportion.


The 'number tears' are from a happy find in the Squiggly Ink range; Ding and Dong


The crowns are from another Squiggly Ink set- Crowns and Castles


You can just about see that the pupil has a little shimmer- I've used the Fresco Finish Metallic Glaze which when watered down slightly turns any base colour into a metallic looking one


I really enjoyed all the fussy cutting (i know, I'm strange !) and adding in as many metallic elements- from the metallic embossing powder, the Metallic Glaze, to the watered down metallic markers (Nuvo Glitter Markers) and the metal wire help tie it all together. 


I really enjoyed taking the Hot Picks image and trying to transform it into another type of image because I didn't have quite what I wanted in my stash. Linking separate elements like the numbers to create a more solid larger image was a challenge and I loved the happy accident where the crowns looked a little like false eyelashes from a distance. 


Do have a sort through your stamps and try transforming into a part of something else. Taking metallic pens and watering them down with a water-brush led to some delicate results and I really recommend you having a play. 

Thanks for bearing with me to the end- hope it's not been a 'wasted' read!!

Blog: Kerenbaker's Blog
Facebook: Keren Baker
Twitter:craftstampink
Instagram:Craftstampink
Pinterest:Craftstampink

Isn't this fun! I really love the eyelashes too, twinkling in the light. Small numbers, big numbers, they all work so well! thanks Keren, you always throw us a great challenge!


We always hope that you  learn something interesting from our blog. 

Our creative team love to read your comments so much, so please take time to let them know you've been inspired!  

Why not join our 2-weekly challenge by blogging your create response to the current topic and link it here?

The current topic link Topic 13: Metallics will close 17:00 (London Time) Sunday, 1st October 2017, and the winner will be announced 2 hours later at 19:00.

All links go in the draw to win a £50 voucher to spend on products of your choice from the PaperArtsy online store.