Showing posts with label PS159. Show all posts

Sunday, 8 August 2021

2021 Topic 9: Baubles & Bling with NEW EGL {by Keren Baker}

 2021 Topic 9: Baubles & Bling


Hi everyone, it's Keren Baker with you today, and I'm here to share with you creating a non-Christmas plus a seasonal project. I wanted to use some acetate bauble shapes and add some stamped images onto them. I was really happy getting to use Gwen Lafleur's new stamps and I am rather inspired by all her ticket images.

I wanted to do something non-Christmas- (onto that one later!) but the whole idea of using the stamps with a stencilled image seemed perfect. I decided to use acetate with Tracy Scott's PS159 stencil (because I never tire of acetate...ever!).


A little useful tip- find acetate with a removable thin film, so you can use a permanent pen to mark the shape onto the filmed side and when you've cut it out, removing the film takes the remnant of pen away.


I added alcohol ink to one side of the cut out bauble shapes and added some stamped tickets randomly on the reverse. I stamped with Stazon ink on the opposite side as otherwise it would have reacted with the alcohol ink and I didn't want to use Archival Ink straight on the alcohol as it'll ghost the image which I didn't want. I used EGL17 with these awesome tickets.


Now I grabbed as modern a book as I could find so the pages were whiter and auditioned them. I found the pages with less text looked better and let the beautiful ticket images shine.


I wanted to give the baubles 'bling' so added some Glossy Accents to the reverse of the stamped image and left 0.5cm around the edges to allow for seepage. Sprinkle some glitter on, flip it over and straight onto the book page. 


It's quite like the 'caught in crystal' technique, and after trying different amounts of Glossy Accents, using it in a scribbly fashion rather than aiming for full coverage meant less seepage.
Leave to dry completely, trim and then add decoration. Stamp out the leaves; it's amazing how just colouring any foliage red and green gives it a Christmas vibe.


It's not easy to see but I've used one of the images to stamp onto glitter cardstock. Using Stazon meant it dried but the rough texture obscures the image slightly. I trimmed some tiny 'v's along the bottom edge to make it look like a bauble top.


I could imagine these as tags too - you could write on the reverse.


My second project was what I planned originally but when I used the larger bauble outlines on it looked too big for the journal cover. So onto the next one, using the smaller bauble outline on the stencil..


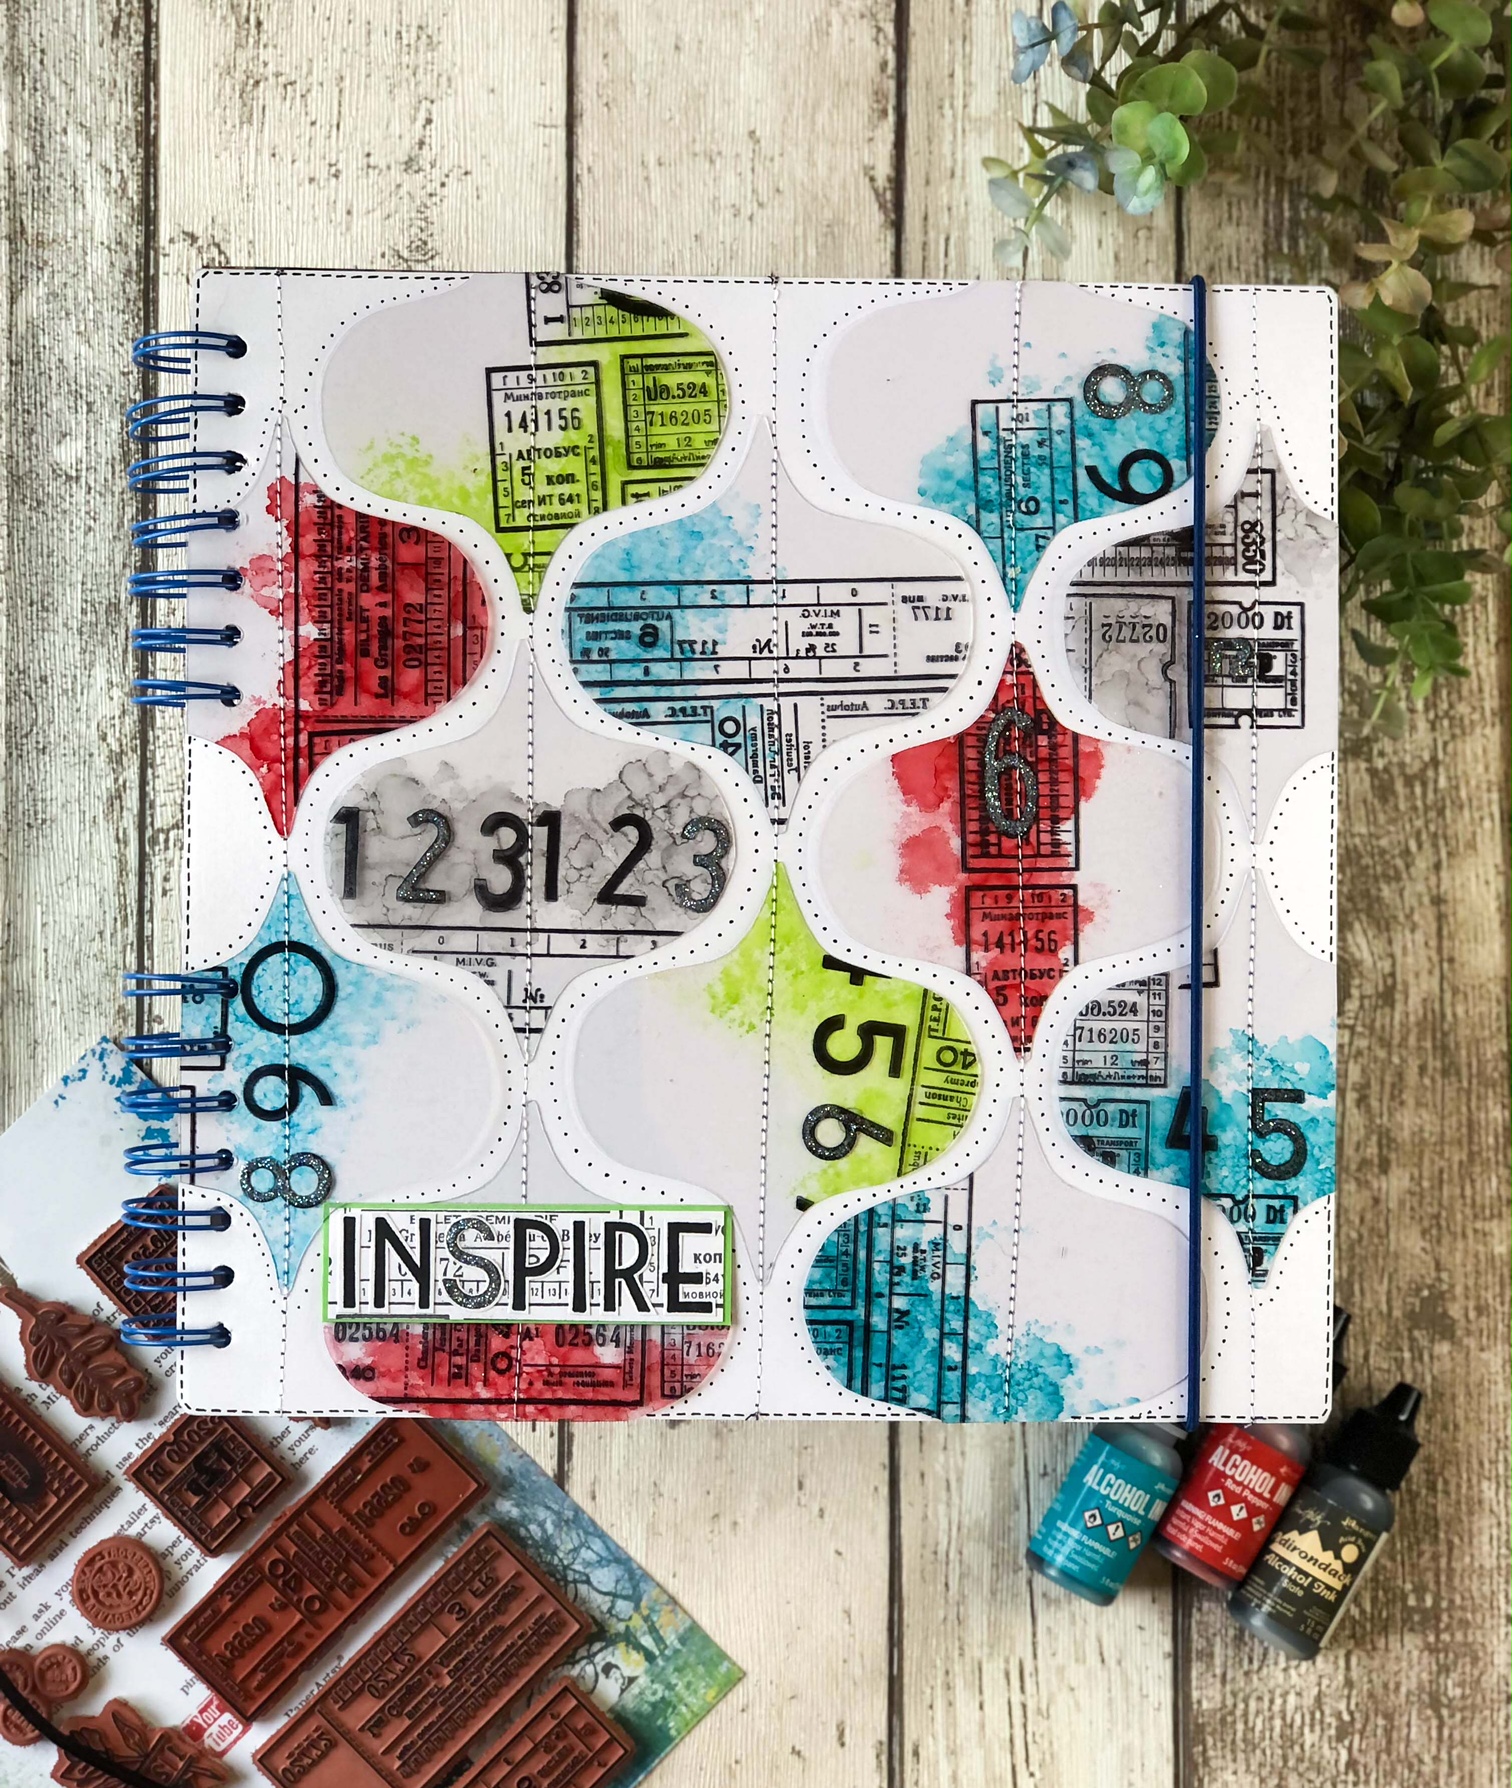
I followed the same process but didn't use the Glossy Accents. I laid the pattern out how I wanted it to look on the book.


I wanted to use some of the numbers and letters from EGL16. I really love the 20's feel they have to them whilst still retaining a modern bold look.


 I had an old rather ugly journal that needed a facelift. I decided that the only realistic way of attaching the acetate 'baubles' would be to sew them to another piece of cardstock. I trimmed the base card to size and after laying them out, added a tiny dot of glue to stabilise them before sewing. Sewing slippery surfaces is generally a recipe for disaster, even using a Teflon foot, so I used some baking paper to sew over using a longer length stitch that I could simply tear away afterwards.


To add a little glitter, I traced around the letters and numbers on the front. Having used black ink, the translucent glitter just looks sparkly black.


Glitter tends to get everywhere, sticking to the acetate, so you end up with extra sparkle! I now wanted to add a title, and some dots and dashes. For the title, I stamped the letters and trimmed them out adding them to a ticket stamped background.


There's nothing complex about the projects, just light and bright finishes. Gwen's almost vintage and bold images are wonderful to use and you can make them modern and clean or rich and even vintage.


One of my favourite challenges is trying to solve the problems that come when using tricky substrates, and how to combine different products but still let individual ones shine.
Creativity isn't always artistic, it's sometimes more to do with 'work arounds' and choosing new paths.
Gwen's new sets are super versatile and I can see them becoming go-to sets both for focal points and backgrounds too.

If you've never used acetate before, do try creating with it. I love the dual sided nature of the product - planning how to combine images and colours so they work together. Dig out your glitter or microbeads (that's my next project) to resurrect the 'caught in crystal' technique and see what you can come up with.

Thanks for being with me today,
Keren x

Blog:
Twitter:@craftstampink
Instagram: @craftstampink
Pinterest: @craftstampink
 

Thursday, 12 March 2020

2020 #5 Mark Making: Slow Stitch with ETS {by Keren Baker}

2020 Topic 5: Mark Making


Hi everyone, it's Keren with you today, and I'd like to share with you an experiment of two halves using bleach to make marks plus some wonderful freeing slow stitching.

For a while I've wanted to use PaperArtsy stencils and bleach on denim. I have loads of denim pieces ready to upcycle and had a sewing project in mind. It didn't work at all, for reasons that I'll share shortly, but I thought I'd begin by showing the set-up in case you fancy trying out the same technique.


Things to note are the mug of bleach ( and eventually bleach solution) in a bowl so if it did spill, it went into the bowl. My plan was to use the rubber end of a pencil to make my marks using the Tracy Scott stencil PS159


Here's my finished frame, and I'll share a bit about how I ended up creating it and the thought process behind it.


The whole denim dyeing thing was a complete failure. After 2 attempts where the neat bleach had absolutely no effect on the denim pieces I did a little research and it turns out that just like ordinary dyeing, you need a high cotton percentage in the fabric. The synthetic element increasingly in jeans such as elastane, is a hindrance to the bleach. I could have probably found a mostly cotton piece, but by that point (with deadline dates looming ;-) ) I grabbed some dark teal fabric that I knew was all cotton and started the bleaching.


You can see the strength of the bleach. I wanted a more subtle effect but when making so many small marks, I couldn't stop the bleaching process with a vinegar solution without impacting the next layer of bleach marks. I began by doing a 50/50 bleach/water solution and decided to change up the application tool. I needed something larger.


So I had my blending tool to hand and using a new sponge, I daubed through the stencil, having wiped a little of the solution off on the side of the mug first.


On the next photo you can see the bleach beginning to react with the cotton. This is the fun part; you have to decide when to stop the process. I sprayed the area with the vinegar solution (50/50 vinegar/water) as I moved down the fabric. Do it in a well ventilated area too!
Once you're happy with the bleaching, chuck it into the washing machine or in a bowl of hot soapy water. Wash it well.Once dry, I had to work out what to do next as my original plan had been wiped out.


I popped it into an embroidery frame and found some brighter embroidery threads than I'd originally considered. You can see that the bleaching process went lighter really quickly. Speed is of the essence in this technique, and forget about control- it's more in control than you are!!


The next part was so joyful. I love stitching but tend to have more structure and use the sewing machine a lot. Paring it all back and having no plan but making marks instinctively was a freeing experience. Choosing different sized stitches and colours adds to the texture. I had initially planned to stamp more of Tracy Scott's minis onto the piece but felt it would have looked cluttered. Maybe I have 'layeritis' or something! 

Sewing a running stitch, backstitch and French Knots built up the feel of the piece. 'Slow stitching' is currently so popular- the idea of hand stitching or embroidery and taking your time. Being present and engaged with your piece. 


After using some areas to focus my stitches onto, I wanted to add one of Tracy Scott's insects to the sewing. Her ETS27 set was just perfect.


I had already added interfacing onto the plain fabric before I stamped on it. I do find using a stamping platform great for fabric as you get a much stronger image. As I was considering my bee, I thought about its flight amongst the flowers and how they often pick up pollen on their legs. The French Knots gave the look of leftover pollen!


I added knots everywhere linking the 'pollen' and giving movement to the design. Making marks had never been so much fun!

I did have plans to make a little zipped pouch with this piece, but it looked so at home inside the frame, that I trimmed the excess off the back and now have a lovely vibrant piece to hang on my wall!


I thoroughly recommend both the bleaching and slow stitching. I loved how by using different marks you could echo the fur on the bee or the 'pollen' french knots. Making marks with a product that creates a reaction is a great experiment as you just don't know what you'll end up with. Planning the final look will give you the clues to what sort of marks you need to make. I did struggle a little with not being to control the process, but it's good for me to let go a little! I am definitely trying it out with a fully cotton piece of denim and can't wait to see the contrast in colours. Do have a go at slow stitching, apart from its relaxing nature, you end up with a real organic result. 

Keren xx

Blog:
Twitter:@craftstampink
Instagram: @craftstampink
Pinterest: @craftstampink

Friday, 25 October 2019

NEW PaperArtsy Products: October 2019 {Eclectica³ Tracy Scott}

 Eclectica³ Collection {Tracy Scott}
October 2019 New Product Announcement


A note from Leandra:
I'm sure if you follow Tracy Scott on social media, you will have seen for much of September and October that she was teaching across Australia. The eagle eyed among you may have spotted some of these new stamp designs, as many pics from classes were shared of the beautiful classes and techniques that Tracy teaches. So now it is time for you to see the big reveal too! Enjoy!

Hi everyone, Tracy here!

I'm super excited to share with you my newest release for PaperArtsy.  4 stamps and 4 new stencils.This particular release was designed with my 2019 Australian Tour in mind. I wanted a mix of funky designs and delicate elegance, so there would be something for everyone.

Everyone loves a circle... don't they!
I certainly do, sometimes I like to incorporate something a little more formal like the mandala type designs (I just love this style; delicate and pretty) and at other times a more informal style is required hence the funky circle and mark making designs. Either way I know you are going to have loads of fun with the new designs. As always I love to use all of the designs to create cool art journal pages but feel that would be equally at home in all other paper crafting applications

I've done something a little different this time for my new release blog post... you will see a host of different samples made not only by myself but also by some of the many talented students I taught whilst in Australia throughout September and October. I think it only fair to showcase a few of the fabulous designs students produced in class with the new stamps and stencils (I only wish I could share them all but with 17 classes and over 300 students it would simply be impossible!!).

So grab yourself a cuppa and settle in for a riot of colour and amazing creations... enjoy!
You can also see plenty of activity on PaperArtsy's Instagram, Facebook, Twitter, Pinterest. (links at the foot of this post) So no matter what your preferred social media platform, we will be sharing with you!

Let's check out these new beauties, some ideas from each set and a couple of projects.

  New Stamps
Price: RRP £18.74 +VAT
Size:5" x 6" (13 x16.5cm)
All stamps are individually trimmed onto cling foam, presented in a clear hanging bag
with a laminated storage/index sheet.
  
Eclectica³ Tracy Scott Set 32 (ETS32)

Eclectica³ Tracy Scott Set 35 (ETS35)


This was my original class sample made for ETS32 & ETS35 using a combination of both the funky circles and mark-making stamps included within the sets.  I wanted to create a cool double journal spread that could be open to interpretation by all of the students taking the class and boy did they not disappoint.  Look at just a few of the amazing samples from some of the lovely people from my classes below....

Kristy (Sydney)


 Vicki (Adelaide)


 Tammy (Adelaide)


Jennifer (Melbourne)

Aren't they just incredible?.....
I was just blown away by all of the amazing samples created in class.
  
Sue (Adelaide)

And what about this funky pocket journal from Sue.... isn't it the coolest?

Eclectica³ Tracy Scott Set 33 (ETS33)


Those who know me are aware that I just adore a mandala, whether it be collaged, painted, drawn or stamped. There is something so beautiful, therapeutic and hypnotic about them. I knew I had to incorporate at least one of them into this set...and what about that fabulous swirl? Can't you just imagine it nestled amongst some of the earlier botanical stamp releases...yummy!

The fleur-de-lys design is a perfect addition to the set and as you can see in the above journal page, it's perfect for extending the original mandala pattern. I simply stamped them around the original mandala and overlapped them to create a larger piece.

The main mandala flower is also a perfect match to the new stamps in ETS34 seen below and I used a mix of the two sets to create the focal image of my mini pocket journal, cutting and layering for a dimensional embellishment.

Now look at some of the lovely samples created by my students using the stamps....

Pat (Melbourne)

Lisa (Tasmania)

Kerry (Melbourne)

Selection of pocket journals


Didn't everyone do a fantastic job?.....

Eclectica³ Tracy Scott Set 34 (ETS34)


I love the idea of making repeating patterns as part of my art and that was the idea behind these stamps. I came across the concept of interlocking designs (unfortunately I am certainly not clever enough or patient enough to design them perfectly symmetrical) so I went for my own slightly wonky version and I just love how they have turned out.

They are not only ideal for using in my art journal (see the page layout above) but also stamping with black or coloured ink pads onto plain Smoothy card they would make amazing backgrounds for cards. So much fun and many combinations to be had with this set! And whilst experimenting with different configurations I realised that they can make a cool Christmas bauble too....bonus!!

A few of the pages created in the pocket journals


New Stencils
Regular Size: 6.5" x 7" (16 x 18cm) Price: RRP £4.60 + VAT
Large Size: 6.25" x 9.5" (16 x 24cm) Price: RRP £5.40 +VAT
  
PaperArtsy Stencil 157 (PS157)


What can I say about this project?....The canvas started its life as a community project, during my classes in Victor Harbour. We had a canvas situated at the front of the class, students were then encouraged to add any left over paint to the canvas during the course of the weekend. We ended up with a very brightly coloured canvas with lots of yummy PaperArtsy paints in all different designs. It was then our job (mine and store owner Vicki) to turn the canvas into a finished piece. Vicki blocked out areas of the canvas and stencilled the beautiful swirls from my previous release whilst I set to work making the dimensional flowers.  As this was a large canvas the new stencil was the perfect size to create some high impact embellishments for the project. I just love that everyone taking the classes had a part to play in creating this piece.

Perth Student

One of the classes was my lace cut pages class where students are encouraged to both hand cut and use stencils as templates to design their pages. Doesn't this stencil design look fabulous peeking out from behind that black page by one of my talented students in Perth?

Kate (Sydney)


And what about this absolute beauty from one of my students, completely gorgeous!

PaperArtsy Stencil 158 (PS158)

Gayle (Adelaide)


How gorgeous is this sample from Gayle, I love how the stencil is peeking out from behind the page and then accentuated with pen work. 

Perth Student

I love that my stencils work perfectly as cutting templates and doesn't this one look glorious showing through the black page?. This was created by one of my talented students in Perth.

PaperArtsy Stencil 158 (PS158) - Large Stencil


So after discovering that some of the pattern stamps in ETS34 created a cool Christmas bauble I just knew that I had to make a coordinating stencil to bring them to life. In this sample my entire painted background is created with just the various shapes in this large stencil before adding some both stamped and foil images from ETS33 & ETS34.
The stencil was then used to create the painted baubles shape and used as a template for stamping as well as a guide for cutting creating a fantastic interactive journal spread. And what a bonus that the stamp sets and stencils can be used all year round.   

PaperArtsy Stencil 159 (PS159) - Large Stencil


So this double page started life as a demo page in class for my 'Bold and Beautiful' workshop. I always end up with unfinished pages when I demo as I only need to take students to a certain point and then their creativity takes off and they are away on their own creating their own unique projects.... so what to do with the left over unfinished pages?....This large stencil was the perfect solution, I stencilled all over my painted piece with various elements from the stencil and set to work with a mix of gel pens, posca pens and coloured pencils.
Wow what a difference the pen work makes to this piece, its still a work in progress but I am going to enjoy many hours of creativity finishing this one off and what a fabulous way to use your stencils to create a very different look.

Sue (Sydney)


And yet again the stencils are just perfect to use as a cutting template, look at this stunning design from one of my students in Sydney.

And to finish,  here are a few more of the wonderful creations from my students using the new stamps and stencils.... Enjoy!

Kerry (Melbourne)

 Kim (Melbourne)

Melbourne Student

Adelaide Student

Helen (Adelaide)


Perth Student

Lisa (Perth)
  
I had the most amazing time travelling around Australia and met some of the most awesome and talented people, I only wish I could share all of their work with you in this post, however if you have been following me on social media you probably would have noticed lots of glorious projects being shown as I travelled from state to state.
I hope that this has given you lots of ideas and left you truly inspired to create, I'd love to see what you do so please do share with me n my social media platforms below....

Thanks for stopping by,
Tracy.


Teaching Schedule:
If you click on the link to my Facebook page above a current teaching schedule is pinned to the top of the page.

Below is a list of the retailers who have already got these new releases in stock ready for you to buy NOW!


PaperArtsy Stockist List

Due to the high proliferation of counterfeit products emitting from China, and affecting the craft sector globally, we want to help you identify our brand with ease.

1. We ONLY manufacture RED RUBBER STAMPS (not clear, polymer, silicone).  
2. We manufacture ALL our red rubber stamps and stencils on site in Essex, UK. 
3. We do not outsource any of our stamp or stencil manufacturing from China.
4. If you purchase from a supplier on the list below, then you are buying authentic PA products.
5. We daily check sites like AliExpress, Wish etc and if we see any unbranded PaperArtsy pirated products, we report them for immediate removal. 

Any PaperArtsy stamps or stencils listed for sale on websites such as are counterfeit products manufactured illegally without our consent in direct breach of our Copyright and Intellectual Property protections. To purchase counterfeit products from such sites directly undermines our brand, our retailers and our product designers.

We EXCLUSIVELY supply the stockists below. If you purchase from these approved PaperArtsy retailers, you can be confident you are buying authentic, PaperArtsy made products.

Australia
Art and Soul Studio, Burrum Heads, Queensland www.artandsoulstudio.com.au
Arts and Craft Supply, Frenchs Forest, NSW https://artsandcraftsupply.shop  
Auzz Trinkets and Crafts, Calamvale, Queensland https://atcraft.com.au/
Bella Paperie, 
Brendale, Queensland, www.bellapaperie.net.au
Bev's Cross Crafts, Spreyton, Tasmania https://www.bevscrosscrafts.com.au/
Crafters Cupboard, Berwick, Victoria www.crafterscupboard.com.au
Scrap Matrix, Port Elliot, South Australia http://scrapmatrix.com/
Scrapbook Superstore & More South Penrith, NSW https://www.scrapbooksuperstore.com.au/
The Thread Studio, 6 Smith Street, Perth http://www.thethreadstudio.com/
The Scrapbook Store, North Perth,WA http://thescrapbookstore.com.au/
Time To Create, Modanville, NSW www.timetocreate.com.au

Austria
CP Marketingservices Gmbh, Wilhering, Upper Austria,office@cpmarketing.at

Belgium
Cart N Scrap Art, Antwerp, cartnscrap@gmail.com
Cotrain, Kontich, www.cotrain.be
Expression Hobby, Marcinelle www.expressionhobby.be

Canada
Emerald Creek, Clagary, Alberta, https://emeraldcreek.ca/ 
Clipper Street Scrapbook Company, Langley, BC. www.clipperstreet.com
Scrapbook Centrale, Dollard Des Ormeaux, Quebec www.scrapbookcentrale.ca
Treasured Memories, Duncan,BC www.treasuredmemoriesscrapbooking.ca
Simply Scrapbooking, Prince George, BC https://www.facebook.com/simplyscrapbooking/
Scrap Addicts, Edmonton, Alberta https://www.scrapaddicts.ca/
Scrap and Bean, Edmonton, Alberta http://scrapandbean.com/ 
Scrapbooking Fairies, Drayton Valley, Alberta https://www.scrapbookingfairies.com/
The Paper & ink Boutique, Calgary, Alberta https://www.paperandinkboutique.com/

Czech Republic
Hurapapir, Brno https://www.hurapapir.cz/

Denmark
Hobbyboden Scrapworld Samso www.hobbyboden.dk
Papir Ulven, Lejre www.papirulven.dk
Three Scoops Design, Frederiksberg, www.threescoops.dk

Finland
Käsitellen, Lempäälä, https://www.kasitellen.fi/
Piia Takalo, Kittila, www.piiapaper.com/fi

France
Eirl Bancon Cartoscrap, Midi Pyrenees, https://www.cartoscrap.com/blog/
Horizon Creatif, Ste Jalle h.creatif@gmail.com
Katzelkraft, Ingwiller http://www.katzelkraft.fr/en/
Kerglaz, Basse Goulaine, https://www.kerglaz.com/  
Kerudoc Creation, St Yvi www.kerudoccreation.com
Quartier Serre Teston, Ste Jalle, hcreatif@gmail.com
Scrap by Nini,  Uzerche, Limousin https://scrapbynini.fr/ 
Scrapo'naturel, Tourville La Riviere, www.scraponaturel.fr/livraison 
Toutencolle, Dun sur Avon www.toutencolle.fr

Germany
Paperbasics, Hessen, www.paperbasics.de
Stempelbar, Berlin, www.stempelbar.de
Stempeloase Munich, Munich www.stempeloase.de
Stempelfee Shop, Hilden www.stempelfee-shop.de
Stempellaedle, Stuttgart, www.stempellaedle.de/shop

Greece
Scraps N Pieces, Kallithea www.scrapsnpieces.gr

Italy
Immagine SAS di Rapaccini, Rome, www.immaginelab.com
Il Negozio Della Mamma Di Cle, Torino, clelia27@liberio.it
L'artistica Glo, Cinisello B (Mi), www.artisticaglo.it
Marte Savona, Savona, www.martesavona.it
Piccole Passioni, Siena, www.piccolepassioni.it
Scrap it Easy, Rome, https://www.scrapiteasy.com/it/

Japan
Tiny Dots, Funabashi-shi, Chiba www.facebook.com/TinyDots

Netherlands
Coosa Creatief, Zeewolde, www.coosacreatief.nl
Creafine, Papendrecht www.creafine.nl
Creatotaal, Barendrecht, www.creatotaal.nl
De Hobbystudio, Genemuiden, www.dehobbystudio.com
De Scrapheap, Sprang-Capelle, https://www.descrapheap.nl/ 
Doe@ding,Spijkenisse https://doeading.nl/
Hobbidee Breda, Noord-Brabant, www.hobbidee-breda.nl
Hobbycompleet de Duif, Leeuwarden www.hobbycompleet.nl
Kimya Verpakleingen,
 Arkel, https://kimya.nl/
Noor! Design B.V. Waspik, https://www.noorenzo.com/
Scrap & Co, Klarenbeek www.scrap-co.nl
Scrapbookdepot, Uitgeest, www.scrapbookdepot.nl
Stampingcorner, Capelle Aan Den Ijssel www.stampingcorner.nl
The Stamping Cottage, Schaijk www.thestampingcottage.nl

New Zealand
Art of Craft, Papamoa, Bay of Plenty, www.artofcraft.co.nz

Norway
Hobbygarasjen, Kopervik, www.Hobbygarasjen.no
Hobbykunst, Rasta, www.hobbykunst-norge.no
Scrapbookengros AS, Kleppe www.hobbylageret.no

Spain
Arts & Crafts, Barcelona, pebdesign@hotmail.es
Cien por Cien Manualidades, S.L., Bizkaia, Catalunya,  www.100x100manualidades.es
Endulze & Crista S.L, Navarra, endulze@gmail.com
Ideas 10 Manualidades Y Scrapbook, Bilbao https://ideas10manualidades.com/
Marakiscrap, Tarragona, www.marakiscrap.com
MundoMint, Sabadell, Barcelona, www.mundomint.es
Scrap & Papers Experiences, Barcelona, Info@casonadequintana.com
Scraphouse S.L. Barcelona www.scraphouseshop.es
The Paradise Corner, Barcelona, www.facebook.com/theparadisecorner 
Endulze & Crista S.L., Pamplona, Navarrawww.endulze.com 

South Africa
Kcraft Imports Ltd, Centurion, www.kcraft.co.za
Stencil Art, Gauteng, www.stencil-art.co.za 

Sweden
Butik Elva, Staffanstorp, https://www.butikelva.se/
HC Design, Svedala, www.hcdesign.nu

Switzerland
KRL and Co, Payerne, http://www.krlandco.com/en/

Taiwan
Mandy's Cards, Taipei www.facebook.com/mandy.card

United Kingdom
A Trip Down Memory Lane, Ipswich, Suffolk, http://www.atripdownmemorylane.co.uk
Abermaw Quilting & Crafting, Gwynedd, Wales ph 07818556758
Aldridge Crafts, Attleborough, Norfolk www.aldridgecrafts.co.uk
Amelia's Creative Crafts, Studley, Warwickshire  www.ameliascreativecrafts.co.uk
Art from the Heart, Harrogate, Yorkshire www.afth.co.uk
Bellacrafts, Eastleigh, hampshire www.bellacrafts.co.uk
Blade Rubber Stamps, London www.bladerubberstamps.co.uk
Charlottes Crafty Corner, Suffolk, http://www.craftycorner.suffolkcraftshop.co.uk/
Clacton Art Craft Model Centre, Clacton on Sea,  Essex, http://www.clactoncrafts.co.uk/
Countryview Crafts, Potton, Bedfordshire www.countryviewcrafts.co.uk
Craft World Scotland, Glasgow www.craftworldonline.co.uk
Craft Your Art Out, Ballynahinch, County Down, craftyourartout@outlook.com
Crafty Bunch, Telford, Shropshire, http://craftybunch.co.uk/
Crafty Snippets, Billingshurst West Sussex www.craftysnippets.co.uk
Crafts & Candlelight, Ipswich, Suffolk www.craftsandcandlelight.co.uk
Crafts @themalthouse, Herstmonceux,  East Sussex, http://www.themalthouse.co.uk/
Craftrange, Burnley, Lancs, https://www.craftrange.com/
Handmade at Helen's, Dumfries, Scotland, https://www.handmadeathelens.co.uk/
I Love Mixed Media, Cromhall, Gloucestershire, https://www.ilovemixedmedia.co.uk/
Imagine, Design, Create, Seaton, Exeter http://imaginedesigncreate.co.uk/shoponline/
Keep on Crafting, Bury St Edmunds, Suffolk www.keeponcrafting.co.uk
Kraft Crazy, Amesbury, Wiltshire https://www.facebook.com/KraftCrazy/
Lisa B Designs, Maidstone, Kent, http://www.lisabdesigns.co.uk/
Lets Create, Lincoln, Lincolnshire, http://www.letscreateartandcrafts.co.uk/
Loobi Crafts, Leighton Buzzard, Bedfordshire, www.loobicrafts.co.uk
Papermaze, Ipswich, Suffolk www.papermaze.co.uk
Paperstory
, Norfolk www.paperstory.bigcartel.com
Poppycraft,
 Wallingford,  https://poppycraft.co.uk/
Rowan Tree Crafts, Carnforth, Lancashire www.rowantreecrafts.co.uk
Fave Rave
, Stourbridge, West Midlands www.shabbychicstencils.co.uk
Scrapbook Magic, 
Mullion Helston, Cornwall, www.scrapbookmagic.co.uk
Shed Load of Crafts, Enfield, Middlesex, www.shedloadofcrafts.com
Simply Crafts, Cardiff, www.simplycraft.com
Snazzy's
, Swindon, Wiltshire. https://www.facebook.com/snazzystampingandscrapbooking/
Stampers Grove, Springbank, Lilliesleaf, Melrose,Scotland www.stampersgrove.co.uk
Stamps & Memories
, Hungerford, Berkshire 
www.stampsandmemories.co.uk
Swanstitch, Deal, Kent www.facebook.com/swanstitch
That's Crafty
, Romford, essex www.thatscrafty.co.uk
The Artistic Stamper Craft Store, Faversham, Kent www.theartisticstamper.com
The Craft Box
, Barnsley, South Yorkshire www.thecraftbox.biz
The Crafty Cabin,
Rolleston-on-Dove, Staffordshire, https://www.facebook.com/Rollestoncraft/
The Craft Den, Wisbech, Cambridgeshire www.thecraftden.co.uk
The Craft Room
, Newcastle-Under-Lyme, Staffs https://www.garnersgardencentre.co.uk/crafts/
The Craft Studio, St Austell, Cornwall https://www.facebook.com/thecraftstudio/
The Forget me not Kraft Kabin www.facebook.com/TheForgetMeNotKraftKabin
The Stamp Pad, Saddleworth, stamp-pad.blogspot.com
Whichcraft, Wallasey, Merseyside

USA
Artistic Artifacts, Alexandria, VA https://www.artisticartifacts.com/
Artistic Studio Creations, Fayetteville, Georgia www.facebook.com/ASCbyCrystal
Artistree Workshops, Fulton, New York, www.facebook.com/artistreeworkshops
Big Mouth Scrappers, Forney, Texas, https://www.bigmouthscrapperstx.com/ 
Clay with Me, Colorado www.facebook.com/Claywithmestudio
Creative Designs by Debbie Castle Rock, Colorado debbie.knight@centurylink.net
Creative Inkling, Hatnboro, PA https://www.creativeinkling.com/
Creek Bank Creations, Indiana www.creekbankcreations.com
Ephemera Paducah, Paducah, Kentucky www.ephemerapaducah.com
Everything Scrapbook & Stamps, Lake Worth, Florida www.everythingscrapbook.com
Frantic Stamper, Oregon www.franticstamper.com
Free Heart LLC, Denver, Colarado, http://www.freeheartllc.com/
Golden Hills PaperCrafts, Fairfax Station, Virginia, https://www.goldenshillpapercrafts.com/
Guadalupe's Fun Rubber Stamps, Santa Fe, New Mexico www.santafe.com
Joggles, West Warwick, Rhode Island, www.joggles.com 
My Rusty Crown, Escondido, California, https://myrustycrown.com/
PaperCraft Clubhouse, Westbrook, Connecticut, http://papercraftclubhouse.com/
Papere Parachute Art Design Co., Beaverton, Oregon www.paperparachute.com
Runaway, Art & Craft Studio, NE Salem, Oregon http://www.runawayart.com/
Sherries's Stuff, Warrenton, Virginia, https://www.facebook.com/sherriesstuff.va/
Simon Says Stamp, Columbus, Ohio www. simonsaysstamp.com
Stamplistic, Cleveland, Ohio www.stamplistic.com
The Artistic Palette Studio, Eugene, OR, http://www.artistspalette.com/studio/
The Crafty Scrapper, Waxahachie, TX http://www.thecraftyscrapper.com/
The Doodlebug Inc, Jasper, IN, https://www.thedoodlebuginc.com/
The Ink Pad, New York, www.theinkpadnyc.com
The Queen's Ink Savage, Maryland www.queensink.com
Topflight Stamps, Irmo, South Carolina https://topflightstamps.com/
Seth Apter, New York www.sethapter.com
Stamp Fever, Orange, California www.stpstamp.com
Whim so Doodle, Saint Petersburg, Florida, http://whimsodoodle.com/ 
Vintage in KC, Shawnee, Kansas, http://vintageinkc.com/

Our brand is only available from established stockists who are VAT/ GST/ sales tax registered and for whom product education is a core principle. We would rather supply a few hand selected stockists, than the greater masses. If you would like to apply to be a stockist, you can find our more about our supply criteria here

PaperArtsy Links
Facebook Group (NEWPaperArtsy People
Facebook Page PaperArtsy