
Good Evening again, Leandra here to introduce you to Part 4 of this summary series... we are half way!
I'm really looking forward to the year ahead, I think. LOL Ever since we left New Zealand in 2001, life has not really panned out quite the way we expected it to. Life's like that isn't it!
This May will be our 15th year in England. We only planned on being here for 5 years max! I remember meeting a kiwi lady who had lived here for 11 years not long after we arrived. At the time I thought... "crikey, why would you stay here so long...that won't be us, we'll be long gone back to New Zealand"... but no, here we still are!
But I really enjoy living here in old blighty! Looking back, I can see we have learned so much about business, manufacturing, bringing products to market, selling, merchandising, branding and more! I guess we have been in the school of retail and manufacturing! Nothing like our New Zealand life at all!
It is funny how your life can end up with you going in a different direction to what you anticipated when you were younger!
So before we look forward to 2016 and all the plans we have up our PaperArtsy sleeves, let's look back at Bottles, Hidden Objects and Stencils.
Hello Bloggers, Lauren Hatwell here
Here's one of my own favourite makes this year because it was out of my comfort zone and not what anybody expected me to make.

Here's one of my own favourite makes this year because it was out of my comfort zone and not what anybody expected me to make.

I hope you all had a lovely Christmas. These days between Christmas and New Year are always a time of reflection for me, and what an incredible time I have had in your company this year. I feel I’ve learned so much and come so far, yet it’s still only the beginning of an incredible creative journey; and there’s so much more discover. What an exciting place to be at this stage of my life. I’m a crafter, not an artist, but I am gradually learning how to make my own art, guided and encouraged along the way by the amazingly talented and generous community at PaperArtsy.
Leandra asked me to talk to you about my personal development here. “Something you never did before, something you got better at and a new thing you enjoy” were the prompts. Amazingly for me, I can answer that with one magical word. The word is…. PAINT! When I opened up those first few bottles of Fresco Paint back in January it quite literally opened up a door to a whole new world for me. The world of Mixed Media.
My journey into that world is, I think, summed up perfectly in the tag below. I was so pleased with the fern leaves which I made by pouring neat Fresco Paint into a silicone mould.

Now, enough about me, let’s take a look at just a handful of the really amazing projects that really inspired me on the blog this year. I can't tell you how difficult it was to narrow it down to just a few.
Topic 10: Bottles
I was very excited about the bottles topic as there was such scope for creative thinking. I was pretty sure we’d see a lot of really great altered bottles, and we did, but as is always the way with the PaperArtsy topics, so much more besides.

Later in the week Bracken Sparkes showed us how to think INSIDE the box when she created this amazing box frame using one of Lin Brown’s lovely flower stamps and a great sentiment by Ellen Vargo. A beautifully executed piece of work; I think the little hanging bottle filled with sunflower seeds is genius.

Let's not forget the talented Anneke de Clerck who delighted us with her striking display of painted bottles and delicate tissue flowers. Anneke has such an eye for colour and I really admire the way she is able to layer a few simple elements to such great effect.

The challenge entries were fantastic, I hope you saw this post by Claire. I loved all her gorgeous layering on this piece and her clever use of colour to create that wonderful sky. The little scrap of French book paper inside her little bottle charm is such a lovely touch. Simple but effective, as the best things often are.

I loved this post by Moira Sutton on her blog, The Altered Ego She has gone to town with her Alice in Wonderland theme, creating some really fabulous charms with PaperArtsy stamps and shrink plastic. She used Treasure Gold on her bottle and it looks just like Mercury Glass.

Topic 11: Hidden Objects
I loved this topic. It was a really fun and exciting theme and fascinating to see what it meant to each of the contributors; what they would hide and where they would hide it (whatever IT was). I love out of the box thinking so this was like a masterclass for me. I really enjoyed it. It was so inspiring.
Do you remember this fabulous post by Lucy Edmondson? Wow! What an amazing idea these Matryoshka dolls were! Lucy skilfully conjured these little beauties by combining her amazing painting skills with some of Lynne Perrella’s fabulous faces, and flower stamps by JOFY and Lin Brown.

Etsuko delighted us with her fabulous book, filled to the brim with beautiful backgrounds and Darcy’s mystical creatures and flowers. Etsuko has such a way with colour and placement. She seems to have an innate ability to create fabulous backgrounds which melt away allowing her focal image to take centre stage. I loved her beautiful book binding too. It provided the perfect finishing touch to her project.
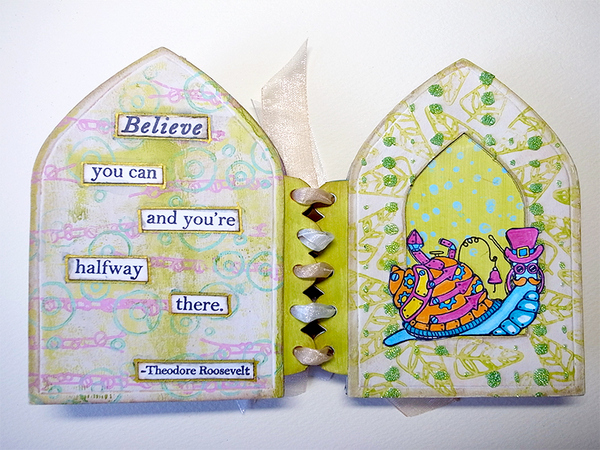
I do seem to have a soft spot for the quirky things in life so it will come as no surprise that this piece by Trish Latimer really hit the spot for me. I liked the clever way she created a sort of niche in a book for her lovebirds to sit inside and her extra long stripey poles for her bird houses to sit on are a really fun addition.

When we have a broad topic like this we get such diverse challenge entries. I remember Ruth’s cleverly constructed pages contained both hidden text and little people peeking out from their hiding places behind lots of clever raised tiles that were created using a variety of interesting mediums and textures.

And personally I loved this post by Sue. She created the most beautiful canvas featuring a lady whose face was hidden from us. It was a really powerful piece of work which spoke volumes. A really interesting and individual take on the theme.

Topic 12: Stencils
I confess I had never properly appreciated just how versatile the humble stencil is. This topic really opened my eyes to a whole host of exciting possibilities using a huge array of different mediums. It was absolutely fascinating and so inspiring to see each post. I am still marvelling at the variety of effects that were achieved with these fairly flimsy pieces of plastic…
This journal page by Alison Hall vibrates with colour and I love the way she’s ramped up the textures with the addition of those fabulous stamped flowers with their bead centres.

So, from “bursting with colour” to “bursting with textures”. How could I forget DianaTaylor’s gorgeous creation in shades of white where she used stencils so effectively to build a spectacular underwater scene. Diana used a book cover as her base and created the effect of coral using puff paint through a stencil. The finished piece speaks for itself. It’s breathtaking!

We’ve seen, then, how stencils can be used to build some amazingly detailed work. Clare Lloyd took a different approach with her fairly clean and simple tag. She built up lots of layers using her stencils and then seemed to be covering each layer up before using a wipe out technique to reveal beautifully layered stars beneath a night sky. Magical! So now when I plan a project I think not only about what I can add but also about what I might take away.

The challenge entries were fabulous too. Did you notice this amazing journaling by Suman Pandit. Her Seascape has real energy and movement. She’s used a plethora of techniques to create this sumptuous page but it seems to me that the whole thing rests on and is underpinned by the amazing effects created using texture paste through just one stencil and a variety of inks to bring out all the detail.

In direct contrast is this very understated but brilliantly effective piece by Carol. She has simply used the negative image of a stencil as a backdrop to her beautiful hand drawn figure and it works so well. I love it.

And Finally from me....
How about an item that links all 3 of these topics?
I decided to make something a bit seasonal so here is my slightly steampunk snowman made from two bottles and a lightbulb. I painted the two bottles with snowflake fresco paint and stencilled on some swirls in Antarctic.

You can see I've used a piece of old stencil for the snowy swirls and I've used some puff embossing powder for the snow.

"But what about the hidden object?" I hear you cry! Well this snowman is hiding a secret. Beneath his snowman body he is hiding a pair of legs. Yes, it's really Aunt Maud's nephew, Algernon. He's off to a fancy dress party dressed as a snowman.
Wishing you all a wonderful 2016.
Lauren
Blog
THE PAPERARTSY SALE HAS STARTED !!
Once the SUB-TOTAL value of your order exceeds these thresholds
in the shopping cart your discount will automatically activate...
£50 order subtotal get 10% OFF
£100 order subtotal and get 20% OFF
£150 order subtotal and get 30% OFF
We only do this once a year for a very short period across our entire online shop
so don't miss out!
Sale applies to all orders
We ship worldwide.


