Showing posts with label EAB25. Show all posts

Saturday, 9 November 2024

2024 Topic 9 : Alison Bomber Treasure Chest {by Ann Barnes}


Hi everyone it is Ann (aksbarchitect CREATES) here with you today. Where I live we are deep into the season of Autumn. The season where I often find myself noticing and picking up nature's treasures from the ground whenever I am outdoors.
 
When I first learned of this Topic's focus: all things Alison Bomber, my creative mind began conjuring ideas of a treasure box that would hold small natural elements, or treasures that I have found. A place for safekeeping until I use them in my art. Alison has a wonderful variety of stamps, both with words and illustrations. I have always been drawn to her gorgeous botanical illustration stamps. I chose to focus on Eclectica Alison Bomber Set 25 (EAB25) Acorn Edition, taking advantage of the tie-in to the season as well as our current PaperArtsy Blog theme: nature.


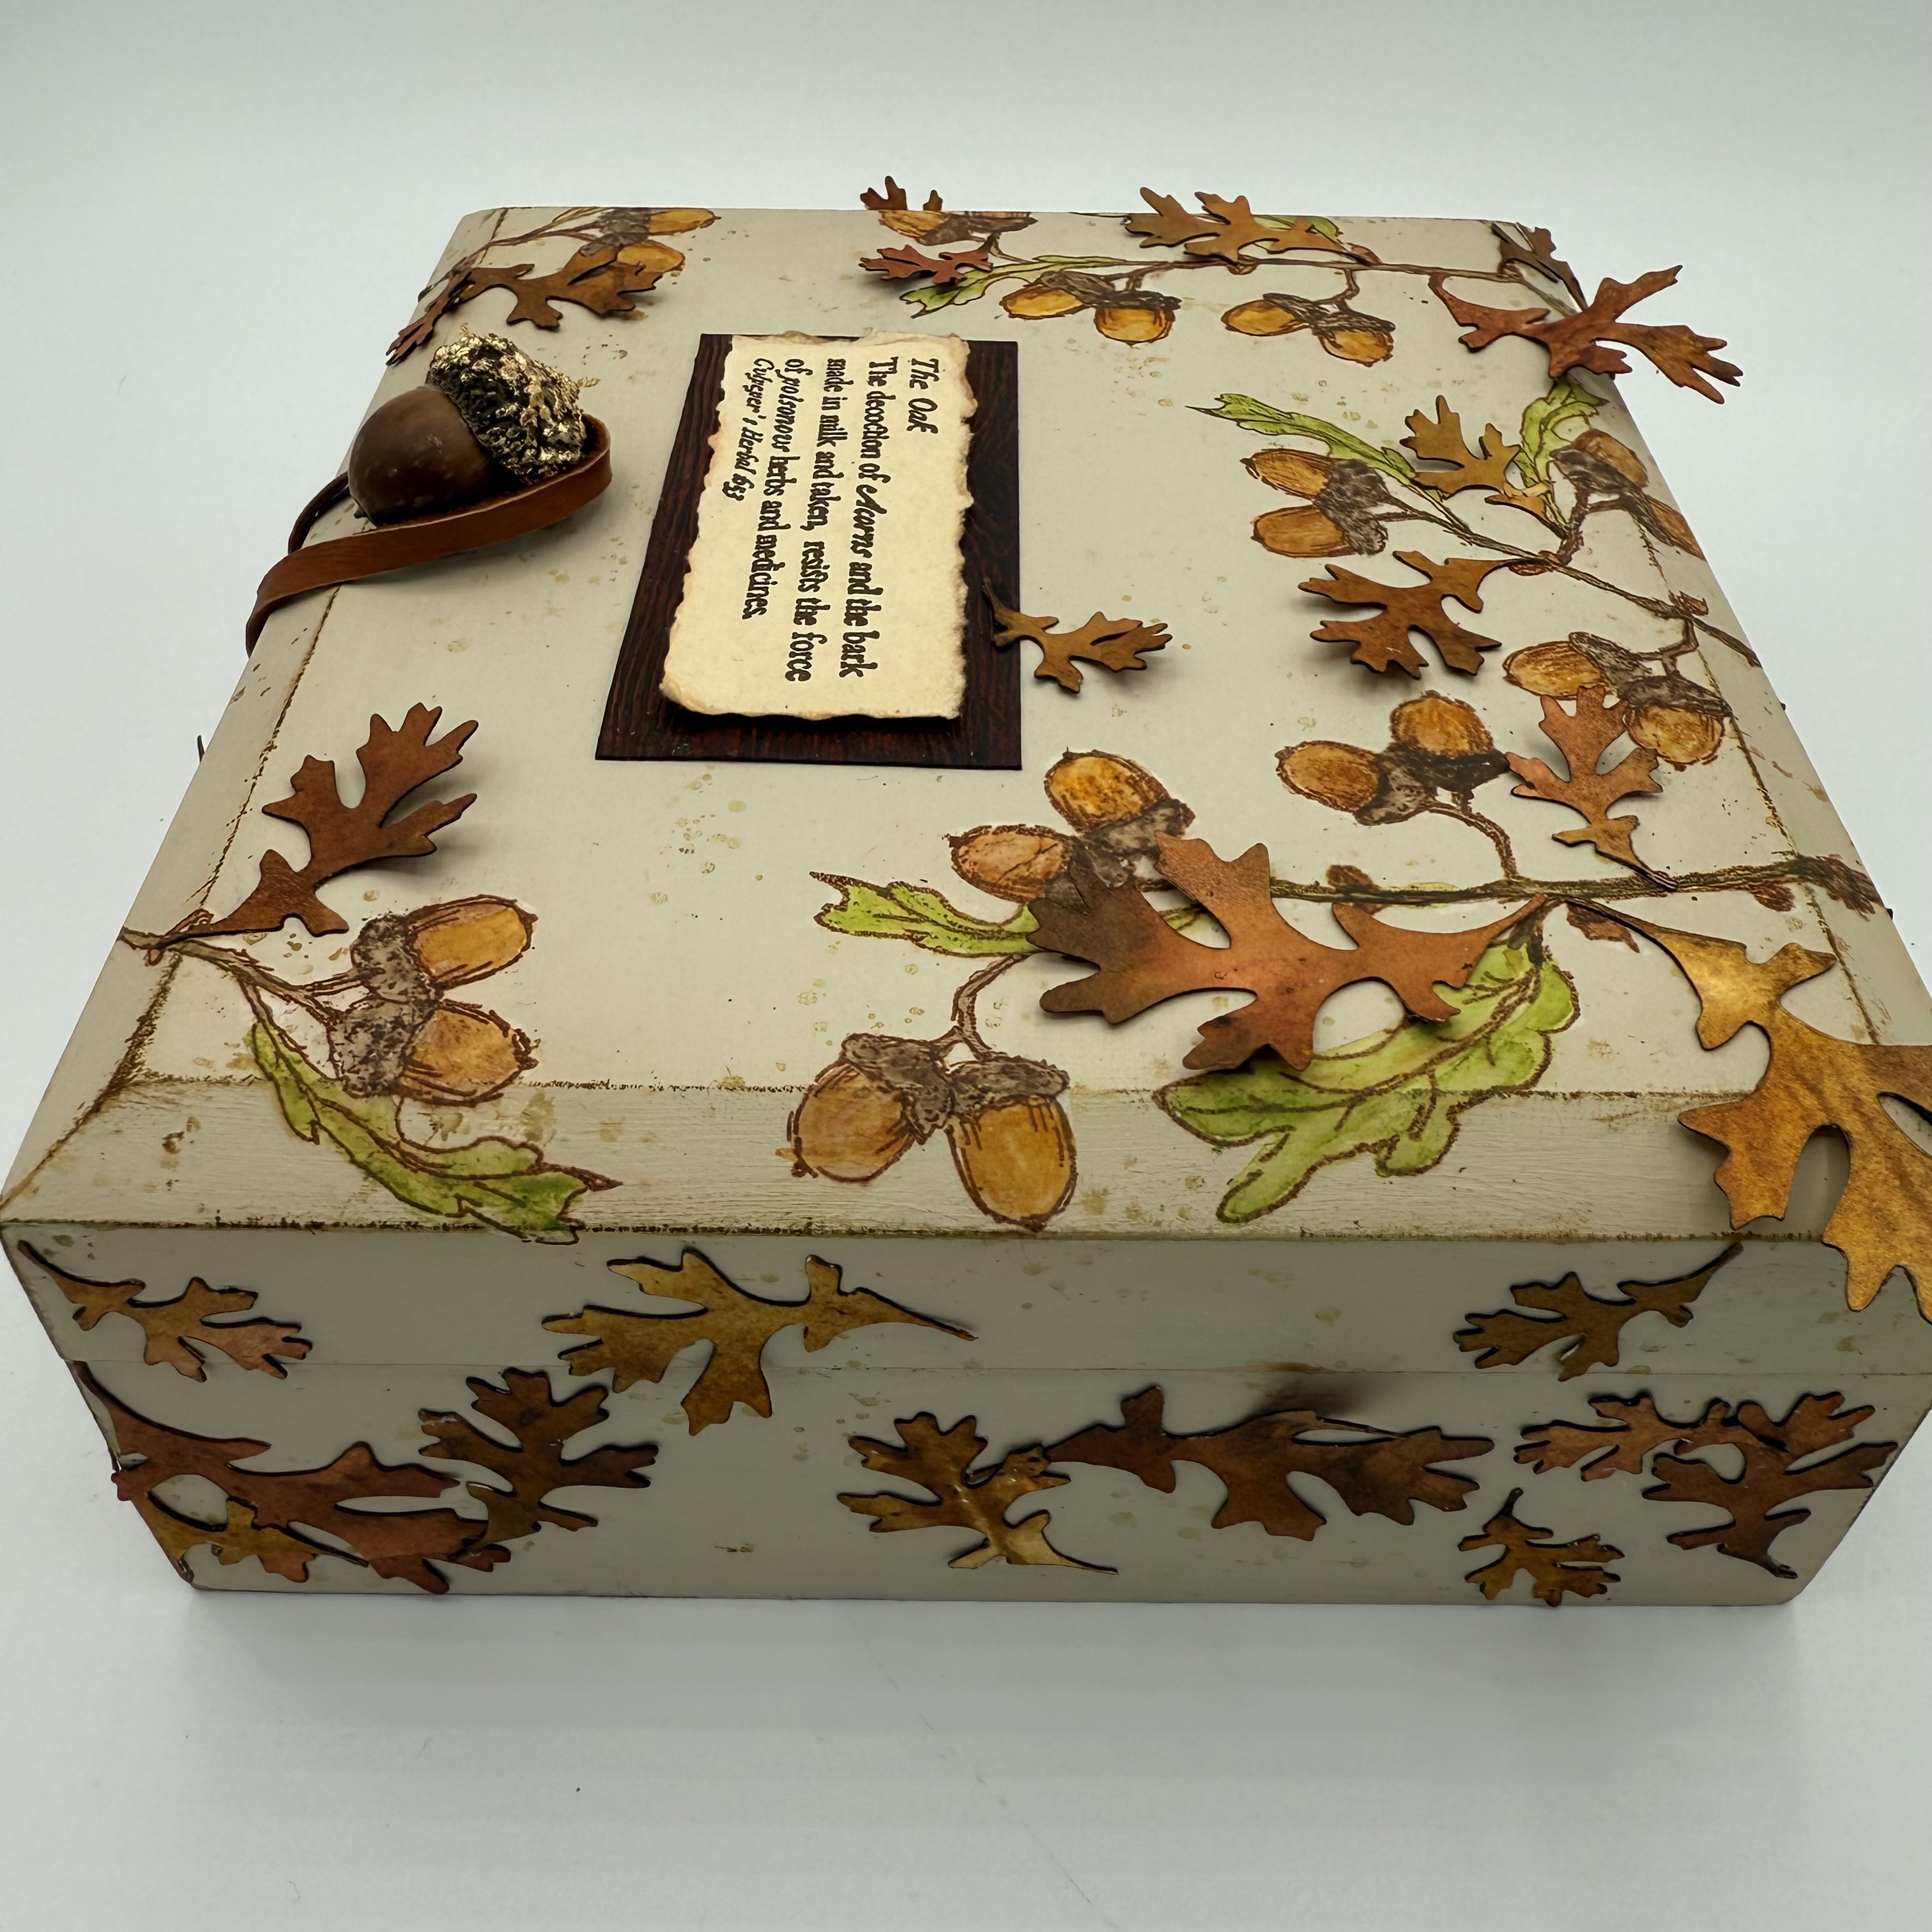
I am so in love with this Nature's Treasure Box! Adding the dimensional leaves to the base oak branch illustration stamp turned out even better than I imagined. The PaperArtsy Infusions created such a realistic palette for the leaves, bringing the entire design to life.

I am fawning over the wax seal that holds the leather closure piece. I wanted to draw special attention to the round stamp design included in this set, and thought that it would be wonderful as an actual seal; yet only having ever used metal heads to create wax seals, I was unsure if this could be achieved. I will explain how I was able to create this gorgeous detail using sealing wax.


I am often inspired by the colors I see in nature, and for this project I was definitely feeling the autumn vibes. PaperArtsy Infusions Dye Stains in Golden Sands (CS05), The Sage (CS03), Just Walnut (CS25), Terracotta (CS21) and Rusty Car (CS17) reflect the gorgeous hues of autumn foliage, while all of the stamping was done in browns using Ranger Industries Archival Inks (ground expresso, vintage photo and coffee) to keep it earthy and neutral.. 


I was gifted a few old cigar boxes from a fellow artist a number of years back and have been waiting for the perfect opportunity to use one. I wanted this treasure box to be large enough to hold a variety of pieces both small and large, and I thought this box was a perfect fit. I removed all of the stickers and sanded down the finish. Then I coated the outside of the box with clear gesso. At this point I was unsure of what color I would be using for a base.


Next, I created colored die cut leaves that I would be adding to the collaged, stamped images. I figured this would be the best way to select a background color that would complement the palette and allow the acorn branch imagery to take center stage. To make the leaves, I sprinkled PaperArtsy Dye Infusions onto wet Bristol Paper and allowed the colors to bleed and blend together. In some areas I used additional water and a paintbrush to dilute the color and others I blended the colors together. I tried to leave some sections with straight infusion colors so that when I die cut pieces from the sheets of paper I would have a large variation in leaf color.


It's always a good idea to die cut a lot more pieces than you think you will need, I seem to find myself using way more than I anticipate. If you have any leftover, you can always use them in another project or even to make a quick greeting card. With a gorgeous pile of leaves to complement, I am able to select a paint color for the outside of the box. I chose PaperArtsy Fresco Finish Acrylic Chalk Paint in Buff (FF96), and paint the exterior. When the paint is dry I lightly distress the edges.


To add interest and give the box a more weathered appearance, I randomly stamp around the edges with PaperArtsy Minis stamp (MN72). Since I want this to blend into the background and not draw a lot of attention, I ink the stamp with Ranger Industries Archival Ink - Coffee, stamp onto a scrap paper and then stamp on the box using whatever ink remains on the stamp. This second generation stamping appears much less crisp than if I had stamped directly onto the box immediately after inking.


With the prep work complete, I was eager to see my vision come to life! I wanted to add a knob or pull to make opening the box easier. Considering that this would be fastened to the top, I decided that it was important to figure out what would be inside incase I needed to account for any fasteners. 

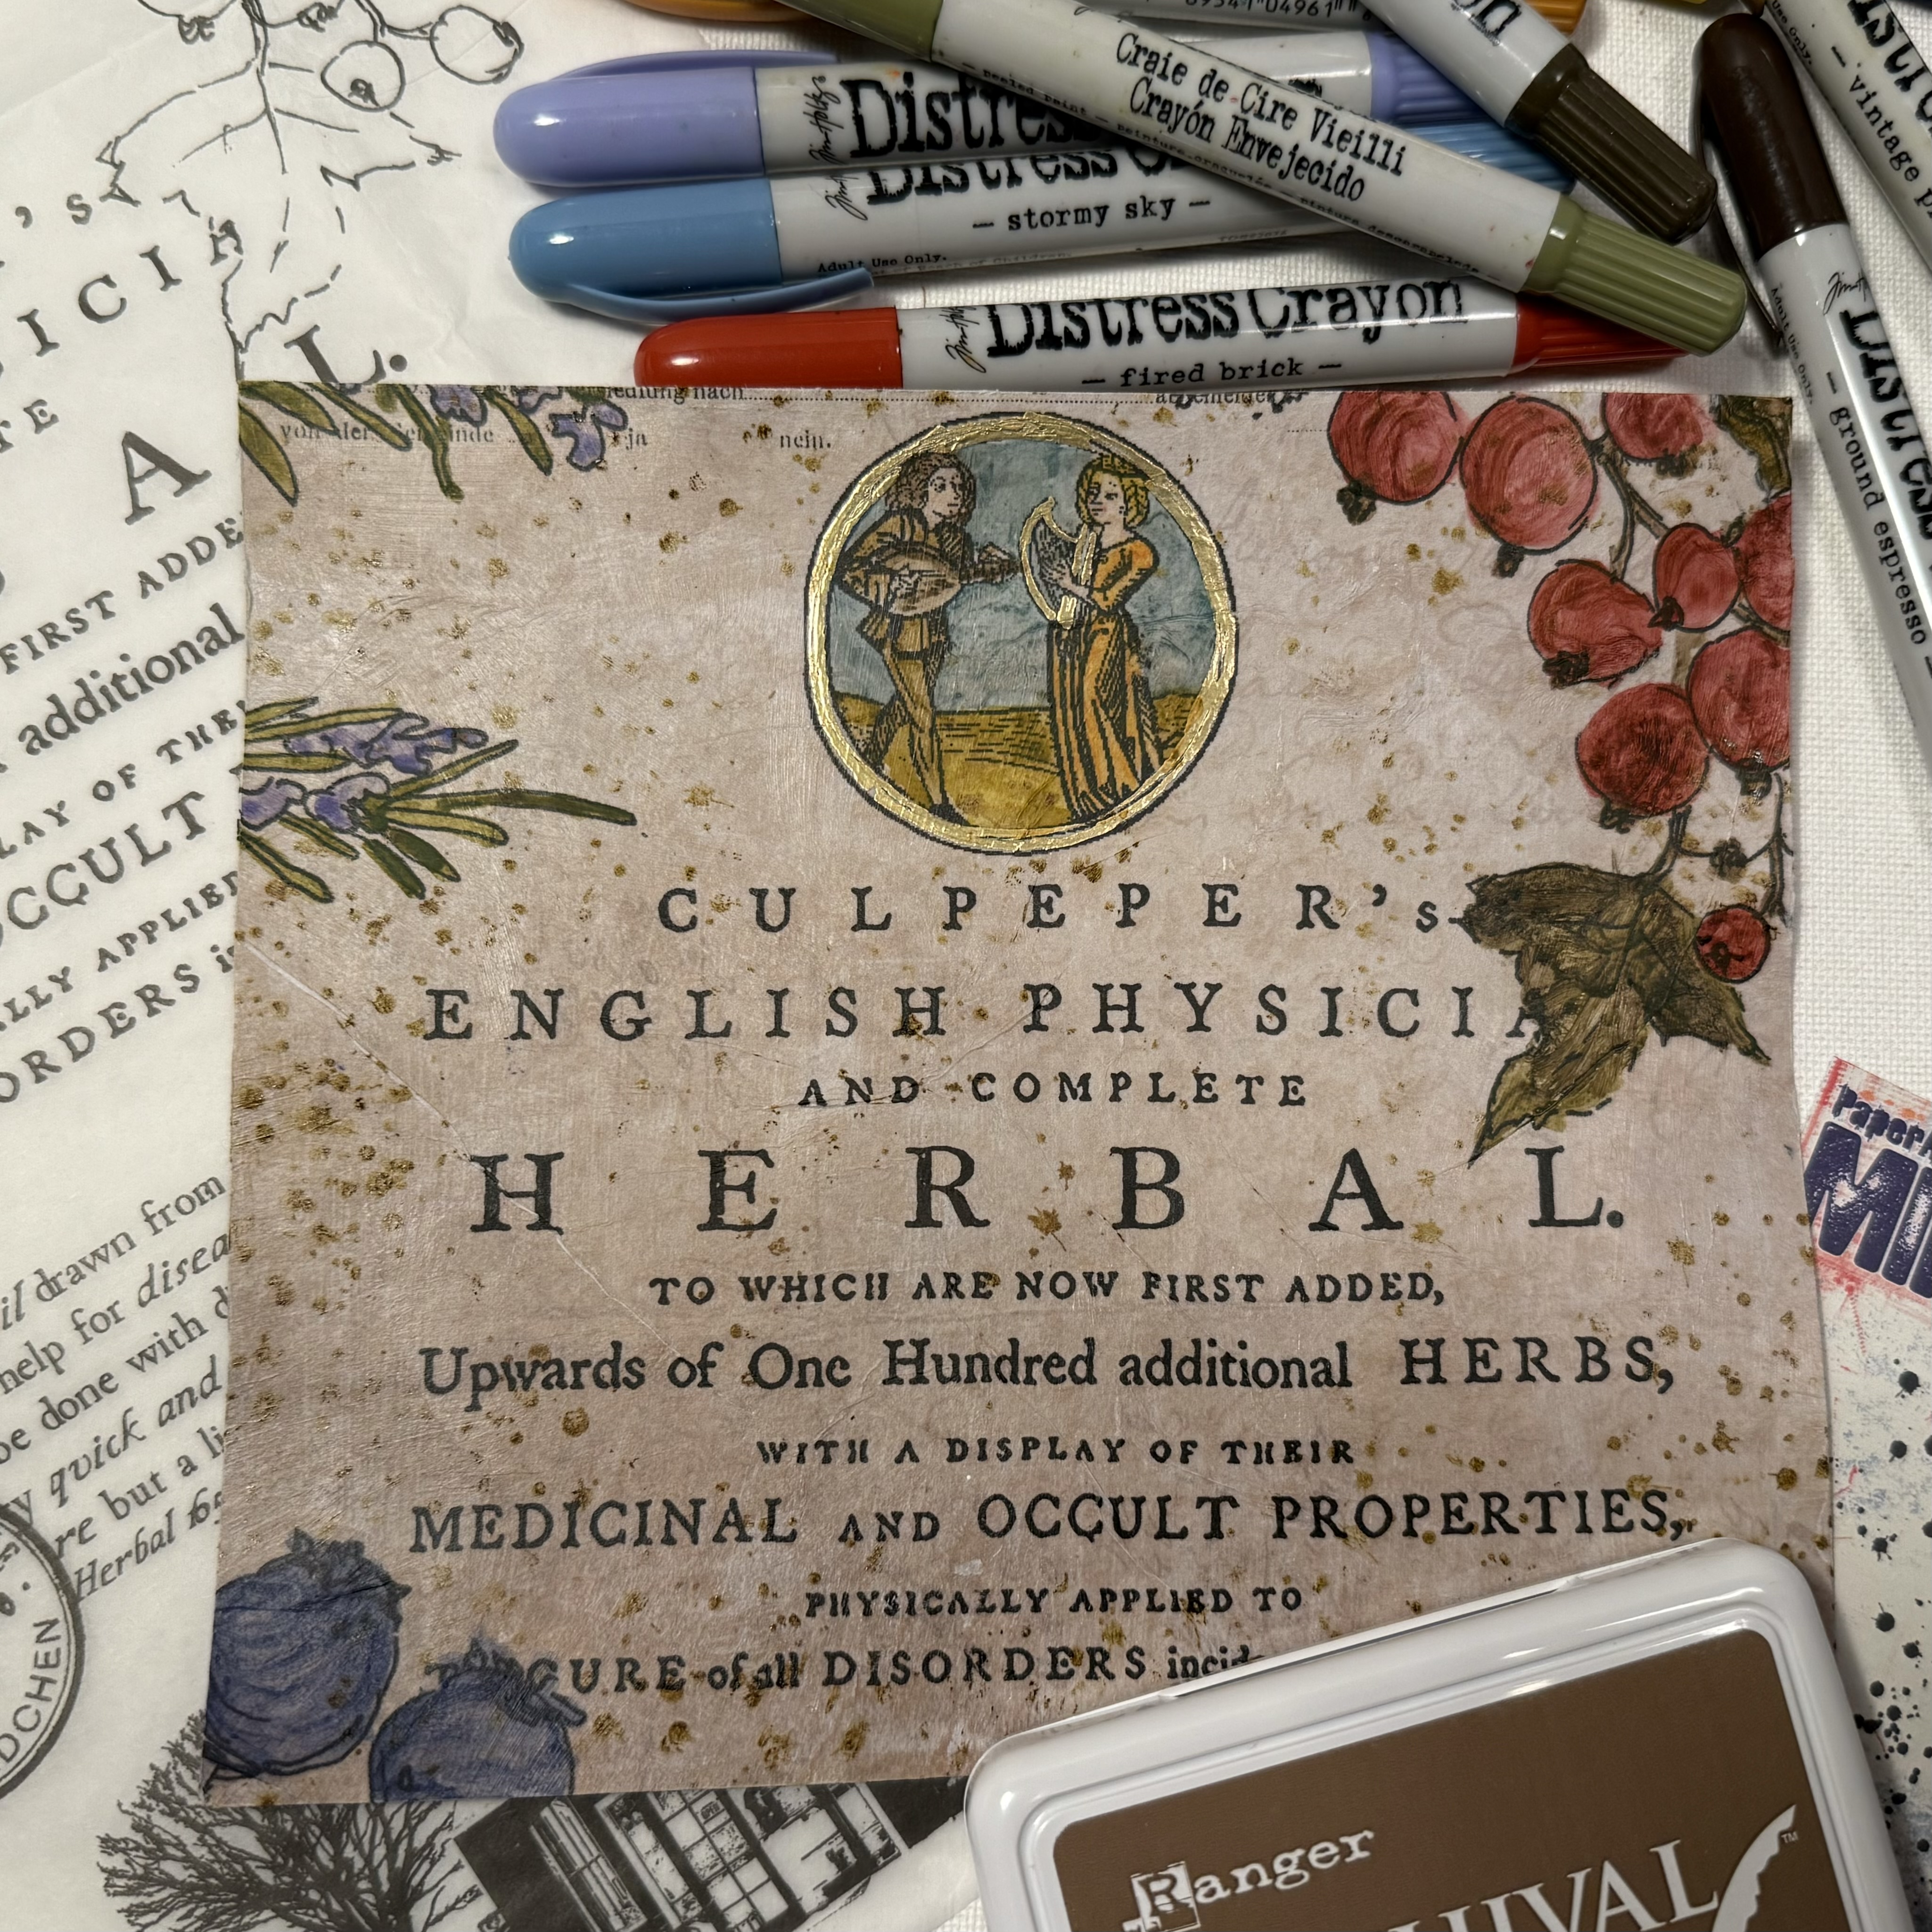
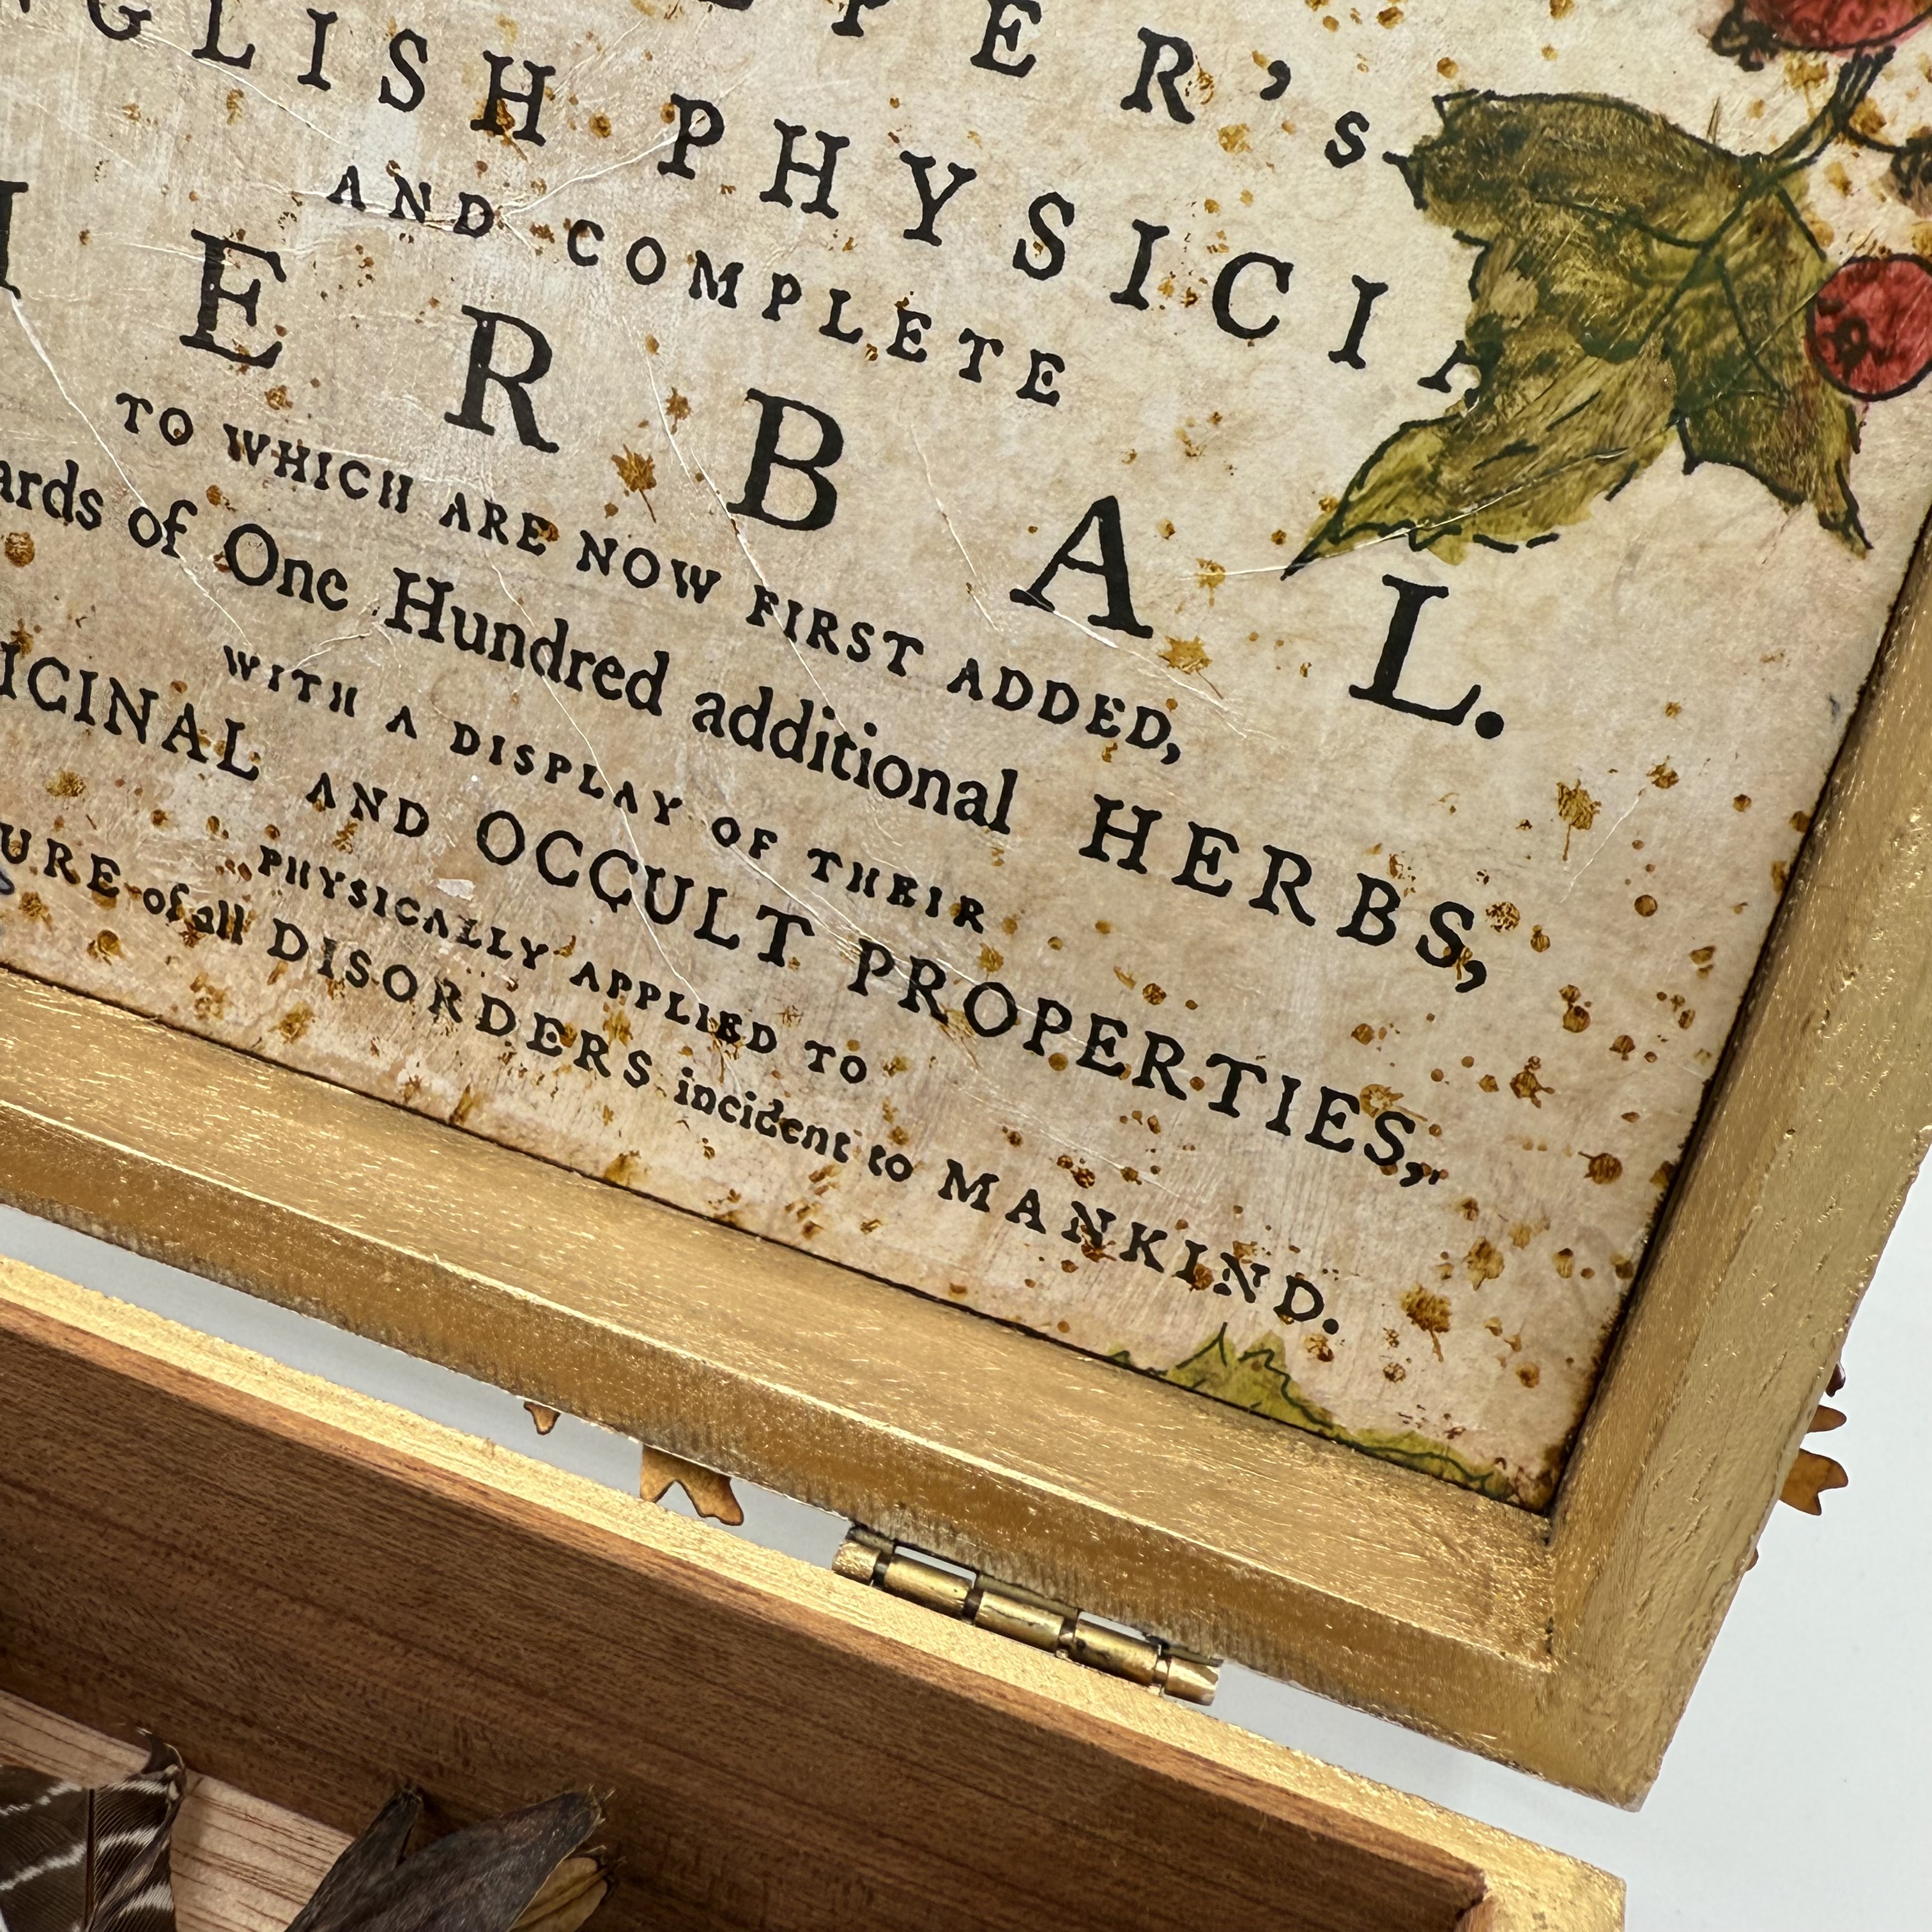
I figured the best way to have flexibility with the interior finish would be to make a panel that could be attached after the knob was secured. I measured the interior dimensions and cut a piece of patterned scrapbook paper to size. Then, I selected a favorite section of the PaperArtsy Printed Tissue - Alison Bomber (PT08). Using Ranger Industries Distress Collage Medium matte, I collaged the tissue onto the paper panel. The patterned paper is faintly visible through the tissue and gives an aged appearance. 

Using Ranger Industries Distress Crayons, and a water brush, I added color to the botanical images and circular seal portion of the printed tissue. to add a bit of grunginess to the panel I stamped PaperArtsy Minis (MN72) with Ranger Industries Archival ink - Coffee. I added bit of Gold leaf pen around the outside edge of the circle and the interior panel was finished.

Now it's time to work on the outside of the box. I want to create an overall pattern on the top and plan on creating this using the oak branch with acorns stamp. In order to gauge how the design will fill the space, I stamp it multiple times onto tissue paper and cut them out. Then I can easily move the pieces around. It also allows me to see where I might be able to include some of the die cut leaves.


I continue arranging the tissue pieces on the top of the box. Where necessary, I cut off sections of the design. In particular if there is an area that I would like a die cut leaf to replace one in the stamp design. Using another stamp from the set, I create a faux wooden layered plaque. This will be placed towards the center of the box top. I set it in place so that I can easily layout my design around it.


In areas that I want to add more acorns, I cut up the stamped tissue and situate the pieces to make it appear as they would be an extension of the branch.


Once I have my desired design, I collaged all of the tissue pieces into place using Ranger Industries Distress Collage Medium - Matte. After the collage medium has dried, I tested out some of the leaf placements before adding color to the stamped pieces.


To color the collaged, stamped pieces I used Ranger Industries Distress Watercolor Pencils. It is easy to add and blend the colors. I tried to make the acorns look as realistic as possible while also allowing for a range of color to distinguish all the elements.


Once satisfied with the coloring, I sprayed the box with Kylon Matte Finish Sealer. This seals the watercolor as well as gives the box an overall matte finish, concealing any of the matte medium brush strokes. I secured the gold leafed acorn knob to the top, and attached a leather closure.


The leather strap is held in place with a wax seal. I stamp the circle stamp directly onto my box with archival ink. This helps me to place the leather straps where I want them. To ensure that nothing moves when I stamp into the hot wax, I first glue the leather straps in place at the center of the stamp. I drip hot gold wax over the stamped area (covering the leather straps as well). Before the wax cools, I press the rubber stamp into the melted wax with even pressure. I allow the wax to cool completely before removing the rubber stamp. When the stamp is lifted, the impression reflects the beautiful design. This is one of my favorite details, it turned out even more beautiful than I imagined!


The final steps include gluing the colored and embellished tissue panel inside the top of the box, and attaching all of the die cut leaves onto the exterior. Gold leafed edges at the interior add the finishing touch.




Alison Bomber has the most gorgeous collection of botanical illustration stamps with PaperArtsy, I could imagine making various boxes for different seasons. These could make a wonderful gift idea for someone special. Perhaps I've inspired you to make your own treasure box, or even just to experiment with different ways to incorporate these incredible stamps into a project, either way I hope you find yourself getting crafty.

Thank you so much for stopping by today, Ann

Tuesday, 4 October 2022

2022 Topic 14 : Colour Study: Triads {by Alison Bomber} with Alison Bomber stamps


Hi everyone, it's Alison here from Words and Pictures, and I've been playing with some of my botanical stamps and an autumnal colour wheel.


The first inspiration for this project happened before any craft table action, and that was a feeling of autumn starting to creep in to my world.  The weather has turned chillier, the trees are just starting to show signs of changing colour, and (with frost forecast quite soon) I'm having to think about getting the garden ready for the long Czech winter.

With all that going on, I wanted an autumnal palette, so my colour wheel didn't start with the three primary colours (red, yellow, blue), but is closer to the three primary colours of light (red, green, blue).  Even then I wanted to go with quite earthy autumnal shades of those three basics, so for my three Fresco Finish Chalk Acrylics I picked Brown Shed (FF38)Tinned Peas (FF55) and Summer Sky (FF150).


I adored the autumnal colour palette that the mixing process gave me.  It was a little frustrating to restrict myself to just three of the colours!  But I decided that I really wanted that fresh clean blue for the sky behind the acorns, so working with colours separated by three segments, that gave me the three pure paint colours to play with... no mixing involved.   And here's where I ended up.


It's hard now to remember which came first - the idea for an autumnal palette or the choice of stamps.  I think I already had the acorns in mind - my botanical Eclectica³ {Alison Bomber} Acorn Edition (EAB25) - when I started thinking about what paints to choose, but it became clearer and clearer as I played with the colour mixing that those were the stamps to go with.


I very much enjoyed mixing the colours for the wheel.  It's a really meditative process... and you get lovely moments of surprise at the colour tones appearing... that smoky grey at no.12, for instance, the soft duck egg at no.2, or the perfect burnished acorn at no.8!  I will definitely be deploying both this palette and the colour wheel mixing process again.  When you create a limited palette by mixing your paints, you're always going to end up with a harmonious effect as all the colours "belong" to each other.

 
So yes, no.8 would have made the perfect ripe autumnal acorn, but that would have meant using 4, 8 and 12 - and, as I said, I really wanted the blue of the Summer Sky (yes, I know it says it's summer not autumn, but it definitely has a cool cast to it), as well as the yellowish green of unmixed Tinned Peas, so 1, 5, and 9 it had to be.

At this stage, I had no long term plan, I just wanted to try out my chosen colours by painting the images.  I used a stamping platform and Potting Soil Archival ink to stamp both the large acorn branch, and the close-up stem along with its 1653 advice from Nicholas Culpeper for using oak medicinally.  (I'm not recommending doing any of it today!)
 

When I'm painting with Fresco Finish Chalk Acrylics, I like to use a water brush.  This gives me the ability to thin out the pigment to create lighter tones, working in a more watercolour kind of way, even with the opaque paints.  (You can see on the colour wheel, I've deliberately lightened each colour towards the outside edge of the wheel to see the kind of tonal gradation that's possible.)  I put a small splodge of paint direct on the craft mat and spritz it with a bit of water, as well as using the water brush itself to control the pigment.
 

With these botanical stamps, I'm often trying to get dimension and light and shade for a natural look, and with the restriction of using only three colours, I needed the tonal changes to create that sense of 3D.  The dark tones retreat into the background. Lighter tones appear to emerge towards you out of the paper, so you can work to create that sense of the rounded acorns.  And white = light when you're painting, so leaving that little area of white space helps with the illusion of glossy reflectiveness that you would hope for on the surface of an acorn.
 

And it was definitely the right decision to use the stamping platform as, after I'd added my blue sky softly around the branches, I was able to restamp to get back all that lovely sketchbook detail.
 

(Sshhhh... don't tell anyone, but while I had the stamping platform and the stamps and the paints all sitting there ready, I also painted a version using more colours from the colour wheel.  On the plus side, that gave me a dark brown for the branch, and also some more colour variation in the leaves, not to mention those richer, riper acorns.  But there's a freshness and a brightness to the three colour version - those contrasting colours which live across the wheel from one another give the painting real vibrancy, compared to the earthier natural look.)


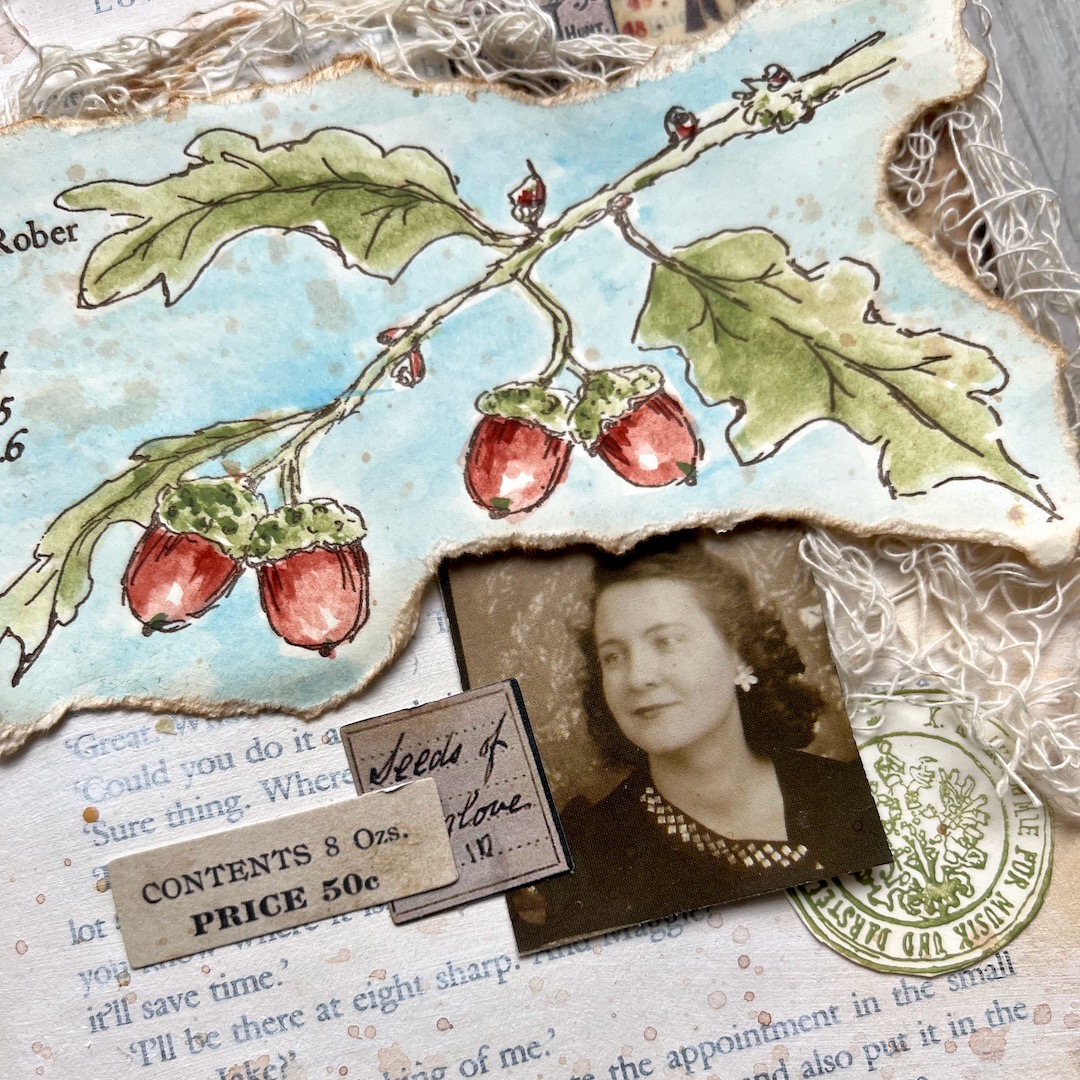
I had meant that painting to be just an experiment, to see how the colours worked, but once it was done, I liked it so much I thought I might as well use it somehow for the actual project... but how?  My little hardback book journal came to mind, so I tore around the acorns, and started playing with some layered elements on the gessoed pages.


It needed something more, so I decided to add the round seal stamp from the same Acorn Edition set to the mix.  I wanted it to match exactly, so I stamped it in Tinned Peas.  When I'm stamping with paint, I paint a thin layer onto the craft mat and press the stamp down into it.  (Always make sure you clean your stamps immediately when you're stamping with paint... I did it even before I took the photo!)
 
 
I stamped it multiple times (as you can see) which gave me plenty of nice circular elements to echo the Idea-ology ephemera vellum clock which I'd already cut in half to add to the page spread.  And it wasn't long before I was reaching for the quote which comes in the set too!


The words are stamped in Potting Soil Archival (I very rarely stamp in black... brown is my most common choice - it's a softer look).  But you can see that the deep carving and strong rubber gives you an incredibly sharp image on the green seal, even stamping with the paint... that's the sign of a quality stamp!


Collaging for me these days almost always seems to include the wonderful Idea-ology tiny labels and number strips.  I think the pharmaceutical labels and specimen records work so well with my botanical imagery.
 

And I enjoyed finding the two women in the Photobooth snapshots and positioning them so that the collaging is balanced and harmonious, leading the eye around the pages.


I'm really pleased with the texture from the torn edges - now inked with Vintage Photo Distress Ink - as well as the ragged netting in the layers.


And I love the effect of that brightness from the contrasting colours in the painting popping beautifully against the neutrals.  
 

It's in the final stages of a project, as I'm looking at what's there and wondering if there's more to add, that I start to understand how some of the instinctive choices I've made along the way (without thinking much about them) actually connect and have meaning.  As I was adding the final splatters of watery Vintage Photo ink, I started to notice the relationship between the two women...

I love how the woman on the right is gazing over at her friend on the left-hand page, while she is making direct contact with us, demanding our attention, drawing us in to the pages.


And then I realised that they also connect to the words... I feel sure that between them these two bright-eyed, intelligent women have plenty of plans and ideas, those little acorns from which mighty oaks - and indeed whole forests - can grow.


I realised I do a version of a colour wheel whenever I'm creating, especially when I'm watercolour painting.  I've never really formalised my colour blending in a wheel before, but I almost always work with a fairly limited palette of colours, mixing those as I go.  So it was fascinating to deconstruct the process like this, and see it all laid out so clearly.  Plus it's always a thrill to see how colours combine to make new colours! 

I most often work with colours closer together on a given wheel, but it's really refreshing to pick out the colours furthest apart and work with the contrasts that throws up.  I definitely enjoyed the fresh, bright results that gave me here.

So I thoroughly recommend that you take a colour wheel out for a spin.  I know I'll be exploring this method again, and you already know that the full palette of this particular wheel has been out to play... you've seen the results!  

I'm really looking forward to seeing the colour wheels in store for the rest of this topic, and I hope you are too.
Alison x


Blog: Words and Pictures 

Facebook: Words and Pictures
Brand new website (hopefully going live in the first week of October!): Words and Pictures
Instagram: @w0rdsandp1ctures and @b0hem1anh0me
Pinterest: butterfly crafter