Showing posts with label Cerise. Show all posts

Monday, 17 February 2025

Patterned Umbels with EAB Products {by Nikki Acton}


Hi everyone, Nikki (a2a.craft) with you today to share a few ideas using Alison Bomber designed stamps.

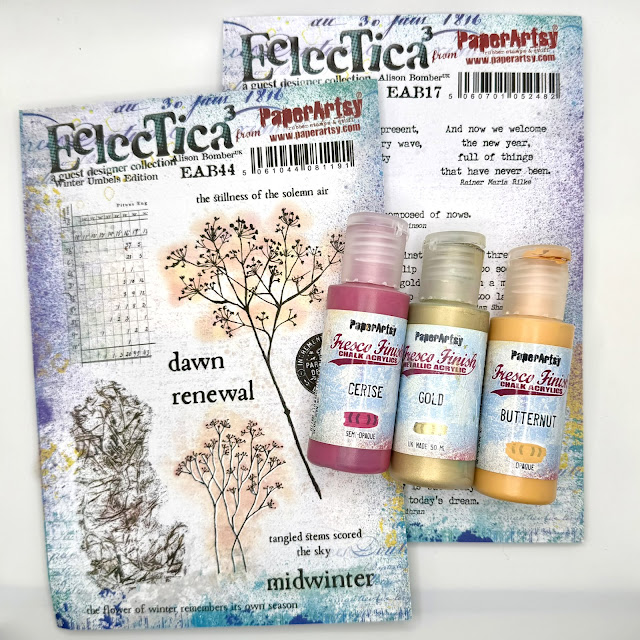
This year on the blog, we are being given free reign to do a deep dive into one of the PaperArtsy product ranges. I am very happy to be using a couple of stamp sets from Alison's range - one from her last release of 2024 (the fabulous Winter Umbels from her botanical texture series) combined with one of her older curated quote sets (The Time Edition). 


You can see already, my projects are not very 'Alison like'! - I love working with bright colours and geometric shapes.
I started off just making the wall panel on the left in the photo above - but as I had lots of 'bits' leftover I made a card to go with it.
It all started with gel plate prints and I'll show you how I created the pattern from these.


I love how Alison's recent stamp sets provide a combination of elements; focal points, ephemera, texture and words. Before Christmas I was visiting a friend who had a piece of art (in her cloakroom!) using this colour range. It really appealed to me, so I have used PaperArtsy colours to reflect this today.


As I often do I started with my gel plate and PaperArtsy Smoothy Card. I chose to work with three colours; PaperArtsy Fresco Acrylics in Gold (FF20), Butternut (FF02) and Cerise (FF136).


I used each colour on it's own but also combined them for some prints. I used the main Umbels stamp from PaperArtsy stamp set EAB44 (by Alison Bomber) to stamp off the painted gel plate giving me 2 prints in one go. I also used the stamp and brayered some paint onto it to create more backgrounds. The gold on black card is fabulous!


You can see how the Umbels image is dominant in some of my prints but just hinted at in others.

As usual once the gel plate is out, it is hard to stop but I knew I had more than enough, so it was time to create the pattern.
 

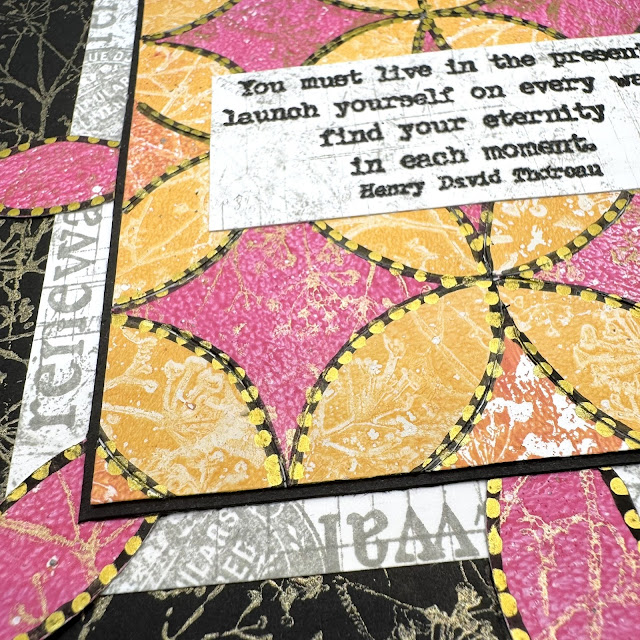
I had an idea of the pattern I wished to create. The pattern is overlapping circles which are built up with different colours.


Firstly I drew a circle using a compass - but you could draw around something or use a die or punch. My circle is 5 cm diameter. I drew a 5cm square around it.


The corner of this square is the centre of the overlapping circle - so I could now draw this one too. You can see above the pattern is created by repeating this.


I then used this idea on different colour backgrounds and fussy cut the pieces.


If you don't have a compass - just draw and measure a circle. Add lines for the horizontal and vertical centres and this will show you where the overlapping circle will sit. You can fussy cut the pieces and use as templates.


I glued the fussy cut pieces onto my drawn pattern sketch to help get them positioned correctly. Fussy cutting means there were going to be slight imperfections - but after the pen work, I don't think they are too visible.


For a matt layer I took some Smoothy Card and used Ranger Archival Ink in Watering Can to randomly stamp some of the texture, word and ephemera stamps.


I cut my border out of the gold paint stamped Umbels on black card. (I had to do it like this as by created background wasn't big enough for the wooden panel!)


The base wooden panel is 6x6 inches. I painted this in PaperArtsy Fresco Acrylic in Butternut before stamping the Umbels on the visible edge.


The detail around the pattern elements is done with Posca Pens - firstly in black and then gold dots were added.

To finish I stamped one of the quotes from PaperArtsy stamp set (EAB17 - The Time Edition) by Alison Bomber.


With all my 'Umbels' backgrounds I had some left over so made the card to go with it.


 Again you can see the Umbels in each of the squares below.


And another wonderful quote....


Monday, 4 October 2021

2021 Topic 12 : Sustainable Crafting with TS {by Etsuko Noguchi}

   2021 Topic 12: Sustainable Crafting

 
Etsuko thought about how to create a really useful item for this post. She has made an accordion folder with pockets, perfect for storing ephemera or loose small papers. But she also made (and beautifully decorated) an envelope for each of the gaps in the folder. So many great ideas within this and I think we all really love to create and end up with an item that has a purpose.
~ Leandra

Hi everyone, It's Etshko(My favorite things) with you today, and I'm here to share with you Handy Holder with Envelope packets. I chose this project because it is a fun way to remake and reuse the parcel packages and direct mail envelopes and little less waste. It's also a great way to spend my time working with lovely designer Tracy Scott stamps and my favourite Frescos colours.


The first step was to make the masterboards. Fresco paints were printed on a thick sheet of printing papers using a Gel Plate. Using the technique I learnt in Tracy Scott's workshop 'Index Card Art 2', I spread a thin layer of the above Fresco Chalk Acrylic ( Banana, Cerise, Cerulean and Electric Violet in my case) but you can use any colours you like choice. Then one colour at a time, print onto the Gelli Plate. Mist with water using a spray bottle on the Gelli Plate, use a brayer to blend the water and paint, then use an eyedropper to drip Isopropyl Alcohol in places and print on paper. The circles like this will appear where the alcohol has been dripped. Repeat this process until you get a nice shade, and then you will have some masterboards. As always, this process is very enjoyable with many happy accidents.


The next step is to make the cover for the holder, using my favourite Tracy's stamps that are used over and over. I cut a used parcel package to the size of the holder. I then used two sheets of Gel-prinedt papers in similar shades and stamped Tracy Scott set 054 and 057 (TS054, TS057) randomly in Ranger Archival ink (Leaf Green and Blue Violet) to cover and pasted the holder base. Next, I stamped the three mandalas of (TS055) with Ranger Archival ink (Jet Black) on Smoothy (Heavyweight) A4 white card. On the same piece of paper, painted Fresco Chalk Acrylic (Cerulean, Electric Violet and Zucchini) and stamped three small mandala of (TS055) in the same number in Ranger Archival ink (Jet Black), cut and stick it in the holder as shown in the picture. Size of the holder--Length 8 1/4" (21cm), Height 5 1/4" (13cm), Depth 3/4 (2cm).


I wanted a slightly darker colour so I added Fresco Chalk Acrylic ( Southern Skies )


The majority of the paper is used for the dividers and bellows of the holder itself, leaving some for the envelope collage.


This is the front, I put the clasp on it, using Fresco Chalk Acrylic (Cerise) and Tracy Scott set 055 (TS055) and black elastic band.


And the back.


The holder itself useful enough, but I made the pocket in it that can be removed, using a direct mail envelopes. I though it would be fun to make a collage on top of it and remake it. Each envelope was coated with White gesso and once dry, the same as the masterboard technique was used to print the envelopes with the Gelli Plate.


I used my finger to apply Fresco Chalk Acrylic ( Banana, Cerise, Cerulean and Electric Violet ) on the Smoothy ( Heavyweight ) A4 white card. I then stamped Tracy's lovely floral stamp set 061 and 058 ( TS061, TS058 ) Fuchsia and Magnolia and Mandala set 055 ( TS055) in Ranger Archival ink ( Jet Black ) on the card and  cut them to use as the focal point of each envelope. Also I used masterboards leftover as a rectangular and circular cutlayer.


The final touch is  the addition of the sentiment from Emma Godfrey's flower set 14 ( EEG14 ) to the holder.

The theme of Sustainable Crafting was bit difficult for me, and thinking about how to reuse limited resources - I need to use up lots of my old supplies too. Also I made this because I think it's about being able to collaborate and create/work with stamps and stencils from wonderful designers and then turn it into something good. Then share it with people and have fun connecting all the time. 
 
Hope you enjoy it.
Thank you so much for visiting.
Etsuko xxx

Blog: My favorite things
Facebook: Etsuko Noguchi
Instagram: Pixienest
Pinterest: Etsuko N