Showing posts with label 2019 Topic 10. Show all posts

Friday, 5 July 2019

2019 #10 Tiled Patterns: Coasters with ETS {by Anneke de Clerck}

2019 Topic 10: Tiled Patterns


I always love the colours that Anneke chooses. They are bright and fun, and she has the knack of putting colours together that always offer a striking contrast and really appeal in such a fun way. Her use of white to enhance that pop is a really great tip! ~ Leandra 

Hi everyone, it's Anneke with you today, and I'd like to share with you a set of one layer cards I made for the Repeated Patterns/Tiled Patterns topic. For my cards (or should I say tiles?) I was inspired by the patterns on the Marimekko napkins. Marimekko is a Finnish brand known for its original prints and colors. My aim was to design a few patterns using only one single stamp per pattern.


I started by cutting 3 card panels out of Smoothy White Stamping Card 240gsm, size 5 x 5" (12,5 x 12,5 cm). I rounded the corners using my We R Memory Keepers Crop-A-Dile Corner Chomper.


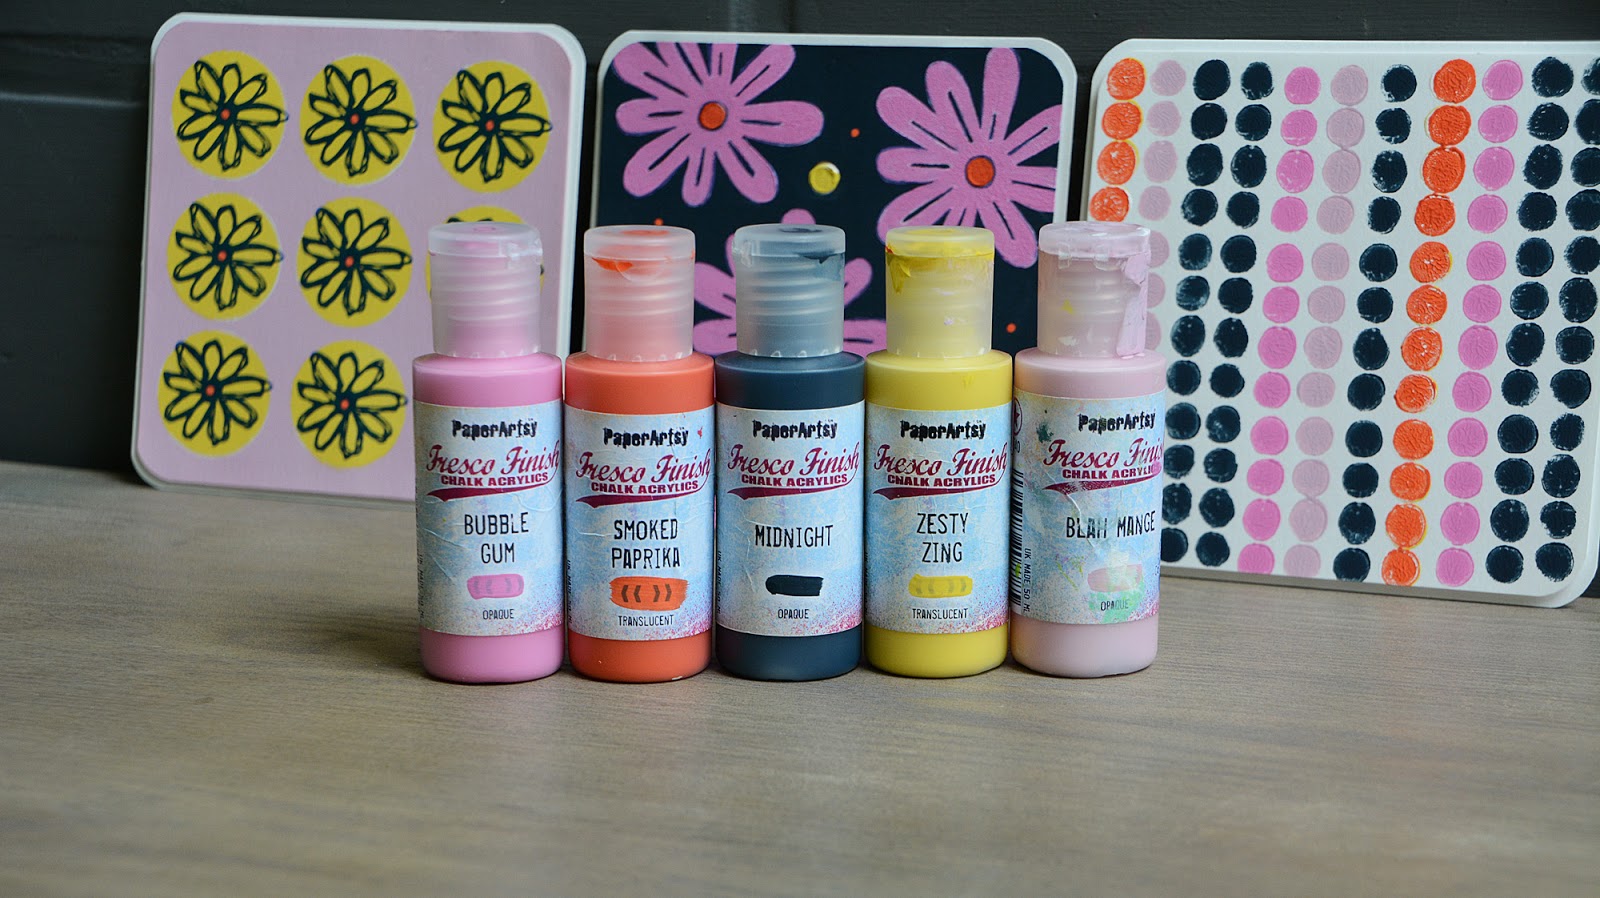
For my project I've chosen Fresco Finish Chalk Acrylics Bubble Gum, Smoked Paprika, Midnight, Zesty Zing and Blah Mange as my main colors.


I used one small stamp on each card, made a repeated pattern with each of the stamps. The stamps are from the ETS 24, ETS 25 and ETS 15 stamp sets.


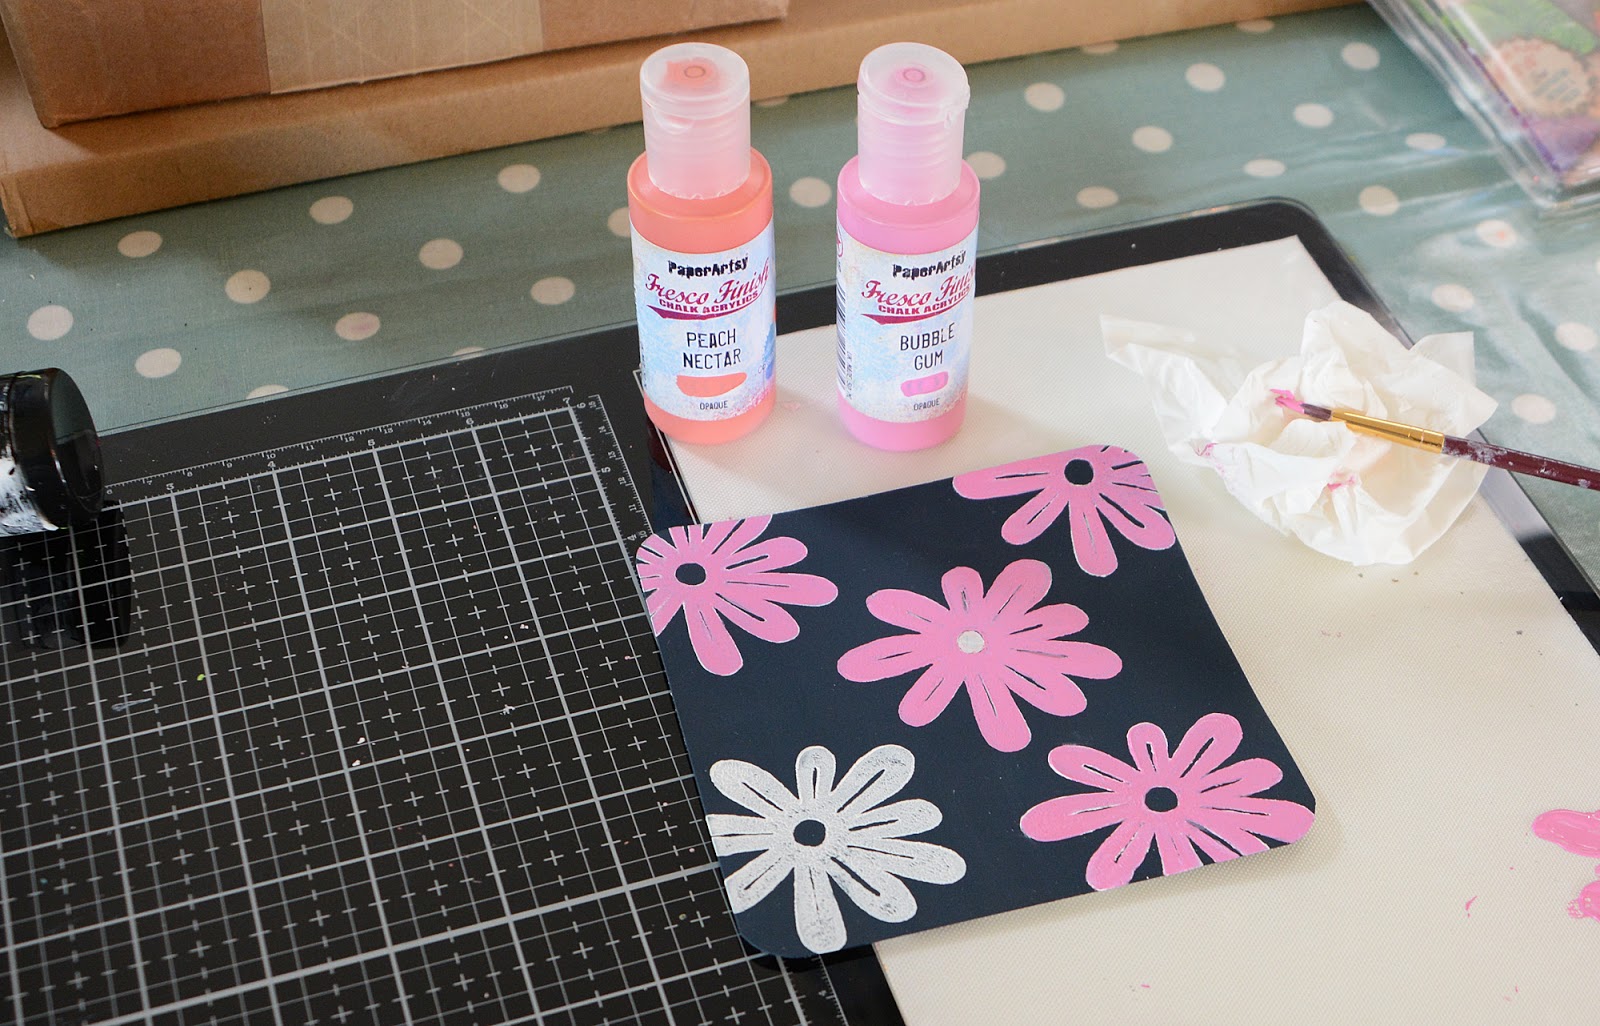
To create the first card I started by painting the background with Fresco Finish Chalk Acrylics Midnight. I stamped the flower from the ETS 24 stamp set randomly on top of the blue background using Fresco Finish Chalk Acrylics Snowflake. I used a small brush to overpaint each flower with Fresco Finish Chalk Acrylics Bubble Gum. Because of the white layer underneath, the pink color looks really pink on the dark background.


I colored the flower centres using Fresco Finish Chalk Acrylics Peach Nectar. I added a touch of Fresco Finish Chalk Acrylics Smoked Paprika to make them pop more. I outlined each flower using a Distress Marker. I finished the card off by adding dots. I 'stamped' the yellow dots with Fresco Finish Chalk Acrylics Snowflake and Zesty Zing using the eraser at the end of a pencil. Did the orange dots with a paint marker.


For the second card I painted the background with Fresco Finish Chalk Acrylics Blah Mange. I created circles using a stencil (TCW Mini Cut Circles). I sponged Fresco Finish Chalk Acrylics Snowflake through the stencil first, continued with Zesty Zing.


I stamped with a flower from the ETS 15 stamp set on each circle using Archival Ink Cobalt. Did the flower centres with Fresco Finish Chalk Acrylics Smoked Paprika.


For the final card I worked on a white card panel. I stamped rows with a stamp from the ETS 25 stamp set and used Fresco Finish Chalk Acrylics Midnight, Bubble Gum, Smoked Paprika and Blah Mange.


I first stamped yellow dots instead of orange ones. I didn't like the outcome so I overstamped the yellow dots with Fresco Finish Chalk Acrylics Snowflake first, then restamped with Fresco Finish Chalk Acrylics Smoked Paprika. Because Smoked Paprika is a translucent paint that white layer was necessary to cover the yellow paint.


If you're familiar with my work you'll know I'm often making grid/tiled backgrounds for my cards (f.i. HERE & HERE) but this time I tried to design my own tiles. I'm happy with the outcome. Playing with pattern, repetition and order is fun and it brings a sense of calm into your work. It's also surprising what you can achieve by using just one stamp.
I hope I could inspire you to take a better look at your small stamps and use them to design a few nice patterns. It's super easy and so fun to do! 
I would love to see what you come up with!

Thanks for joining me today, I hope you have a creative week.


Wednesday, 3 July 2019

2019 #10 Tiled Patterns: or Patterned Tiles? with JoFY {by Helen Chilton}


2019 Topic 10: Tiled Patterns


Actual Tiles! Well someone had to give it a go...yes I know Alison did lovely miniature ones for her fireplace, so here are the human-size version! With a JoFY twist! ~Leandra

Hi everyone, it's Helen with you today, and I'd like to share with you my tiled patterns project.

I've used a bit of artistic license with the theme here and and worked on an actual 6x6 tile with some of JOFY's newest stamps - they're a good size and fit the scale of this project perfectly.

  I love stamping on tiles - there's so much you can do with them - use them as wall art, placemats, teapot stands, house signs or, as I've done later, combine them to make larger designs. Usually I use bisque (unglazed) tiles for this but I've found them harder and harder to come by at a reasonable price when you include postage, so I've experimented with ordinary glazed plain white tiles this time. These come in packs of twenty and are easily available from any DIY store - these were 20 for under £5.00 so you have spares if you go wrong.


You can see here how glossy they are. Now you can stamp on them like this but the stamps can slide around a bit.


So all I did was give them a quick coat of white paint - this 'mattes' them down nicely and gives the surface a good key for working on.


As you can see this JOFY stamp is a lovely size. I decided to black emboss the design so that you get the slightly raised edge to paint up to.


I didn't bother with any masking off when I added the border and the extra seed pod (all that embossing had practically finished me off!). I was going to use the circular design as my filler but it was just too large to fit between the petals.


Then I just added paint - keep a cotton bud handy to wipe off any stray blobs.


After that I though I'd try some monochrome tiles - blue above, green below:


Combine the tiles together and that's where your 'Tiled Patterns' comes in. You could add to the design by using different combinations of the same three colours - I can see some more yellow based tiles in there as well.


And here's a pic of where I've used them.


Of course once I got started I couldn't stop there - I thought I'd try a really bright one.


And then something more muted using Sugar Plum and Teresa Green and painting with a more 'watercoloury' effect. Surprisingly, considering how much I love bright colours, out of all of them, this one is my favourite. It just goes to show you can never quite tell what something is going to look like until it's finished!

I added some doodling to all of my tiles, on the petals and round the edges, some black, some white and then sealed them with a glossy spray varnish. If you're going to stand things on them or use them outside, make sure you varnish them well - several coats. I thought I might dot some round the garden or you could combine them to make a tabletop for outside
.
And there are my tiles - however I've still got quite a few left to work on and in the DIY shop I saw that you could buy some much larger, single, sample white tiles (one was 10" by 16") which are definitely calling to me! Be great for a big piece of art.
Enjoy!

Helen

Monday, 1 July 2019

2019 #10 Tiled Patterns: Card Quilting with Minis {by Bryan Evans}

2019 Topic 10: Tiled Patterns


Just as I'm thinking people don't use yellow enough, along comes another blogger with fabulous use of yellow. Will there be a third?? Bryan brings a ray of sunshine, inspired by a quilt-block. ~ Leandra

Hi everyone, it's Bryan here from Geezer Crafter with you today, and I'd like to share with you my tiled project using some of the Mini range of stamps.

I wanted to create a pattern using some triangles. I don't usually create in such a 'staged' way, if you never step out of your comfort zone, you will never know!


Using some Infusions Dye Stain In The Navy, and some Ranger Multi Medium Matte, I made some marks onto the surface of Smoothy Heavyweight Card. I love how the rough bristles of the old paintbrush leave some cool marks. 


Great fun making marks, splogging watery mixes of Fresco Acrylic Chalk Paint in Blue LagoonGlacier Ice and Seaglass.


Letting each layer dry before the next.


A dried piece of grapevine makes for some fab marks.


I love how a watery layer of Yellow Submarine Fresco Paint reacted with the white embossed repeat pattern of Mini 69, 70 and Jofy JM38.


Several layers of BananaTango and Zesty Zing.


I cut up both pieces into 4" by 4" squares, then cut into triangles, I didn't take into account how large the finished piece would be, a massive 12" by 12". My inspiration came from a picture of a quilt block made from triangles.


I really enjoyed this project, it opened up my mind to new things, very exciting. I did find however I adhered the triangles with PVA, this only gave me a very short working time adjusting the pieces as I went. I remember reading or seeing somewhere that a gel medium dries much slower, so next time that will be my glue of choice.

Thanks for joining me today, Happy Creating!!  Bryan.

Blog: geezercrafter.blogspot.com
Instagram: bryanevans7772

Sunday, 30 June 2019

2019 #10 Tiled Patterns: Strength and Courage with EEV {by Nikki Acton}

2019 Topic 10: Tiled Patterns


Nikki is getting out her bright colours, and everyone loves these stamps by Ellen, the geometric bold designs look awesome against the pop of colour. I'm sure this with get your fingers itching! ~ Leandra

Hi everyone, it's Nikki from Addicted to Art with you today, and I'd like to share with you my Repeated Patterns / Tiled Patterns project. 

This was the perfect topic for me to combine my love of paint and abstract images. I decided to create some painted squares and use various stamps from the classic stamp sets from Ellen Vargo - EEV 3 and EEV 5 (see later for images). For my painting I used a credit card to swipe my paint - a quick and effective way to build layers and create the same but slightly different effects.


I used some of my squares to make a mini book, adding quotes from Alison Bomber's stamp set 'Strength and Courage'. (EAB08)


For my first set of cards I used Fresco Acrylic Paints in Chalk, Tango, Turquoise, Peach Nectar, Bubble Gum and Banana. I swiped one colour at a time with a credit card making sure I dried each colour before adding the next. (Chalk paints dry really quickly so this wasn't a chore!) As I was repeating my patterns I used the same pattern of colour for each square - but with this technique they were never going to be identical! I used opaque colours first, followed by translucent ones.


My second set were a little more muted - using Chalk again, Spanish Mulberry, Bora Bora, Blah Mange and Butter. You can also see here how I used the stamps to create my repeated patterns. The stamping was done with Archival ink in varying colours.


There are so many great patterns on these stamp sets I was a little spoilt for choice and managed to resist the temptation to overdo it - restricting myself to 4!


Here they all are, in a pile! I quite like them like this - but decided to create the little book.


There are 8 squares used in the book - for the facing pages I used one quote spread across both pages and also rotated one of the squares so the pattern was at 90 degrees to the other - the composition felt better that way!


Front and Back


I could carry on making these little squares with different colours and patterns all day! Great for backgrounds for other projects or just as they are. The squares I have left are going to be turned into birthday cards... a little matt layer and a greeting and they will be complete!

Nikki

Instagram: @Nikki_Act
Pinterest: nikacton