Hi everyone
Ellie Knol from PAPER-STAMPS-COLOR here with you today.
I haven't been crafting that much lately, as I had to have two eye-surgeries during the last half a year. I feel very blessed, the operations were very successful and my vision is not minus 15 anymore, but instead around minus 3. Back to 95% vision. Happy I am back at creating.
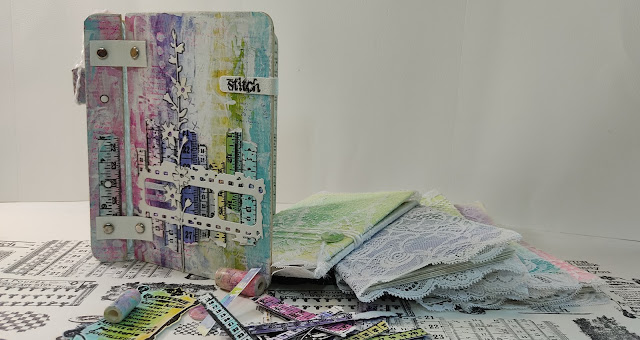
This topic BOOKS (and journals) had me thinking about my collection of books I've created in the past. Aim for me with this bookbinding series is to explore the binding techniques in particular.
I decided to create number 37 in this series.
I struggled a little with this binding as it turned out to not open as well as I imagined. To make it work, I changed the spine in the end; in the process I created a hidden compartment in it, to fit in with the quarterly theme HIDDEN.
I decided to create number 37 in this series.
I struggled a little with this binding as it turned out to not open as well as I imagined. To make it work, I changed the spine in the end; in the process I created a hidden compartment in it, to fit in with the quarterly theme HIDDEN.
As I chose to use sewing themed stamp sets from the PaperArtsy Hot Picks series, it will kind of be the focus of my book.
Part of some beautiful lace in my stash came in handy...
Part of some beautiful lace in my stash came in handy...

I made a picture of the starting product, PaperArtsy Hot Picks HP1212 and HP2202 and also the basics for the book I will be creating.
The front cover in the making; bookpaper glued to a piece of cotton fabric to make it sturdy.
The colors I chose were inspired by a journal page that I created a while ago; I like these colors together. It is sort of a rainbow except the color red.
.jpg)
So far I have made five signatures, containing watercolor papers and bookpapers as a starting point.
Very basic still, but the possibilities are endless.
Very basic still, but the possibilities are endless.
I will create a 6th booklet as part of the theme HIDDEN at a later stage.
A book needs a pretty cover. To cover up the booktext partially I scraped white gesso over it and let it dry.
.jpg)
I added a layer of Frosting Glaze as a medium to protect the surface.
I also do this most of the times, intentionally, so I can wipe off any 'mistakes' when adding new layers of color or inks.
I also do this most of the times, intentionally, so I can wipe off any 'mistakes' when adding new layers of color or inks.
.jpg)
I adhered the cotton to a piece of parchment paper for this step so I can get messy with adding color.
Onto this strip of masking tape I added a blob of Fresco Chalk Acrylics: Cherry Blossom (FF117), Orchid (FF13),Eggplant (FF25), Lavender (FF104), Snowflake (FF15), Butter (FF129), Granny Smith (FF108), Mermaid (FF44)).
Scraping Fresco Chalk Acrylics, Snowflake (FF15) over the colored Fresco paints adds to the grungy feel of the background.
When it is dry, adhere it to the front cover of the book as shown.
I like to sand the edges so the excess comes off instead of cutting the edges with scissors.
I like to sand the edges so the excess comes off instead of cutting the edges with scissors.
.jpg)
Stencil white paint, through a stencil to add more interest and more white.
For here I used Fresco Chalk Acrylics, Snowflake (FF15) Stencils PS421 available from a PaperArtsy Stockist.
For here I used Fresco Chalk Acrylics, Snowflake (FF15) Stencils PS421 available from a PaperArtsy Stockist.
I added a few die cuts and also strips of the stamp with all the measuring tapes, stamped onto colored paper and heat embossed in clear.
I tried to follow the color range I've used in the background.
I tried to follow the color range I've used in the background.
.jpg)
I fixed the spine, by creating a box-type 2 centimeter wide spine from cardboard, open at the top. To decorate it I used book paper with white gesso on top again.
To add some interest I added stenciling with a white modelling paste through PaperArtsy Stencil PS420 (available from a PaperArtsy Stockist).
Two hidden spaces! The shallow bookbox, and the hollow spine compartment.
Let me show you some details I came up with as finishing touches. Book number 37 in my series52 is ready to go into my collection.
.jpg)
All booklets inside are snuggled up, the closures done and I am happy with the result.
The spine is nicely closed off with a button closure, only accessible when all the booklets are taken out the cover.
The white leather strips make for a useful and neat hinge to the front cover.
You may have noticed: I LOVE to use a lot of white in my projects; and color for that matter!
The hidden booklet: closed-off with a button closure too. What did I put in there?
The hidden booklet: closed-off with a button closure too. What did I put in there?


.jpg)
.jpg)

.jpg)
.jpg)
.jpg)
.jpg)
.jpg)
.jpg)
.jpg)

.jpg)
.jpg)
.jpg)
.jpg)

.jpg)
.jpg)
.jpg)
.jpg)
.jpg)


No comments:
Post a Comment