
Topic 15: Gels and Mediums
Hi there everyone, Liz here. Tonight I’m back again playing with something new to me! I went to Stamperama
recently where I bought some Golden Fibre Paste on Leandra’s recommendation.
I’ve not used this before so I started playing with it to see what I could do
with it. I have to say that I love this paste because of the textured finish
and the fact that it is very light when dry. It does take a while to dry even
when helped with a heat gun but it’s worth the wait.

I decided to use the
paste to make some embellishments and frames that I could then use on a book
cover. When making these pieces I spread the paste onto some palette paper
because this is non stick and could be put to one side while the paste is drying. Once dry run a palette knife under the edges of the paste to start to lift it
off the paper – it will then peel off easily.

I spread the paste
through two different flourish stencils. I didn’t try to get a smooth surface
– I wanted texture and some depth. In fact when I removed the stencils I found
that the paste was raised around the edges of the design adding texture. When
dry slide a palette knife under the flourishes to remove them from the palette
paper.

To create the Fibre
Paste frames I drew an outline onto the palette paper that was slightly bigger
than the stamp that I wanted to use. I used this as a guide when spreading the
paste. I used a palette knife to spread the paste around the guide line to
create a frame. This is fun because you can create and shape you want with as
much texture as needed. After the paste had
dried I removed it from the paper and painted it with Honeydew and a little
Mermaid .

Here are some other
ideas I had while playing with the paste. The top two pieces are fabric; on
the right I just stamped into the paste to make a texture and on the left I used the end of a
paintbrush to draw a design into the paste. The bottom two pieces are both on Grey Board and again I drew into them with a stylus this time. When the were
dry I sanded the top to smooth it a little.

The book is made using
two canvas covered boards as the covers. To start with I spread Grunge Paste
as smoothly as I could through two different stencils. I wanted to create layers of texture on the
covers. I stencilled Grunge Paste onto both of the covers. When this was dry
I stuck some lace down the edges of both the covers.

I then stuck the FibrePaste flourishes onto the covers using a strong glue. When dry I painted
everything with white Gesso .

To add some colour to
the covers I painted small areas of different colour randomly onto the covers.
While the paint was still wet I blended
the edges away from the main colour using a wet wipe and my fingers. I used
Nougat, Honeydew, Mermaid and Wisteria. In between these colours I blended
some Antarctic which seemed to ‘pull‘ all the colours together. I also used
this colour around the edges of the covers. When adding the clours don’t forget
to spread the paints over the lace.

I used some flourish
stamps from EEB03 and EEB05 which I stamped around the edges using Mushroom Pigment Ink. I then rubbed White Fire Treasure Gold over the raised flourishes and
around the edges of the cover. This is a picture of the back cover to show
that I had not forgotten to decorate it as well!
EEB03

EEB05

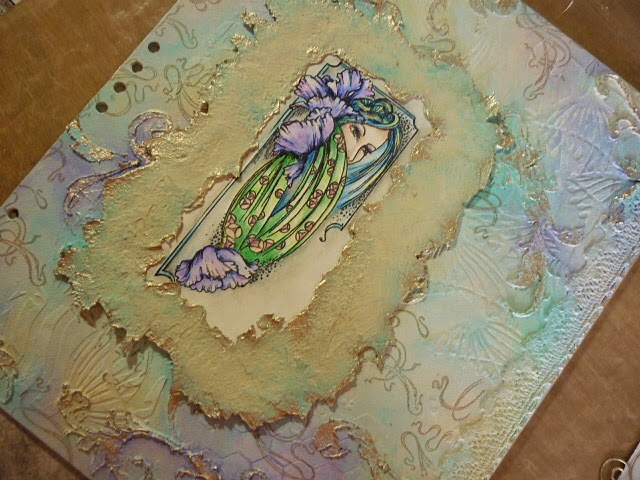
The stamps that I had
chosen when making the Fibre Paste frames where then stamped onto cream card
and coloured with colours that toned with the background of the book covers. I
rubbed the edges of the frames with more Treasure Gold and attached the stamped
images behind the frames. I stuck the main image onto the front of the book
using silicon (or similar) glue because the background is ‘lumpy’.

I painted the second
frame with Wisteria and then rubbed Antarctic over it to catch the texture.
Then I rubbed Treasure Gold around the edges before attaching the frame onto
the stamped image. This picture was stuck on the inside front cover of the
book, which I had lined with some patterned paper .

To finish the front
cover of the book I die cut some ivy leaves and flourishes out of craft metal (I wanted the embellishments to be tough enough to be handled as this is not a
decorative item). I painted the leaves with Honeydew and then washed some HeyPesto over this to get a variegated effect. Finally I rubbed Treasure Gold
over the leaves and the flourishes. I painted two fabric flowers with Wisteria
and Lavender and rubbed Treasure Gold over the paint and then attached the
flowers, leaves and flourishes onto the front cover as shown.

This photo shows part
of the top of the cover to show the layers of texture and the frame.

I made pages for the
book using various materials. Some of the pages are heavy watercolour paper
ready to be used. I also made a couple of large envelopes out of patterned
paper. This picture shows a stamped and embossed piece of vellum and an
embossed piece of acetate which I rubbed Staz On Ink over and then some Treasure Gold.

Finally I bound the
book with all the pages inside it. I hope that you have
enjoyed my adventure into book making! I really liked using the Fibre Paste
and will go on experimenting with it. I’ll be back soon with more ideas.
What a fantastic experiment Liz, great to see the different contrasts using the two pastes. The fibre frames look like they have just literally been ripped from old paper adding so much depth to the centre focal image. The soft colour hues and Treasure Gold add the perfect finishing touches. Thank you for sharing your creativity with us.
We would love you to join in with challenge #15: Gels If you are inspired by any of our guests who blog with us over the fortnight, then please join in and link up your creativity HERE.
All links go in the draw to win a voucher to spend on products of your choice from the PaperArtsy online store. The Gels link will close 17:00 (London Time) Sunday, Aug 23rd winner will be announced 2 hours later at 19:00.


13 comments:
Such stunning effects using these wonderful products. This is such an exciting and experimental post. When I have the time, I'd love to play with some of these gels. x
Lovely effects, inspiring stuff. Can see i'm going to have to stock up and dabble
Another product I haven't come across before. You've used it to stunning effect too. Another must have for my list I think. I'm really looking forward to seeing what else you find to do with it too. Lx
love the look of the fibre paste! great project, Liz!
stunning. i adore the colours. beautiful x
Same here, yet another product that I haven't met yet! You have certainly whetted my appetite! A beautiful book Liz!
I am sighing and oohing and ahhing a lot right now. I love everything about this, the way the colours have blended beautifully, the texture from the paste, the stamps are absolutely awesome and going to the top of my stamp wish list! I love everything and I would love to own this too! My crafty wish list just got seriously bigger, thanks for sharing Karen
What a stunning project Liz! I love the pretty colours and all the layers of texture. I have only 'met' this product once several years ago in a workshop and had forgotten it existed! What gorgeous effects you have achieved with it.....something else for the shopping list, lol!
Hugs
Lesley Xx
Gorgeous!!!!!!!!!!!! I have some of that fibre paste and shall go spread some out to dry.
Beautiful, Liz, such an original product to try and I just love your experimenting.
Lucy x
This is just so gorgeous!!!!! love everything about it, what is the die you have used for the ivy leaf flourish, it's really lovely
That is beautiful.
So brilliant and beautiful, wow!!!! Thank you for this very original make and great way of using this product, I don't have it but now on my wishlist! Also your stamps are gorgeous :) Coco x
Post a Comment