
"Hello all, Keren back again for another post about making
your own embellishments. I've been visiting a few arty blogs and fell in love with
this
blended watercolour technique shown by Tim Holtz".

I wanted to use this stencil of Lin Brown's; it's completely my
favourite of them all (except the poppy one, but I haven't inked that one up
yet!) The fact that I'd already cut it out was really useful for this
technique- the only down side is that if you're wanting to add the shape to a
larger area, it's very hard for there not to be obvious 'edges'. A good bit of
extra ink & misting would help soften them, but I liked the finished
result. Back to how to do it.. you'll need a few distress ink colours, the
stencil & some water in a spray can.

Add ink in little parts of the stencil. I just used the edge of my ink
pad, but a blending tool or sponge would work too. Once you've put ink all over
(& as there are small parts to this stencil- you do need to make sure the
ink is on every part) get ready to mist.

Spray over water, do it on a different surface other than what
you intend to add the stencil onto. You may need to experiment a little to work
out the best amount of water. I just sprayed a whole bunch of droplets on and hoped for the best! Carefully flip the stencil over and place it straight onto
the card/paper. The Smoothy cardstock worked perfectly for this- and is robust
enough to cope with water without pilling or warping.

You will need a tissue to blot up the escaping ink from under the
stencil as you are smoothing the stencil onto the cardstock. When you're happy
that the ink has made sufficient contact with the card, carefully remove the stencil and blot away any excess
colour. Leave to dry. The effect becomes a little sharper once the ink is
completely dried.
So onto the embellishment. I'm back with the shrink plastic again- such a useful medium for echoing
the images already stamped but giving a different look. I love the white opaque
look so stamped, trimmed and shrank it. If you are wanting to suspend it from
something, don't forget to add a punched hole so you can attach something
through it. I've used this birdcage image from Hot Pick 1103.


Here's the contrast in size. Such a cute little bird cage now!

In my Aladdin's cave of a craft space, are items that haven't seen the
light of day in quite some time- these flexible metal frames with two thin
microscope slide type of glass pieces were perfect. I didn't want the metallic
look so painted a thinnish layer of Snowflake paint.

I stamped out the birdcage again on pieces of graph paper cut down to
the size of the glass slides. I couldn't decide which colour to go for!

I then printed out the phrase I wanted onto printer paper and
cut out.

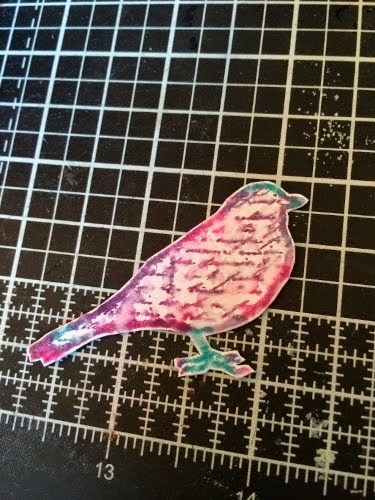
I wanted a partial image of the bird. Again, following the
watercolour look, I chose the same colours and the water spray


Now I just needed to put it all together. I did make a bit of a
faux pas- in that I forgot how thin the printed words paper was and added
some wet glue which then allowed the printer paper to suck up the distress ink
colour. Fortunately it doesn't ruin it too much!

Now to add some seam binding ribbon. I love this stuff and chose some
colours that matched (although you can colour it yourself) and wet it,
scrunched it, left it to dry and then you end up with a gloriously messy set
of ribbons, ready to thread through the mini bird cage and into the frame.

Then I simply needed to add the embellishment onto the card base.
I'd cut out the stencilled panel so I could both have a completely flat panel
but also so it added an extra set of lines into my card and helped give it a
cleaner look.


I hope I've inspired you a little- even to dig out those old slide
mailers or frames and make yourself some teeny works of art. It has the added
benefit that your card also doubles as a gift.. which has to be a good thing.
The only better gift on here would be a cupcake- but it wouldn't look as good!
I'll see you tomorrow with my last project for this month- a simpler
state of affairs you'll be glad to hear!
~Keren~
Leandra Says: Ohhh a watery wonderland! Great ideas Keren, and fun to explore what adding a little water can do in lots of situations! Thank you!
Gillian Says: Love the watercolour effect background and the delicate colour palette. the slide looks fab as an added embellishment.
If you would like to join in this week's challenge and play along with Keren's techniques, then do link up your creativity here, and go in the draw to win some PA stamps of your choice! You need to link your entry by 17:00, Sunday July 13th 2014.


18 comments:
Oh, I like this a lot!!
A beautiful and original creation, Keren xx
Definitely inspired! Fantastic card and project :-) xxx
What a gorgeous card! I love the technique, it's really lovely.
Love the little frame and watered colours x
I love everything about this, it's just gorgeous. If I can scap together some my time in the week I will have to give it a try x
Lovely delicate colouring and the embellishment is fab too.
Oh. Wow. Fab
This is just gorgeous, Keren! Love the embellishment of the framed glass slide! Such a unique creation! Lovely!! XOXO-Shari
Bravo pour l'interprétation de cette technique, je trouve ta création magnifique.
Bravo pour l'interprétation de cette technique, je trouve ta création magnifique.
wonderful project Keren :)
So much inky awesomeness from awesome Keren!!!
I love this watercolour effect with the stencils, and once again I love how you experiment, Keren, you make me want to rush off and play!
Lucy x
Beautiful & inspiring! xxx
Clean and simple perfection!
Hugs
Lesley Xx
So pretty!!
WOW WOW WOW absolutely gorgeous card, really love the technique, definitely going to try this, especially with the new pens I got from PA :-) Kezzy xxx
Post a Comment