
"Hello, it’s Julie Ann here from Magpieheaven! I am thrilled and still a little bit ‘in shock’ to be here, Guest Designing for Paper Artsy! This is something I would never have dreamed of when I stepped into a little rubber stamping shop near the British Museum and bought my first ‘Ink and the Dog’ stamp. A love affair with all things PaperArtsy began. I discovered the Paper Artsy blog; the wonderful Lynne Perrella collection, Fresco Finish Paints, Polyshrink and Grunge Paste – a world of possibilities".

For my first project I want to show you what PaperArtsy means to me by creating a little box with a world enclosed inside it using Frescos, Grunge Paste, Shrink Plastic and images from Lynne Perrella Collection 015, Hot Pick1204 and PaperArtsy Minis 75 and 84!

I had a plain wooden, hinged box 10.5x10.5cm, which I bought on a Christmas shopping trip to The Range. I wanted to work the PA magic on it by transforming it into a Renaissance Style Casket: just the word ‘casket’ sounds more magical than box, don’t you think? I decided the images from LPC008 and LPC015 would be perfect as they evoked just the mood I wanted.
LPC008

LPC015

I am always drawn to blues and greens, but I wanted a really aged look for this project so I decided to go a little bit out of my comfort zone and play with some antique looking tones: Caramel and Toffee. In the end Antarctic and Guacamole found their way in too – I couldn’t resist! Oh, yes and there are touches of Chocolate Pudding and some French Roast in the mix too!

When I started I knew I wanted three things on the outside of my box: a Lynne Perrella image like a Renaissance miniature; a quill pen shape and some Grunge Paste flourishes in the corners. I think you can get a Tim Holtz die-cut of a quill pen, but I wanted to make my own miniature sized one that could fit onto my box and that would be flexible to mould into a curve. First, though, I gave my box several coats of Opaque Frescos: Snowflake, Nougat and Sage so that I had a nice base to work on before blending in my top coats of Caramel and Toffee.

Next I used a Prima Stencil with a Renaissance Flourish design and spread Grunge Paste through it just in the corners of my box, varying the thickness.

I waited until this was dry, sanded the edges a little to ‘wear them in’ and I then sponged on more Caramel with Cut N Dry Foam, blending some Toffee in around the edges. I used the ‘Dry Brush’ technique to add some Chocolate Pudding to really age those edges. I darkened even more with touches of French Roast. After this I stroked those flourishes with some Treasure Gold in Florentine.
My box was beginning to become a casket!
My box was beginning to become a casket!
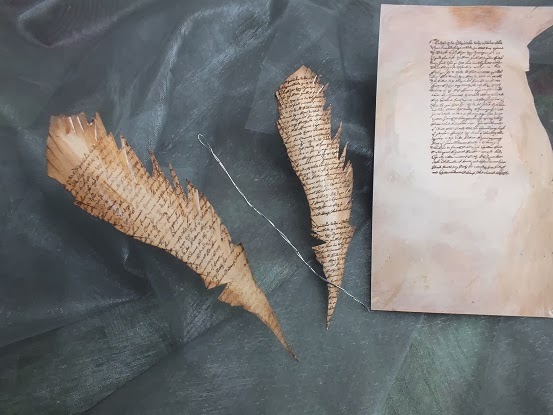
Now for my feather! I discovered a great method for making feathers from Tony Burrows DT member of Eclectic Paperie: there is a link to how she creates feathers here http://eclecticpaperie.blogspot.co.uk/2013/07/birds-of-feather.html. Toni uses sheet music, but I used Heavyweight White Stamping Card, as I wanted to fix my feather to the box lid and have something that appeared to have been carved from wood. Also I wanted to use Frescos on it and to stamp with one of my Minis.

First I drew around a feather that fitted onto my box. I then cut out two templates from this drawing. I coloured my feathers with Caramel and Toffee then stamped with Mini 75 in Potting Soil Archival Ink. I took some nice, thin bendy wire and stuck this along the centre of my feathers and then sandwiched them together with the wire in the middle using silicone glue and snipped the edges diagonally to give the feathery look.
Mini 75 
Now I decided to fix my feather at about the centre of my casket lid so that I could arrange my composition around it. Here it is with a rose positioned beside it, a possible starting point for my composition. A minor calamity struck!

I thought the feather was fixed, picked up my box and it fluttered to the floor! In a panic, I hastily applied more glue and stuck it firmly back where I thought, judging by the trail of glue, it belonged. To my dismay, I discovered that now the ‘nib’ part was facing up rather than down as I had intended. Because the box was hinged I couldn’t even simply turn it the other way up. This meant that I had to rethink my composition.
Working with my quill the other way, I re-positioned that large pink resin rose. I coloured it with Caramel and then when it was dry, touched it with Florentine Treasure Gold and a little Rose Quartz so that it looked more as if it had been carved and gilded. Then I covered the top of my feather with it. Instead of the quill pen dominating, I decided to go for a more organic, serpentine composition where a feathery pen was hinted at, but where feather, flora and fauna swirled over the lid. I actually found that my ‘mistake’ was leading me to an idea I liked better and that I would take up this theme inside the box. Here is what I now had to work with as a composition for my box lid.
Working with my quill the other way, I re-positioned that large pink resin rose. I coloured it with Caramel and then when it was dry, touched it with Florentine Treasure Gold and a little Rose Quartz so that it looked more as if it had been carved and gilded. Then I covered the top of my feather with it. Instead of the quill pen dominating, I decided to go for a more organic, serpentine composition where a feathery pen was hinted at, but where feather, flora and fauna swirled over the lid. I actually found that my ‘mistake’ was leading me to an idea I liked better and that I would take up this theme inside the box. Here is what I now had to work with as a composition for my box lid.

In the short time I’ve been crafting I’ve been really inspired by how artists like Carol Quance and Lin Brown use Shrink Plastic with PaperArtsy images. I’d always had the idea of using stamped and die-cut Polyshrink on this project. I slapped a good slather of French Roast on the edge of the lid and the sides of my casket, applied some Crackle Glaze thinly with a palette knife and, while it was drying, set about making a Shrink Plastic focal image and some embellishments.

I sanded with cross hatched strokes and then painted one sheet of Polyshrink with Antarctic. This is the perfect shade for using with Shrink Plastic because when heated the colours always darken and Antarctic is a really icy, white blue initially. The other sheet I painted with Guacamole, which is a lovely pale green and one of my favourite Frescos. I spread the paints really thinly. I like to add Fabric Medium and a little water so that they have a good thin coverage of the plastic. I then stamped some of the green plastic and some of the blue with my Mini 75 in Potting Soil Archival Ink. I believe that the preferred ink for Shrink Plastic is Stazon, but I have done quite a bit of experimenting on Shrink Plastic now and I’ve always found that Archival Inks are fine as long as you have a light touch and work quickly and carefully.
{Note from Leandra (ink nutter): If you have painted your SP, then archivals are perfect, as you are stamping onto paint, not plastic, and archivals are fast dry on porous surfaces (paper, chalk paint, card),and they dry sharp and permanent on paint, so that is the right thing to do. Stazon is specifically designed for any smooth shiny surfaces, so for example, directly onto shiny shrink plastic. The ink is fast drying as it is a solvent ink,whereas the oil in archivals delays dry time, hence why stazOn is more user-friendly for surfaces such as metal card, SP, acetate. It is not as black as archival, partly because the ink is thinner in consistency}
{Note from Leandra (ink nutter): If you have painted your SP, then archivals are perfect, as you are stamping onto paint, not plastic, and archivals are fast dry on porous surfaces (paper, chalk paint, card),and they dry sharp and permanent on paint, so that is the right thing to do. Stazon is specifically designed for any smooth shiny surfaces, so for example, directly onto shiny shrink plastic. The ink is fast drying as it is a solvent ink,whereas the oil in archivals delays dry time, hence why stazOn is more user-friendly for surfaces such as metal card, SP, acetate. It is not as black as archival, partly because the ink is thinner in consistency}

A while back Carol Quance suggested placing the Shrink Plastic coloured side down on the inked image and gently pressing and I’ve found this works very well, giving nice crisp images. For my central stamped image I used Lynne Perrella Collection 015 using Archival Black Ink , I was pleased with the result. I used a heat-gun for shrinking my plastic, turning and positioning the plastic with a pair of craft tweezers. Polyshrink will curl and twist under the heat gun at first, but it always flattens out if you turn it over.

Using PaperArtsy Dies Grunge Flower 1 & Scallop Flower, I die cut some leaf and flower shapes from the Shrink Plastic which I had stamped with text. I also stamped a butterfly from HP1204 onto the blue Shrink Plastic twice. For this project I didn’t glaze my Shrink Plastic with Glossy Accents, as I felt that this would look a little too polished and ‘new’ for the antique look I was going for. I wanted to create the impression of fresco painted wood and I think this worked, as the finished embellishments really don’t look as if they are fashioned from plastic – thanks to the chalky matt finish of Fresco Paints.

Now I was able to enjoy the magic of Crackle Glaze! I never tire of watching the cracks creep over the surface – sad but true! I used a generous layer of Caramel, then when it was nice and dry and crackly I randomly stamped with Mini 84, without a block, over the edge of the lid and sides, using trusty Mini 75 in the same way in places on the lid. Finally I painted, stamped and Treasure Golded some torn card, spraying it with a mist of water drops to make it mouldable and added this.
Mini 84

This is my box/casket at Stage 1. I then added a little butterfly – more of his fate to come!
And a flower that resembles a fancy clasp ...

At this stage my casket isn’t quite finished; I did add one or two more details to the outside, which I’ll show you the day after tomorrow.
In the next post I’ll be inviting you into my little world inside the casket. I do hope you’ll be able to take a peek and have a go at creating your own personal world in a box in the weekly PA Blog challenge, or perhaps decorate a little casket using any of the simple techniques I chose to use in this post.
Julie Ann x
Leandra says:Fabulous start Julie Ann, now you can relax into it! I've had a sneak peek of the interior, and its amazing, just love all the ideas you have represented in this box!
Gillian Says: Welcome aboard the 2014 adventures Julie Ann. I'm intrigued already with the techniques you have incorporated into tonight's projects and the colour palette is wonderful, look forward to seeing more.
If you would like to join in this week's challenge and play along with Julie Ann's techniques, then do link up your creativity here, and go in the draw to win some PA stamps of your choice! You need to link your entry by 17:00, Sunday January 19th 2014.


29 comments:
Brilliant transformation Julie Anne I cannot believe it's the same box. Loving the colours and texture xx
FAB-U_LOUS, love the dimensional butterfly, so many luscious bits to look at. Can't wait to see the insides.
SO beautiful, Julie Ann, and I can't wait to see inside later...
Fantastic start - all the texture is yummy, and I love those feathers... can't wait to see inside!
Alison x
Wowser, that's a tough challenge, but i do love the results so far. Thanks for all the links & inspiration. Will have to dig deep for this one!
Amazing first post, beautiful colours & fab ideas :-) xxx
You little tinker you! what a lovely surprise. I love your casket and your writing is clear, helpful and interesting. I particularly like the ageing on the sides of the box and the feather is genius. Well done you. Must have been a brave step but you did it! Look forward to seeing more. X
What a wonderful first project Juie Ann...it's gorgeous and I love your feather!!
Well done xx
Fab project, can't wait to see the rest of the week.
Jo
x
Great to see you here! Your casket is lovely and the details perfect. I am sure the inside will be just as exciting...
Fab first project Julie Ann! Love it! Look forward to seeing the inside! xxx
Well, that's got us off to a flying start! It looks amazing & very beautiful.
Fabulous project, I love the feather. Can't wait to see what is inside!
Wonderful to see you here, julie Ann. What a surprise! And what a beautiful casket. Love the feathers,
Lucy x
As always Julie Ann you invite our imaginations to go on a journey! This is lovely and beautifully aged. Love all the caramel tones and the brilliant quill! So looking forward to seeing what's being kept inside.
Hugs
Lesley Xx
Lovely! I want to see inside.
I checked the tutorial on how to make the feather, but the link seems broken. For who wants to make the feather (like me) the correct address is http://todolwen.blogspot.co.uk/2011/03/a-new-tutorial-hymn-page-feathers.html
Congratulations Julie Ann - loving your first project Sarah x
Your box is wonderful, Julie Ann!!!!!!!!!!!! I haven't played with my shrink plastic in a long time... I need to get that out.
If that is what you can do on the outside, I am really looking forward to seeing the inside! Well done, your box is beautiful.
Congratulations Julie Ann!! It's a fabulous first project. I love the Renaissance Casket, and story of the production process was very fun. Can't wait to see what is inside!
Etsuko xx
An intriguing and beautiful project- process is always so fascinating- and your feather is just awesome
Love your hand-cut scripty feather - beautiful!
Congratulations!
Your first post as Guest Designer is wonderful, filled with great information and photos.
Can't wait for tomorrow's post!
Gorgeous texture and well done you on the GD spot, you deserve it! Love the textures andthat feather is gorgeous x hugs x
A wonderful project Julie Ann, I love the colours & textures on your box.
Alison xxx
Wow! Love it!! The stamps - obviously! The texture - of course! The feather - F.A.B.U.L.O.U.S! So pleased to see you here Julie Ann. Look forward to seeing more! Chrisxx
WOW WOW WOW such an awesome altered box, I really love the colours (ooo got these colours a few weeks ago). I love all the crackle effect and all the details you have added. Truly Inspirational :-) Kezzy xxxxx
smashing Julie Ann. enjoy your GD semester!
Such elegance!! Very beautiful, Julie Ann!!
Post a Comment