Sunday, 4 August 2019

2019 #12 Eyes: Take Another Look with Ink and the Dog Collection {by Amanda Pink}

2019 Topic 12: Eyes


The vibrancy of this reminds me of those kaleidoscope things we used to use a kids. A great perspective using 'rays'  pulls us right in to zoom in on those eyes! A really engaging piece! ~ Leandra

Hi everyone, it's Amanda Pink here and I'd like to share with you the project I have created for the current topic: 'Eyes'. 

Initially I set out to create a 'play on words' project- a note pad that I would cover in eyes and call an 'eye' pad but along the creative road my project morphed into a meaningful Art Panel.  (I explain the meaning further down the post.) Being a larger project (in size) gave me more surface areas to create on and allowed for the finished piece to be multi layered with the 'Eyes' taking centre stage.


My creativity began with the eyes. I cut a few pieces of PaperArtsy Smoothy card into small rectangles and painted them with PaperArtsy Fresco Finish Acrylic paints: Caribbean Sea, Smurf, Limelight and Tangerine Twist


I stamped the eyes using the eye stamp from Ink and the Dog Collection Femme Plate 3 (F3EZ) 

For the surrounding detail I used the dot and small script stamp from Eclectica (Courtney Franich) Collection ECF04. 


A few white pen highlights enhanced the eyes whilst some PaperArtsy Smoothy card framed each of the eye panels. They were arranged and adhered to a square piece of PaperArtsy Heavy Grey/Whiteboard that I painted with PaperArtsy Fresco Finish Chalk Acrylic Paint : Little Black Dress.


For the quote I used the words from the centre of the eye stamp that's included in the Vintage Ink and the Dog Collection ID08EZ 


The quote offered some direction for creating the middle panel. I wanted to create a panel that would both draw the viewing eye in to focus on the focal feature as well as pan the viewing eye out to see the whole project. I hoped to represent through my creativity that 'in life its good to not only look inward and focus on the main feature- the event, problem, issue but its also good to 'take another look' that look being outward to see the bigger picture - the cause, effect and influences'. Pretty deep, huh?! 
So in a bid to try and achieve this I created the 'effect of 'rays'. 
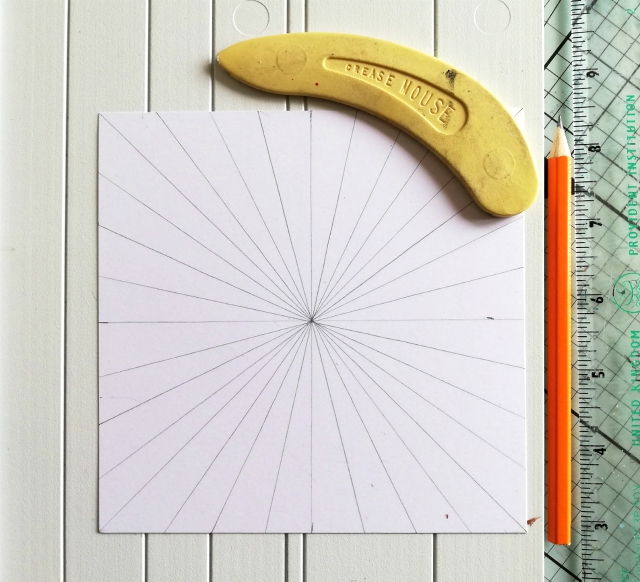

I drew and scored lines across the centre and diagonals of a square panel of PaperArtsy Smoothy card. I then added colour using Paper Artsy Fresco Finish Paints: Caribbean Sea, Tangerine Twist, Mustard Pickle, Limelight, Eggplant, Snowflake and Little Black Dress.


Snowflake and Little black Dress were used primarily to accentuate the scored lines.
The long thin stamp of numbers from Vintage Ink and the Dog Collection ID08EZ was ideal for adding some detail in between the scored lines.


Stamping around the panel in a 'circular' way coupled with the 'ray like' effect of the scored lines helped (I think) achieve the effect I was after - to draw the eye both in and out. 
The texture and interesting peaks and troughs of the scored lines and paints were a great bonus too.


For the final panel I wanted to compliment and enhance the rest of the creativity so used some of the colours and the detail stamps mentioned above. A PaperArtsy brayer helped me achieve the much lighter colour tones I wanted in the main body of the panel. It also served as the perfect tool to frame the panel with Paper Artsy Fresco Finish Chalk Acrylic paint Little Black Dress. 


The panels were mounted onto a sturdy base of PaperArtsy Heavy Grey/Whiteboard painted with PaperArtsy Fresco Finish Chalk Acrylic: Little Black Dress . A few eyelets were added as finishing embellishments. 


I am pleased that my project morphed from a notepad into a meaningful Art Panel that I can display. For now, anyway as I can see this panel making a great cover for a personal art journal. I reckon the design would also scale down well to notepad size too so who knows maybe I'll end up creating a note 'eye' pad after all.  

Thanks for joining me tonight/today
Keep on Creating 
Amanda 
x
Blog: ink-a-pink
Facebook: Amanda Pink
Instagram: Kynapi10
Pinterest: PinkArt

Saturday, 3 August 2019

2019 #12 Eyes: See The Miracle Tag with LPC {by Jenny Marples}

2019 Topic 12: Eyes


So nce to see how a gel rint can be turned into atag with effective layers. When you select to use elemnts from Lynne Perrella's stamps as accetns (eg the little butterflies to the right) itputs a whole new light on what you can do with such gorgeous collage-style stamps such as these.

Hi everyone, it's Jenny Marples (Pushing The Right Buttonswith you today, and I'd like to share with you a mixed media tag featuring the amazing designs of Lynne Perrella.

Many of Lynne's designs include faces (and of course eyes) so they were a perfect choice for the current theme. Her latest collections also feature lots of butterfly images, including the largest one in set LPC041 which reminds me of a Venetian mask. I decided to use this as the focal point of the tag and built the other complimentary elements around it.


Here's how it came together; I created a background for the tag by adding layers of Pansy, Chalk and Lake Wanaka Fresco Finish Paint to a gel plate using a brayer before pulling a print on PaperArtsy's Super Smoothy Card. 


The print was stuck onto a chipboard tag for stability (I used a Tim Holtz Small Etcetera Tag in this instance).


I painted an uneven line of Pansy Fresco Finish Paint 
over a strip of old book paper to one side of the tag.


After masking off the area to the right of the line I stamped the big butterfly image onto the background using permanent black ink.


At this point the painted line was further decorated by adding a variety of textures, from the remains left over after tearing paper from a pad, to lace trim, a little piece of calico and a scattering of seed beads. I also applied thin lines of Lilac and White Fire Fresco Finish Paints to highlight these elements.


Another gel plate print was pulled onto Super Smoothy Card by applying a combination of Venice Blue, Pansy, Lilac, White Fire and Chalk Fresco Finish Paint layers with a brayer. 


The left side of the main butterfly image was stamped onto this card using permanent black ink before being cut out and highlighted with a white gel pen. It is well worth running a black pen around the edges of the image for a professional finish.This image was then mounted on black dimensional foam tape ready for applying over the image on the tag. I also added Glossy Accents to the eye area to highlight it further.


With the card left over after cutting out this image I stamped some of the butterflies from set LPC043 and cut those out too, again adding highlights with a white gel pen and edging them with a black pen.


To finish a corresponding line of paper and paint was added to the lower left of the main butterfly, words from Alison Bomber's EAB001 Set were stamped onto white card and mounted over that line.


Pearls were applied to link the three areas of interest and a white bow was tied onto the top of the tag. In a nod to the way Lynne Perrella has used vertical lines of butterflies in many of her images I added the smaller butterflies over the beads in a similar way.

Here are a few close ups to show you the various elements on this tag in more detail;


It was easy to combine the images from several of Lynne Perrella's stamp sets to create a harmonious and coordinated look so if you already have one or two it's well worth adding more to your collection to give you even more creative options.

Friday, 2 August 2019

2019 #12 Eyes: Chalky Vintagy Booklet with HP {by Ellie Knol}

2019 Topic 12: Eyes


Lovely textures in Ellie's layers and she has some lovely embellishments added in the mix too. ~ Leandra

Hi everyone, it's Ellie Knol from PAPER-STAMPS-COLOR with you today, and I'd like to share with you the fun I had making this grungy cover for a booklet. I don't know about you, but eyes fascinate me a lot. It says all (or to be pricise: you can read all in its depth) : anxiety, happiness, humor, love or hate ...
....  and because of the KODAK type of stamp in the set with the woman (HP1303), I chose to go for frames and filmstrips to enhance all the beautiful product I've used in this creation.  


I knew I needed to use Grunge Paste to be able to stamp into it for a grungy effect. When nearly dry, I dried it with a heat tool, and that made some bubbles here and there.


I stamped into the paste with a for me all-time-favorite stamp of circles from HP1010.


Here you can see the first page of the booklet, a collage made with stamped images and script 
from stamp set HP1303 with a dark black. This collage peeps partially through the opening in the frame when the book is closed.  


I've used Fresco Finish Snowflake, to paint over the paste, to make it more white to match the pages inside the book. I also used to splatter with it in the end, and do some dry brushing over the embellishments and grungy pasty frame. 


The eyes at the top are from set ID08; stamped onto tissue paper and adhered to the frame with decoupage. 


Here you can see the script from ID08 stamped into the Grunge Paste.


LOVE this button, made from a real button after making a mold from caulk. It didn't turn out perfect, but it adds to the vintagy feel to it.
I stamped a script onto the film strip. 

Have you guessed what the color medium is?
Royal Blood Infusions. it gives depth to all the structure I've created: from the frame, the button, to the script and circles stamped into the grunge paste.
The brownish color is sponged Old Paper distress ink, and pink PanPastel. 


You ask me what is my favorite part?
This small clay frame which I filled with the girl image from 
MINI 05. It has been stamped onto Shrinky Dink (shrinked to 40%).
It took some effort to make it fit (
I had to do some maths to make it fit, hehe), and I filled the gaps with grunge paste. When it was dry I added some Glossy accents to make it look a real photo with glass on top.  

So now it's your turn to create something for the challenge this fortnight: EYES!
I personally like to be challenged, and it makes me have a goal for my creativity!

You could win the challenge by entering, remember ?!