Showing posts with label VID08. Show all posts

Tuesday, 24 November 2020

2020 Topic #21 Mini Calico Wallet with VI&D (by Jennie Atkinson)

  2020 Topic 21: Masterboards


I'm so glad that Jennie has experimented creating a masterboard on fabric. It shows how versatile the Fresco Finish Chalk Acrylic Paints are and gives a wonderful softness to this lovely softly stamped project. Spying her special mitre tool might mean that Santa gets a few requests for it this year too!
~ Keren.

Hi everyone, it's Jennie (Live The Dream) with you today sharing a textile project using a collection of Vintage Ink and the Dog stamps.

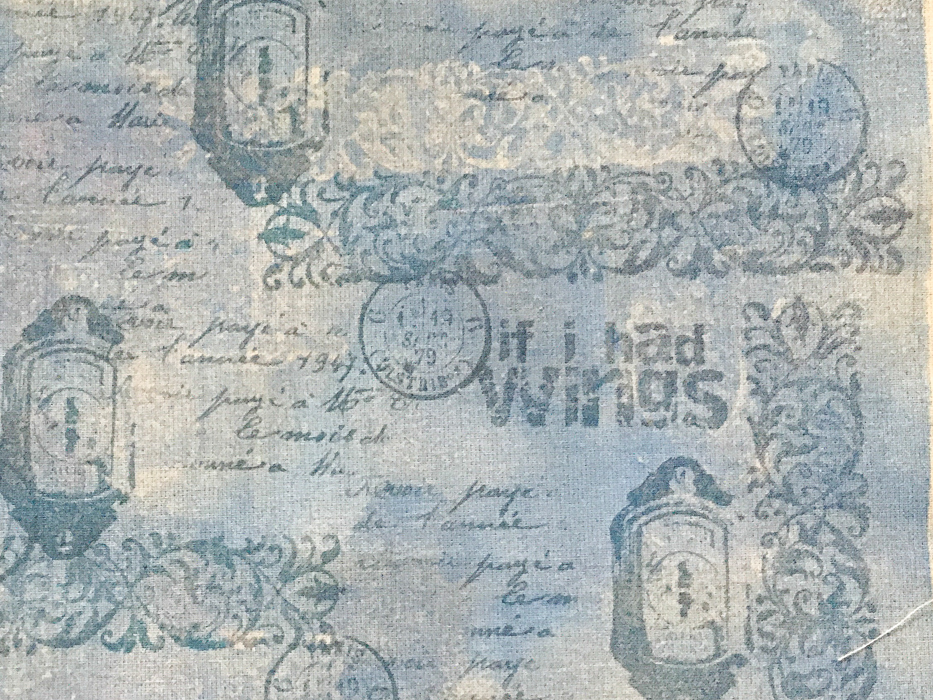
I love making masterboards using different substrates as I just love the total uniqueness of the process. Using calico is always an interesting outing as sometimes the material takes up the paint really fast and then another time it will just sit on the top and take ages to dry! My intention had been to cut the calico into ATC size pieces but I just loved the finished piece and couldn't bear the thought of cutting into it, so it became the cover of a mini wallet.


The days are quite grey and dull here now with the days shortening and so it is nice to sometimes recreate some summer warmth. I fell in love with all the wonderful new blue Frescos and they pretty well all fell into my basket ... and then I saw Rose ... how had I missed that one before? It was just a gorgeous compliment to those wonderful blues.


I love using the Gelli Plate to get colour on my substrate and calico is just as easy to work with as paper, although you do have to use a lot more paint to get a brighter colour. I have used four wonderful Fresco's: Cloudy, Chalk, Azure and Rose, along with Sara's lovely stencil which is becoming a huge favourite.


The stencil didn't work that well on the calico, but you can just see it here and there in places. It did take a while to dry (in fact I left it overnight) and then I was able to start stamping. I am a great fan of the smaller stamps within a set and these two VID sets have some gorgeous ones.


I generally start with some of the bigger stamps and then start filling around them with text. I used Archival Ink (Hydrangea) which looks quite grey on the calico. This was a second piece of calico which I did not use in the end, but you can see that my stamping on the Gelli Plate came out better than the stencil.


As I said above I couldn't bear the thought of cutting into the calico as it was all so lovely. I found I could just about fit the covers of the Eileen Hull Pocket Notebook within the painted area, so decided to make a small wallet. If like me you are an avid bookmaker it really is worth investing in a mitre tool - it really does save all the guessing!


Before glueing the covers I started stitching a little collage on the front cover using a lovely sentiment from Alison's Time Edition:


 I kept the inside quite simple covering with some good quality printed paper and making a small pocket on the inside cover and a sleeve on the right hand side.


Both are handy to hold some tags and a little notebook. I really like having a little wallet like this to note down little ideas or technical bits of projects (particularly my knitting or spinning). It doesn't take up much room in a bag or on a desk, but can be very helpful to refer back to particularly as my decaying brain requires me to write down just about everything these days!


Drying time aside this was really quite a quick project to make and I think would make a lovely gift. The only thing I would suggest is that you try different weights of calico with the Gelli Plate. The calico I used for this project was quite heavy and had been washed so was quite porous. Some of the thinner unwashed versions sometimes dispel the paints. It is a cheap material to experiment with and I always have a stock sitting around waiting to be used. I even like it in its natural state.. and do iron it before you start.

As always thank you for joining me.

Jennie x

Blog: Live The Dream

Sunday, 4 August 2019

2019 #12 Eyes: Take Another Look with Ink and the Dog Collection {by Amanda Pink}

2019 Topic 12: Eyes


The vibrancy of this reminds me of those kaleidoscope things we used to use a kids. A great perspective using 'rays'  pulls us right in to zoom in on those eyes! A really engaging piece! ~ Leandra

Hi everyone, it's Amanda Pink here and I'd like to share with you the project I have created for the current topic: 'Eyes'. 

Initially I set out to create a 'play on words' project- a note pad that I would cover in eyes and call an 'eye' pad but along the creative road my project morphed into a meaningful Art Panel.  (I explain the meaning further down the post.) Being a larger project (in size) gave me more surface areas to create on and allowed for the finished piece to be multi layered with the 'Eyes' taking centre stage.


My creativity began with the eyes. I cut a few pieces of PaperArtsy Smoothy card into small rectangles and painted them with PaperArtsy Fresco Finish Acrylic paints: Caribbean Sea, Smurf, Limelight and Tangerine Twist. 


I stamped the eyes using the eye stamp from Ink and the Dog Collection Femme Plate 3 (F3EZ) 

For the surrounding detail I used the dot and small script stamp from Eclectica (Courtney Franich) Collection ECF04. 


A few white pen highlights enhanced the eyes whilst some PaperArtsy Smoothy card framed each of the eye panels. They were arranged and adhered to a square piece of PaperArtsy Heavy Grey/Whiteboard that I painted with PaperArtsy Fresco Finish Chalk Acrylic Paint : Little Black Dress.


For the quote I used the words from the centre of the eye stamp that's included in the Vintage Ink and the Dog Collection ID08EZ 


The quote offered some direction for creating the middle panel. I wanted to create a panel that would both draw the viewing eye in to focus on the focal feature as well as pan the viewing eye out to see the whole project. I hoped to represent through my creativity that 'in life its good to not only look inward and focus on the main feature- the event, problem, issue but its also good to 'take another look' that look being outward to see the bigger picture - the cause, effect and influences'. Pretty deep, huh?! 
So in a bid to try and achieve this I created the 'effect of 'rays'. 


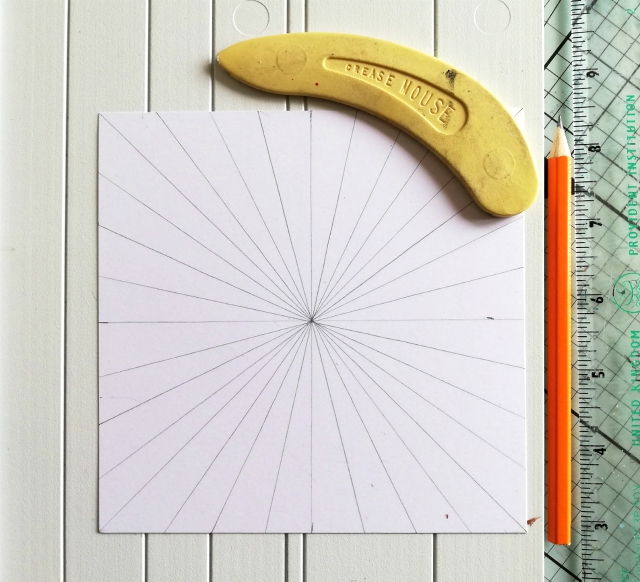
I drew and scored lines across the centre and diagonals of a square panel of PaperArtsy Smoothy card. I then added colour using Paper Artsy Fresco Finish Paints: Caribbean Sea, Tangerine Twist, Mustard Pickle, Limelight, Eggplant, Snowflake and Little Black Dress.


Snowflake and Little black Dress were used primarily to accentuate the scored lines.
The long thin stamp of numbers from Vintage Ink and the Dog Collection ID08EZ was ideal for adding some detail in between the scored lines.


Stamping around the panel in a 'circular' way coupled with the 'ray like' effect of the scored lines helped (I think) achieve the effect I was after - to draw the eye both in and out. 
The texture and interesting peaks and troughs of the scored lines and paints were a great bonus too.


For the final panel I wanted to compliment and enhance the rest of the creativity so used some of the colours and the detail stamps mentioned above. A PaperArtsy brayer helped me achieve the much lighter colour tones I wanted in the main body of the panel. It also served as the perfect tool to frame the panel with Paper Artsy Fresco Finish Chalk Acrylic paint Little Black Dress. 


The panels were mounted onto a sturdy base of PaperArtsy Heavy Grey/Whiteboard painted with PaperArtsy Fresco Finish Chalk Acrylic: Little Black Dress . A few eyelets were added as finishing embellishments. 


I am pleased that my project morphed from a notepad into a meaningful Art Panel that I can display. For now, anyway as I can see this panel making a great cover for a personal art journal. I reckon the design would also scale down well to notepad size too so who knows maybe I'll end up creating a note 'eye' pad after all.  

Thanks for joining me tonight/today
Keep on Creating 
Amanda 
x
Blog: ink-a-pink
Facebook: Amanda Pink
Instagram: Kynapi10
Pinterest: PinkArt