Saturday, 6 January 2018

2018 #1 ATCs with ETS Sneak Peek {by Anneke de Clerck}

2018 Topic 1: ATC's


We are killing 2 birds with 1 stone here on the PA blog this week...not only have we kicked off a new topic (ATC's) but we have given our bloggers some BRAND NEW stamps to make ATC's with. We are not sharing the stamps in full (that happens when we get to Creativation in just over 2 weeks) but as we do love to tease you, at least you can pin your faves, and enjoy a small taste of what is to come from us with our 2018 new products! Here's some new stamps from Tract Scott made by the lovely Anneke, who as you know, adores bright and cheerful colours - a match made in heaven!


Hi everyone Anneke here.

Great to be here on the PA blog tonight with a post about ATC's. I'm one of the lucky design team members who already could work with some of the brand new (and not yet released!) stamp sets (ETS14 & ETS15) and stencils (PS087 & PS089) designed by Tracy Scott. Both stamp sets and stencils are gorgeous, they're fitting my style perfectly! 

I'm allowed to give you a little sneak peek tonight, how cool is that! 
To create the ATC's I worked on various backgrounds: dark  blue cardstock, kraft paper and white cardstock. Love the different outcome!


Last year I was inspired by a mini workshop by Rae Missigman to create my own tiny pocket journal. I also took part in Rae's artmarks30daychallenge. There I learned it's perfectly possible to create beautiful artwork on very small pages. This experience came in handy while creating these ATC's, as I'm usually working on bigger surfaces such as cards or art journal pages.


For the first ATC I used one of my favorite techniques: layering.


I worked on a kraft base and started by stamping scribbles on the kraft paper and on blank paper tape with Archival Ink Jet Black.


I created pink flowers using Bubble Gum Fresco Chalk Paint and the PM008 mini mask. On the photo you can see a glimpse of one of the new stencils designed by Tracy Scott (PS089). I only used the centre of that large stencil. For easy sponging I masked off the area around the centre (I used the blue spotty tape you can see on the centre of the stencil)

As I worked on a brown surface and wanted the colors to be vivid I did all the stencilling with Snowflake Fresco Chalk Paint first. This white layer made a perfect undercoat for the colors such as the Limelight Fresco Chalk Paint.


I continued adding layers with stencils (Tim Holtz Layering Stencil Linen & Dina Wakley Media Paint Comb - Circles) using Caribbean Sea and Bougainvillea Fresco Chalk Paint.

Before stamping the main flower in black I added strips of the stamped tape to bring back a few of the scribbles of the first layer.


To create the next ATC I first made a background using a technique inspired by Kim Dellow. I created  stripes with a plastic card using Limelight, Caribbean Sea, Captain Peacock, Pea Coat, Bubble Gum and Candy Floss Fresco Chalk Paint.


I used one of Tracy's new stamps from the ETS14 set as a frame. I stamped it on a painted ATC, cut away the centre and attached this ATC to the striped background using 3D tape. I finished the tag off with a heart from the ETS15 set.


A lot of layers on this ATC as well. 


Here I worked on a white background. I applied a coat of Snowflake Fresco Chalk Paint to start with. This layer takes away the porousness of the paper and mistakes can easily be wiped away with a baby wipe. 

I applied a small amount of Caribbean Sea and Limelight Fresco Chalk Paint through the PM007 mini mask using a baby wipe. I repeated this step using Bubble Gum and Snowflake Fresco Chalk Paint. The use of the baby wipe in combination with very little paint provides a soft, watercolor look.


I added three strips of stamped tape to the ATC. Next I've put one of Tracy's new stencils (PS087) on top and sponged Pea Coat Fresco Chalk Paint through it. I added dots to the right by stamping with the end of a paint brush using Bougainvillea Fresco Chalk Paint. After drying I made marks with a white penI decorated this ATC with a beautiful flower. I'm totally in love with this flower stamp from the  ETS15 stamp set.
 

I did the stamping of the flower using my MISTI stamping tool. I left the stamped image and the stamp in place on my MISTI while painting the flower. This allowed me to stamp again on top of the painted layer. That way I didn't have to bother about losing stamped details while painting, as you can easily re-print the flower image once the paint is dry.


For this final ATC I worked on dark blue textured cardstock. Love how the texture remains visible, even after adding a lot of layers.


I started by rubbing a wash of Snowflake Fresco Chalk Paint on top of the dark blue cardstock using my fingers (my favorite tools :)). I applied a small amount of Limelight and Captain Peacock Fresco Chalk Paint, sprayed water on top and let the paint drip.
 

I stamped scribbles on tissue paper and adhered torn strips of that tissue paper randomly. I continued adding layers with parts of Tracy's new stencil PS089 using Candy Floss Fresco Chalk Paint. I stamped dots using the end of a pencil using Bubble Gum Fresco Chalk Paint. I stamped the flowers twice, once with Snowflake Fresco Chalk Paint and once with Versamark Ink Jet Black. I finished the ATC off by making marks with a white pen. I painted ribbon in matching colors to create tabs. 

I hope you'll agree with me the PaperArtsy stamps designed by Tracy Scott are gorgeous. I love every stamp of the sets I worked with. I'm sure I will use them a lot more in the future! 

Stay tuned for Tracy's new products release later this month. 

In the meantime I hope you'll grab your stamps, stencils and paints and join the ATC challenge. You'll be surprised what you can accomplish on such a small surface.
I can't wait to see what you come up with!


Note: New PaperArtsy stamp releases start here on the PA blog, Jan 18th

Our creative team love to read your comments so much, so please take time to let them know you've been inspired!  

You must complete step 1 AND 2 to be entered into the draw. 

To join our challenge:
1. Leave a comment on the Topic Introduction Post and go in the draw to win a PaperArtsy Apron. 
2. Make something arty relevant to the topic, and link your creation from any social URL (eg. Instagram, Pinterest, Blog Post etc) sharing your original make to this challenge page.

The current topic link Topic 1: ATC's will close 17:00 (London Time) Sunday, 4th February 2018, and the winner will be announced 2 hours later at 19:00. (Please note the challenge is 1 month long due to significant new Product news during January)

All links go in the draw to win a PaperArtsy creative apron. Please make sure we can contact you as a prize winner - it helps if you share your contact info from the platform you opt to use.

Good Luck! If you have any questions, don't hesitate to ask!

Friday, 5 January 2018

2018 #1 ATC's with EKC Sneak Peek {by Keren Baker}

2018 Topic 1: ATC's


Kay has a huge release coming up in a few weeks. Tonight Keren is sharing a little looksie at a few of Kay's new stamps. As ever, you can expect great things!


Hi everyone, it's Keren with you today, and I'd like to share with you some ATC pieces.
ATC's are a wonderful way of both exercising restraint and plugging into the creative side of you that doesn't worry so much about filling space as there's so little to fill. I've had the delight of using some of the brand new Kay Carley stamps and have combined them with some of the currently available ones. Eagle eyed KayCarlians (if that's a word!) will be able to spot which is which!


Creating on a mini canvas is the perfect opportunity to use the smaller (but perfectly formed sets!). I did dig out my craft knife for this one & wished I'd remembered where to put the spare blades!! Easier cutting= new blades!  The image isn't supposed to be a tree - but with ATC dimensions it takes on a new role!


I wanted a really clean design for this one and decided to combine the images with the EKC07 set.  Obviously this stamp set I can show you as its not new! See how this is working tonight??? We love to tease!


Using partial images around the edges gave me an unexpected frame and I love the light soft vibe it gives.


I went even simpler with this one- using a (shhh) stencil to trace around using a fineliner in black. It's a lovely delicate treatment with a stencil - and so simple that I'll be using it again. It also is a clean technique and perfect for that 'just before the school run' kinda crafting!


This ATC isn't strictly the correct dimensions- but then, rules are made to be broken sometimes. Truthfully, I needed the matt to hide all the messy back of the sewing and because the canvas is such a light colour, I thought it needed some sort of contrast. No difficult sewing techniques here, just French knots (& rather too many of them for my liking!!) and some back stitch! The cut out image of the mini dragonfly kept fraying, so I needed to add a fusible bonding to stop that. I used the Black Shadow Hybrid ink from Tonic that would have needed heat setting had I intended to wash the fabric.

Even if you don't end up using ATC's in the manner of which they were first invented for, they're a great starter for a card or would look gorgeous as the main image on a journal or a canvas filled with them. Either way; quick and accessible art is my idea of fun and I'd encourage you to have a go with one of the least scary forms !
Thanks for letting me share these projects!
Keren xx

Blog:
Twitter:@craftstampink
Instagram:craftstampink


Note: New PaperArtsy stamp releases officially start here on the PA blog, Jan 18th

Our creative team love to read your comments so much, so please take time to let them know you've been inspired!  

You must complete step 1 AND 2 to be entered into the draw. 

To join our challenge:
1. Leave a comment on the Topic Introduction Post and go in the draw to win a PaperArtsy Apron. 
2. Make something arty relevant to the topic, and link your creation from any social URL (eg. Instagram, Pinterest, Blog Post etc) sharing your original make to this challenge page.

The current topic link Topic 1: ATC's will close 17:00 (London Time) Sunday, 4th February 2018, and the winner will be announced 2 hours later at 19:00. (Please note the challenge is 1 month long due to significant new Product news during January)

All links go in the draw to win a PaperArtsy creative apron. Please make sure we can contact you as a prize winner - it helps if you share your contact info from the platform you opt to use.

Good Luck! If you have any questions, don't hesitate to ask!

Wednesday, 3 January 2018

2018 #1 ATC's with ESA Sneak Peek {by Dounia Large}

2018 Topic 1: ATC's


Dounia has a fascinating stick-it-remove-it technique for this post to create textured and very clever Backgrounds. To me, they almost look like a satellite map image, or perhaps a bird's eye view of nature. Swwoping over the landscape. She has cleverly secreted some new stamps from Seth Apter in the midst!


Hi everyone, it's Dounia from France. Happy New Year! All the best for 2018. Today I'd like to share with you a technique for great textured backgrounds using paper scraps. I was also lucky to be trusted with stamps from the 2018 collection of one of my favorite designers, Seth Apter... I gleefuly set to play with them so be on the look out for sneak peeks of these fabulous new stamps before their official release in a fortnight!


I'm a rather nit-picky crafter and tend to obsess over every small detail, which can make the realisation of ATC's long and stressful, especially if I want to make a bunch! I therefore love to use a technique that give me a busy and interesting motherboard, as most of the work is then done and I "only" need to worry about accents and focus images. This one also uses all your paper scraps from previous projects that you can't bear to throw away (it's not that small, I could need it!) so it's a win-win!


This way of making backgrounds is inspired by the artistique technique of décollage and particularly lacerated posters as practiced by Jacques Villegré, for example. Instead of adding layers as in collage, you take them off. For that you need base made of numerous layers. 


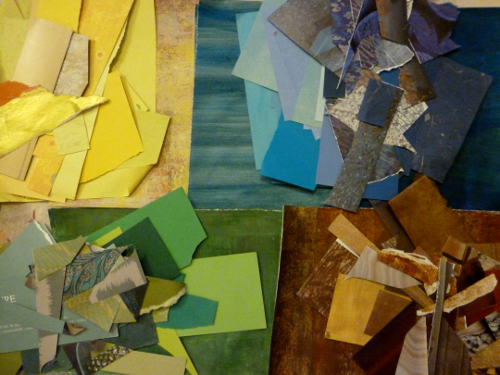
This is the moment to take out your paper scraps! Anything goes: cardstock, pattern paper, painted or inked pieces... Here I chose a color palette and glued layers of similar shade but you can mix random colors for crazier results! I ended up stacking 9 layers but you already get great texture with 5.


When the collage is perfectly dry, you can begin to tear off parts! It generally is very random, big pieces sometimes coming apart, or thin ribbons, one layers at a time or other times 3 together... I find the tearing very fun and satisfying, the difficulty is knowing when to stop! Most torn off pieces can also be reused, so there is little waste.


The resulting masterboard may look busy and random but when you cut it into ATC size pieces, it's another transformation! The lot is coherent but each piece has its own story to tell. You just need to listen, keep the best parts and add a few focus features to finish.


Seth's stamps are always full of versatile and inspirational words, they were easy to use to make the ATC's "speak".


I think staplers always make a statement. I love how their straight lines contrast with the more organic torn hedges while still complementing the mechanical elements from the stamps.

Clean cut shapes are another good contrast. They also help show off the dimension of the décollage layer. However you need strong punch/die to get through all these layers!

All in all a very easy technique with rewarding results. A great afternoon crafting project for a group: fun and hands on, with a tea break during drying and everybody can exchange ATC at the end. Of course, you can do bigger (or smaller) pieces and achieve very different atmospheres depending on your color palette, your layering and your tearing technique. I hope I inspired you to use your paper scraps and got you excited about Seth's new stamps! Stay curious!

Dounia x

Blog: Doudoulina


Note: New PaperArtsy stamp releases officially start here on the PA blog, Jan 18th

Our creative team love to read your comments so much, so please take time to let them know you've been inspired!  

You must complete step 1 AND 2 to be entered into the draw. 

To join our challenge:
1. Leave a comment on the Topic Introduction Post and go in the draw to win a PaperArtsy Apron. 
2. Make something arty relevant to the topic, and link your creation from any social URL (eg. Instagram, Pinterest, Blog Post etc) sharing your original make to this challenge page.

The current topic link Topic 1: ATC's will close 17:00 (London Time) Sunday, 4th February 2018, and the winner will be announced 2 hours later at 19:00. (Please note the challenge is 1 month long due to significant new Product news during January)

All links go in the draw to win a PaperArtsy creative apron. Please make sure we can contact you as a prize winner - it helps if you share your contact info from the platform you opt to use.

Good Luck! If you have any questions, don't hesitate to ask!

Monday, 1 January 2018

2018 #1 ATC's with EAB Sneak Peek {by Jennie Atkinson}

2018 Topic 1: ATC's


We are kicking off 2018 jumping in boots and all with a new Topic: ATC's (Artist Trading Cards), but our bloggers are also sharing sneak peeks of new stamps that you will be able to lay your crafty paws on towards the end of the month! So yes, we deliberately chose small format substrates so you only get to see tiny bits of stamps. Mwahahaha.

Tonight Jennie is using a few brand new Alison Bomber stamps...but she's not telling you what comes exactly from where...yet!!

~ Leandra 


Hi everyone, it's Jennie (Live the Dream) here with you today, the very first day of 2018! We may be in the depth of winter but I am sharing with you tonight some ATCs which have a glimmer of spring and more importantly give you a sneak peek of some new quotes from our fabulous designer Alison Bomber.  

I love ATCs for lots of reasons. Although they are great for swapping and make a lovely miniature front for a card, most importantly I find they are perfectly sized to enable me to experiment with different mediums and techniques both in terms of backgrounds and little collages.


This wonderful spring quote put me in mind of April skies which don't really have the deep blue of summer, but tend to be a more violet hue between showers.


In order to get a watery sky background I experimented with a palette of Violet Storms Infusions Dye Stain on a Chalk Fresco Chalk Paint background. Painting the Smoothy Heavyweight Card first provides a base for the dye to sit on and I like the resulting brighter colours. I mixed my dye and water on the craft mat and lay the card into it, before drying with a heat gun. Different pressures and amount of water will give different results. The last of the dye was mopped up with my ribbon and I added some colours to the text paper too.


I layered the quote over a little collage using one of my favourite PaperArtsy labels from Ephemera Plate 2  and used this glorious butterfly from Eclectica Scrapcosy 04. Initially I had stamped everything in a Vintage Brown, but this just didn't work well with the cool tones of the background (I should have been thinking of the colour wheel !) but did find that Watering Can Ranger Archival Ink toned in perfectly.


This background was more watery and more reminiscent of April skies so I tried not to hide the background too much - stamping lightly with the text stamp from Travel Plate 2. Being lighter I thought the ATC needed a little background edging so used cardstock which I had painted with the dye to get its fullest colour. I very lightly coloured the rose with the dye as well as I always try to use the same hues throughout a project in order to create a feeling of calmness. 

I decided to do some experiments mixing the Violet Storm Infusions dye with Fresco Chalk Paint. This is not something I have done before, but I absolutely adore the affect.


The cardstock was primed with Chalk Fresco Chalk Paint as before and I mixed Spanish Mulberry and Chalk Fresco Chalk Paint on my craft mat and shaking in the dye. I kept it as light as possible with plenty of water and mopping with kitchen towel whilst drying with the heat. gun. 


On these two I put more emphasis on the dye than the paint, but still love the effect.


Normally I use a lot of texture on my backgrounds but a good stamping surface was most important for this ATC. I used the lighter part of the background to stamp the quote directly onto the ATC. I also love being able to isolate individual words and Alison's quotes are just perfect for this.


As soon as I saw this wonderful quote I knew it would work with the lovely Roma lady from Travel 4. I just love the way the colours work so wonderfully on this background.


What I love about Alison's quotes is that they can be used for so many projects. I have chosen to keep this ATC feminine to match the others, but by exchanging the flower and lace for some hessian and string would make a front for a masculine card. 


It is also easy to isolate parts of the quote with dies as I have done here making two tags from the single quote to create a little cluster of tags.

I hope you have enjoyed this sneak peek of these wonderful new stamps from Alison as much as I have enjoyed using them. I hope too that our ATC challenge will prompt you to try out new techniques and experiment with paints and dyes - I was delighted with the different backgrounds I managed to achieve and in a very short time had loads of backgrounds to play with (and plenty more left for another day!).

As always thank you for joining me and may I wish  you all a very Happy and Creative 2018.

Jennie x

Blog: Live the Dream
Facebook: jennie.atkinson
Instagram: atkinsonjennie
Pinterest: jennieatk


Note: New PaperArtsy stamp releases officially start here on the PA blog, Jan 18th

Our creative team love to read your comments so much, so please take time to let them know you've been inspired!  

You must complete step 1 AND 2 to be entered into the draw for an apron. 

To join our challenge:
1. Leave a comment on the Topic Introduction Post and go in the draw to win a PaperArtsy Apron. 
2. Make something arty relevant to the topic, and link your creation from any social URL (eg. Instagram, Pinterest, Blog Post etc) sharing your original make to this challenge page.

The current topic link Topic 1: ATC's will close 17:00 (London Time) Sunday, 4th February 2018, and the winner will be announced 2 hours later at 19:00. (Please note the challenge is 1 month long due to significant new Product news during January)

All links go in the draw to win a PaperArtsy creative apron. Please make sure we can contact you as a prize winner - it helps if you share your contact info from the platform you opt to use.

Good Luck! If you have any questions, don't hesitate to ask!