Monday, 6 November 2017

2017 #16 Rust: Aged Star canvas with ESC {by Nikki Acton}

2017 Topic 16: Rustification
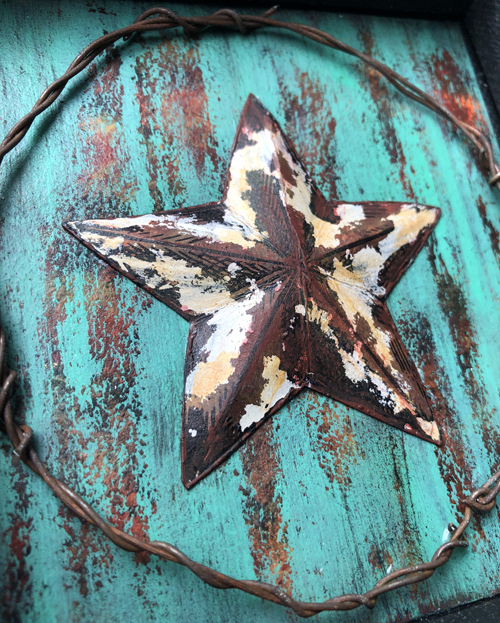
Rusty Star Canvas with PaperArtsy ESC08 stamps and Seth Apter PaperArtsy Fresco chalk paints - by Nikki Acton

It's always interesting to see what Nikki gets up to when she is on a Rust kick, and I think this topic is probably her safe place! She has many tip and tricks up her sleeve, if you haven;t tried a Vaseline resist before, then now's your chance!

Hi everyone, it's Nikki Acton here from Addicted to Art with you today, and I'd like to share my rust creation using the fabulous Christmas stamps from Scrapcosy.

I love creating worn paint effects with rust being one of my favourites. When the Seth Apter ranges of PaperArtsy paints were introduced late 2016 and early 2017 I knew they would be perfect for rust / patina effects. Raquel's Christmas stamp set ESC08 with the bold imagery seemed a great fit!
Rusty Star Canvas with PaperArtsy ESC08 stamps and Seth Apter PaperArtsy Fresco chalk paints - by Nikki Acton

As Raquel herself showed in a recent post the star stamp can be made 3 dimensional really easily! I used Fresco Chalk paints - Terracotta, Mahogany, Smoked Paprika, Toffee and French Roast to create a rusty toned background before stamping the star.


My evening photos under the room lights don't quite show the true colours!

Having created the rust effect, I stippled some waxy hair product over areas of the star and then covered with Buff Fresco Chalk Paint. Once dry wipe away and you get the chipped paint effect. (Thanks to Andy Skinner for the hair product tip.) I added a little extra Mahogany and Terracotta in places.


Rusty Star Canvas with PaperArtsy ESC08 stamps and Seth Apter PaperArtsy Fresco chalk paints - by Nikki Acton

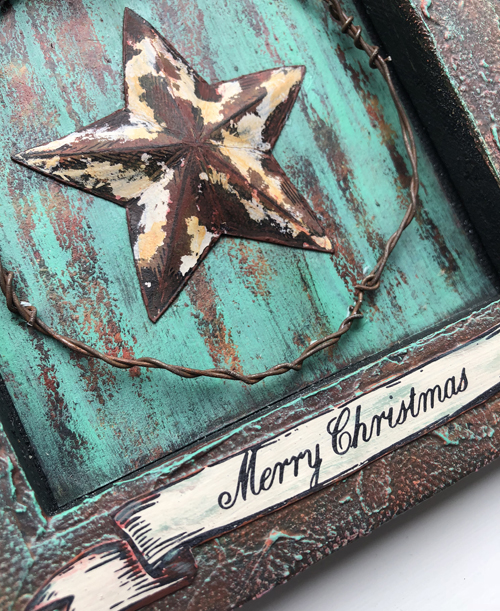
Once I had my rust head on I had to add a little patina too - so I used this as the background panel for my star. Another rusty mix in the background, this time adding candle wax in vertical strokes before covering in Green Patina Fresco Chalk paint. Once dry, wipe away and the resisted wax reveals some rust under the patina.


All the same Seth Apter paint colours were used on the canvas frame too. A little Grunge Paste was added first to create some texture. This time I have dry brushed the Green Patina over the textured surface for subtle hints.


Rusty Star Canvas with PaperArtsy ESC08 stamps and Seth Apter PaperArtsy Fresco chalk paints - by Nikki Acton


And finally the banner - love the vintage feel of this - stamped over Buff Fresco Chalk Paint and a little Mahogany and Green Patina added.
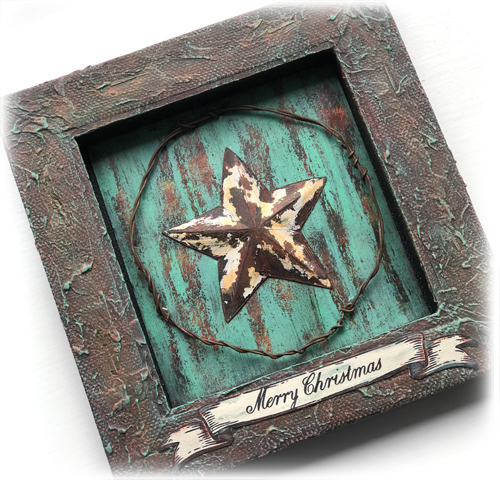

Rusty Star Canvas with PaperArtsy ESC08 stamps and Seth Apter PaperArtsy Fresco chalk paints - by Nikki Acton

I am looking forward to using the baubles and bow from Raquel's stamp set too; I can see these being used in the same way or for a more modern Christmas look. But if, like me, you like a little rust - grab Seth Apter / PaperArtsy chalk paints and go for the rusty / patina version! 

Nikki

Blog: Addicted to Art
Instagram: @A2Acardscraft
Pinterest: nikacton

Wow that star truly is the centre of attention and rightly so! It looks wonderful! Sp easy to get the dimension with that stamp, but the whole project is awesome! Another amazing creation Nikki, thankyou! ~ Leandra


We always hope that you  learn something interesting from our blog. 

Our creative team love to read your comments so much, so please take time to let them know you've been inspired!  

Why not join our 2-weekly challenge by blogging your create response to the current topic and link it here?

The current topic link Topic 16: Rust will close 17:00 (London Time) Sunday, Nov 12th 2017, and the winner will be announced 2 hours later at 19:00.

All links go in the draw to win a £50 voucher to spend on products of your choice from the PaperArtsy online store.

Sunday, 5 November 2017

2017 #16 Rust: Autumn Flutterby with ETS {Clare Messenger}

2017 Topic 16: Rustification


After this one you'll be rummaging around for any kind of textured paper to have a go! Clare has tested out one of Seth's ideas with brilliant results! Enjoy!


Hi everyone, it's Clare Messenger with you today, and I'd like to share with you a rust themed project using Tracy Scott's Set #11 butterfly.

After watching a You Tube video of Seth Apter printing with textured wallpaper I decided to have a go.  I just loved watching the layers grow and couldn't believe how much it transformed the plain, blank MDF panel!


Using Paperartsy Fresco Acrylic Paints I painted a base colour of Slate Grey.  I started to add different colours using the wallpaper.  It took some time for the texture to build but I persevered and I was so glad I did! The print was gradually gaining more texture, depth and colour. I changed colours frequently, adding in more of one colour, changing my mind about colours I'd used, it didn't matter!  I just kept on pressing down with my painted piece of wallpaper.


I even used a smaller piece of the wallpaper along with a versamark ink pad and some rusting powder.  I adore the speckled effect it left behind.


The Butterfly, flowers and small circles were stamped onto a piece of card where I used Rusty Hinge Distress Inks and Peacock feathers Distress Oxides.  I heat embossed with a frosted crystal embossing powder, twice, to add more texture to the butterfly.


I added metal embellishments and carefully painted them with Prima Finnabair Art Extravegence Rust Paste.  I also added the pastes to the frame the panel and dabbed some on to the flowers and the butterfly along with a little aqua Treasured gold.


I had so much enjoyment from this project, watching it grow and evolve.  I cant wait to try this with some different colours, I think I will be on the hunt for some more textured wallpaper so I can try out some different patterns. So go on, dig out those rolls of wallpaper and have a go!

Thank you for reading my post,

Crafty Hugs,
Clare

Oh Clare this is wonderful! Love how that background technique turned out! Just goes to show, even pretty butterflies can be rusty too!! Thank you for this I'm sure I have some of that wallpaper lurking around somewhere.....


We always hope that you  learn something interesting from our blog. 

Our creative team love to read your comments so much, so please take time to let them know you've been inspired!  

Why not join our 2-weekly challenge by blogging your create response to the current topic and link it here?

The current topic link Topic 16: Rust will close 17:00 (London Time) Sunday, Nov 12th 2017, and the winner will be announced 2 hours later at 19:00.

All links go in the draw to win a £50 voucher to spend on products of your choice from the PaperArtsy online store.

Saturday, 4 November 2017

2017 #16 Rust: The Colors of Iron with ESA {by Dounia Large}

2017 Topic 16: Rustification


OK folks, this is one of THOSE posts where you exclaim out lout 'SAY WHAT!???' ...go ahead READ IT!! Professor Dounia is in the house!
I can imagine Seth punching the air already!!

Hi everyone, it's Dounia with you today, and I'd like to share with you a different way to use the amazing Rusting Powder from PaperArtsy. It also involves tea and tree leaves...

I always like to use products different ways, make the most of them and I also try to work with natural objects and this is a great technique that combines both! It's also a bit of a cheat in this them, as I didn't actually rust anything...


From my chemistry background, I know that iron is involved in a form or an other in a lot of pigments and dyes. It is particularly reactive to tanins, and what has tanins? Tea! You probably already have heard or practiced tea dying, this is just taking it a step further. After infusing you paper or fabric in a strong tea, you can add Rusting Powder directly in the bath (in a plastic tub!) for a medium color. You can also prepare a iron (IS) solution the day before by mixing the powder with lemon juice. You can dilute and spray it for a darker tone.


The color takes a few minutes to fully develop, it's like magic each time! Of course instead of spraying the paper/fabric directly, you can use stencils!


Stamping is also possible! Either with the Iron Spray on the tea dyed substrate or by spraying tea on the stamp, printing it then using the Iron Spray. Both give slightly cloudy and grungy images that I think pair perfectly with Seth Apter fabulous designs! Here I used ESA05 with its gorgeous collage stamps.


Do you now what else contains tanins? Most tree and bush leaves! You can run them through your die-cuting machine to "juice them" them spray with the iron solution. The difference between before and after is striking!


I had a big play session with my tea and iron and used the results in a journal. Here are a few pages.


Hope this inspires you to get a bit messy and use your rusting powder differently!

End signing off with your name, and directly clickable links to your blog and social media hangouts.

Well it is certainly super-handy to have a Chemist blogging for us! I can't believe how those leaves turned out! From henceforth you shall now be known as Prof Dounia on this blog !! You win in the rusty experimentation challenge!! ~Leandra


We always hope that you  learn something interesting from our blog. 

Our creative team love to read your comments so much, so please take time to let them know you've been inspired!  

Why not join our 2-weekly challenge by blogging your create response to the current topic and link it here?

The current topic link Topic 16: Rust will close 17:00 (London Time) Sunday, Nov 12th 2017, and the winner will be announced 2 hours later at 19:00.

All links go in the draw to win a £50 voucher to spend on products of your choice from the PaperArtsy online store.

Friday, 3 November 2017

2017 #16 Rust: Rusty Christmas with Zinski Art {by Bryan Evans}

2017 Topic 16: Rustification


Bryan, our reisdent geezer is always good at testing out new ideas, and he patiently tried Versamark with rusting powder (brave), but he did say glue was much easier, which is the intended adhesive for Rusting Powder...but you'll never know unless you try right? But oh my, his rusty backgrounds further down kick some seriously rusty butt....

Hi everyone, it's Bryan here from Geezer Crafter with you today, and I'd like to share with you my projects on Rust using the new Christmas stamps from Zinski Art along with some Rusting Powder and Fresco Chalk Acrylic paints.

I wanted to try the Rusting Powder as I find rust fascinating, I found lots of inspiration from Pinterest, A rusty metal look can be easily achieved along with the extensive range of Fresco colours. The little figures from the stamp set are fab to use, easy to cut out and colour. 


This was my third attempt with Versamark to adhere the Rusting Powder, I was over spraying with a mix of water and vinegar, and loosing the definition of the stamp. Got there in the end.. 


I found that Tacky Glue worked really well for me to adhere the Rusting Powder to the edges of the torn sentiment. In days of old Father Christmas was dressed in green robes, he was known as the Bringer of Spring. Hold tight Santa...


My brayer and glass mat are my favourite tools, my 'masterboards' are made up of...

Rusting Powder 


Warm rich tones of Rusting Powder with the Mahogany...


I created a background with Infusions Rusty Car.
I enjoyed stamping off the card on each section of my concertina card. Don't fold the score lines until you have finished stamping!!


I wanted to create an illusion of large flakes of decaying, breaking down metal..


I am looking forward to seeing your rusty makes!!. I found my favourite way to adhere the Rusting Powder was with Tacky Glue, I am going to try using a fan brush and all manner of different tools to apply the glue. This I find really interesting and exciting, allowing me to be free and expressive with my art. If you like working on fabric, how about stamping and colouring, great for tree hangings and bunting. 

Until next time, Bryan.

Blog: https://geezercrafter.blogspot.bg/
Facebook: Bryan G Evans
Pinterest: bryan evans

Those cheeky faces peeking out - It would also have been fun if you had made little opening and closing rusty doors that they were hidden behind. Love those Zinskis! and your brayered rusty backgrounds are amazing! Don't know how you could bear to cut into them!I'm sure you'll get lots of people mixing their paints and rusting powder this weekend! Thankyou Bryan ~ Leandra


We always hope that you  learn something interesting from our blog. 

Our creative team love to read your comments so much, so please take time to let them know you've been inspired!  

Why not join our 2-weekly challenge by blogging your create response to the current topic and link it here?

The current topic link Topic 16: Rust will close 17:00 (London Time) Sunday, Nov 12th 2017, and the winner will be announced 2 hours later at 19:00.

All links go in the draw to win a £50 voucher to spend on products of your choice from the PaperArtsy online store.

Wednesday, 1 November 2017

2017 #16 Rust: Rusty Burlap Panel with EKD {by Sue Carrington}

2017 Topic 16: Rustification


Another take on how you can use Rusting Powder in this post. All you need to remember is rusting powder needs something to stick to, so you can generally secure it with glue, but Sue tries another option that works really well too! Check it out


Hi everyone, it's Sue Carrington with you today, and I'd like to share with you lots of rust ! 

Those or you who know me will wonder why on earth I chose a rust themed post, it is true that my relationship with rust powder has been very much love / hate and not necessarily in that order. The problem is I love the effect of rusted projects, the added texture and depth of colour is just wonderful. So not to be beaten, I have persevered and the project I'm sharing with you today is the result of that perseverance !


I attended a workshop over 18 months ago now with the lovely Lin Brown and it was all about rusting fabric. I had mixed results at the time but really fell in love with the effect. One of the things I wanted to try was stamping onto fabric then using the Rusting Powder and I wasn't disappointed  


The above shows how well the Rusting Powder clings to the Versamark Ink which I've used with a stamp from EKD06. I've stamped onto Egyptian Cotton fabric and then sprinkled on the powder and spritzed with vinegar. No dilution, just vinegar. I've found that this gives me the best results. I left this overnight and the result the next day was wonderful ! 


Although the rusting does bleed (which I think is fabulous) you still get a really, quite sharp stamped image. In fact I was quite amazed at the level of detail that could still be seen. 


For the leaf I used a stencil from PS048, the process was repeated and I loved the result of the powder drying quite thick in places. I wrapped this piece around a piece of Stampbord to give it some dimension. I used some scrap pieces of Burlap and sprinkled with Rusting Powder and spritzed with vinegar. I also did some dry brushing with South Pacific Fresco Chalk Paint. 


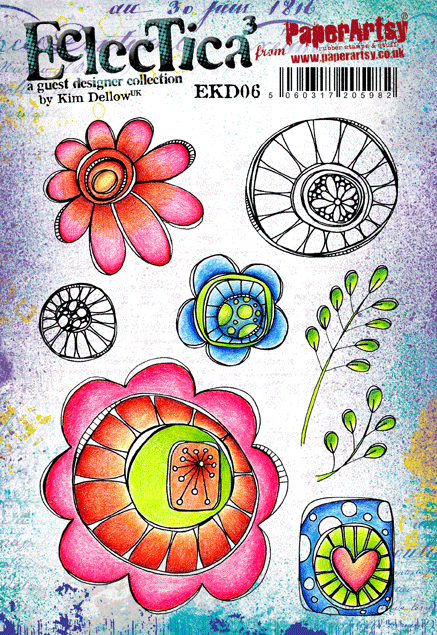
The 2 smaller leaves are from EKD05 and I think I was a little over zealous with the Rusting Powder but when I saw the faint veins on the leaves I loved the effect, such a contrast from the darker rust areas. The flowers from EKD06 were stamped onto watercolour paper and initially was just an experiment, but the paper sucked up the vinegar and left a really clear stamped image. I used watercolour paints to just add a hint of colour to  them. 


 EKD05
 EKD06


You can see on the butterfly from EKD05 how much detail is captured by the Rusting Powder. I also stamped onto some Burlap to see how that would work using the delicate leaf stamps from EKD06. It worked a treat ! You may have gathered that by now I was stamping onto pretty much anything to see how the rusting would work. It does get very addictive ! 


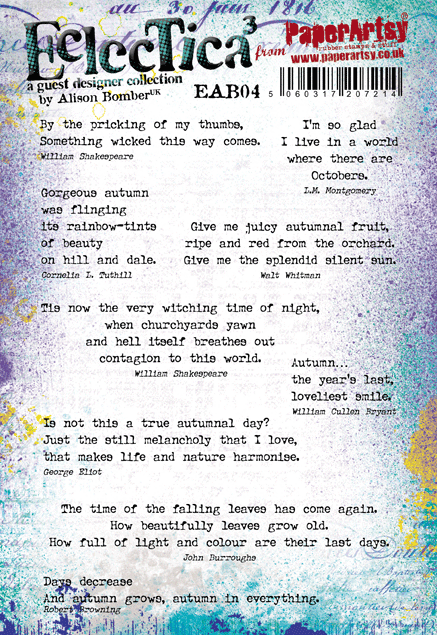
This final shot covers 2 birds with one stone as it not only shows the text I used, which is from EAB04...


... but it also shows my favourite piece of stamped, rusted fabric. The rust didn't seep as much on this piece which I guess all depends on how much powder I sprinkled. I added some splats of Snowflake Fresco Chalk Paint and some metal embellishments to finish off.

If you've never used Rusting Powder before I would recommend you jump in and have a go. The results are never exactly the same and when you leave something to 'cook' overnight it's exciting to see the results the next day, and you will be addicted !

Sue

Oh this is fantastic Sue, I did not know you could use Rusting Powder this way so perfectly with stamps and versamark!! I love it. I guess the Egyptian cotton, being so fine, gives an awesome surface for the versamark ink to grab onto with the rusting powder, and you are right, once rusted, it does seem to fuse to the surface too - very handy! ~ Leandra


We always hope that you  learn something interesting from our blog. Our creative team love to read your comments so much, so please take time to let them know you've been inspired!  

Why not join our 2-weekly challenge by blogging your create response to the current topic and link it here?

The current topic link Topic 16: Rust will close 17:00 (London Time) Sunday, Nov 12th 2017, and the winner will be announced 2 hours later at 19:00.

All links go in the draw to win a £50 voucher to spend on products of your choice from the PaperArtsy online store.