Tuesday, 4 November 2014

GD: Wanda Hentges Project #2 Seasons Greetings

"Hi Wanda here and welcome back for my second day of this week! Today we are making gift tags but when they were finished, as I looked at them, it occurred to me they would also look very nice hanging on the tree, something you could note on the back for the recipient - an extra gift"!


I'm using ELB10 and ELB12.


and the mini stamp MN61


and stencil PS007.


I painted the front of each #5 manila tag with Guacamole and dried them. I stamped the holly image with Archival Ink Leaf Green stamping once on scrap paper before stamping on the tags and stamping 2-3 times on the tag before reinking. 


Next I stenciled on the flower with Candy Floss. I used painter's tape on the stencil around the flower making is much quicker to work with.

.

The text is stamped with Snowflake paint. I didn't use a block so I could just add some of the image with each stamping. 


After heat drying I inked the edges, front and back, with leaf green ink. I inked the edges of the back to hide any bits of paint I'd gotten along there so it would look nicer for signing. 


Next, I roughed up the edges using a distressing tool. Any distressing tool would work or you could use the edge of your scissors.  That completes the background of the tags.


To finish the first tag I stamped the sentiment with Archival Ink Jet Black, added White Fire Treasure Gold to the edges of the tag, glued on a scrap of lace, a painted strip of paper and a heart, and added gold cording to the top.


The strip of paper was painted with Guacamole and the edges inked with Leaf Green.  I freehand cut the heart out of a scrap of paper, painted it with Candy Floss, ran it through an embossing folder, and used my finger to add White Fire to the high spots and edges. 


For the second tag I wanted to use the bird and I wanted it to have a Christmas hat so I decided I would try to make one. I stamped the bird on a scrap of cardstock and, looking at a picture of a hat, used a pencil to try and draw the hat.  When I had something I thought would work, I cut it out (at which point I thought "oh, I should have taken a picture")  LOL  


I erased most of the pencil lines, painted the hat with Candy Floss and Snowflake, dabbing the Snowflake on so it was a little thicker, dried it and added shading with a colored pencil.  I stamped the bird on the tag with Archival Jet Black Ink and tried the hat. Yay, it works!!!


To add the "snow" to the tag I painted a line of Snowflake with a round brush.


and then used a flat, stiff, dry brush to pull that paint downward in a straight line. It worked even better than I had hoped!!!  


I painted a scrap of cardstock with Candy Floss, stamped the bird with Jet Black and cut it out.  After cutting it out I used my finger to pat a little snowflake in the belly area.


I painted another scrap with Guacamole and stamped the bird again.  


I stamped over it with the script image using Archival Leaf Green Ink, and cut the wing out.
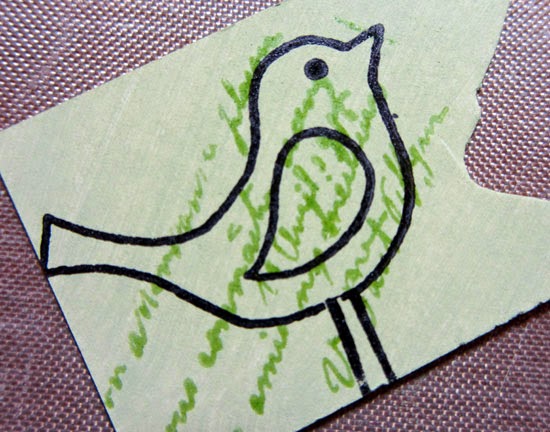


I stamped "Merry and Bright" on a scrap of white with leaf green, cut it out, glued it to another scrap painted with Candy Floss and cut it out. 


I added white fire to the edges of the tag and glued on all the pieces. I used a Pitt pen to draw some music notes and also touched up a few lines on the bird like where I dabbed on the snowflake paint for the belly. I again tied gold cording at the top.


The third tag.  I used painter's tape to mask off some of the trees, inked the trees with fern green, removed the tape and stamped the trees on the tag.  


I again wanted a snowy hill so added a line of Snowflake with a round brush...


and pulled down the paint with the flat brush. 


I painted the center of the middle tree, the dots on the last tree, and made my own dots down the stem of the first tree with Candy Floss.


"Season's Greetings" was stamped on a scrap of white with leaf green, cut out, glued to a Candy Floss painted scrap and cut out again. 


White fire was added to the edges of the tag, the words glued on and gold cording added to the top.


Here are the 3 tags again.  I really love how these came out!!!


If you create anything inspired by something in this post, I hope you link up to the November challenge!!!  Thanks so much for following along!!  Until tomorrow....

~Wanda~

A huge thanks from everyone at PA HQ Wanda, these tags are delightful. The way you have incorporated both paint and ink to build up the layered background is fab, particulary in this colour combo ... striking. Who wouldn't like to receive this trio.

We would love you to join in with our monthly challenge. If you are inspired by any of this month's guests who have blogged between Nov 1st 2014 and Nov 30th 2014 then join in and link up your creativity HERE. You will go in the draw to win a £50 voucher to spend on products of your choice from the PaperArtsy online store. You need to add your link by 19:00 (London time) Nov 30th 2014.

Monday, 3 November 2014

Welcome Back GD: Wanda Hentges Project #1 Winter Wonderland

"Hello everyone,  Wanda here and I'm so happy to be back on the PA blog. Today I'm sharing a journal page. This journal is 7 1/2" x 10". I'm using stamps from all 3 of Lin Brown's newest sets - ELB10, ELB11, and ELB12".


The largest flower from Chipboard shapes ES02.


And the stem from Chipboard Shapes ES01.


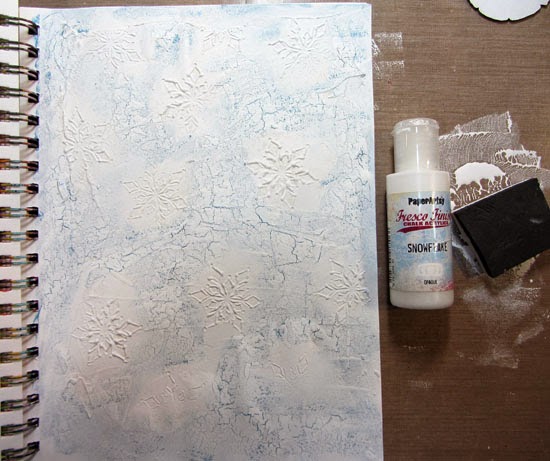
Since I knew I was going to start the page by scraping on Grunge Paste and stamping into it with the Snowflake, I glued 2 pages together just to be sure it would be strong enough. To stamp into grungepaste, spray your stamp with some water, rub the water around with your finger, and stamp into the paste. When your finished be sure to clean any Grunge Paste off the stamp immediately.  


I painted on sky avoiding the stamped in snowflakes. No need to be neat about it :)


Crackle Glaze is scraped on avoiding the stamped in snowflakes and left to dry (or use your heat tool).


Add snowflake over the Crackle Glaze patting it on with a piece of cut-n-dry foam and let it crackle.  


I just love crackle!!!


I watered down some Ice Blue and lightly brushed over some of the page. I watered down Guacamole and used a pipette to add drips. I held the book up, squirted along the top and just let it run down.


To bring out the snowflakes again, I used my finger to lightly rub Snowflake paint over them. I stamped "Let it Snow!" with Archival Ink French Ultramarine. I didn't use a block and I stamped more than once with each inking.


I decided on more drips and watered down some Ice Blue but it was a little too light so I added just a bit of Sky to the mix.  


I used a damp cloth to blot up some of the blue before it all dried. I know, the cloth looks dreadful!!  It's well loved and totally stained.  It won't even come clean with bleach.


The pine bough is stamped across the top and part way down the sides with evergreen, one of the colors in Lin Brown's Limited Edition Set 2.  I did use a block because I knew I would have had my finger tips in the paint and making a mess on the page. 


To stamp along the spine area you can prop the book up on something or try to hold your other hand under it while stamping.  I'm working on a counter top and there is a drawer right there so I just opened the drawer and let the other side hang over without falling off.  It worked really slick and I sure wish I had thought of it before!!


The stamped-in snowflakes were there but didn't stand out as much as I wanted so I painted Metallic Glaze in them. Nothing tedious!!  I just used a small brush and quickly painted them.


I really like how they catch the light!!


Before I even started this page the thought of that cute bird stamped on a flower was in my mind.  I originally had thought of doing a tag with that but then decided to build a journal page for it.  My winter flower had to be crackled too. I first painted the flower with Snowflake including the edges so they wouldn't be brown.  For my crackle I based coated with Ice Blue, scraped on the Crackle Glaze and put Snowflake on top.


I also knew I wanted the bird to be standing in snow. I mixed Grunge Paste and Snowflake paint, put some on the flower and immediately stamped the bird with Archival Ink Jet Black. I thought I would get a black line from the legs in the paste, but I didn't...


so I scraped some of the paste away in the legs area and very carefully re-stamped that part of the bird.  I thought for sure I'd mess it up by not getting it lined up but it worked well enough.  I put on a little more of the Grunge Paste/Snowflake mix, used a toothpick to take any off the leg area and let it dry.  Later, I went in with a black pen along the bottom of the body and down the legs.  I also decided I wanted more "snow" and added paste again and sprinkled on clear rock candy distress dry glitter. 


I was planning to add some paper strips along the bottom of the page to look like snowy ground and I didn't want to let the left over grungepaste/snowflake mix go to waste so I tore some paper and scraped the excess onto the pieces.  A little extra texture can't hurt, right :) 


I hadn't yet thought too much about the stem of the flower, but it was time. I decided to use another chipboard piece and went to work crackling it.  I used Hey Pesto and Evergreen for the base coat, scraped on the Crackle Glaze and used Snowflake on top. I also decided to add crackle onto the torn paper - white on white so it would be subtle.


To help the flower/stem stand out from the background I inked around the edges with Archival Ink Red Geranium, Leaf Green, and Fern Green. 


I laid out the torn, crackled papers on the book deciding placement and to determine where I wanted to stamp "Winter Wonderland", took them back off and stamped the words with Jet Black.


To attach the pieces to the page, I used red line tape (a generic term for very sticky, permanent, double-sided tape with a red plastic liner) just along the bottom of each piece. 


I stamped several more birds on a scrap of Smoothy White Stamping Card so I could cut them out and use them on the page.  I painted the birds with London Bus.  I cut extra wings for each bird and painted the wings with a mix of Snowflake and Metallic Glaze. The 2 standing birds at the bottom of the page were first stamped directly onto the page and then extra birds glued on top. The bird on the flower was painted directly on the flower and only an extra wing cut to glue on. I couldn't resist having one of the birds sitting on a Snowflake!! After everything was glued on, I watered down some Snowflake and splattered it over the page by getting some on a paintbrush and hitting it against my finger.  Finally I added some metallic glaze along the tops of the torn paper and around the edges of the page.  


I hope you've enjoyed today's post!  If any part of this inspires a project, I hope you'll share it and link to the November challenge.  See you all tomorrow!


~Wanda~

A huge thanks from all at PA HQ. This is such a refreshing take on the festive season. The wintery backdrop looks magical and the depth from the snowflakes is wonderful. Great use of colour Wanda, thank you for sharing.


We would love you to join in with our monthly challenge. If you are inspired by any of this month's guests who have blogged between Nov 1st 2014 and Nov 30th 2014 then join in and link up your creativity HERE. You will go in the draw to win a £50 voucher to spend on products of your choice from the PaperArtsy online store. You need to add your link by 19:00 (London time) Nov 30th 2014.

Registration Open for #3UP end of Semester 3

Hi Everyone, Leandra here

This post was supposed to go up over the weekend, but as many of you are aware, we had a retailer training event in Coventry organised by CHA-UK, so that kind of took over, and I simply did not find a second last week to get the post done. Oh well, not the end of the world. So I'm sneaking it in ahead of Wanda's Guest Designer Posts which of course starts tonight for the next 3 days.

So, as we have done for every #3UP in the past, I am mixing it up again, lets see what you think this time!

This #3UP will be called: My Fave Technique

  • You can do a short blog post showing your favourite technique. You could use ink, paint, dyes, pencils, markers etc and work on any kind of surface that suits that particular technique. 
  • Your technique must somehow incorporate stamping and so therefore we ask just one thing, that the technique must feature PaperArtsy stamps.
  • We ask that you explain the technique in no more than 3 photos and 3 paragraphs
  • If applicable to your technique, you are welcome to show us a crafty item or creation you have made utilising that technique. If you do this you may include a further 2 photos to show the item, preferably full size, and close up.
  • Remember, its always correct crafting etiquette to give credit where due, so please make sure in your description to acknowledge where you first heard about the technique, and what you like about it so much. Or, if it was a happy accident that you discovered yourself, then tell us about how it came about.

SO... what do you think? At this point just get your thinking caps on and notebooks out, and start jotting down your ideas. 

You don't actually need to DO anything yet, first you need to register that you are keen to be one of the  #3Up list, then we will do the draw, and if your name gets pulled out of the hat, then you will get the thumbs up and you can crack on with your submission.

How do you become a #3UP player?

Step 1: Register you want to play along 
Via the PaperArtsy Facebook Page - leave a comment on the #3UP post following this format : My fave technique for #3UP is XXXXX

Or on twitter publicly Tweet Leandra following this format: @PaperArtsy My fave technique for #3UP is XXXXX

Or email direct to Leandra sales@paperartsy.co.uk and tell her: My fave technique for #3UP is XXXXX

If you are a #3UPNewbie (ie have not been drawn from the hat previously, or have not played along before) then please add the #3UPnewbie hash-tag to your registration so we are aware. 

We do draw randomly, but it is nice if we can try to arrange newbie posts and give them a special toot toot in among  the die hard #3Uppers!

Step 2: Tweet me, FB me or email me you registration ASAP
You have 5 days to sign up, ie register by Friday November 7th at midnight GMT, that's 00:00 London Time

Step 3: You will receive confirmation 
If your named is pulled from the hat to be a #3UP player this time, you will get either an email, or Private Message on FB, or Direct Message on twitter...by Saturday, noon (London time, that's 12:00 GMT) . In other words, we will confirm back with you on the same forum you registered with us.

Step 4: Deadline December 15th
You can start emailing you post to sales@paperartsy.co.uk your submissions as soon as you like. The deadline is December 15th, which I hope won't cramp your Xmas style too much. 

Once we have allocated each of you a specific #3UP night, then there may be another week or so of flexibility on that date, but it's better we aim earlier than later considering the time of year.

TIPS: 

  • Remember photos must be clear, in focus and well lit please, this can make such a difference, try to take pics on a white background where possible so the colours are clear.
  • It's nice for us to hear about your feelings and passion for the technique, so don't be a robot, just write like you are talking to us. But don't rabbit on too much or Leandra will have to edit you! LOL

Good luck and registration is now OPEN! 

Saturday, 1 November 2014

November Challenge 2014

Hi everyone, Darcy here. 

Thanks to everyone who joined in with our October challenge. What a fabulous month we had, so many juicy posts full of inspiration. Our main Guest Designers returned for a second month with some truly magical ideas. We also saw some gorgeous things from a handful of random guests and of course we had our signature designers at the weekends. Over the past month we have seen journal pages and covers and 2 very different ways to decorate frames, not forgetting some beautiful tile art. We also went seasonal with an Autumn wreath, and as we approach the holiday season we had some gorgeous festive cards and ornaments. Truly something for everyone. 

You know we love seeing how you interpret these ideas in your own projects so keep them coming. Thanks too for all your support and comments over the month, it means a lot to our designers, and they read all of them. 

The winner of the October Monthly Challenge is: Alison


Please get in touch with Darcy (darcydotneedles@hotmail.com) to find out how to claim your prize. 

November Challenge {2014}


Our challenge is now a monthly one, open from the first to the last day of the calendar month. 

We would love you to join in. We know our designers come up with utterly fabulous ideas, and often this makes you want to have a go and play along too. So go and make something, blog about it and share the link so we can see what you've been inspired by!

If you are prompted to creative-action by any of this month's guests who blog between Nov 1st and Nov 30th 2014 then join in and link up your creativity to this post.

You will go in the draw to win £50 (this includes VAT and postage) to spend on products of your choice from the PaperArtsy online store. (Think of it as £40 prize with £10 to cover the VAT and postage costs, worldwide) 

You need to add your link by 19:00 (London time) Nov 30th 2014. Please ensure you are familiar with our guidelines below


Challenge Etiquette:

1. The challenge is to show how you have been inspired by our designer(s) to try a particular technique. Your entry should contain:
- a mention of which designer inspired you and why, and 
- a link in your blog post to that designer's original post on the PA blog
.
The whole concept of this challenge is 'play along with us'. You are encouraged to put your own twist on ideas you see on our blog, don't feel obliged to copy an idea exactly.


2. The link must come directly from the specific post on your blog where you have explored the technique/ idea mentioned in point 1 above. You cannot link to the home page of your blog, or we will be unable to find the post to leave you comments. (NB. Linking to your home page also looks like you are spamming us to drive traffic to your blog)


3. Spam links will be deleted. We did have someone who linked to a competitor's product launch/ website, so it does happen.


4. We prefer your post is created exclusive to our challenge. Multiple challenge links in one blog post is poor etiquette and generally makes you look like a blog-candy grabber. We know you have busy lives, and it's easier to do multiple links, but from our point it can result in a conflict of interest. 

5. You are welcome to use stamps/ products/ substrates you have to hand from a variety of companies, we do not expect you to exclusively use PA products - but of course it's lovely when you do! Try to be sensitive to these things :)

6. You can enter as many times as you like. We don't want to restrict your creativity or participation!

6. Entries can be inspired by any post on our blog for the duration of that same calendar month.

7. The winner of the random draw will receive a £50 credit to be redeemed on the PaperArtsy Website. We request that one of your purchases is an A5 rubber stamp. You can add any other items to your basket, but the final total (including VAT and postage) must not exceed £50 The voucher can only be used once, so you must redeem it in a single transaction.

8. The first day of every month (in this, the Challenge post) is when the winner of the month will be announced, also, in the same post, the link for the new month is posted. It's your responsibility to claim your prize coupon from Darcy: email her 
darcydotneedles@hotmail.com

9. Good Luck! If you have any questions, don't hesitate to ask!