Wednesday, 9 January 2013

Michelle Webb #2 .... Printing With Fresco Paints

Leandra Says: Here's another project from the painty one, Michelle Webb! As you will see, being experimental certainly pays off, and the combination of printed layers, and a wash of paint produces a delightful vibrancy from Fresco Chalk Acrylic Paints. My limited experience of printing in this manner is you deffo end up thinking inside out! Enjoy.
 
I got a Gelli Plate for Christmas and I couldn’t wait to try it out, so I went straight for the PaperArtsy Fresco Paints as I thought they would perform brilliantly, and they did! There is nothing better than starting off with something blank and adding layers to see the dimension start to appear. After a couple of practice runs on plain card I decided to use Tim Holtz’s Alterations envelope die from plain card and to alter it along with an ATC to put inside.

I love trying out new crafty products - this was going to be a steep learning curve, it could potentially go wrong, but I wanted to try it out anyway....so here's what happened...

I started by using London Bus red, spreading it across the GelliPlate with an old credit card then leveling it off with a brayer. I put some sequin waste over the top of the paint on the gelli and placed my card on top of the sequin waste and pressed down evenly. I peeled back the card to see my first layer of red. So, from the gelliplate you get the first 'print' of red paint masked by the sequin waste onto the Envelope blank.I repeated the process using Sky Blue.Again, the paint is brayered onto the gelliplate, a numbers stencil is laid on the wet paint, and then you press the envelope blank on.
Oh but look at what was left behind on the Gelli after lifting up the stencil, a little bonus!!
It would seem a waste to wipe this off the Gelli, so I used a spare die cut envelope to print what was left on the Gelli Plate onto the card. Oh winner, love this, the numbers look great! The stencil kind of protected the wet paint, so if you are quick, it stays wet long enough to get a second impression. I’ve saved this one for later.
I did one more layer using Zesty Zing bright neon yellow. Remember, if you use a translucent layer over opaques, you will see through the layers, so Zesty Zing still lets the colours below come through. You get an orange where it is over the red, and green tones where it is over the blue areas.
I bet you’re thinking; 'where is she going with this'? I was asking myself the same question!
Out of curiosity I wanted to know how the colours would change if I painted another semi-translucent paint over the top. I chose Inky Pool deep blue, and I’m so glad I did, the transformation was amazing. I loved the effect it had on the layers of colour. Those 3 layers looked garish, a bit like they didn’t belong with each other, but with the Inky Pool paint over the top it just brought them all together in painty harmony.

{Leandra comments: Michelle has totally captured here the accidental magic of paint, and the entire reason we added some translucent colours to the collection. Notice how the red gets some purple tones, the zesty zing sections pops to a grassy green, and of course, you can always use a sanding block to sneak back to reveal the layers underneath in a few areas if you want to. A wash of colour over the top is a perfect way to bring harmony to all the layers. And remember, satins glaze mixed with opaques also creates translucent shades across the entire paint range}
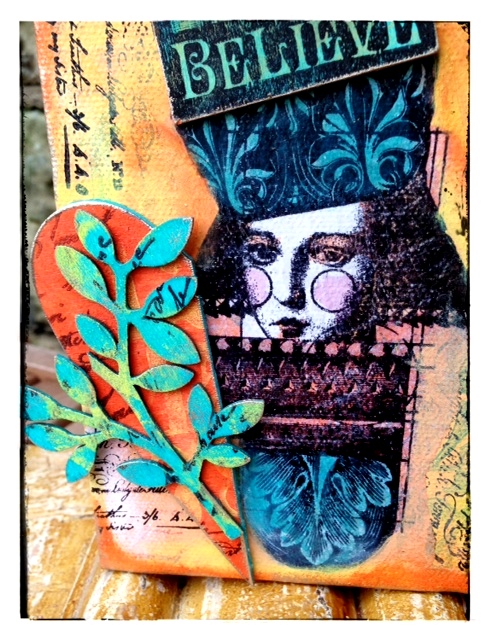
So I dried the background thoroughly, and then, using a permanent ink, I stamped over the 'envelope' section with the following stamps:

Ink and The Dog: Clocks Plate 7 (C7) which has some bold numbers on the plate
 
Ink and the Dog: Mini 54 (MN54), par avion (bottom left)
  
Ink and The Dog: Dolls Plate 1 (D1) – Impress numbers man (side right)

The final touch was to add a finishing touch on the front of the envelope, the words printed onto white card “Create art it makes....” This refers to the stamp used on the inside on the ATC that says 'a smile...that sets everything straight' (coming up below).
And this is the back. Once folded some of the stamped images wrap around. Remember, over acrylic paint, it's appropriate to use a permanent ink like Ranger Archival (Jet Black or Sepia) or Tsukineko Versafine (Onyx Black, Vintage Sepia) and heat set thoroughly once stamped.
I added subtle 'rings' and 'lines' using Snowflake, Little Black Dress, Eggplant and Old Gold paint, then distressed the edges with Pitch Black Adirondack dabber. It’s an amazing colourful finish. I’d like to try this kind of printing on a larger scale now.

As mentioned above, on the 'ATC' insert I stamped the numbers from:
 
Ink and the Dog Mini 12 (MN12) the rocket scientist
and the smile quote (masked) from Hot Picks Xtra Plate 4: HPXT04
 
And on the inside I stamped the Rocket Scientist Mini in Black ink

To use the Hot Picks sentiment HPXT04 “a smile is a curve that sets everything straight” the Fresco Paints are perfect for this technique, I needed to lighten off part of the rocket scientist image in the lower left corner before stamping the sentiment. Because the paints are so chalky, it worked perfectly as a base for stamping the quote onto. I want to try this again. 

Note I blacked out the words “is a curve” off the quote with a pen. So from the outside of the envelope to the inside on the ATC it reads “Create art it makes....a smile that sets everything straight”  

Finally I attached some TH ideology and stapled some folded tissue tape across the bottom of the ATC.
I hope you have enjoyed today's project.

Leandra Says: Well I am in love with the sheer vibrancy of colour that you have achieved here Michelle. I have dabbled with a gelli, but I was trying to use it differently to you, and I must admit I got a bit frustrated, I think Claudine's extra time medium may be a good option to use here. But by golly, I think you have cracked it! As Fresco's are a chalky, fast drying paint, the 'paint-stencil-print' is a great fast method. I can't wait to have another go now!

Gillian Says: Michelle seriously the depth of colours you achieved with this technique is amazing. Makes me want to crack open my Gelli Plate!

 I have two more projects up my sleeve to share with you this week .... :)


Monday, 7 January 2013

Michelle Webb #1 ... Altered Tag Box

A little intro into what makes Michelle Webb tick ....

I'm positive (I bet you've gathered that one already), and have a zest for life. I think most crafters are positive people just by the fact that we create lovely things, which makes us feel good inside. I'm 41 and I work full time as a data analyst, a geek's title but I'm far from geeky! I have a 22 year old Son who thinks the world of me, he has been known to join in with my inky messyness sometimes. Good Lad! I live in the north of England born and bread in County Durham, but I moved south to Teesside in 1990. I'm into stamping in a huge way and painting. I like to combine the two as much as possible, usually making mixed media canvases. I like making my own digi stamps too (not the cute kind!) whenever I get the time that is, which isn't very often. I have 3 loopy young cats who take delight in removing things from my craft room and placing them in doorways where I trip over them, especially paint brushes! Don't ask me why, I don't know! Anyhoo enough about me, lets see project No. 1.

Wood is a brilliant substrate to decorate because you can stick anything you want to it (paper), paint over it, or apply embellishments and they will stay put.
For this 12 x 15.5cm wooden gift bag, I’ve started tearing out a few pages of a love themed poetry book and tearing them into smaller pieces. I’ve stuck these pieces to the wood using matte gel medium. It’s better to use gel medium than ordinary PVA glue because gel medium dries like a clear acrylic paint, so you don’t see it, and you can stamp and paint over it too. PVA glue tends to dry with a glossy finish and can be difficult to stamp over.
 
(Paintover a white wash of gesso (or snowflake acrylic paint), but thin enough to see the text through).

{Comment from Leandra: You can also use PaperArtsy Satin Glaze as an adhesive for this kind of collage-style application}
Well seeing as I was using a love theme I went straight for London Bus (red) and Vintage Lace (light creamy-pink) Fresco Finish Acrylic Paints. They have a great chalky matte finish, which gives a nice soft look to the surface. I’ve used vertical and horizontal brush strokes, I think they look better than random strokes. As a general rule, I've found vertical and horizontal always looks better, diagonals just look out of place. I’ve used both colours in this way, making sure I leave areas where I can clearly see the text coming through.
I stamped a PaperArtsy (Mini19) number stamp in random places with Maroon Archival Ink and also with the Claret Fresco Paint.
Next I chose a great green complimentary colour to the red, Hey Pesto through the stencil (Mini Paisley Swirls) over the top of the red and pink paint. As this is a translucent, you can still see the layers below through the Hey Pesto paint.

I love the look it gave the box. I also used this green colour to paint inside the box. Here you can see the random number stamps. I’ve also added some green honeycomb stamping.

 
I added some texture paste through a circles stencil and when it was dry I brushed it with Aged Mahogany Distress Ink, just to give them a subtle highlight.
 
I used white tissue paper (Crackly) to stamp the bird cage (Hot Pick 1004) and a sentiment from Hot Pick Xtra 04  then stuck it onto the box using gel medium. I stamped random little circles using Fresco Paint (Inky Pool). Inky Pool is fast becoming my favourite colour as I seem to be using it a lot! Finally I distressed the edges of the box using burnt umber and Pitch Black Adirondack Dabbers.

I was thinking what I could put in my wooden gift bag with a love theme, but purely by accident I ended up putting my tag backgrounds in it,and I love those, so they’re staying there, I like them there. So now it’s my tag backgrounds holder.
 
On the back of the box I have used a Crafters' Workshop "Birds Of A Feather" stencil and used a sponge to dab more Inky Pool Fresco Paint though. I love the finish. The Wooden Gift Bags come in a set of three sizes this is the smallest one so I have another two to play with and decorate. They come with rope handles but I took mine off for this project.

I’ve had so much fun making this project, looking forward to the next one.

Leandra Says: Now you can breathe a deep breath - that was quite a bit of pressure being the opening Guest Designer with a pretty short lead time to boot! I adore this project. Wood is so accepting of the Fresco Acrylic paint, and the layers of paint look fantastic. The touch of Distress Ink around the edges really gives a fantastic finish, and the contrasting Inky Pool through the stencil really 'pops'. I imagine the texture with the Altered Book pages underneath is quite lumpy, so stamping onto tissue allows you to get a perfectly stamped image onto a lumpy surface, good move Michelle!

Gillian Says: Way to go Michelle what a fantastic opening project. Love the colour choice you opted for - the burst of Hey Pesto & Inky Pool are very striking. Substrates are one of my most fav surfaces to work on for the very reason Leandra has pointed out.

Sunday, 6 January 2013

Introducing ... Michelle Webb, Guest Designer

Hi everyone, Gillian here to tell you all about who the Guest Designer will be on the blog this week! There's a real buzz in the air since Leandra announced here the plans for the  PaperArtsy blog for 2013 and also going by your reactions it is going to be fun times ahead.

The first Guest Designer to kick start the new PaperArtsy venture is the lovely and talented Michelle Webb. Michelle is a bit of a number cruncher by day, but in her spare time, its all about stamps and paint dabbling, so Fresco's are right up her street! Watch the blog this week as she experiments with Fresco Finish Acrylic Paints for the first time, and see the fabulous different results she achieves along the way!

Can you tell Michelle is excited .... 

"When I saw my email from Leandra, asking me if I'd like to be one of the guest designers for 2013, I can't tell you how excited I was. I discovered it as I was going to bed.....big mistake really because I was like a kid on Christmas Eve, I couldn't sleep, wide eyed excitement kept me awake for hours, dreaming of what I was going to make. Of course I replied and said YES!
When the postie came to the door a few days later with a huge box printed all over with the Paper Artsy logo, I was like Zebedee bouncing round my kitchen, I did a full lap of jumping round the box before I even opened it. Then upon realising the contents of the box, there was another lap of jumping! It's safe to say that I was very happy with all the lovely Paper Artsy products that Leandra had sent.
I knew I only had a couple of weeks to make some projects, but I had the small matter of 70 wedding invites to make before I could get going. So I worked like the clappers and made projects for my January debut".

Michelle will be here tomorrow with her first project and what a beauty it is! I'm only saying one thing - storage! My lips are schtum, check back tomorrow!

We expect you will be very inspired by Michelle's posts this week, so if you would like to play along with her this week, please share by linking to this page following the guidelines below. No backlinks please, and leave a blog comment once you have linked.

Every Sunday we will announce the next Guest Designer .... let me tell you there is a wealth of talent and projects winging their way to you!

 Loading InLinkz ...


Al Fresco ....

I can't quite remember when my love affair of PaperArtsy goodies started it seems that long ago. What I do remember is being amazed by the style and quirkyness of the stamps initially. Then over the years watching in awe at the amazing projects Leandra and  Lin would produce whether it was here on blogger or at shows/ArtsyCrafts events. Then came Fresco Acrylic Paints .... I was hooked immediately. The colour choices along with their quirky names were a must ... the paints are a perfect base to stamp on and easy to apply to any surface. Snowflake/Nougat are also ideal to use as a primer. The paints have different qualities: Semi Opaques, Opaques or Translucent .... to understand this more Leandra has done some great YouTube videos on the PaperArtsy channel.
The inspiring thing for me about the colour palette within the Fresco paint range is that it entices me to come out of my comfort zone. I normally stick to Blues/Browns but not any longer lol oh no!
I've discovered Autumn Fire, Smoked Paprika  and the best of all Zesty Zinggggg!!

For this project I started by giving my 6x4 chunky canvas a base coat of Nougat. I opted for Nougat instead of Snowflake as it has a warmer depth to it. I then began adding layers of Butternut, drying in between layers to ensure colours don't muddy together. I then added some more Nougat to knock back the colour. 
At this point I then began to add some stamped layers using Archival Ink (sepia) and MN44. These mini script stamps are perfect for adding layers to your projects.

Then the fun part began - I added a layer of Zesty Zing , this colour is truly amazing (I'm converted).
Continuing to build up the layers at this point I stamped MN22 with Mermaid then MN74 with Archival Ink (Black).
MN22
MN74
Crackly Tissue Paper is the perfect surface for adding an image to your canvas. With detailed stamps such as the Lynne Perrella collection I use Versafine Ink (Onyx Black) which gives you a real crisp image.
LPC008

To colour the image I started on the reverse using Autumn Fire, Mermaid, for the face I mixed up some Nougat, Vintage Lace and a small spot of Rose to highlight the cheek area. BTW don't panic at this stage as it doesn't look great.
However when you turn it over, Hey Presto you have a beautifully coloured image.

To add this to your canvas apply Satin Glaze over the back of the image, place on canvas then apply another thin layer over the top to seal. Satin Glaze is useful for so many things you should see how it works on Crunchy Wax Kraft Paper with Liquid Leaf and Fresco Paint


Satin Glaze dries clear, the sheen from this image was just after I applied to the tissue paper.
These wooden chipboard shapes from Artemio again are the perfect embellishment to any project and yet another surface Fresco Paints love to "stick" to! I covered the heart base with Autumn Fire then stamped with Zesty Zing.
On the above leaf I used Mermaid, stamped Script mini from above then smooshed some Zesty Zing on as a contrast.
This one has Mermaid Butternut and Zesty Zing.


I hope you have enjoyed this project .... I will be back later tonight with some more news about our first Guest Designer and another piece of news. Stay tuned! Hope to see you then.


Thursday, 3 January 2013

An introduction to {summer} JoFY styley

Time to wake up and smell the ......flowers!!!

Llittle Missy Jo Firth-Young has been a busy bee, and in addition to what is featured in this post, she has more stunning stamps up her sleeves, all of which I am 100% certain are going to be a big hit with crafty stamping folk! But for now, we have this one gorgeous set of stamps, with super ideas from Jo.

We cracked the whip (ever so nicely), and got her to do an advance stamp set, which has had some publicity in the form of a double spread in this new Creative Stamping magazine.

Not only did we ask her to do a stamp set earlier than we originally planned, but we also asked her to make 3 cards for the magazine article in less than 24 hours, nothing like a tight deadline... this all happened late November! And didn't she do well! So go get yourself a copy of the January issue of Creative Stamping for instructions on how to make these 3 lovely cards.

I can give you a sneaky look-see of a teeny bit of detail. This is the blue one, with a distress ink background over stamped, a bit of masking magic, and layered up. Very nice indeedy. Clever use of the sentiment stamp from the bottom of the set!

On this one you can see how the addition of buttons and layers can make all the difference. Jo is very attentive with her colour selection, she has used distress inks and markers, but selecting shades of the same brightness and depth. Even though they are cool toned, the creamy antique linen adds a subtle contrast, and allows the cream button and altered book pages to fit the palette perfectly. She's so clever!

Again, this is just a snippet, but here she stamped a leafy-grassy multiple times, adding additional flowers into the mix to create a more random leafy grass repeat. This is going to be a really useful set, I'm sure you'll agree. Available now JoFY09.

Don't forget, the sale is on #justsayin


Tuesday, 1 January 2013

Much {Blog} Excitement Ahead

Hi everyone

Well we have been scheming for the last few months, but to be honest, this is an idea I have been mulling over for about 2 years. But it required the right person to co-ordinate, and finally last year the right person popped up to co-ordinate it for me, so we are all action stations! but first let me explain to you what I see happening here this year.

The whole Design Team blog thing can easily become a chore, for the organisers, the contributors and so on, it's so much more work than you would ever expect to keep everyone on task, and my schedule isn't consistent enough for me to be able to do that as efficiently as i would like, so I came up with a solution that works for me, and most importantly gives you, the blog follower, more variety of content and therefore in theory it should keep it fresh with a far wider variety of content from a number of fabulous people.

So we have enlisted a bunch of people to be short-term Guest Contributors for a semester only. Some of them may be well known bloggers (but not necessarily from your neck of the woods), and others you may not know at all. It really doesn't matter to me how long they have been blogging or doing what they do or how many followers they have etc. That is not what this is about.

What matters to me is they are passionate about what they do and how they do it. They are uniquely creative and perhaps i have noticed they show a real strength with a particular PaperArtsy product line. They are sure of their own style and, most importantly they are all very willing to share the utter nitty gritty of how they create with you! Sounds good to me!

I am so excited to see what is going on in their heads as they work, how they recover if it doesn't go quite to plan, and if they actually have a master plan, how do they get there? Some of them are nervous and feel a bit out of their depth because they are quite new to crafting or stamping even, others are like the energizer bunny bouncing of the walls in anticipation, but each of them I am so absolutely grateful to for agreeing to share with you their spin on using PaperArtsy Products. It's so nice for me to see how other people like to use our stuff, and to be able to feature those ideas on this blog is awesome!

I don't want a bunch of mini-me's out there, I know what I like, and how I like to do it, but that might not be your thing. You need to find your *thing*. I guess that is why I tend to teach techniques, because it's a starting point from which you can easily twist to find your own personal preference.  My passion for the readers of this blog is for you each to find your own unique style, colour preferences, mediums, products etc. and to express using them in a way that you enjoy. 

We all can always grow, move on and learn something new, whether we are beginners, intermediates or experienced, the learning curve never ends, there is always something new around the corner. Being willing to learn, try things out, have a go, that is what helps you to find yourself, how you like to create, and the things that push your buttons. What others think isn't important, it's what you enjoy doing that is.  So my wish for you, is that this blog, and these people will be a small part in your creative path this year, and that you will find and adapt ideas into new and interesting ways to express yourself.

Every Sunday night we will let you know who is up the following week. But for now, can I say how happy I am that Gillian Simson has offered to be the Chief coordinator behind the scenes. Thank you sooooo much (from all of us) in advance!

So, look out this coming Sunday to see who will be first up for 2013!
Amazing piece by Paula Tidman
And while Mark was mooching about setting up our PaperArtsy Pinterest page he stumbled on this Fabulous piece by Paula Tidman featured here on the That's Crafty blog. Go check it out, I love the colours. She has used Lynne Perrella Stamps, they look gorgeous!

Happy stamping times ahead of us all!

Leandra