Showing posts with label Texture paste. Show all posts

Wednesday, 24 April 2019

2019 #6 Fish: Sand in My Toes with Hot Picks {by Jennie Atkinson}

2019 Topic 6: Fish


Adorable beachy  tones in this seaside project from Jennie, where she remembers her childhood days of splashing and sandcastles. As always, her finishing touches are sublime. ~Leandra

Hi everyone, it's Jennie (Live the Dreamwith you today, and I am sharing a journal page reminiscent of my childhood days by the beach. 

I have been very lucky to have always lived within a few miles of the sea and I have so many happy childhood memories of our beach hut at Mersea Island and days spent fishing, swimming in the shallow waters, dodging jellyfish and building huge sandcastles. It was my natural habitat.

So for our current "fishy" challenge I thought I would celebrate these memories by pulling together a number of elements for my page using one of my very first PaperArtsy purchases (Zeppelfish Poste).


I have used both of these stamp sets to create tickets and labels and to adorn my "fishy girl" and a Scrapcosy sentiment to sum up my page.
ESC17


I do like to create my project from a simple set of colours and chose Fresco Finish Chalk Acylics Lake Wanaka, Seaglass and South Pacific to get the seaside/ocean feel. And nothing better than to create with these gorgeous paints with my Gelli Plate and Smoothy Cardstock which gave me papers to work with.


My pages started with some washi tape which was then covered with Crackle Paste and some Texture Paste dots through a stencil when this had dried. This is my favourite technique at the moment - I just love the randomness of it!


I then started working with the Fresco Finish paint onto the page, sloshing watery bits here and there on the crackle and giving the pages a splattering of colours. 


Although the text stamp from HP1306 is quite large it is possible to stamp small areas by using the edge of the stamp. I have used Archival Watering Can ink to get an image over all the textures which also allows me to go in with more water if I feel the colour is too strong.


I am a sucker for small ticket punches and this is one of my favourites. I have been able to punch out some tickets from the gelli plate papers and also from the stamped images. I have cropped the large stamp to form an ATC which fitted the scale of my page.


I have used Crackle Glaze over Lake Wanaka to get this lovely distressed wood feel on the mannequinn.


And the fishy stamps were just perfect for decorating the dress. I had to experiment by using just about every blue and green inkpad in my stash to get the right colour to match! 


My journal pages tend to be two opposing collages and the little tickets have fitted in well with the ATC sized background. Again I have cut as much as possible from the gelli plate papers.


And finally some sand ....... I remember it was almost a strange feeling in winter NOT to have sandy feet in my shoes! 

As usual I have created with many small parts of the larger stamps in these sets. What I absolutely love about PaperArtsy Hot Picks stamp sets are the tiny little words, swirls, numbers, etc. within each of the larger stamps. They are just perfect for tickets and labels and background stamping. Also, by limiting my whole spread to just three colours of Fresco Finish paint I feel I have managed to maintain the seaside/beach feel of my page.

I do hope this layout inspires you to look into your Hot Picks stamp sets and see all those wonderful little bits and pieces just waiting to be used in your next project!

As always, thank you for joining me.

Jennie x

Saturday, 21 April 2018

2018 #7 Kraft card: A Butterfly Floats with EAB {by Wanda Hentges}

2018 Topic 7: Kraft Card


Ohhhh I've just been demoing here in Paris with Hot Pick stamps all day! I LOVE this collection, it will never date. These stamps have so many details that I know i will be revisting for years to come! Gorgeous ideas from Wanda to see in this post!

Hi everyone, it's Wanda Hentges with you today, and I'd like to share with you a card using both Kraft Card and Crunchy Waxed Kraft Paper.

I do love making cards!!  I enjoy canvases, art journals, altered pieces, atcs, etc, etc. but have always loved cards.  And they are wonderful to give away hopefully putting a smile on someone's face.


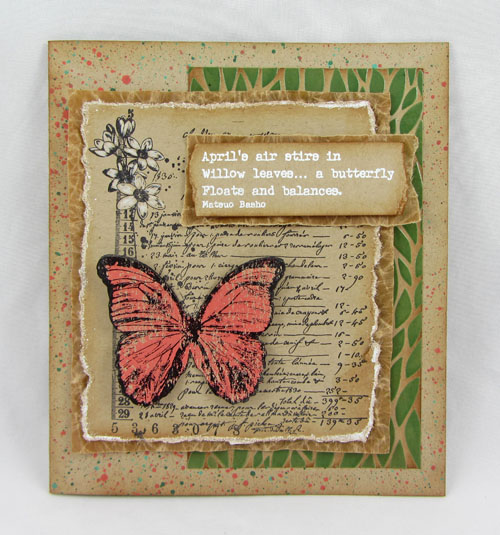
This whole card is built around the quote I used from the Eclectica {Alison Bomber} Collection (EAB06).  Alison has such wonderful quotes in her stamp sets!!!  I've paired it up with a stamp from Hot Picks 1301 (HP1301EZ).


Besides Kraft Card I've also used Crunchy Waxed Kraft Paper.  This is such a fun paper to use in projects and I love how it looks after crumpling!!


I wanted the butterfly to have color and dimension but not completely cover the Kraft.  I took a piece of Kraft Card large enough for the butterfly and painted Fresco Chalk Acrylic (Coral) onto it with a fan brush working from the center outward.  Using a Stamp Platform, I stamped the whole image onto Kraft with Archival Ink Jet Black.  I then added my painted card where the butterfly was and stamped again.  To make the black darker on the butterfly I stamped it multiple times, dried it, cut it out, and colored the cut edges with a Wink of Stella Pen (Gl. Black) to give a little sparkle and a finished edge. 


This Tim Holtz stencil makes me think of willow leaves so it also went well with the quote.  I mixed just a couple drops of Fresco Chalk Acrylic (Hyde Park) into some Ranger Texture Paste (Transparent Gloss) and stenciled it onto a piece of Kraft Card.  Once it was completely dry, I trimmed it and inked the edges with Distress Ink (Vintage Photo).


Splattering with the Tim Holtz Splatter Brush to add a bit of color to the folded card base - Fresco Chalk Acrylics (Green Patina, Hyde Park, Coral).  Edges are inked with Vintage Photo.


All the pieces.  The quote from Alison Bomber (EAB06)...


... is stamped with VersaMark and embossed with detail white powder, torn out, and the edges inked with Vintage Photo.  The main panel also has torn edges and they were then embossed in white and inked with Vintage Photo.  A White Colored Pencil brought out the flowers in that wonderful collage stamp.   


I really had a good time creating with Kraft Card.   It is not my go-to color and can be a bit challenging.  I enjoyed making all the layers and working everything together!!  I hope you can get out your Kraft Card and create something for this challenge!!!  If you do, link it up and I'll be along to take a look. 

Hugs, Wanda

Blog:  https://artbywanda.blogspot.com/
Facebook:  Wanda Hentges
Twitter:  WandaHentges
Instagram:  wandahentges
Pinterest:  Wanda Hentges


We always hope that you  learn something interesting from our blog

Our creative team love to read your comments so much, so please take time to let them know you've been inspired!  

You must complete step 1 AND 2 to be entered into the draw. 

To join our challenge:
1. Leave a comment on the Topic Introduction Post and go in the draw to win a PaperArtsy Apron. 
2. Make something arty relevant to the topic, and link your creation from any social URL (eg. Instagram, Pinterest, Blog Post etc) sharing your original make to this challenge page.

The current topic link Topic 7: Kraft Card will close 17:00 (London Time) Sunday, April 29th 2018, and the winner will be announced 2 hours later at 19:00.


All links go in the draw to win a PaperArtsy creative apron. Please make sure we can contact you as a prize winner - it helps if you share your contact info from the platform you opt to use.

Good Luck! If you have any questions, don't hesitate to ask!

Saturday, 28 October 2017

2017 #15 Pearlescent: A Pearly Gift Bag with JoFY {by Kate Yetter}

2017 Topic 15: Pearlescent


Kate is back! I really like her way of creating, she is very organic, and there is a hint of scrapbooker to her method of composing layers, and I super-love the dimension she always achieves too! Check out the photos below, lots of details. A lovely way to enjoy the weekend. And relax.....

Kate here, sharing a holiday themed gift bag featuring pearls. I love working with products that lend a pearlescent effect so I chose to work with liquid pearls for this project. I find that I don’t often reach for liquid pearls when creating a project because it is one of those more forgotten embellishments. But a little bit of shine and dimension can go a long way in creating an eye catching creation.


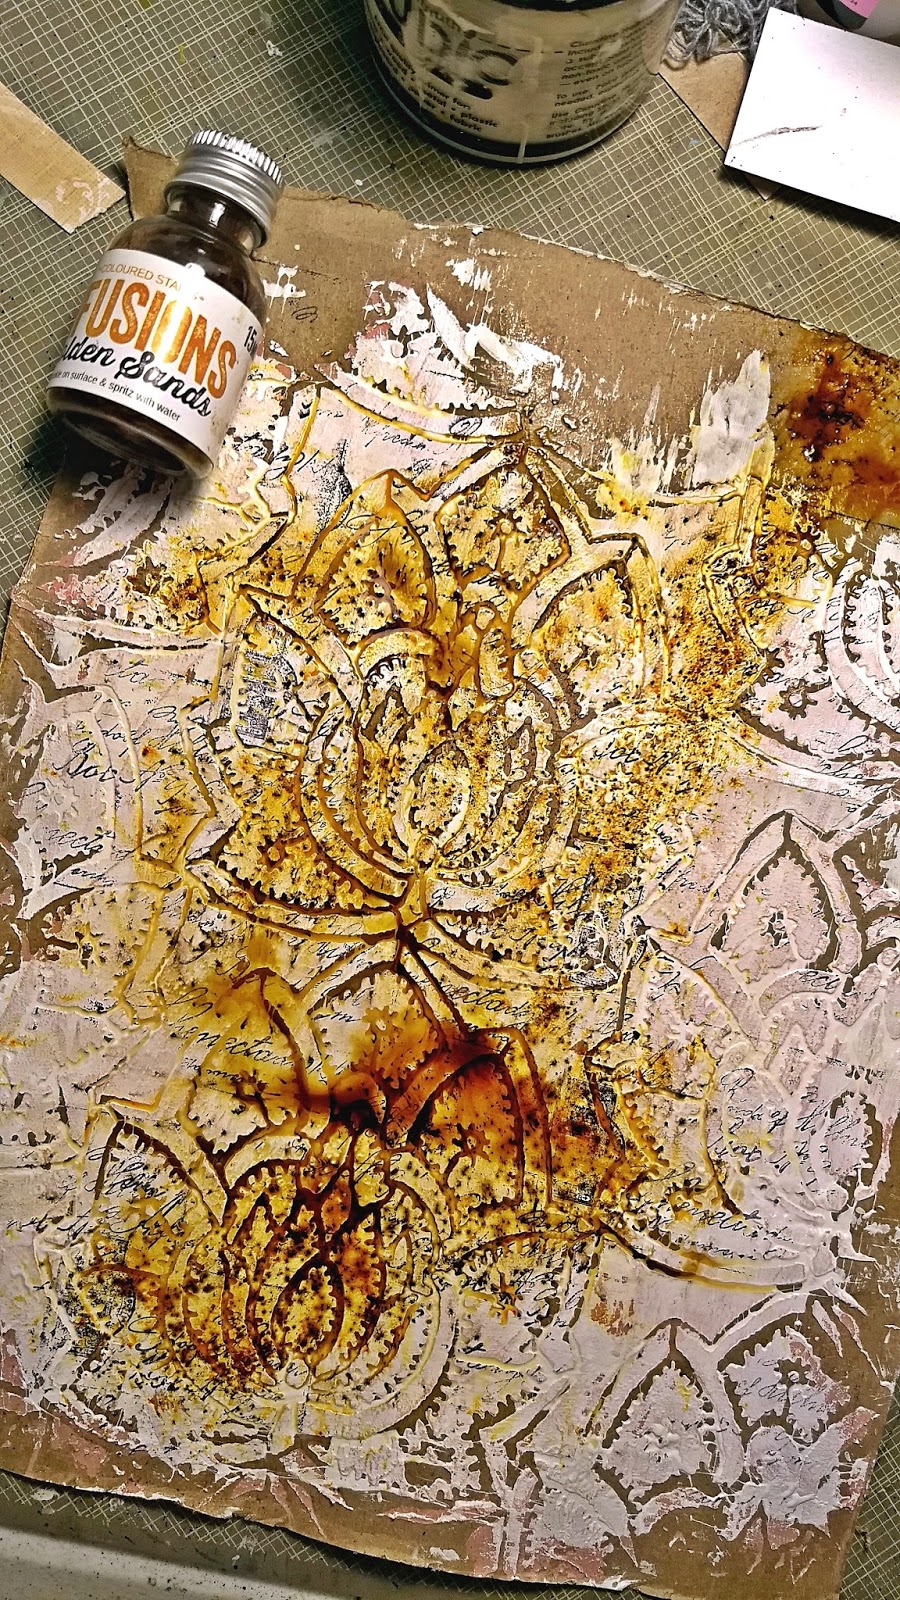
I started out by stenciling with grunge paste on a grocery bag. I covered it in gesso and allowed it to dry. My favorite part of this whole project was sprinkling Golden Sands Infusions over the stenciled area and spraying with water. This was my first time working with Infusions and I couldn’t get over the variety of colors that presented upon spraying with water. Usually, I add 2-3 colors in my background because I like variety but that was unnecessary with the Infusions.


I stamped on my colored background and many of the embellishments with JoFY 40.


After I created the background, I glued it to a plain kraft gift bag before adding embellishments. I rolled up paper and tied them together with muslin that has been stamped and dyed with Infusions. 


The JOFY stamp set was perfect for this topic. I used the liquid pearls to create the pearls underneath the baubles in the cloche, as well as to accent the lines of my background stencil and to fill in the string of lights.


I added some chipboard, fibers and string to embellish as well.


This piece is full of dimension that the pearls and stamps together have created

I hope you enjoyed this project and are inspired to create your own packaging as the holidays are approaching.  Don’t be afraid to make your packages a work of art! At first I was a little worried about how this was going to turn out but once I started creating, I couldn’t stop adding more! 
 

Kate Yetter
 

Blog: http://scrapyardthe.wordpress.com
Facebook:  https://www.facebook.com/katesscrapyard/
Pinterest: https://www.pinterest.com/katesscrapyard/

What a stunning gift bag this is! I totally adore the infusions spritzed into the texture paste and then the fibres and stamped layers are just so much fun. Anyone receiving that would be totally blown away! Great project, thanks Kate! ~ Leandra


We always hope that you  learn something interesting from our blog

Our creative team love to read your comments so much, so please take time to let them know you've been inspired!  

Why not join our 2-weekly challenge by blogging your create response to the current topic and link it here?

The current topic link Topic 15: Pearlescent will close 17:00 (London Time) Sunday, 29th October 2017, and the winner will be announced 2 hours later at 19:00.

All links go in the draw to win a £50 voucher to spend on products of your choice from the PaperArtsy online store.