Showing posts with label PS297. Show all posts

Monday, 9 October 2023

2023 Topic 10: Tags {by Etsuko Noguchi} with Gwen Lafleur stamps


Hi everyone, It's Etsuko with you today, and I'm here to share with you ' Tag book' using talented designer Gwen Lafleur's lovely and very useful stamps.

When I was child, I loved collecting labels, tags and wrapping papers as you were too. The fun memories of exchanging the items with friends and crafting and playing paper dolls are still the source of my creativity to now.


The large tags are full of possibilities and have been used in various works. Today I use these #10 and #3 tags to make a case with a window and an accordion book with a pockets in it. And please enjoy with me, as I have also included this time themes of 'Tags' and 'Typography' in the project.


First of all, you will see the tools PaperArtsy products used for the case and accordion book, there are still others that are needed but I will be introduced shortly.


I used these tags are ready-made #10 and #3 sizes that I have on hand. 


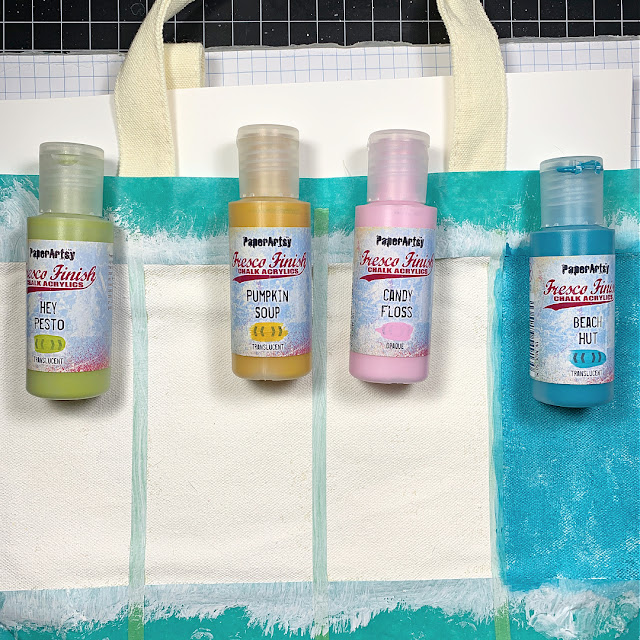
These tags was coated with white gesso. The #10 tag on the case was painted PaperArtsy Fresco Finish Chalk Acrylic - Cerulean and Double Denim using PaperArtsy brayer. The colours were a bit vibrant so I toned down the Snow Flake using brayer.


I then made the collage papers for the surface of the tag case, I added PaperArtsy Fresco Finish Chalk Acrylic Heavy Cream using PaperArtsy Stencil by Tracy Scott PS234 and PS386 stencils on the Cerulean and Double Denim painted copy papers.


Collage and paste those papers onto the painted tag.


I die cut it into an oval shape and made the window for the tag case.


Use the tag case by folding it like this. This photo was taken after this time but I will explain the frame and button band in the image later.


Now I made the accordion book background by painting the front and back pages using stencils onto the Smoothy (Heavy) A4 white stamping card. This photo is the front of book. I then using the PaperArtsy Stencil by Tracy Scott (PS365), I first applied the PaperArtsy Fresco Finish Chalk Acrylic - Aqua Duck Egg (199) and moved stencil slightly to apply - Willow (FF178).


Then on the back page, I used brayer to paint Tangerine Twist and Firebird, and tapped Heavy Cream onto the PS386 stencil with a sponge.


Fold the book paper backwards and cut into a mountain shape to make a pockets.


These are to use the papers for the book collage and I adde leftover too.


The Gwen Lafleur stamp set 22 and 23 ( EGL22 and EGL23 ) images stamped in Ranger Archival Ink - Jet Black on Smoothy (heavy) A4 white stamping card and lightly coloured with watercolour.


The second thematic Typography had letters SCENE created on a computer and EGL22 image coloured using Ranger Archival and Distress Oxide some inks.


This the entire front page of the accordion book.


Next my typography, I used Grunge Paste and Infusions - Golden Sands, Rusty Car and The Sage on PaperArtsy Stencil by Sara Naumann ( PS297 ) as a background for the tags to give it grungy look.


I was planning to use tissue paper for the focal point of the tags but the acetate I had ordered had just arrived, so I made a double tag. Some alcohol ink was dripped onto a clear block, a little alcohol was added, acetate tag was pressed onto it, coloured and EGL22 images was stamped on the other side with Ranger Archival ink Jet Black.


They are three pairs tags for the each (circle, acetate and typographic).


I also comes with the round tags and is decorated with sari ribbons and small charms.


These are each tags was placed in the pockets like this.


I wondered what kind of stopper be attached to the cover, I looked at the hole in the tag and decided to make a button out of clay and thread an elastic through it to make a band. To make the button, press EGL22 flower onto Sculpey Clay, cut in cookie mould and bake in the oven for five minutes.


Let button cool, I painted with Aqua Duck Egg and a little bit of diluted Double Denim. Once it dried I rubbed with Treasure Gold.


A die-cut oval frame is attached and the EGL23 image stamped onto the acetate  with Stazon Pigment - Snow flake, which is then affixed to the back of the cover to complete the piece.


I made a small pocket on the last page spread and put in a photo slide folder, paper flower and envelope.


I created this tag book by expanding on an idea from Gwen's Facebook free workshop ' Macthbook Minis', Her ideas amazing and always inspired by me and it spurs creativity. 

I first planned out how to incorporate the theme Tags and Typography using Gwen's stamps and decided to use a large tag as a  book cover, sandwich an accordion book in between, and layout the typography on it. In order to create a pleasant atmosphere, I added texture, acetate, Grunge Paste and clay to create a variety of changes. It may not enough yet but I finished it here to leave a topic for tomorrow.
Thank you so much stopping by.
Etsuko xxx


From here is extra post, I collaged after the tags and decorated it with Alison  Bomber's quotes in order to use enough leftover papers.


Facebook: Etsuko Noguchi
Instagram: Pixienest
Pinterest: Etsuko N

Sunday, 17 April 2022

2022 Topic 06: Mainly Stencils {by Laurie Case} with Nicci Battilana Stamps


Hello everyone! It's Laurie with you today, and I'm here to share with you the super fun play session I had with a bunch of stencils, paint and embroidery floss!!


Stencils. We all have them and we all love them! Stencils have to be one of the most versatile and inexpensive crafty supplies we have. Yet, in my experience, I basically use them with inks and paints. And while one of my projects involves just that, my first project involves embroidery floss!

First off, this project isn't a quick make. It took me approximately 3 days, on and off, to complete. But it was great fun and I am in love with the finished project!


I had an inexpensive, canvas zipper pouch in my stash that needed to be dressed up a bit. I started by using a neutral colour of paint to use with the stencil. In this case, I used Fresco Finish Eggshell and the new stencil PS316 by Nicci Battilana. I adore this stencil! And because my plan was to do some stitching, the simple design is perfect.


Even with just a light coat of the paint it looks great! But let's add some stitching!


I chose neutrals for this project but I think it would look great in brighter colours! I kept the stitching very simple. Just back and forth, covering the stenciled image. Honestly, my first few "x's" were not pretty. But once I got into the groove, they looked much better by the end of the project!


Now, to add a bit of whimsy to this bag. I decided to create my own zipper pull using the new stamp set ENB07 by Nicci Battilana!


I stamped out a couple images from both the ENB07 and ENB09 sets but in the end, chose the cute little bat on the right.  I used alcohol friendly ink (Tuxedo Black-Memento) and used my alcohol markers to colour.


It was at this stage, I decided to stamp the image again so my keychain would have a more finished look. I decided not to colour this one. What is great about this image is that it is ALMOST symmetrical. I glued these images together and only minor trimming was needed!


Everything is now trimmed and a hole punched to put the chain through. I promise this little guy did not feel a thing :)!  After these pieces were adhered, I placed it into a thermal laminating pouch.


These I've had in my house for ages! I should mention that I don't think this is a necessary step if you didn't have these pouches. But it will add some durability for sure! After running this through my laminator, we have a sweet zipper pull or key chain!


And he looks adorable on the stitched/embroidered pouch!


I hope you're still with me because I'm still "in the zone"!

My next project is far simpler and much quicker yet still has a lot of impact! This is also on a canvas bag that is larger than the pouch. It uses a few different stencils and some fun, beautiful colours of Fresco Finish Paints!


I chose a summery colour palate for this tote. Fresco Finish Hey PestoPumpkin SoupCandy Floss and Beach Hut.


Isn't this palette delicious? 


I started by doing some simple masking on the tote. No precision here, I eyeballed it as best as I could. I'm not going to lie, it was hard to get a great seal with the tape, especially over the handle portion but I went for it! 
Before applying a thin layer of white gesso, I did tuck a sheet of cardstock inside the tote to protect the back.


Inside each of the masked sections, I applied the paint with a makeup sponge. These paints went onto this material like a dream and dried quickly!

Before removing the masking tape, I chose a variety of stencils including the new Nicci Batttilana stencils, PS315 and PS316. 


I did want to add some text to this tote bag so I chose 220 PA Stencil along with 297 PA Stencil, both by Sara Neumann.


It's going to look like a hot mess at this point. I'm not going to lie, I was a bit worried!! But once I removed all that tape....


I think it turned out great!!! These colours just give me summer vibes! 


I know that the first, stitched project may seem a little intimidating. It sure was for me! But I really wanted to try it. Yes, it did take some time. But this bag would make such a great gift and will last for years!  The painted tote bag was much quicker and easier. Great for mass producing actually! Both these techniques are new to me and I learned so much from each one. 
I encourage you to have a look at your stencils, get out your inks or even your embroidery floss and have a good play!

I thank you for hanging out with me today and hope you found just a little inspiration here!

Until next time!!

Laurie