Hello all, Alison here from Words and Pictures, and I can't wait to share today's storybook with you! It's definitely a labour of love, bringing together scraps and mop-ups with collaged panels, fragments of book pages, multiple stamp sets - both my own and France Papillon's - plus oodles of ephemera, all to create a celebration of storytelling through pictures and words.

I was inspired by those wonderful editions of classic novels where, as you read the dense text, suddenly every once in a while you would turn the page to find a small illustration - usually a fabulously detailed black and white drawing. I loved discovering those visual bits of storytelling illuminating the words. I'm sure that's why I was so drawn to the trio of France Papillon stamp sets I've used here. But I always wished there could be more pictures, and so this hand-stitched book is my way of fulfilling that wish... with more pictures than words!


You may have noticed that I'm slightly hooked on the Mattints at the moment, and they play a major role in these book pages. Their transparency brings that gorgeous glow, as well as making it so easy to tint a stamped image with subtlety. And I just loved finding ways to combine my stamps with the vintage delights to be found in the France Papillon trio.
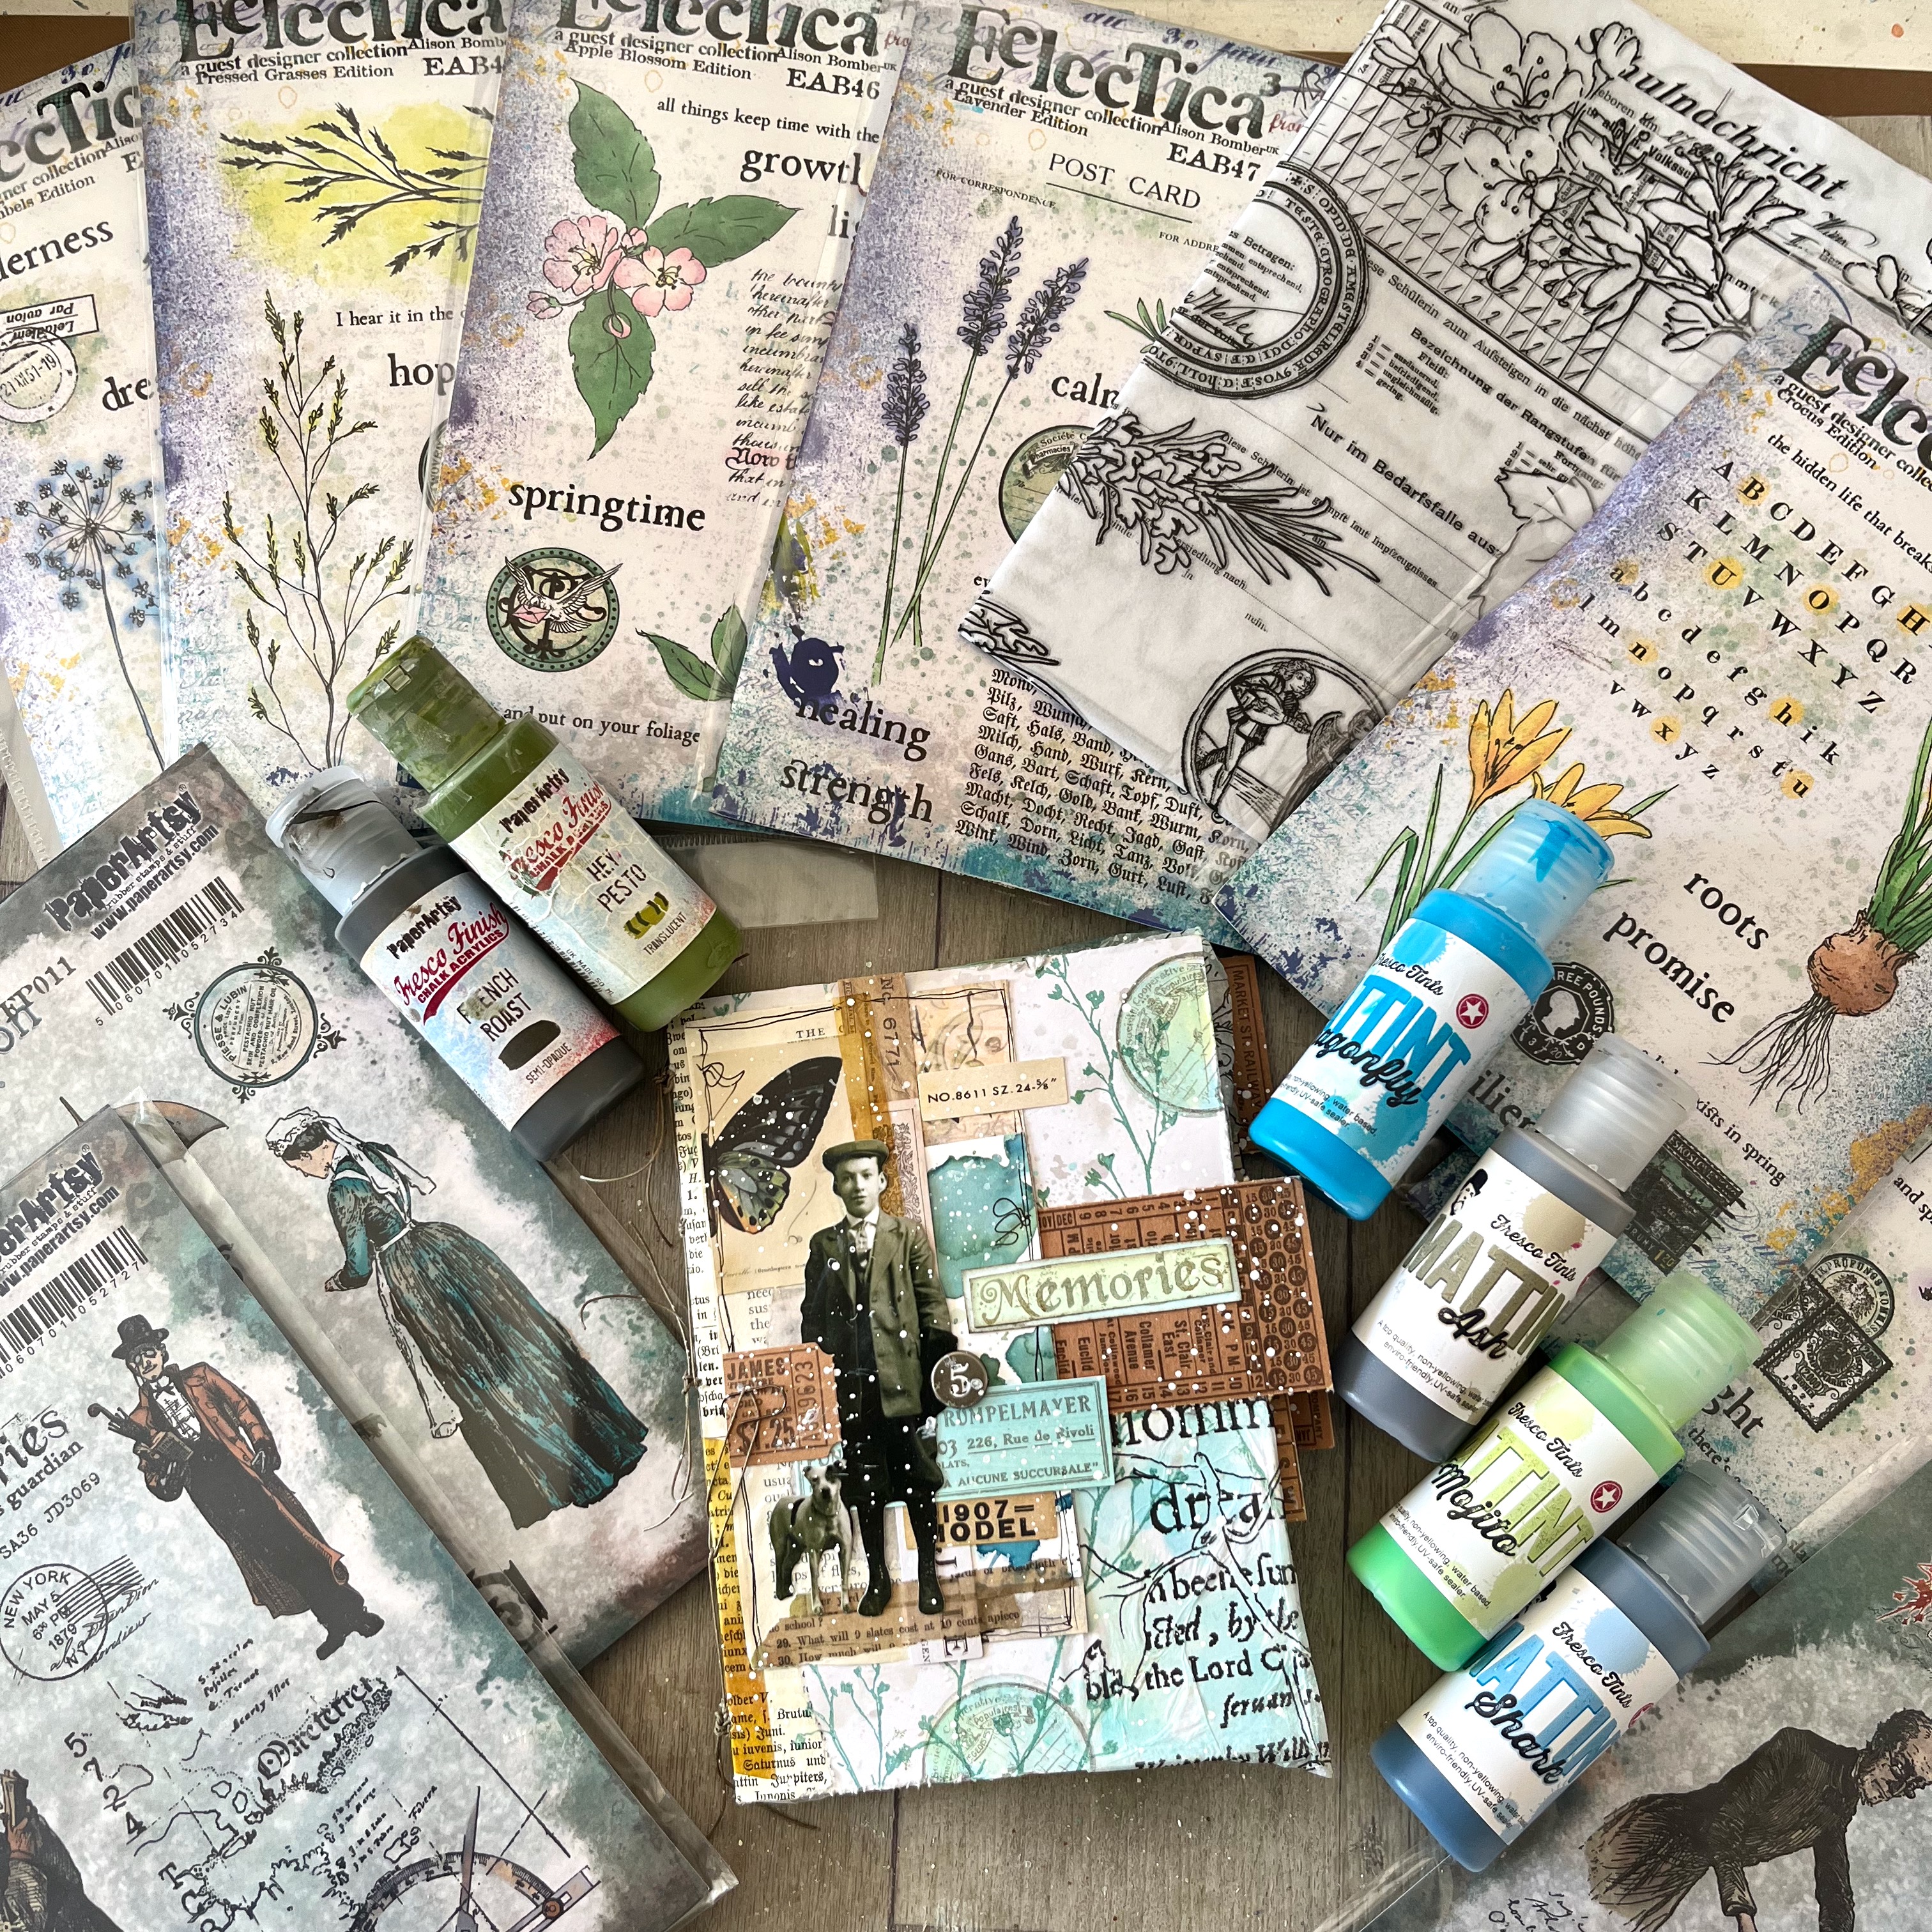
As you can see, I've used a LOT of stamp sets... FP010, FP011, FP012 are the France Papillon ones. The botanical stamping comes mainly from my new springtime sets, EAB45 Crocus Edition, EAB46 Apple Blossom Edition and EAB47 Lavender Edition; with EAB40 Pressed Grasses, EAB41 Pressed Umbels and EAB42 Winter Grasses also in play.
But I've also used ephemera from lots of my other sets - more about that to come down below... and of course all the products are available from PaperArtsy stockists worldwide.

I used a pack of pre-folded cards as the main substrate for my pages, and used Distress Inks to add the splotches and discolouring of aged paper.

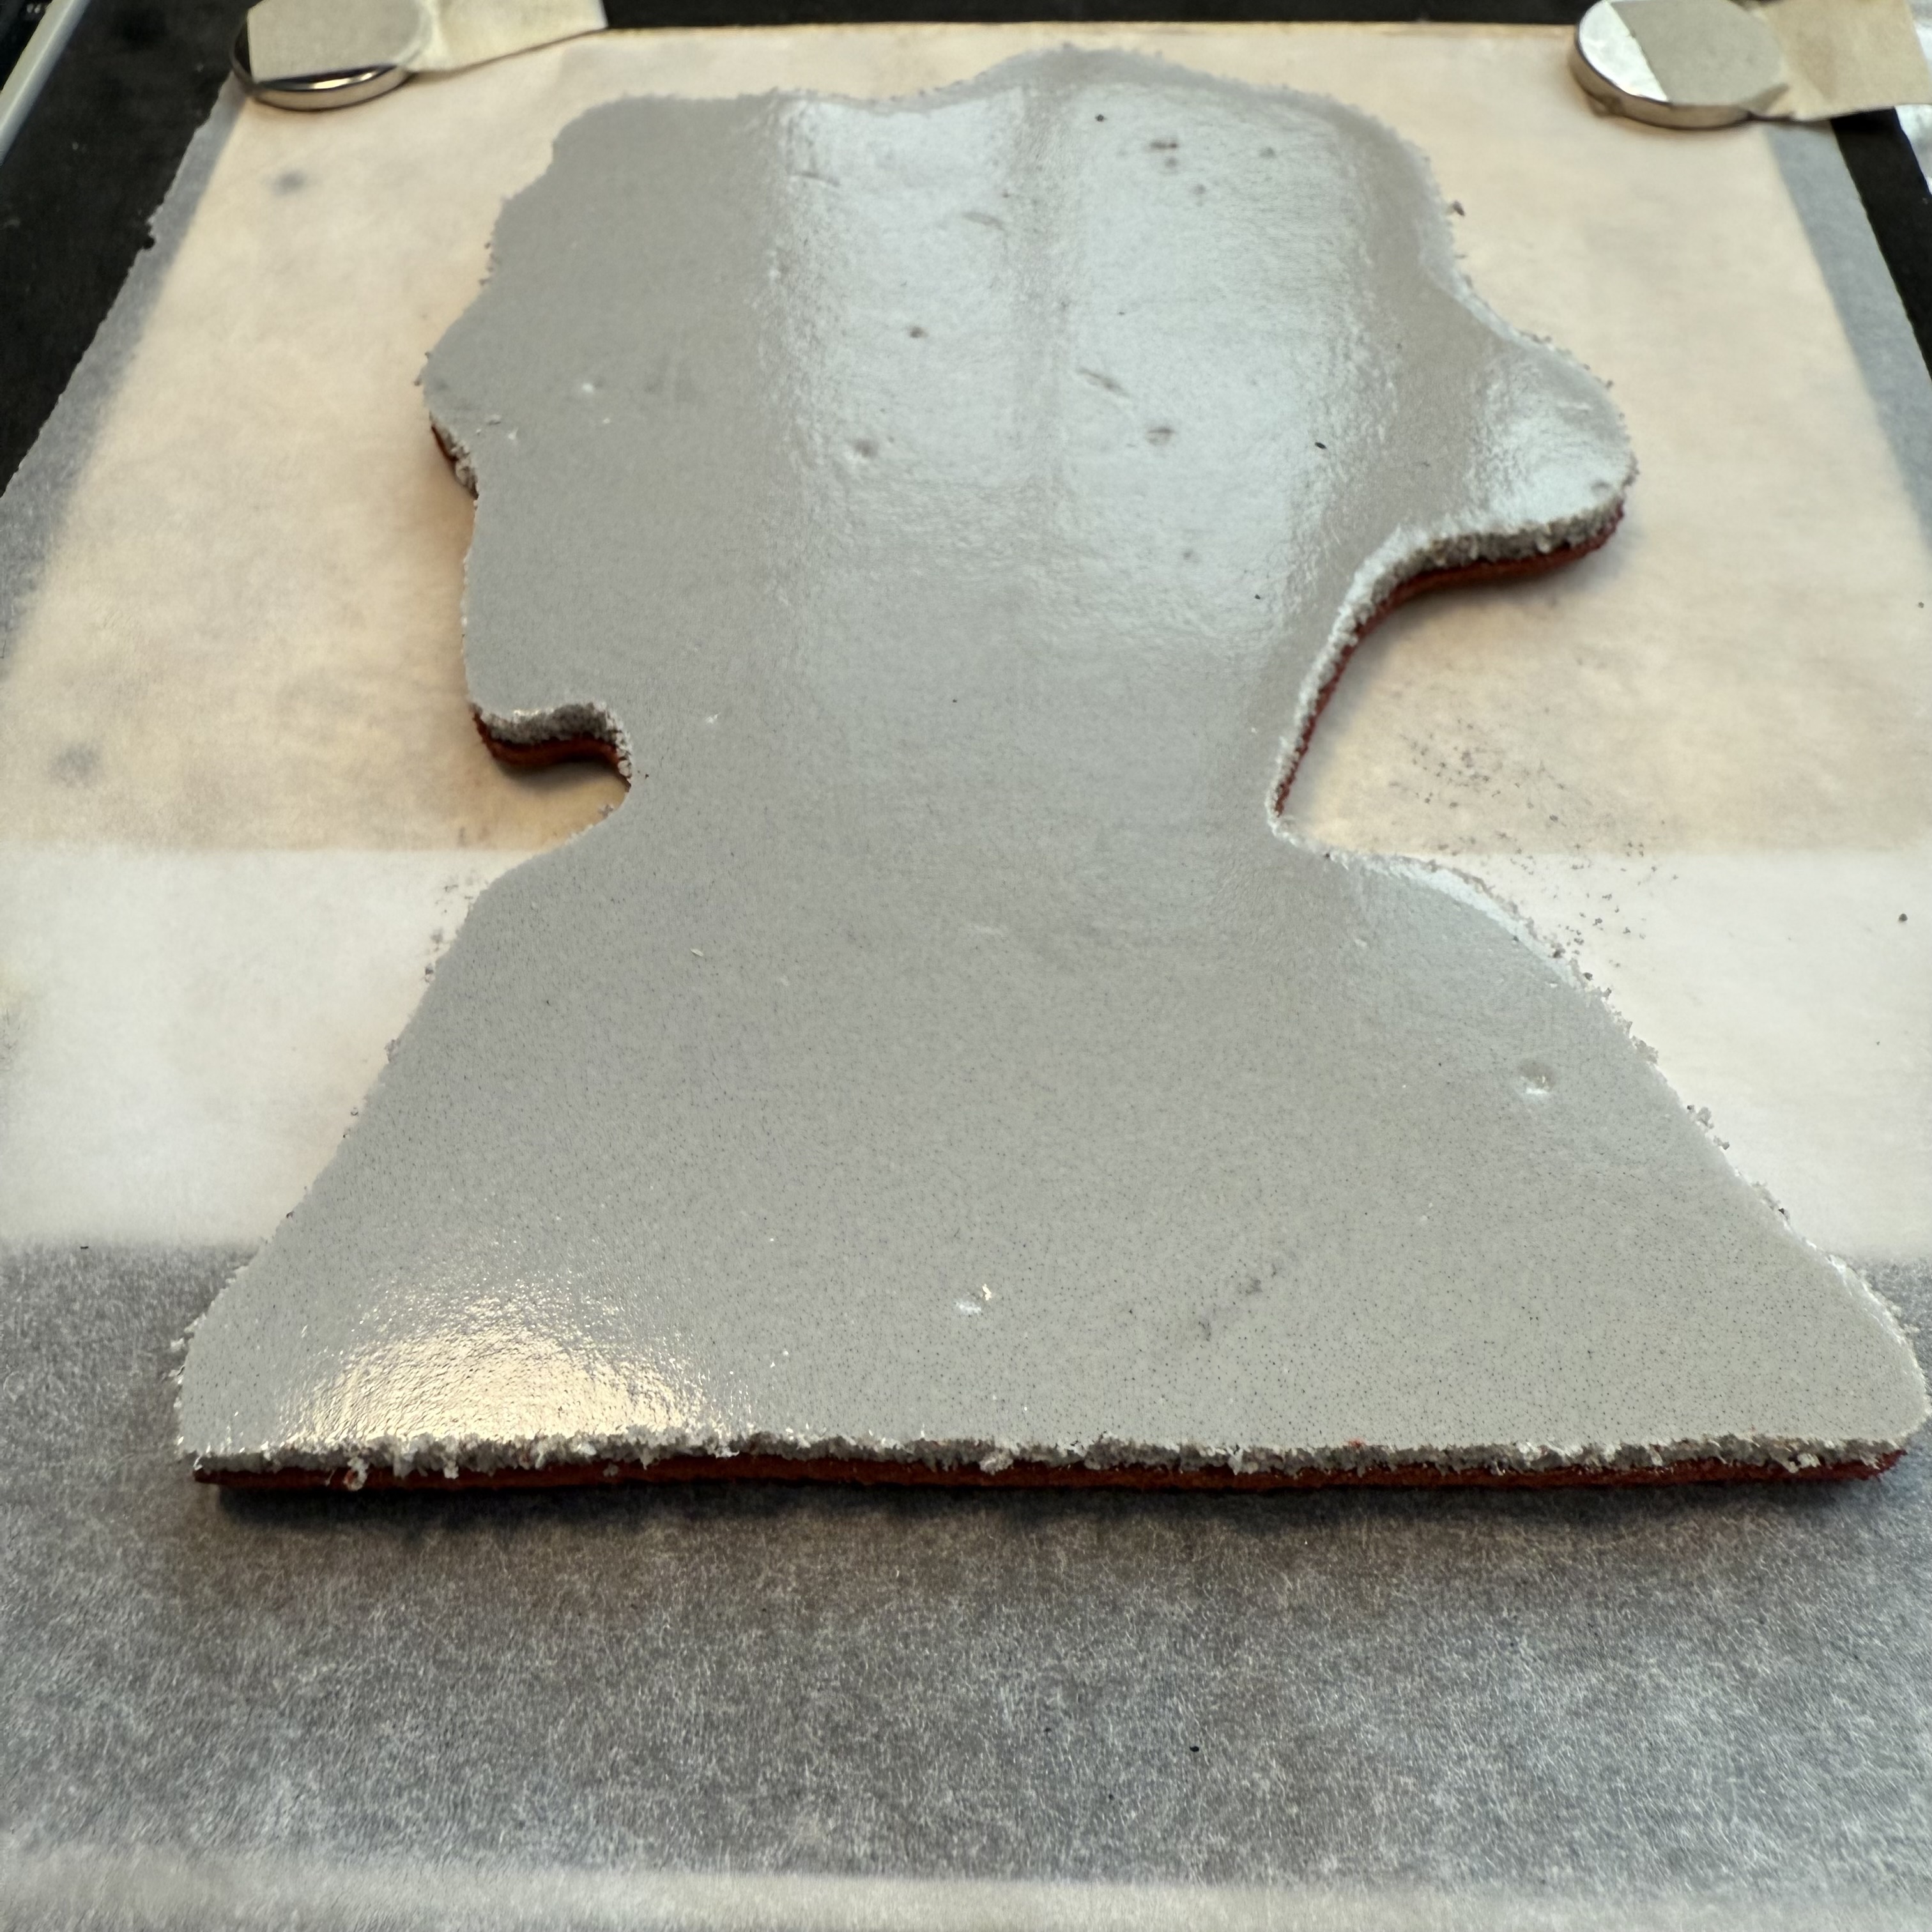
I painted some Smoothy Stamping Card with layers of Mattints. I'm slightly obsessed by the new Mojito colour, especially combined with Dragonfly. Together they create gloriously sunlit turquoises, duck egg, tropical ocean tones, with some occasional River Deep thrown in for a deeper shade.

I used that painted card to stamp ephemera drawn from almost all my botanical stamps, from the first of the sets including imagery, EAB24, all the way up to the most recent, EAB47. (The 23 earlier ones were all quote collections, so no ephemera involved!) Thanks to the tonal variations across the pieces of card, each individual piece of ephemera is a slightly different colour, and yet they all harmonise together.

I smooshed some scraps of my Printed Tissue PT08 which were around on the craft table into the same colours. Since the Mattints also work as a glue, while the colour was wet I was able to stick the tissue straight onto the pages as a first layer. And (of course) I spattered some of the leftover Mattint onto the pages for extra colour and detail.

That Mattint glow on both the ephemera and the tissue is going to be crucial in bringing the storybook together as we progress...


The next steps were partly done page by page, and partly with an eye on the whole book. I wanted to make sure that the literary characters from France Papillon's sets would appear at fairly regular intervals, not all in a rush, so I had to watch the spacing from signature to signature.

I used mostly Mattints to tint the images. Since they are completely transparent, you never lose the detail of the stamped image, no matter how many layers you put on. I did use occasional touches of Fresco Finish Chalk Acrylic when I wanted a particular colour but I either used translucent paints like Hey Pesto, or worked with washes (mixed either with water or with Mattints) so as not to obscure the stamping.

Earlier, I had created a series of collaged panels on Tim Holtz Wallflower papers, using my Mattint-ed ephemera as well as Photobooth, Snapshots and Paper Dolls. (You can see that whole process - including the full Mattint ephemera-making - here on my YouTube channel.)

That matching ephemera (which I loved so much that it inspired me to use the same ones for this project) suddenly made me wonder whether those panels maybe had a part to play in this storybook - with stories of their own to tell.

I wasn't sure whether the vintage photos would work alongside the book illustration characters - but as soon as I tinted the stamped images, I loved how they looked alongside the collaged panels.

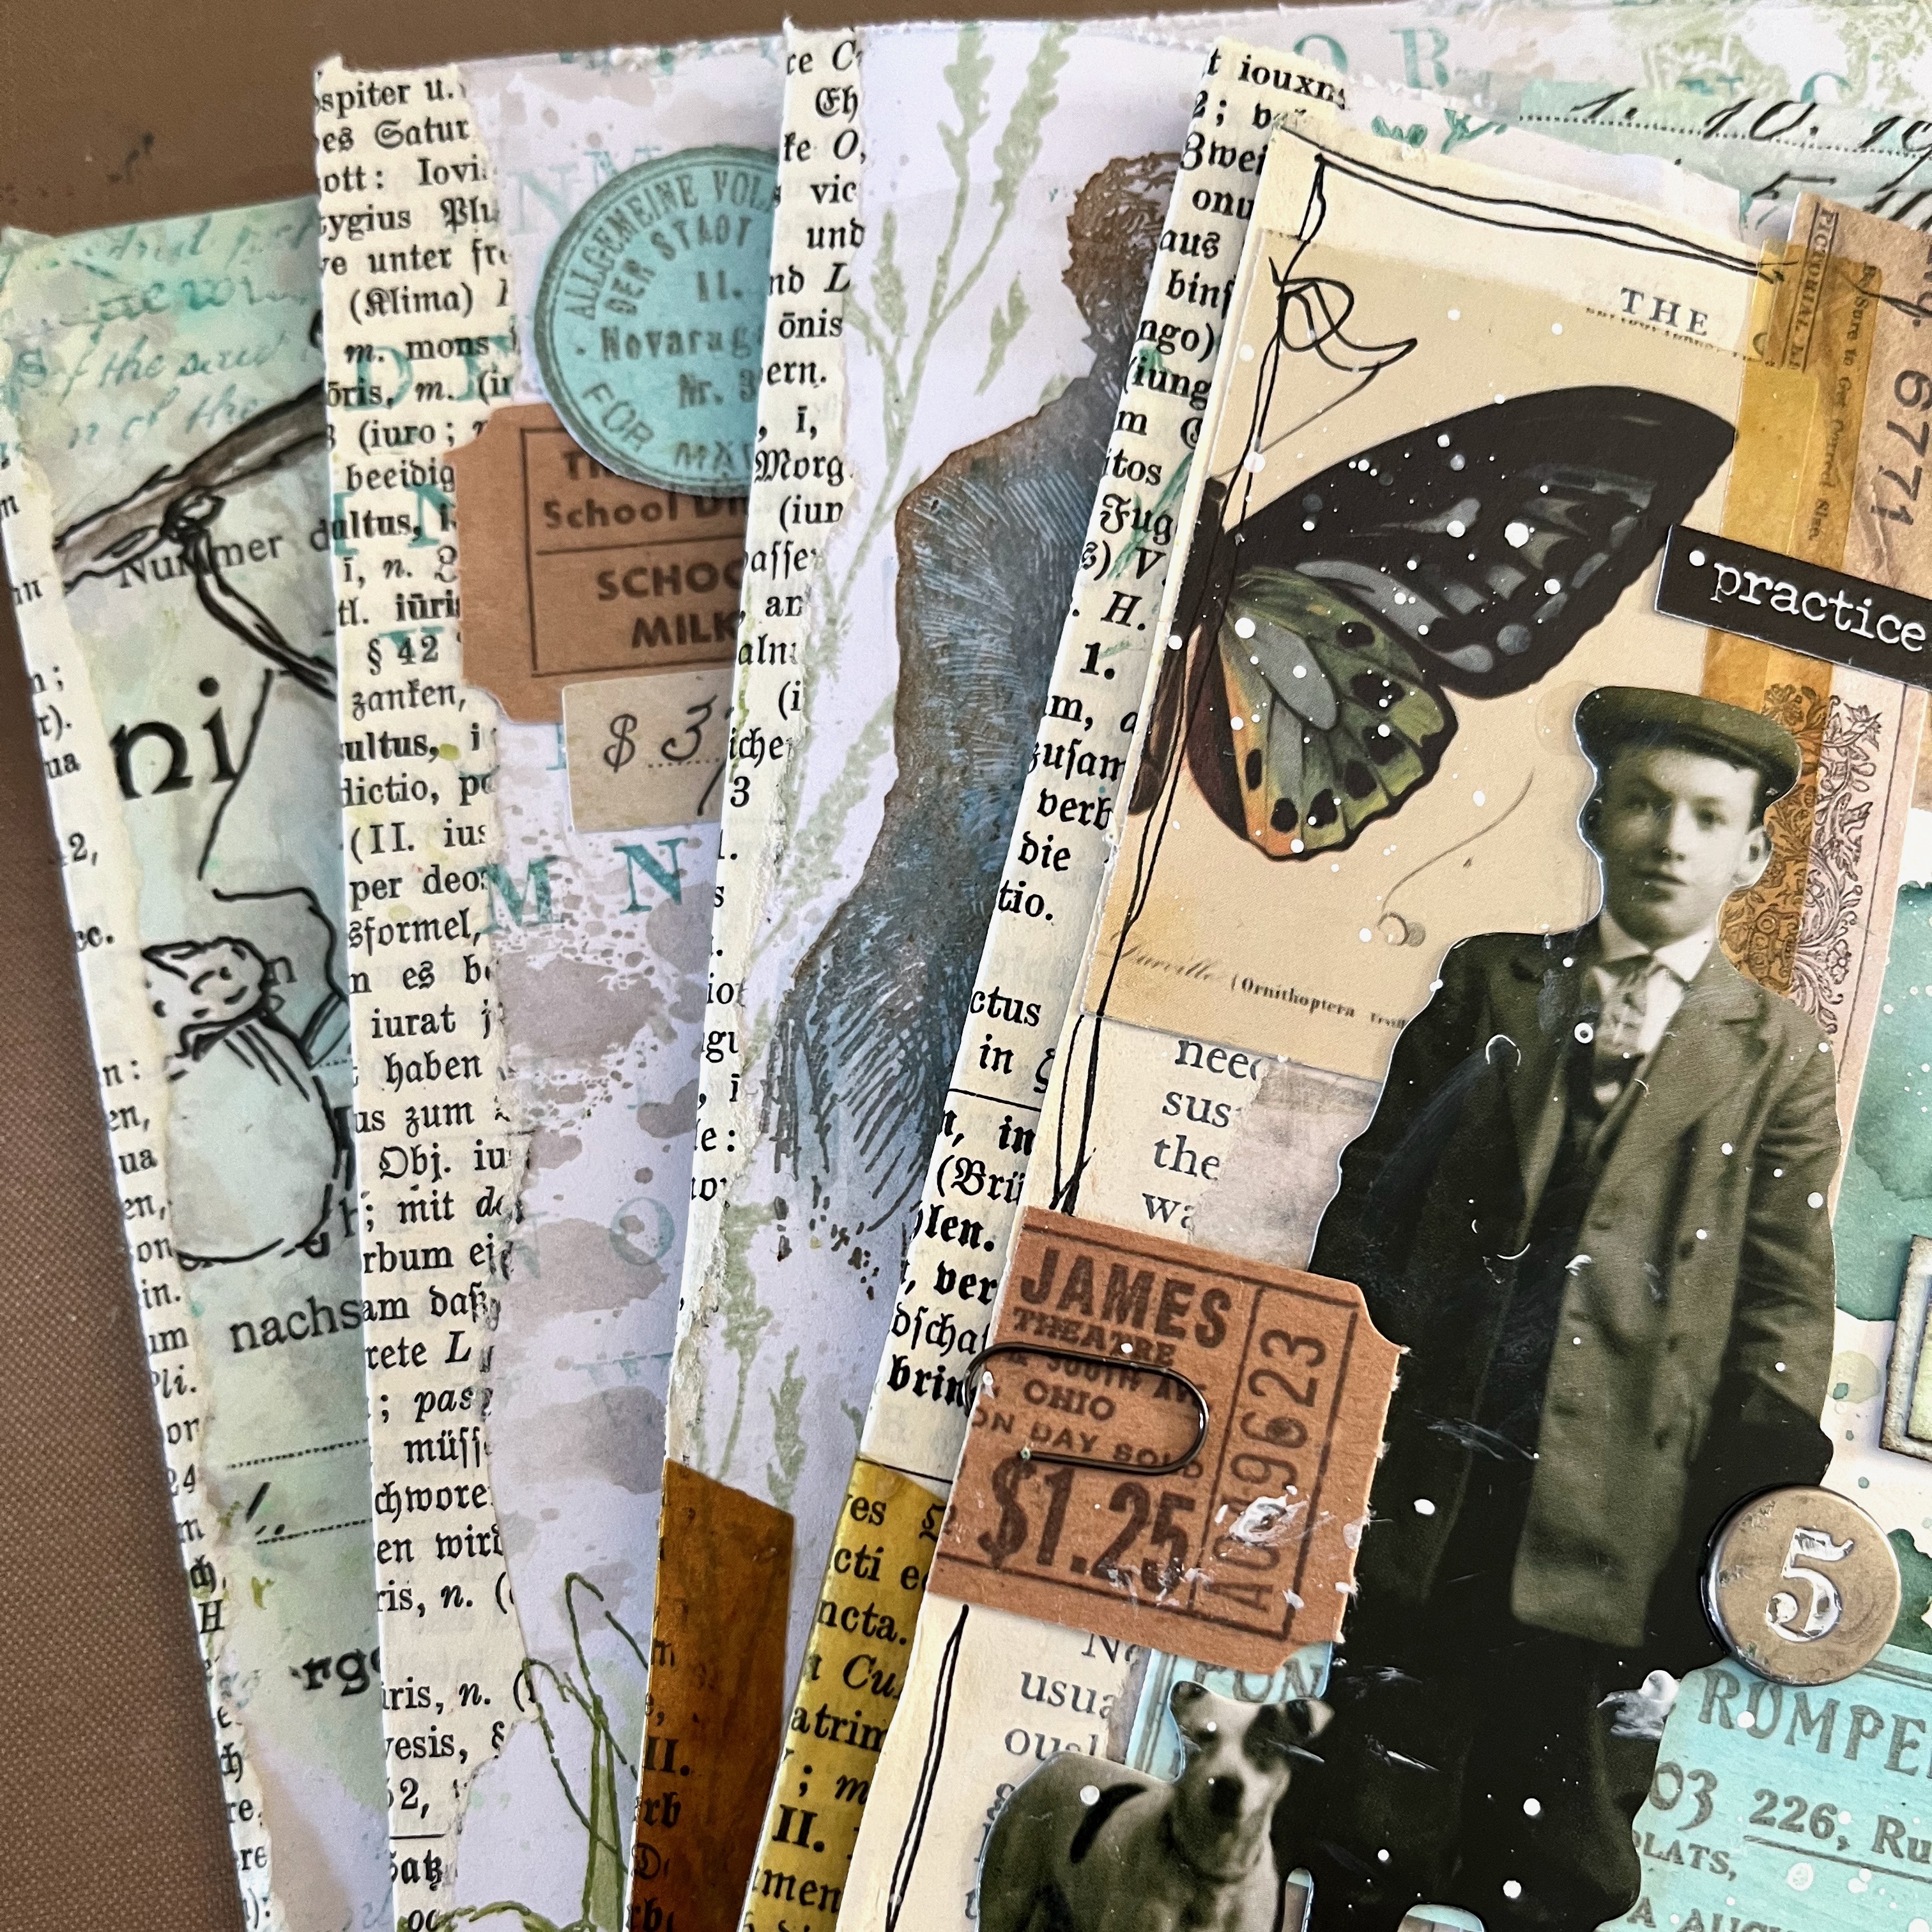
On each page with a tinted image, I started to build clusters of ephemera that echoed the ones on the panels.

And see what a difference the tinting makes, bringing the illustrations to life... Here's that maid with her newly tinted dress (River Deep and Shark, for the most part). It was at this point that I began wondering what she's holding in her hands that she is gazing at so intently - and that's how the stories start to emerge... they start to tell me things. (More about that further on...)

So then it was a question of mixing and matching ephemera pieces (both hand-stamped and pre-made) across the pages - either alongside the tinted France Papillon illustrations, or added to the collaged panels. That intensifies the sense of them all being part of one cohesive whole... to allow them to "speak to" one another. (How perfect are those horses from FP011 - one "Mattinted" in Nutty and one in Ash?!)

Bits of ephemera were already sticking out over the edge of some of the panels, and I was able to reposition some of the ephemera to help embed them even further into the pages. Sometimes I cut a piece of ephemera in half and used one half with a photo panel and one half with a book illustration, so again the two are drawn together.

So by now, I had four "signatures" - that's to say four folded cards directed front and back on all sides...

... and it was time to take a deep breath and do some stitching to bind the whole thing together! (These two photos show you all the outside pages... you'll have to carry on to see the inside spreads, and how these pair up together.)

I'd known from the start that I wanted to stitch my signatures eventually, so you'll notice (even way back in those early process photos at the start of this section) that I glued torn book page fragments to reinforce the spine of each card. Not only does that increase the sturdiness of the card where I needed to stitch, but it adds to the old book page theme of the whole project... good, eh?!
I found a number of videos on YouTube demonstrating the "kettle stitch" book binding technique, and followed those, using the book binding thread and needles which I have tucked in my stash.

I'm very happy with how it came together... there are imperfections in the binding - a bit of wobbliness here and there, but you know me... I'm not that interested in perfection!!


I'm absolutely thrilled with how this book has all come together. There are some of my stamps and some of France's on every single page... even on the cover. I had plenty of my ephemera there already, of course, and the EAB42 Winter Grasses, as well as the tissue paper in the background. So then, instead of picking one of the (many) large words on my sets, I decided the word Memories, from FP010 was actually a much more appropriate title for the book.


This post is already quite long enough, so rather than share all the stories from the book now, I'm creating a full length storytelling flip-through video which should go live on my YouTube channel at the same time as this post goes live.
What I will do now is give you a quick glimpse at each spread you find as you turn the pages. There will be close-ups to come over on my Instagram grid over the next days and weeks, so keep an eye out there too.
What I will do now is give you a quick glimpse at each spread you find as you turn the pages. There will be close-ups to come over on my Instagram grid over the next days and weeks, so keep an eye out there too.


This was such fun to make... a gradual process over several days, adding in bits and bobs that were around on the craft table, as well as creating bespoke elements to bring the pages together.

You don't have to follow my springtime colours, of course... but using something like the Mattint-ed ephemera, in whatever colours you love, allows you to bring a complex project together by having that repeated element involved.


I hope you've enjoyed this journey through the process, and I hope you'll join me over on YouTube to hear the stories which emerged from each page as I was creating this book inspired by my memories of the illustrated books I grew up with.

Thank you so much for your company today, and happy crafting, all!
Alison xx

Add clickable links to your blog and social media hangouts, delete what you don't need
YouTube: Words and Pictures
Instagram: @w0rdsandp1ctures and @b0hem1anh0me
Instagram: @w0rdsandp1ctures and @b0hem1anh0me
Website: Words and Pictures
Blog: Words and Pictures
Pinterest: butterfly crafter
Facebook: Words and Pictures
Watch out at Stampers Grove and Country View Crafts for workshops coming your way in May 2025!