Showing posts with label EKC19. Show all posts

Sunday, 9 September 2018

2018 #15: Artist Trading Coins with EKC {by Chris Cresswell}

2018 Topic 15: Artist Trading Coins


Hi everyone, it's Chris Cresswell from loopsandlines.blogspot.co.uk with you today, and I'd like to share with you my Artist Trading Coins and Holders, using some of Kay Carley's recent stamp sets and stencils. 

I was really excited earlier this year to catch onto this new version of Artist Trading Cards when I saw a FaceBook post which featured some examples of Artist Trading Coins. I was intrigued. I then went onto Pinterest to see if I could find more, only to find very few had been uploaded. Only six in fact and a short Process video created by Joanne Hodges (aka Craftyhodges) who got this idea while taking a shower! Of course, there are hundreds now but I clearly entered this mini world at its very early stages. I'm very grateful as I adore making them. I have particularly enjoyed creating these for PaperArtsy, using Kay's lovely stamps and stencils because the flowers fit the 2.5" size so well and because they achieve the same purpose as the original Artist Trading Cards, which is to provide samples of an artist's work: in this case a sample of a PA designer's work! I have also created a 'Holder' for storing the ATCoins. The small size Pringles tin is a perfect fit for these Coins. 


This quickly became a Mixed Media project. I knew that I wanted to make several ATCoins but I wanted to keep them fairly simple to really show off the beautiful flowers, butterflies and dragonflies that Kay loves to design. I always start with a Masterboard and die-cut the Coins once the background is complete. 


I first put down a layer of Distress Oxides followed by various PaperArtsy Infusions, sprayed with water to create a lovely watercolour effect. Infusions work so well on top of the Oxides. There are more process steps of this stage on my blog tonight if you haven't yet tried this technique, here 


I used 340gms PaperArtsy Smoothy Card for these backgrounds. This is the 12" x 12" size, so I was able to die-cut a lot of Coins from these three colour combinations. 

Having made the backgrounds for the Coins, I then started on the backgrounds for the ATCoin Holders, again using the same size PaperArtsy Smoothy Card, but adding some texture using PaperArtsy Grunge Paste and two stencils: PSO34 and Kay's new stencil PSO97.


First I used PSO34 to scrape grunge paste through the stencil, all over two sheets of the card, in its natural form.


Once dry, I brayered several Fresco Chalk paints across each surface. On one sheet, I used predominantly pinks and oranges, on the other sheet I used a mix of blues, purples and greens. Again, I have listed the colours used on my blog. The raised stenciled circles resisted a lot of the colour so quite a bit of white space was created. 


Once I was happy with the colour blends, on each stenciled sheet, I used Kay's new stencil (PSO97) to add further grunge paste on top of the coloured background. This is such a pretty stencil and wonderfully firm to take heavy media. This time I wanted to add colour to the grunge paste before applying. This was when the surprise happened. In the photo you can see I used Magenta Infusions on top of the pink/orange background. I had hoped by using the Infusions I would create a vibrant raised set of stenciled images. However, to my surprise, I found that when this dried the colour had paled down considerably. At first I was disappointed but gradually found that I loved the new colour that the mixing with the grunge paste had created. The same happened when I mixed Violetta Infusions with the grunge paste for the blue/green background.


The little daisy is from a much earlier stamp set: EKC03.


As you can see I added further doodling to the raised stenciling and used a Sharpie white paint pen to colour in the daisies.These were now ready to cut to size and wrap around the Pringles Crisps tins to transform them into Mini ATCoin Holders. 


The tiny butterfly and dragonfly are from sets: EKC03 and EKC06.


The next step was to stamp out some of the gorgeous flowers from Kay's new stamp set: EKC19 and my all time favourite stamp set: EKC15.


I used Black Archival ink for one set and Memento for the other set, again stamped on PaperArtsy 340gms Smoothy card. One set would be coloured with Copic markers, thus the need for a Memento ink pad, and the others would be coloured with Derwent Inktense Blocks which I grated into little pots and added water to. These three Coins (which are my favourite) were coloured with the Inktense Blocks, cut out and adhered to the Coins:


Each Coin is embellished with stamping, doodling and mark making before the final image is adhered on top. The final flourish in the three above was to add some text and a little DecoArt Media Liquid Glass in the centre of each flower. Once completed I generally adhere them either to black or coloured card or some of the  many MDF Coins I have in my stash!


The fun part is always the final stage, deciding on the focal image and final embellishments. You will already have seen many different ideas for completed ATCoins this week and there are many more on Pinterest. For some of these, and as a tribute to Kay's preferred style, I've added some glitter to some of my Coins. Often I will add Collage Pauge to ensure all layers are firmly attached, especially if I've added beads and tiny fragments. At other times, I will add DecoArt Crackle Glaze or  Distress Collage mediums. The choice is yours. In the photo below, you can see a close-up of some of the Coins with added glitter and three Coins made from one of the left-over sheets that I created for the Holders:


These little mini art works are quick and easy to make and there are a number of Swaps organised by various groups, including my own facebook group: Mini Marvels. I hope the ATCoins you have seen tonight and throughout the week inspires you to have a go yourselves. Kay Carley's stamp sets are a great way to get started. Any of the Coins shown here are available for swapping if you're interested!

Blog: www.loopsandlines.blogspot.co.uk
Facebook: Chris Cresswell
Twitter: @artmadnana
Instagram: artmadnana
Pinterest: Chris Cresswell

To join our challenge and win a PaperArtsy £50 gift voucher:

Simply make something arty relevant to the topic, and link your creation from any social URL (eg. Instagram, Pinterest, Blog Post etc) sharing your original make to this challenge page.

The current topic link Topic 15: Artist Trading Coins will close 17:00 (London Time) Sunday, 16th September 2018, and the winner will be announced 2 hours later at 19:00.


All links go in the draw to win a PaperArtsy £50 voucher. Please make sure we can contact you as a prize winner - it helps if you share your contact info from the platform you opt to use.

Good Luck! If you have any questions, don't hesitate to ask!

Tuesday, 12 June 2018

NEW PaperArtsy Products {Kay Carley} June 2018

NEW PAPERARTSY PRODUCTS June 2018

Eclectica³ Collection: Kay Carley


Kay is back with more floral magic. As summer blooms here in the Northern Hemisphere,  every stamp addition offers you more options to build your own Monet-esque field of wildflowers! Whether she is working with ink, paint or markers, she has so many gorgeous delicate effects that make her samples project multiple layers, yet she often works on a single, flat layer.I'm sure you will love this mid-year summer inspired release! ~ Leandra

Hi everyone, Kay here to show you my newest stamps designed for PaperArtsy. Below you will find some ideas of how they can be used. You might notice that some of my previous stamps and stencils have sneaked their way into creating these samples too!

With this release I very much had in the forefront of my mind some of my previous stamp sets as these new sets were designed to mix and match with others from my collection. For instance EKC18 is full of delicate imagery and as such will mix very well with EKC17 (my grass stamp set) and also EKC07. Whereas EKC19 and EKC20 were designed so that they can be used with each other and with EKC13 and EKC15. This means there are lots of possibilities of mixing and matching these stamps in with previous releases.

With regards to the stencils I wanted to produce bolder imagery this time around in order to 'layer' with some of my previous delicate stencils. 

In fact let's get to it........I can't wait to show you my new stamps and stencils! There's an art sample for each new product too. 

  New Stamps
Here at PaperArtsy we manufacture red rubber stamps because we love the durability and eco-friendly nature of rubber. Rubber holds ink so beautifully allowing you to work with a variety of inks with ease, but its durability allows you to work with paint, hot UTEE and everything in between. We design, press, trim, and package all our stamps on site giving us complete control over every stage of production.
Price: RRP £17.08 +VAT
Size: 5" x 6.5" (13cm x 16.5cm) 
All stamps are trimmed onto cling foam, and are presented in a clear bag with a laminated storage/ index sheet 
  
Eclectica³ Kay Carley Set 18 (EKC18)


This shows exactly what I meant about this set being designed to go with EKC17. The foreground grasses just work so well with the new imagery from EKC18. (I have a challenge for you........I bet you can't guess what the inspiration was for these 'weeping flowers'........it's probably not what you think!!!)


I've mixed and matched my dragonflies on this. The squiggly ones are from the new stamp set but the spotty one is from my previous EM27 mini stamp. This has been stamped onto a peek of something that may be coming your way soon!!


Eclectica³ Kay Carley Set 19 (EKC19)


I know that I am often known for creating 'layers' when creating my samples but for this card I purposely kept it very simple to show that when you have lovely bold imagery you can create quick but effective cards.


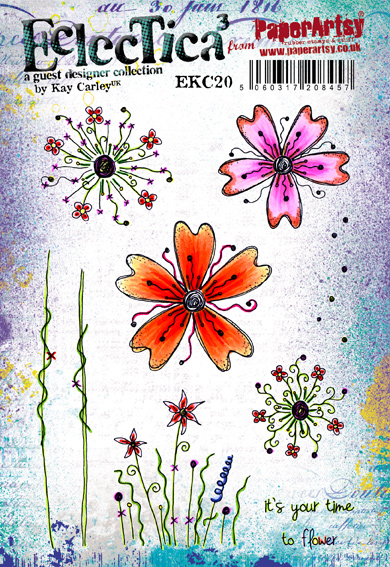
Eclectica³ Kay Carley Set 20 (EKC20)


This sample goes a step further than the previous one as I've incorporated one of my new stencils to add some interest into the background. You can see that I have layered up the main flower to create a fuller looking bloom. (And if you look closely at the base flower you might see a peek of something that might be coming your way soon!! Eeekkkkk.....exciting!!) This stamp set differs slightly from EKC19 in that the flower heads and stems are separate, thus allowing the flower heads to be used on their own to stamp backgrounds etc... therefore giving more versatility. 


New Stencils
PaperArtsy stencils are made from a durable mylar which offer the perfect depth when working with pastes or texture products, and a robust product when it comes to clean up! A craft scrubbie and hot water should do the trick!
Price: RRP £4.60 +VAT
Size: Regular 6.5" x 7" (16cm x 18cm)
  
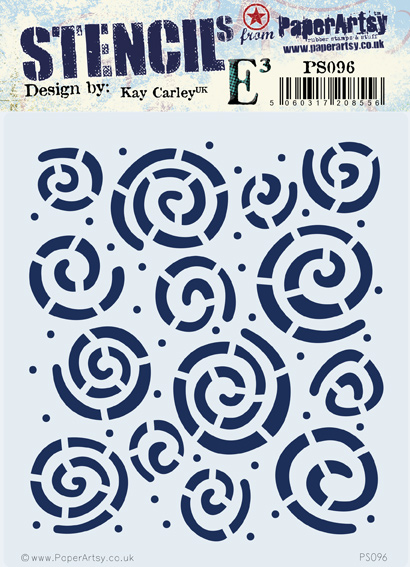
PaperArtsy Stencil 096 {EKC}  (PS096)


When creating this stencil I had in mind that I wanted to be able to dry emboss with it so I purposely made the swirls nice and open. Also having bold swirls means that my delicate looking stencils from previous releases will layer on top of the swirls really well when creating 'background layers'.


Of course it is also a great stencil to add any sort of texture paste through! (See the white borders above.) Being 'PaperArtsy's Glitter Princess' I chose to use a glittery paste - lol!


The stencil was also designed so that it can be used as a border.


PaperArtsy Stencil 097 {EKC}  (PS097)


Having a 'bolder' type of stencil means that you can easily paint different colours onto your stencilled imagery and add your own doodles!!! You'll see on the first image above, how I really 'layered up' using three different stencils to create this sample. The only stamped imagery are the words. It's amazing what can be achieved just with stencils isn't it?


Of course this stencil is also fabulous to put any sort of texture paste through and being that the imagery is bold it is easy to apply different colours of paste to specific areas if you want to. I just kept it all one colour (above) for a clean, fresh look.


Here I've used the stencil very simply with a Distress ink but if you wanted you could have the circles a different colour to the stems and leaves or even have multi-coloured circles! I think they would look fab with Glossy Accents on them too!

PaperArtsy Stencil 098 {EKC}  (PS098)


My thought process behind this stencil was to be able to mix the different sized flower heads with the two different sized stems to create lots of variation. Plus having the flower heads separate from the stems means the heads can be used on their own to create a background. You'll see above that I used Grunge Paste with the 'complete flower' for my main imagery to create raised flowers. Once again the only stamped imagery here are the words - everything else has been achieved with the stencils.


In the background of this sample you can see I have used the smaller flower head and stem to create soft background imagery. 


PaperArtsy Stencil 099 {EKC}  (PS099)


For a couple of releases I have used large open imagery on one or two stencils to complement my stamp sets - for example last year I had the 'blobby' tree shape stencil to create a matching background tree shape for  the tree stamps on EKC10. This release I wanted some flower shapes to exactly match their stamped counterparts on EKC19 and EKC20. This means for anyone who isn't too good at colouring you can quickly and easily colour these flowers using two or three different colours of paint, ink etc... 


With these flowers (EKC20) it doesn't really matter if they line up perfectly with their stencilled counterparts - infact I quite like to purposely offset them a little bit but for those of you who want them to be perfectly aligned a 'stamping platform' is the ideal tool! (I actually used mine for the very first time with this release to create some of my samples- I've probably had it about two years and it had never been out of it's box!!)


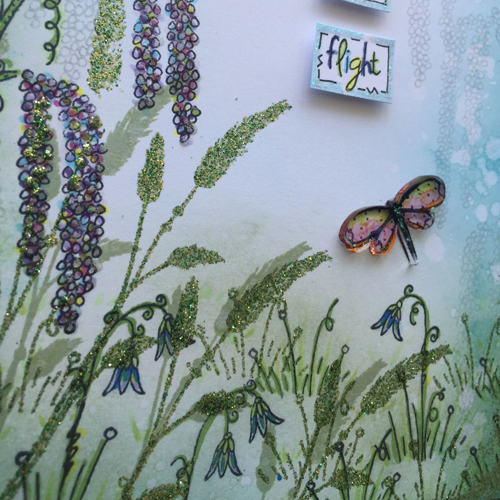
Project One: Let Your Dreams Take Flight
This shows how you can use several of those stamps from EKC18 to create a flower filled garden setting. I have added grasses from EKC17 to add depth to the foreground and stamped extra imagery of the 'weeping' flowers' in light grey to add subtle interest to the background. The large dragonfly 'flew in' from EM27!


Project Two: Wishing You a Beautiful Day
This card is made up of the 'supporting imagery' from EKC19 and I love the delicate nature this creates.


Project Three: It's Your Time to Flower
With this card I wanted to make a 'statement bloom' using the flowers from EKC20 and then kept everything else pared back to allow the bloom to take centre stage.


I really hope that this has given you some inspiration as to how these stamps and stencils can be used. As you will have noticed I chose to give all of these cards a lovely clean, fresh feel by incorporating a lot of 'white'. There also might just be a little bit of glitter here and there too! But of course these images will lend themselves to other looks too.

Love Kay xx

Kay's Socials...
Website: https://www.kaycarley.com
Pinterest: https://www.pinterest.co.uk/kaycwilson1/
Facebook: https://www.facebook.com/kaycarley.designer/
Twitter: https://twitter.com/carleycards
Instagram: https://www.instagram.com/kay.carley/

Kay's Teaching Schedule:
6th July 2018, Kraft Crazy,  

29th July 2018, Kay's Crafty Classes at Lingfield Community Centre, https://www.kaycarley.com/kay-s-crafty-classes-at-lingfield 

18th August 2018, Amelia's Creative Crafts,  

26th August 2018, Kay's Crafty Classes at Lingfield Community Centre, https://www.kaycarley.com/kay-s-crafty-classes-at-lingfield 


8th September 2018, The Forget Me Not Kraft Kabin,  
https://www.facebook.com/TheForgetMeNotKraftKabin/


New 2018 Products are only available from the approved PaperArtsy stockists listed below:


Australia
Art and Soul Studio, Burrum Heads, Queensland www.artandsoulstudio.com.au
Art and Craft Supplies online Australia https://artsandcraftsupply.shop  
Auzz Trinkets and Crafts, Calamvale, Queensland https://atcraft.com.au/
Bella Paperie, Brendale, Queensland, www.bellapaperie.net.au

Crafters Cupboard, Berwick, Victoria www.crafterscupboard.com.au
Scrap Matrix, Port Elliot, South Australia http://scrapmatrix.com/
Time To Create, Modanville, NSW www.timetocreate.com.au

Austria
CP Marketingservices Gmbh, Wilhering, Upper Austria,office@cpmarketing.at

Belgium
Cart N Scrap Art, Antwerp, cartnscrap@gmail.com
Cotrain, Kontich, www.cotrain.be

Expression Hobby, Marcinelle www.expressionhobby.be

Canada
Scrapbook Centrale, Dollard Des Ormeaux, Quebec www.scrapbookcentrale.ca
Treasured Memories, Duncan,BC www.treasuredmemoriesscrapbooking.ca
Simply Scrapbooking, Prince George, BC https://www.facebook.com/simplyscrapbooking/

Czech Republic
Hurapapir, Brno https://www.hurapapir.cz/

Denmark
Hobbyboden Scrapworld Samso www.hobbyboden.dk
Papir Ulven, Lejre www.papirulven.dk
Three Scoops Design, Frederiksberg, www.threescoops.dk

Finland
Piia Takalo, Kittila, www.piiapaper.com/fi

France
Horizon Creatif, Ste Jalle h.creatif@gmail.com
Katzelkraft, Ingwiller http://www.katzelkraft.fr/en/
Kerglaz, Basse Goulaine, https://www.kerglaz.com/  
Kerudoc Creation, St Yvi www.kerudoccreation.com
Scrapo'naturel, Tourville La Riviere, www.scraponaturel.fr/livraison 
Toutencolle, Dun sur Avon www.toutencolle.fr

Germany
Paperbasics, Hessen, www.paperbasics.de
Stempelbar, Berlin, www.stempelbar.de
Stempeloase Munich, Munich www.stempeloase.de
Stempelfee Shop, Hilden www.stempelfee-shop.de
Stempellaedle, Stuttgart, www.stempellaedle.de/shop

Greece
Scraps N Pieces, Kallithea www.scrapsnpieces.gr

Italy
Immagine SAS di Rapaccini, Rome, www.immaginelab.com
Marte Savona, Savona, www.martesavona.it
L'artistica Glo, Cinisello B (Mi), www.artisticaglo.it 
Piccole Passioni, Siena, www.piccolepassioni.it
 
Japan
Tiny Dots, Funabashi-shi, Chiba www.facebook.com/TinyDots

Netherlands
Creafine, Papendrecht www.creafine.nl
Creatotaal, Barendrecht, www.creatotaal.nl
De Hobbystudio, Genemuiden, www.dehobbystudio.com
Doe@ding,Spijkenisse https://doeading.nl/
Hobbidee Breda, Noord-Brabant, www.hobbidee-breda.nl
Hobbycompleet de Duif, Leeuwarden www.hobbycompleet.nl
Papillon Hobby, Hendrik Ido Ambacht www.papillon-hobby.nl
Scrap & Co, Klarenbeek www.scrap-co.nl
Scrapbookdepot, Uitgeest, www.scrapbookdepot.nl
Stampingcorner, Capelle Aan Den Ijssel www.stampingcorner.nl
The Stamping Cottage, Schaijk www.thestampingcottage.nl

New Zealand
The Art of Craft, Papamoa, Bay of Plenty, www.artofcraft.co.nz

Norway
Hobbygarasjen, Kopervik, www.Hobbygarasjen.no
Hobbykunst, Rasta, www.hobbykunst-norge.no
Scrapbookengros AS, Kleppe www.hobbylageret.no

Spain
Arts & Crafts, Barcelona, pebdesign@hotmail.es
Cien por Cien Manualidades, S.L., Bizkaia, Catalunya,  www.100x100manualidades.es
Endulze & Crista S.L, Navarra, endulze@gmail.com
Ideas 10 Manualidades Y Scrapbook, Bilbao https://ideas10manualidades.com/
Marakiscrap, Tarragona, www.marakiscrap.com
Scrap & Papers Experiences, Barcelona, Info@casonadequintana.com

Scraphouse S.L. Barcelona www.scraphouseshop.es
The Paradise Corner, Barcelona, www.facebook.com/theparadisecorner 
Endulze & Crista S.L., Pamplona, Navarra, www.endulze.com 

South Africa

Kcraft Imports Ltd, Centurion, www.kcraft.co.za
Stencil Art, Gauteng, www.stencil-art.co.za 

Sweden
HC Design, Svedala, www.hcdesign.nu

Taiwan
Mandy's Cards, Taipei www.facebook.com/mandy.card

United Kingdom
A Trip Down Memory Lane, Ipswich, Suffolk, http://www.atripdownmemorylane.co.uk
Aldridge Crafts, Attleborough, Norfolk www.aldridgecrafts.co.uk
Amelia's Creative Crafts, Studley, Warwickshire  www.ameliascreativecrafts.co.uk
Art from the Heart, Harrogate, Yorkshire www.afth.co.uk
Bellacrafts, Eastleigh, hampshire www.bellacrafts.co.uk
Blade Rubber Stamps, London www.bladerubberstamps.co.uk
Clacton Art Craft Model Centre, Clacton on Sea,  Essex, http://www.clactoncrafts.co.uk/
Countryview Crafts, Potton, Bedfordshire www.countryviewcrafts.co.uk
Craft World Scotland, Glasgow www.craftworldonline.co.uk
Craft Your Art Out, Ballynahinch, County Down, craftyourartout@outlook.com
Crafty Snippets, Billingshurst West Sussex www.craftysnippets.co.uk
Crafts & Candlelight, Ipswich, Suffolk www.craftsandcandlelight.co.uk
Crafts @themalthouse, Herstmonceux,  East Sussex, http://www.coldfusionglass.co.uk/

Craftrange, Burnley, Lancs, https://www.craftrange.com/
Imagine, Design, Create, Seaton, Exeter http://imaginedesigncreate.co.uk/shoponline/

Kay Carley http://www.kaycarley.com
Keep on Crafting, Bury St Edmunds, Suffolk www.keeponcrafting.co.uk
Kraft Crazy, Amesbury, Wiltshire https://www.facebook.com/KraftCrazy/
Lisa B Designs, Maidstone, Kent, http://www.lisabdesigns.co.uk/
Lets Create, Lincoln, Lincolnshire, http://www.letscreateartandcrafts.co.uk/
Loobie Crafts, Leighton Buzzard, Bedfordshire, www.loobicrafts.co.uk
Papermaze, Ipswich, Suffolk www.papermaze.co.uk
Paperstory, Norfolk www.paperstory.bigcartel.com
Poppycraft, Wallingford,  https://poppycraft.co.uk/

Rowan Tree Crafts, Carnforth, Lancashire www.rowantreecrafts.co.uk
Fave Rave, Stourbridge, West Midlands www.shabbychicstencils.co.uk
Scrapbook Magic, Mullion Helston, Cornwall, www.scrapbookmagic.co.uk

Scrapcosy, https://www.etsy.com/uk/shop/Scrapcosy
Shed Load of Crafts, Enfield, Middlesex, www.shedloadofcrafts.com
Simply Crafts, Cardiff, www.simplycraft.com
Snazzy's, Swindon, Wiltshire. https://www.facebook.com/snazzystampingandscrapbooking/
Stampers Grove, Edinburgh, Scotland www.stampersgrove.co.uk
Stamps & Memories, Hungerford, Berkshire
www.stampsandmemories.co.uk
Swanstitch, Deal, Kent www.facebook.com/swanstitch
That's Crafty, Romford, essex www.thatscrafty.co.uk
The Artistic Stamper Craft Store, Faversham, Kent www.theartisticstamper.com
The Craft Box, Barnsley, South Yorkshire www.thecraftbox.biz
The Craft Den, Wisbech, Cambridgeshire www.thecraftden.co.uk
The Craft Room, Newcastle-Under-Lyme, Staffs https://www.garnersgardencentre.co.uk/crafts/
The Craft Studio, St Austell, Cornwall https://www.facebook.com/thecraftstudio/
The Forget me not Kraft Kabin www.facebook.com/TheForgetMeNotKraftKabin
The Stamp Pad, Saddleworth, stamp-pad.blogspot.com
Whichcraft, Wallasey, Merseyside


USA
Artistic Studio Creations, Fayetteville, Georgia www.facebook.com/ASCbyCrystal
Artistree Workshops, Fulton, New York, www.facebook.com/artistreeworkshops
Clay with Me, Colorado www.facebook.com/Claywithmestudio
Creative Designs by Debbie Castle Rock, Colorado debbie.knight@centurylink.net
Creek Bank Creations, Indiana www.creekbankcreations.com
Ephemera Paducah, Paducah, Kentucky www.ephemerapaducah.com
Everything Scrapbook & Stamps, Lake Worth, Florida www.everythingscrapbook.com
Frantic Stamper, Oregon www.franticstamper.com
Guadalupe's Fun Rubber Stamps, Roswell, New Mexico www.santafe.com
PaperCraft Clubhouse, Old Lyme, Connecticut, http://papercraftclubhouse.com/
Papere Parachute Art Design Co., Beaverton, Oregon www.paperparachute.com
Sherries's Stuff, Warrenton, Virginia, https://www.facebook.com/sherriesstuff.va/
Simon Says Stamp, Columbus, Ohio www. simonsaysstamp.com
Stamplistic, Cleveland, Ohio www.stamplistic.com
The ink Pad, New York, www.theinkpadnyc.com
The Queen's Ink Savage, Maryland www.queensink.com
Topflight Stamps, Irmo, South Carolina https://topflightstamps.com/
Seth Apter, New York www.sethapter.com
Stamp Fever, Orange, California www.stpstamp.com
Whim so Doodle, Saint Petersburg, Florida, http://whimsodoodle.com/ 
Vintage in KC, Shawnee, Kansas, http://vintageinkc.com/

We do not supply chains, TV channels or discounters. Our brand is only available from established stockists who are VAT/ GST/ sales tax registered and for whom product education is a core principle. We would rather supply a few hand selected stockists, than the greater masses. If you would like to apply to be a stockist, you can find our more about our supply criteria here

PaperArtsy Links
Facebook Group (NEW) PaperArtsy People
Facebook Page PaperArtsy
Blog blog.paperartsy.co.uk

More Posts to Enjoy