Tonight I'd like to share with you this evening with a post about transparent art.
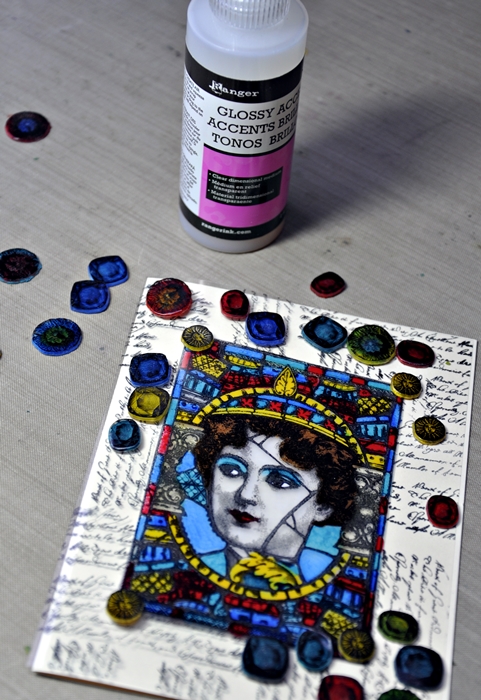
I made a card using two different transparent techniques: stamping and painting onto a transparency sheet to make the card and stamping, painting and shrinking some shrink foil to make ,jewels'. The card can be sent with or without a cream-white card inside it. I used the wonderful Lynne Perrella stamps for the card, love them !
Step One: Lightly sand a piece of transparency sheet (acetate) and stamp the ,leaded glass woman' (LPC033) on the other side with StazOn ink Jet black.
Step Four: Paint the stamped images using the same four colours as above on the sanded side. Just a thin layer of paint will be enough. At the big ornament it's nice to use more than one colour (as shown).
Step Five: If dry, cut out the suns, gems and ornaments and shrink them with a heat tool.
Beautiful jewels will appear :-D
Step Six: Cut a piece of transparency sheet (21 x 14 cm) (and a piece of cream-white cardstock, same size) and fold in half. Stamp the woman onto masking paper, cut out and mask the centre of the front of the acetate card as shown. Stamp the border of the front with text (LPC014) and black StazOn ink.
Step Seven: Remove the mask, glue the cut out woman onto the card (a very little bit of Glossy Accents on the corners) and add your self-made gems on the card with Glossy Accents. Try to create a pretty composition. Insert the cardstock if desired.
As you see you can create ,real' leaded glass by painting the backside of a transparency with Fresco Finish paints ! I used Translucent paints for this piece to keep everything very transparant. The paint works very good with Shrink plastic as well. Hope you will give it a trie , have fun !
Oh Liesbeth what stunning colours, you have created the jewel elements beautifully. The Lynne Perrella stamps are perfect for this style. The use of shrink plastic aswell as acetate adds just that tiny bit extra dimension. Thankyou ~ Darcy
We would love to see how you interpret this Transparent Art topic by linking what you make to our 2016 Challenge #1: Transparent Art, on this page HERE.
All of our bloggers love to see your twist on their ideas, particularly if you were inspired directly by their post.
Links go in the draw to win a £50 voucher to spend on products of your choice from the PaperArtsy online store. The Transparent Art link will close 17:00 (London Time) Sunday, January 17th. The winner will be announced 2 hours later at 19:00.
Tonight I'd like to share with you a post where I'm working with a transparency along with some gold leaf and also a technique once called Caught In Crystal to make a card. Years ago there was a popular technique called Caught In Crystal using clear glue (Crystal Lacquer was popular and might be why it was called Caught In "Crystal"), ink, and often glitter along with tissue paper on the back of stamped transparencies. I'm tweaking the supplies but the basic technique is as fun now as it was back then.
Step One: I started with a piece of transparency larger then I would need. I did this because quite often while working on the back, I get some product along the edges on the front and I wanted to be able to trim the piece down to get rid of any messes. I stamped the flower from EEV10 onto the "back" of the transparency with Fresco Finish Little Black Dress.
Still working on the back, I painted in the flower with Duo Embellishing Adhesive. This goes on white, dries clear, and is sticky when dry. Over the adhesive I applied gold leaf flake, pressing it down all over the adhesive and burnishing it well with my finger. Any excess gold leaf should be put into a container and saved as every little bit can be used. The brush marks from applying the adhesive I consider a bonus as it really give the look of added texture to the flower. The transparency was turned over and the words stamped on the front with StazOn Jet Black Ink.
Step Two: The colors I chose for the transparency are Fresco Finish Beach Hut, Glass Blue, and Zesty Zing. Each color was mixed into a puddle of Gloss Glaze along with one drop of Metallic Glaze. After mixing each color well, transfer the colors to the back of the transparency using a palette knife and drizzled on extra Gloss Glaze.
Step Three: Take a piece of white tissue paper larger than the transparency, crumple it very well, open it and lay it over the transparency pressing it into all the color and glaze causing all the puddles to spread out over the transparency. I had some corners where there was no glaze and I just picked up the tissue, added some glaze and pressed it back down. You want the tissue adhered everywhere. Set this aside to dry completely.
Step Four: Once the tissue was completely dry I trimmed down the piece and went around the front edge with a Gold Krylon Pen. I cut a piece of heavy smoothy 1/4" larger on all sides than my transparency, stamped the sketchy diamonds (EEV07) with Archival Inks Forget-Me-Not and Buttercup, distressed the edges and attached the transparency to the center with double stick tape.
Step Five: On the front of my folded white card I stamped the same flower I used on the main panel - twice on the left, masking the first flower before stamping the second, and once on the right. (I'm so sorry I forgot to take a picture before attaching the main panel!!) To "ink" the flower I used paint, a mix of Gloss Glaze, Beach Hut and just a bit of Glass Blue for the flower and Hey Pesto for the stem. I dabbed the colors onto the stamp with Cut 'n Dry Foam and stamped onto the card repeating the "inking" for each flower. Be sure to clean your stamp before the paint dries on it.
I painted in the flowers with watered down Glass Blue and Hey Pesto and dried them. I somehow dropped a blob of Hey Pesto onto the farthest left flower. When I noticed it, I wiped it up and repainted the flower. You could still see a little green but not bad. I loosely went over the stamp lines of the flower petals with a white gel pen. Then, to give the flowers a more "faded" look, I scraped Fresco Finish Snowflake over the front of the card allowing some spots without Snowflake. After drying the Snowflake paint, a wet paintbrush was used to splatter on Beach Hut.
Metallic embroidery floss was tied around the main panel and it was attached as shown with foam mounting tape.
I hope you can catch a glimpse of the shimmer in the colors from adding that drop of Metallic Glaze.
I love today's card. The techniques are quite easy and fun!!! I just might put this card into a frame. Thanks for reading to the end and I hope you are inspired to play along with this first theme of the year. If so, don't forget to link up your project so I can some take a look!! You all inspire me!!!!!
Oh Wanda this brings back memories of a great technique, back in the day we used Johnson floor cleaner(as the lacquer) on the back of the acetate. It is making me smile, and making me want to revisit this technique. A beautiful end result, the layers and little touches of shimmer are perfect.
We would love to see how you interpret this Transparent Art topic by linking what you make to our 2016 Challenge #1: Transparent Art, on this page HERE.
All of our bloggers love to see your twist on their ideas, particularly if you were inspired directly by their post.
Links go in the draw to win a £50 voucher to spend on products of your choice from the PaperArtsy online store. The Transparent Art link will close 17:00 (London Time) Sunday, January 17th. The winner will be announced 2 hours later at 19:00.
I'm happy to be back here tonight with a blog post about transparent art. I have two cards for you on which I used two interesting transparent mediums: Glass Bead Gel by Golden and Mica Flakes by Finnabair. To embellish the cards I've created a few flowers using a wax paper technique.
I love transparent papers and mediums, they are perfect to use on winter themed projects. The moment I heard about the transparent topic I knew I would make some icy cards. To create these shabby chic cards I've chosen a soft color combination: kraft, light blue, white and silver.
Below I will walk you through the making of the first card. I'll show you how I did the background and some of the embellishments. I've added the second card as extra eye candy. There is a description at the bottom of this post.
Let's get started.
To start I've cut a 4 x 6" (10 x 15 cm) panel out of corrugated cardboard. I randomly applied heavy gesso by Liquitex to the panel with a palette knife.
After drying I applied Glass Bead Gel by Golden the same way. This gel takes a while to dry, I let it dry overnight.
I diluted some PaperArtsy Fresco Finish Chalk Acrylic Mermaid with water to color the background. The beautiful light blue color enhances the icy look.
Finally I added some 'Frosted' Mica Flakes by Finnabair. I applied gel medium with a brush and sprinkled the flakes on top. I love the transparent effect of the flakes. At that point the background of the first card was done.
I've made a few embellishments for the cards as well. First I've created flowers. I used an old technique, sandwiched wax crayon shavings in between two sheets of wax paper by ironing the sheets. You can easily find more details on this technique on Pinterest.
After ironing the wax paper I stamped spirals on top with a spiral stamp and Mermaid. For this blogpost I could work with the brand new EEG15 stamp set by Emma Godfrey, a very versatile set!
After cutting out the 'flowers' I ironed them again, to secure the layers.
I decorated white ribbon by stamping on it with a small stamp from the EEG15 set and Mermaid.
I punched a silver heart out of an old button card. I love to use unusual materials on my cards :)
To put the card together I first adhered the stamped ribbon together with some zigzag ribbon and cord. I sewed some beads in the centre of one spiral flower and arranged two flowers on the card together with some gauze. To further decorate the card I looked for a few silver embellishments in my stash: a button and a metal piece.
I finished the card off with two sculpure flowers by Tim Holtz and a paper clay heart.
For the second card I created a background by applying PaperArtsy Fresco Finish Chalk Acrylics Chalk, Mermaid, Buff, Blue Oyster and Caribbean Sea to a card panel with a plastic card. I added white squares using Snowflake paint and a stencil (Tim Holtz Layering Stencil Tiles). I stamped on top with stamps from the EEG15 set and the same paints. After drying I added flowers using the JOFY PS009 stencil and Glass Bead Gel.
I finished the card off with corrugated cardboard, frayed gauze, ribbon, a crumpled wax paper flower and silver thread.
I'm fond of working with Glass Bead Gel because it dries beautifully and transparent when applied in a thin film. As you can see on the second card it looks awesome when used 'raw' and uncolored. But I do like the effect of the light blue paint on top of the Glass Bead Gel on the first card too. The perfect medium to use on shabby chic cards!
For the wax paper technique make sure to work with a medium heat iron, don't use steam and put an piece of kraft paper on top to protect the wax paper and your iron.
Because I had no wax crayons in my stash I used oil pastels, not quite the same. The melting of the shavings wasn't wat it had to be but I'm happy with the result though :)
I love the fragile transparent flowers.
I hope I've inspired you to make some cards, an art journal spread or a canvas with an icy look yourself now. Or why not try the wax paper technique? I would love to see what you come up with.
Gorgeous cards Anneke, they look totally wintery and frosty with your clear, blue and kraft layers!! Fabulous how the glass bead gel worked out through that JOFY stencil! Beautiful, thank you for sharing!
We would love to see how you interpret this Transparent Art topic by linking what you make to our 2016Challenge #1: Transparent Art, on this page HERE.
All of our bloggers love to see your twist on their ideas, particularly if you were inspired directly by their post.
Links go in the draw to win a £50 voucher to spend on products of your choice from the PaperArtsy online store. The Transparent Art link will close 17:00 (London Time) Sunday, January 17th. The winner will be announced 2 hours later at 19:00.
Hi everyone Catherine Johnson here to talk you through this little box I made for the transparency topic. As soon as I heard transparency my thoughts ran to vintage stamps and stamping on acetate. This isn’t a medium I use often, and vintage isn’t usually the style of crafting I gravitate towards, but I loved the Buttons Ink and the Dog stamps and the photo stamp called out to be stamped on acetate. As the theme of the stamps were haberdashery, I kept to that theme and altered a box into a cut little pins and needles box.
Step One: I grabbed my paint colours and started layering down the Haystack and Guacamole fresco finish paints. I then grabbed some dark green ink and stamped the emotion definition panel from Ink and Dog Buttons 4 and the Pins and Needles words. On top of this I then stamped using the Guacamole paint the button square. This provided a lovely layer onto of the inked stamping.
Step Two: Next I wanted to add a border of grunge paste as I wanted the top to be very textural so I mixed the grunge paste with Guacamole paint to colour it and then roughly applied it. I also added some different kinds of trim to the box sides to add different kinds of texture.
Step Three: After the grunge paste was dry and the trim glued down securely I added more paint and ink to make them blend in with the colours of the box. I then started adding some Baltic Blue to the mix as a contrast colour.
I then started on the topper for the box. I knew I wanted some fabric and sewing to go with the theme. I chose some canvas and some denim coloured fabric and applied stamps and paint to both and then did some sewing with the sewing machine using different stitches. I stamped the main photo imagefrom Ink and dog Buttons 4 in Stazon on to the acetate and then added that to the layers of fabric by sewing it into place. I then added trim to match the sides of the box. Stamping in Stayzon onto the acetate works really well. I love the fact you can see through the images to the layers below.
Step Four: Inside the box I applied the same colours, but also some book paper to tone down the background. I added the same image as on the top of the box, but this time using paint to stamp which doesn’t provide the same clarity as the ink, but looks good against the book print. I added the denim fabric to the base of the box and then made a small pincushion which fits into a corner to that it can both hold the pins and act as a tool when sewing too.
Step Five: My finishing touch was to add the buttons to the top of the box with a bit of bakers twine. The whole box is so textural now and I am so happy with having created something so different from my usual style – and it’s useful too!
I love the way the stamped acetate works and this may well be the first of many future projects featuring acetate. Using Stazon meant the image remained crisp and didn’t smudge and I think the vintage stamps look just like old slides as a result. The clear image and the layers underneath work well together and sewing the acetate to adhere it into place means no messy glue visible.
Thanks Catherine, this has such a lovely vintage feel to it, truly the kind of thing you would find in your Grandmothers sewing box. You are right the acetate makes that vintage photo look even more so, resembling the mirror-like qualities of early 19th century photography.
We would love to see how you interpret this Transparent Art topic by linking what you make to our 2016 Challenge #1: Transparent Art, on this page HERE.
All of our bloggers love to see your twist on their ideas, particularly if you were inspired directly by their post.
Links go in the draw to win a £50 voucher to spend on products of your choice from the PaperArtsy online store. The Transparent Art link will close 17:00 (London Time) Sunday, January 17th. The winner will be announced 2 hours later at 19:00.
Tonight I'd like to share with you a post about the Leandra Bead. This is the ultimate in revisiting old school techniques, but the transparent art topic gives me the perfect excuse to properly showcase this technique that caused a bit of a buzz back in the day! The Leandra bead is a way to create a 'bead' or dangle, perhaps for a mixed media project, assemblage etc The idea I had was to trap stuff inside the bead like mica, small beads, wire, gold leaf etc and encase those things in a UTEE (Ultra thick embossing enamel) glaze.
I did a quick Periscope stream this afternoon on the Leandra Bead, you can watch this replay of the live version via #katch. At the foot of the post you can see the high defginition, more profesh, You Tube Version.
By the way, Periscope is a live broadcast app with a chat feature, so it's interactive, and linked to twitter as you will see evolve while watching the replay.
You need to use the app via any apple hand-held device, or it's also available for android devices too. Please check it out and get on board as we will be doing lots of periscopes when we release our newest products....coming very soon!
STEP 1: Heat/ melt your UTEE
Turn on the meltpot to ‘HOT’ and fill with clear UTEE to the fill line. Add 1 teaspoon of flex (this makes the UTEE more durable so the beads won’t shatter). Once, melted turn down to 120-130 degrees for a thicker viscosity which makes dipping and layering easier.
TIP: Wait for the UTEE to melt before stirring, if you stir while the crystals are melting you will create air bubbles. Once melted, stir gently to ensure the flex is well mixed.
STEP 2: OPTION A: Making clear beads with paper
Tear a small strip of brayered tissue paper, roll around a toothpick and secure with a small dot of glue. It needs to be loose on the toothpick.
Holding the toothpick, dip into the UTEE, allow excess to drip away, then place the paper bead onto a craft sheet, it will create a bell shaped bottom.
Once cool, pick up, and put a headpin through the base, it should stay secure.
Dip again to secure the headpin in place, and then you are ready to think about inclusions to add. (as below)
STEP 2: Option B: Making beads with sequins or beads
Place a sequin or seed bead onto the headpin. The colour of the sequin or small glass bead will shine through the clear UTEE, and is almost magnified by the UTEE.
Dip into clear UTEE. Allow the UTEE to stop dripping, then twist the bead or turn it up and down until the UTEE sets. This is like a 'starter' bead.
If you want your bead larger, then dip again.
Wrap the bead with wire, and dip again allow the excess to drip before you twist or move the bead.
TIP: Once you lift the bead from the UTEE, and let the excess drip off, it’s a good idea to keep the bead moving because if you hold it still, the UTEE will droop, if you keep the bead moving, you will be able to help the UTEE set into a round shape. Unusual shapes can be really interesting, so don’t expect to get a set of identical evenly shaped beads!
STEP 3: Making coloured beads
For this you can either use 2 melt pots (one with clear and one with coloured UTEE), or you can set up the melt pot with coloured UTEE, and half-make make the beads with colour, then fill the meltpot with clear to finish the bead.
Place a sequin or small bead onto the headpin as before and dip into the coloured UTEE. Twist until the bead has set.
Repeat these dips until you have a ball the size you prefer.
Now dip the bead into clear UTEE. Twist, set and repeat so you have 2 or 3 layers.
Next, wrap with wire and dip into clear 1-2 times to glaze.
Wrap green beads with blue wire, or blue beads with green wire and dip to glaze. Be careful as wire-wrapped beads grow really fast into huge beads!
STEP 4: Other Dipping Ideas
Variation 1: Inclusions
Once you have created your starter bead using an option above, while the UTEE is set in shape, and still warm, try dipping directly into the following:
- no hole beads
- gold leaf or flakes
- wrapping it with coloured or plain wire (finer is easier, and UTEE magnifies it anyway to look bigger)
- fine embossing powders, zap then re-dip.
- mica powders
- brush on Treasure Gold
- clear sparkly EP
- there are lots of things to try here!
Now dip again 1 or 2 times in the clear, allowing to set up between dippings...until your bead is the size you want.
Variation 2: Coloured UTEE and Inclusions
The beads also looks superb when you half dip or create a coloured UTEE core.
Then proceed as above with inclusions/ mica powders
- green into blue (or blue into green - create a starter bead/ core), and then glaze with 2 coats of clear.
Note: To dip into heavier items, or to achieve good adhesion for beads, mica powders or gold leaf the UTEE blob needs to be hot so the items stick to it. Allow the excess drips to cease, and then dip the bead straight into the embellishing substance (beads, mica powder etc). Tap off the excess and re-dip into CLEAR UTEE to glaze. Repeat another layer of glaze if you wish.
STEP 5: Adding beads to other items
To finish your bead, first you need to trim the 'UTEE collar' of the bead, sometimes you get too much UTEE creeping up the head pin. While warm, use cutters to trim the UTEE away at the top of the bead and up to the head pin. Repeat from a different angle - you should be able to remove the collar and apply a capping bead.
Make a loop for the bead with round-nosed pliers. Then you are ready to attach it to anything.
So I hope you can find some kind of receptacle to melt UTEE in (if you can't get a Melt Pot), and have a go at this, it really is rather fast, and lots of fun to play about. There are endless variations on this concept! With metallic UTEE, sparkly stuff etc. Here is the YouTube video we shot of the Leandra Bead.
So that's it from me, have a great week, and don't forget to show us what you make!
Leandra
We would love to see how you interpret this Topic: Transparent Art, by linking to our 2016 Challenge #1: Transparent Art, on this page HERE.
Our bloggers love to see your twist on their ideas, particularly if you were inspired directly by their post.
Links go in the draw to win a £50 voucher to spend on products of your choice from the PaperArtsy online store. The Transparent Art link will close 17:00 (London Time) Sunday, January 17th. The winner will be announced 2 hours later at 19:00.


