Showing posts with label 2015 Topic 9. Show all posts

Saturday, 23 May 2015

2015 #9 Beautiful Butterfly {by Sara Naumann.PA Signature Designer}

2015 Theme 9: Words

Hey everyone, Sara here with a word-happy card project for you!

My Eclectica stamps are all about words, quotes and wordy snippets, and today I’m excited to show you three ways to use them: As a collage background (you guys know I love this), by masking off words in a quote, and by stamping on German scrap.

The card project also features my.favorite.ever Fresco Finish paint color: Mermaid. Be still my heart, this blue makes me so happy every time I look at it. Here, I’ve topped off the entire stamped and painted background with clear embossing powder so it has a glossy, shiny finish.

1. Use an old hotel key card to scrape Mermaid Fresco Finish Chalk Acrylic Paint randomly onto white cardstock. Let dry.


2. Arrange the word stamps from ESN16 on one acrylic Flexi Block and stamp with Jet Black Archival.

ESN16

3. Use a stipple brush to spatter watery Vanilla Fresco Finish Chalk Acrylic Paint onto the stamped piece. Apply undiluted Vanilla to a scrap of bubble wrap and stamp. Edge the cardstock with Vanilla. Let dry.


4. Press the embossing inkpad all over the stamped cardstock, covering it completely. Immediately sprinkle with Clear Gloss Super Fine embossing powder, tap off and heat-set.


5. Use your finger to rub a bit of Mermaid Fresco Finish Chalk Acrylic Paint onto a German scrap butterfly. Let dry, then stamp the script and border stamps with Black StazOn


6. Place the Beauty quote onto an acrylic block. Use masking tape to cover all words except for “beauty”. Ink with Jet Black Archival, remove the tape and stamp onto white cardstock.


To finish the card: Mount the background onto black card. Ink the edges of a 1/2”-wide white card strip, then glue across the center, wrapping around to the back of the mounted piece. Wrap again with gold ribbon. Tie a bow in black silk ribbon and glue it behind the German scrap butterfly, then glue to the card front. Add a big mother-of-pearl button in the butterfly center. Tuck the stamped “beauty” underneath.

I hope you enjoyed the project as much as I did! Thank you to the fabulous Leandra and PaperArtsy for letting me share this project with you here!
Sara. 

Oh how beautiful is that butterfly, the text stamping completely transforms the appearance. This is a very elegant card using minimal elements, easily achievable with maximum impact. 

We would love you to join in with challenge #9: Words If you are inspired by any of our guests who blog with us over the fortnight, then please join in and link up your creativity HERE. 
All links go in the draw to win a voucher to spend on products of your choice from the PaperArtsy online store. The Words link will close 17:00 (London Time) Sunday, May 24th, winner will be announced 2 hours later at 19:00.

Friday, 22 May 2015

2015 #9 Layers of Meaning {by Alison Bomber}

2015 Theme 9: Words

Hello everyone, Alison here from Words and Pictures.  Obviously I didn't want to miss out on the Words challenge here at PaperArtsy!  One of the joys of words for me is in the layers of meaning and resonance any given word or phrase can trigger in the mind, so I've created a pair of tags with lots of layers, including stamps from the Ink & the Dog Words series for good measure.


I started by giving the tags a coat of Snowflake Fresco paint and then stencilling over it with a sponge.  I used a range of the newer blue shades - from China, Blue Glass and Southern Skies through to Blueberry as the darkest tone.


The next layer was some Distress Inking in greens and turquoises with a spritz and flick of water...


And then a wash of Beach Hut mixed with Snowflake and plenty of water to soften it a bit...


... before adding some alphabet stamping in Snowflake with a hint of Mermaid using Words Plate #2.  I also did another layer with the same stamp, and this time I embossed it with some Seafoam White.


Words Plate #2.

Next up was the ruled alphabet from Words Plate #5, stamped in Aquamarine Archival and clear embossed for gloss and dimension.


Words Plate #5

I mixed some Blueberry paint into Grunge Paste on my craft mat and applied that through my word stencil (by Red Lead) to each tag.


Once it was dry, I added layers of Treasure Gold, rubbing it on with the pad of my finger - Aquamarine, Florentine and White Fire are all layered in there.  I applied strong heat to get the letters to bubble just a little, adding some cool extra texture.


I added Treasure Gold around the edges of the tags too - I love how it caught the tiny alphabet in places, raised by the clear-embossing and ready to shine even more in the sunlight now.


I dyed my ribbons with some of the same paints and inks as I'd used for the layered backgrounds, and secured them with some notepad wires which happily were already in the perfect shade of gold to complement the gilded lettering.


So there they are - two mixed media tags layered with stamped words and textured words and reflecting the layers of meaning created when language and words are used with love, care and attention.  Used well, words should provide inspiration and illumination - I hope my gleaming gilded lettering and layers can live up to that.


Thanks so much for stopping by.  Given my whole blog is dedicated to both Words and Pictures and how each can inspire the other, I'm looking forward to seeing what visuals the Words theme inspires in all of you!
Alison xx 

Great tags Alison, beautiful combination of colour, texture, words and a bit of bling, giving them fabulous impact.  I agree that words can be hugely inspiring and should always be chosen with care. 

We would love you to join in with challenge #9: Words If you are inspired by any of our guests who blog with us over the fortnight, then please join in and link up your creativity HERE

All links go in the draw to win a voucher to spend on products of your choice from the PaperArtsy online store. The Words link will close 17:00 (London Time) Sunday, May 24th, winner will be announced 2 hours later at 19:00.
  

Wednesday, 20 May 2015

2015 #9 A Place for Secrets and Dreams {by Lynne Moncrieff}

2015 Theme 9: Words

Hi everyone, Lynne Moncrieff (Adorn), joining you this evening with a post featuring journals I created using  ESN stamps and Fresco Acrylic Chalk Paints.

Since childhood I have had a "thing" for journals/notebooks, many I deem too beautiful to actually use so they are there merely for me to look at and to once again promise myself that I must write/sketch in them but that day never does seem to arrive!  Since I started to stamp, altering inexpensive store bought notebooks has been a favourite of mine as is making them from scratch. 

For this tutorial I created three Journals consisting of one signature stitched into each cover using the pamphlet stitch. This tutorial focuses on the process of creating the covers and not the actual binding but if the pamphlet stitch is new to you then you can easily source tutorials online.  It is possible to create such Journals without the need for specialised bookbinding tools however I would advise using a large needle for the stitching, a suitable tool for creating holes to ease with the stitching and wax cord.  

For the signatures I used quality copier paper but this could be substituted with watercolour paper, writing paper, handmade paper, etc. The finished Journals have a front cover of approx 7" x 5".


Artist canvas forms the base for the journal covers. The canvas I work with is primed but I like to add a coat of white Golden Gesso, to both sides.

Once dry, I randomly applied Grunge Paste which was followed by adhering fragments of vintage book text and Idea-ology Tissue Wrap with Golden Gel Medium (matte).

The journals at the stage after the initial preparation, before the  fun begins of playing with paint and stamps!


With the stamps laid out in front of me...
ESN04

ESN05

ESN06

ESN07

...I set about stamping a selection onto white tissue stock with Staz-on Jet Black.

The eagle eyed among you will spot that there are several which I ultimately did not make use of but this is always my way of working. I like to have a selection to hand as I tend to make decisions as I actually work.  Anyway, they can be used for another project, some other day. 

Journal No. 1
Time to get messy with paint! For Journal No. 1, working with an old credit card and artist palette knife, I applied Toad Hall, Guacamole, London Bus, Vanilla and Haystack.  


After heat setting I randomly inked up the handwritten letter stamp from ESN 05 and the calendar from ESN06 with Staz-on, stamping in a random fashion onto the cover. 


Journal No. 2. 
Blush, Prawn and Buff were applied as for Journal No.  1, with only the handwritten letter stamp this time stamped onto the cover. 

For Journal No. 3 I selected Guacamole, Sherbert, Prawn and Toad Hall. I then continued to stamp the handwritten letter and calendar onto this cover. 

Don't forget to paint the inside of all the covers.

The next stage was to adhere the stamped elements with Gel Medium to the Journal covers. During the drying process I cut copier paper in preparation for the signatures.  There are no photographs to share of this stage but you will see that what follows are photographs of a side shot of the binding and the completed journals.

For each Journal I allowed enough length in the binding cord to wrap around the journal to create a closure.

The stamp from ESN06, which reminds me of a blank page from a diary, was the perfect space for me to fill with words.
To co-ordinate with this cover I painted cream rose lace trim with Prawn and Sherbert, cutting into individual rosettes. 

I had fun creating my own sentiments for the covers.  After all, who has not written a secret within the pages of a Journal at some stage of their life!

The random patches of Grunge Paste and thick application of Frescos created a lovely textural quality on each of the covers. 

Sara Naumann's stamps are the perfect selection for such a project, with endless possibilities for creating your own phrases by mixing and matching the stamps with ease. 

The beauty of creating your own Journal is that you can create to any size, colour, theme you desire or what about creating a collection as I did?  Although it is not necessary for the Journals to be formed from artist canvas I recommend it as a fabulous substrate for all manner of projects however the Journals could as easily be made from fabric, mixed media paper, watercolour paper, etc, in fact whatever you have to hand.

Thank you for visiting this tutorial and I hope it will inspire you to create your own Journal(s). 

Lynne Moncrieff.  Adorn

Ohhh Lynne, these look so much fun and really easy to make. I love your colour combinations too. You are right, the texture add lots of interest, but I would also love to have a go doing this onto calico, or even some other cotton fabric that I've lost interest in, in the hope I might change it to something I would like more!! Sara's stamps work a treat, and love the fabric rose embellishments too! ~Leandra

We would love you to join in with challenge #9: Words. If you are inspired by any of our guests who blog with us over the fortnight, then please join in and link up your creativity HERE

All links go in the draw to win a voucher to spend on products of your choice from the PaperArtsy online store. The Words link will close 17:00 (London Time) Sunday, May 24th, winner will be announced 2 hours later at 19:00.

Monday, 18 May 2015

2015 #9 Girlie Hang Ups {by Clare Lloyd. PA Signature Designer}

2015 Theme 9: Words

Hi everyone Clare Lloyd here, joining you this evening with a post about my girlie hang ups...LOL! I really love a play on words, as they can provoke thought or raise a smile. For me they are an important part of any journal or mixed media project. My little tags or hangers make a perfect humorous gift for a like minded pal or as a reminder to yourself when having a bad day:


To tell you the truth these girlie faces were coloured for another project but I went off on a tangent and so kept them for a rainy day. Today they got to be cut out and used, well all that colouring in with watercolour pencil couldn't be wasted...could it!


I used some Heavy weight Smoothy card, stamped a journal card image from EEG02 using Black Archival Ink. Then layered up images from Pierott 2, Mini 72 using different generations of black ink and a LimeLight Fresco paint ink splat Mini 57.


EEG02


On a scrap on card I smeared on some leftover Limelight and Southern Skies Fresco paint. Then stamped out some hats and the phrase from Pierott 2 using Black Archival ink.


 Pierott 2

All these elements got layered up onto my journal tag using foam pads. As you will probably spot I even used some of the hats to make a border at the bottom of my hanger. I was in the zone with these hangers so made 2 more hangers using the rest of my girlie faces plus journal cards/words from EEG01, EEG03 and also used elements Hot Pick 1008. To create the circle borders I cut out a tear drop shape from each element so I had a bit to stick down onto the back without losing the circle shapes.


Hot Pick 1008


Why no try a play on words in one of your projects? Look out for some single words or part of sentiments that can be cut out to create new phrases. Don't forget mixing fonts styles can look great so have a rummage through all your crafting stash. 
Find me on my blog HERE or on Instagram HERE
Clare. 

Great hang ups Clare, such a brilliant mix of stamp collections.It is always fun to use up leftovers, and these will bring a smile to anyone who receives them. 

We would love you to join in with challenge #9: Words If you are inspired by any of our guests who blog with us over the fortnight, then please join in and link up your creativity HERE

All links go in the draw to win a voucher to spend on products of your choice from the PaperArtsy online store. The Words link will close 17:00 (London Time) Sunday, , winner will be announced 2 hours later at 19:00.
  

Sunday, 17 May 2015

2015 #9 Canvas Crossword {by Darcy Wilkinson. PA Signature Designer}

2015 Theme 9: Words

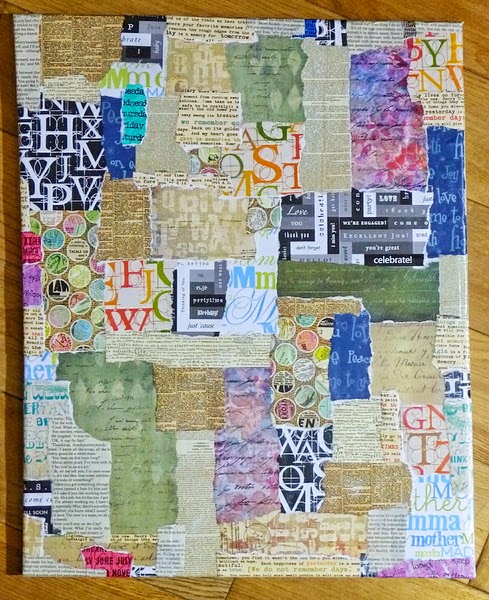
Good evening everyone, Darcy here with a fun,wordy canvas. I love words, text, book pages and above all... alphabet stamps. I could not possibly admit to how many of those I have. So, this was a great theme for me, I knew I wanted lots of words, I knew i wanted bright and layers, and I wanted some quirky bits. 


I began by gluing all sorts of leftover patterned paper to my canvas, all the pieces had text on them, but they were all different colour and fonts. The canvas measure 41cm by 51cm. I used gel medium, to attach the papers and also added gel medium over the top of the papers. 


To begin creating some cohesion I first added a light layer of Snowflake and then wiped it back a bit, made easy because of the layer of gel medium. 


Now the canvas is more neutral, but we can still see most of the text. I started to add colour with a dry babywipe, just smearing a little here and there and blending it in. I started with Haystack, then Autumn Fire ,Tangerine Twist and a little Toffee. 


Next I added Chalk with a brayer, then Bougainvillea and South Pacific, again with the babywipe. once these were dry I used watery Toffee to add some drips. 


I mixed more Bougainvillea with Metallic Glaze and used this to stamp randomly with Words 2

Words 2
I also used the Haystack to add a little stencilling at the edges, and an old credit card to add lines with Little black 'Dress. i was really happy at this stage, I could have gone on and added more layers but sometimes you just have to stop and say 'this is enough'


I collected a whole load of panel pins, screws,washers, beads, broken jewellery and jump rings. I also die cut these hearts from shrink plastic. I painted them with Bougainvillea and Caribbean Sea before stamping with text from EDY01 and EDY02 and ESN 10  I also stamped on the buttons. 

EDY01
ESN10

I measured out each of the 4 sides into equal spaces and started adding the hardware. This shows the top.


This shows the bottom edge, you can see I added broken jewellery and even a key. The shrink plastic hearts were added to the sides. 


Now I had nails/screws and decorations all around the frame. I could then use these to create a grid for my crossword. 


I took some paper string and painted it with Bougainvillea. 


Once dry I was able to string this across the canvas, tying it off at each end around a nail or a screw. I even have a bit of a broken zipper on there. I felt it needed a little something more, so I used watery Blueberry to add some flicks of paint. 


I carried on creating the grid. 


Until it was all done and this was the crossword base complete. Now to make letter tiles. 

I took a piece of heavy weight smoothy and using my brayer I covered it with Space Cadet, Smurf, Tinned peas, Hey Pesto, Blue Oyster, Chalk.. in that order. Alternating between blue and green and getting progessively lighter. I finished with a watery layer of Beach Hut. 

I then covered the card with text from EDY09, EDY10 and ESN11 using Watering Can Archival ink. I chose these 3 stamps as they are all very similar fonts, quite small and would work well in the background. 

EDY09
EDY10
ESN11

I cut this sheet into 3cm squares, and on those i stamped my chosen letters using Jofy 21. I coloured in each letter using a posca pen. 

JOFY21

I gave each tile 3 coats of Gloss Glaze and then attached them to slightly larger squares of greyboard that had been painted with Snowflake. I used foam squares to raise them up a little. When I see embellishments raised up i do not like to see the white of the underneath, so here you can see I coloured the backs of the tiles, and also the white edges of the foam. it's a picky little detail, but it can make all the difference. 


Now to start glueing the tiles into the grid. 


Here you can see the shrink plastic hearts. 


I hope you liked that, I had so much fun making this. The background was all free and easy which contrasts with the very angular and measured grid and tiles. I love the added bits and bobs on the edges, who knew a hammer would come in so useful for arting?Have a go at making your own crossword, or using text on shrink plastic or perhaps stamping on buttons?
Darcy

Twitter - Follow me HERE
See projects on FB with my stamps HERE
My blog is HERE. 

We would love you to join in with challenge #9: Words If you are inspired by any of our guests who blog with us over the fortnight, then please join in and link up your creativity HERE. 
All links go in the draw to win a voucher to spend on products of your choice from the PaperArtsy online store. The Words link will close 17:00 (London Time) Sunday, May 24th, winner will be announced 2 hours later at 19:00.