
2015 Topic 14: Flowers
Hi everyone, Lin here this evening to share a project with you using my latest release of stamps. Those of you who have known me for a while will know that designing stamps is relatively new to me and the whole flower thing is far removed from the art, that until recently, I would have made. Yes, I love my flower stamps and yes, I have thoroughly enjoyed and embraced the bright colours of the Caribbean that initially inspired these flowers, but now I am ready to see if I can combine my love of a more artsy style and my new stamps....here goes!!!

Step 1: Working on three pieces of 10cm square white/greyboard, I used a plastic card to scrape some Squid Ink Fresco Finish paint on the white side of the board, deliberately leaving some white space. While this was still wet, I then scraped some Nougat over the top which I then dried with a heat gun.

Step 2: I used a baby wipe to apply a thin layer of Lake Wanaka over the top, which I also dried.

Step 3: Now for some translucent colours. A tiny amount of Tango and Limelight added randomly with a baby wipe really made the background start to come alive, it was looking a bit frosty before these colours were applied.

Step 4: With my boards all lined up in a row, I used Chocolate Pudding through my stencil PS005.

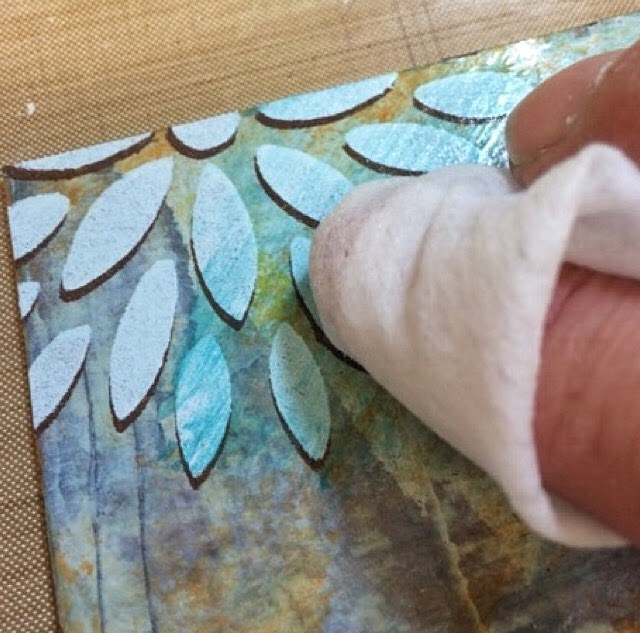
Step 5: Using Lynne Perrella's bumping techniques (slightly off-setting the stencil over the first layer of paint) I added a layer of Antarctic Fresco. This technique still makes me smile!!!!

A close up of the bumping...you can see why opaque paint is necessary for the top coat, and if you put light under the dark it looks blurry, so dark underneath seems to work better.

Step 6: After giving some considerable thought as to what to do next, I decided that the flowers would probably look better if they had a tad more colour, so I added some Beach Hut.
Step 7: Then came the scary part! I cut each of my three squares into four, giving me twelve pieces in total.

Step 8: Arranged them in a design that I liked.

Step 9: Added some additional stamping with Cornflower Blue Archival ink.

Step 10: My original idea was going to be stamping sections of the flower heads from plates ELB22, ELB23 and ELB24 directly on these squares. After giving this some careful consideration, two things sprang to mind...
The first was that the colours I had earmarked for the flowers were translucent colours and wouldn't show up terribly well over the background I had created.
Secondly, having made a background that I really quite liked, I didn't want to risk spoiling it, so I decided that my best option would be to use the tissue paper trick and stamp and colour all my images on tissue first. I would then be able to stick them to the mini boards with Matt Medium. By doing this, I could play around with placement before committing myself to a final design.
 |
| ELB22, |

 |
| ELB23 |

 |
| ELB24 |
Step 11: I love how the tissue just blends in with the background.

Step 12: I used Pumpkin Soup and Brown Shed to paint and decorate a canvas board, which I edged with Bora Bora.
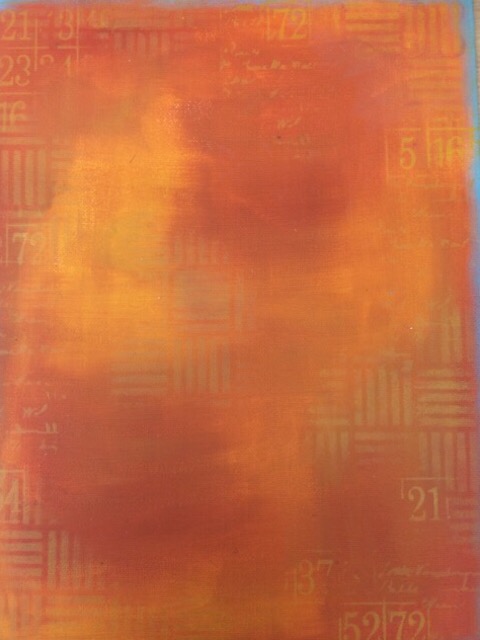
I'm pleased how this project turned out. The hardest part was actually deciding what colour to paint the canvas board!!!!


Here's a close up shot so that you can maybe see how all the layers works well together. In case you are wondering, the quote is from ELB05.

I'm sorry this post turned out to be a bit of an epic, but I do hope it has inspired you to try something like this for yourself.
Lin
Ohhh we love this, especially that you mixed up and rearranged the squares, makes for a really interesting background. Great tip for using tissue paper as the stamping base, it really does make the colours true and vibrant. ~Darcy
We would love you to join in with challenge #14: Flowers.
If you are inspired by any of our guests who blog with us over the fortnight (July 26 - Aug 9th), or perhaps you want to just do your own thing with flowers...then please join in and link up your creativity HERE.
All links go in the draw to win a voucher to spend on products of your choice from the PaperArtsy online store. The Flowers link will close 17:00 (London Time) Sunday, Aug 9th winner will be announced 2 hours later at 19:00.


19 comments:
Amazing!! I love how you've "muddled" up the pieces you cut... but the tissue stamping brings them all back together again. Fantastic.
Loving what you did with this, Lin! Lynne Perrella's bumping technique; the use of tissue and all the layers just go to make up a fabulous piece of art! x
Gorgeous Lin! Love the tiled design and the colours are beautiful together. Sue C x
Wow! What a beautiful piece of work. It turned out brilliantly and I really found the process so interesting. Lx
Really beautiful, love the background and there is so much to look at! X
Absolutely beautiful Lin, you are very talented.
A glorious piece of art and such a beautiful colour palette and the finished artwork has just and no more, been perfectly embellished with that sweet birdcage.
Wishes
Lynne
What a fantastic colours combo for the background and great effective the stenciling by opaque color. Finally you used orange colours, Wonderful project by your new stamps!!. Thank you for the tutorial and share with us. Have a go. xxx
oh so beautiful - awesome technique - fabulous xx
Wonderful techniques, and a stunning finished piece Lin! xx
What an amazing project. Just love it. Love that you cut up into the 12 squares. The flowers are wonderful and so is the backround. I shall definitely be giving this a go.
Stunning Lin!!! Simply stunning!
That looks amazing, gorgeous colours & layers.
It's just fabulous Lin....love it! Xx
I love this board, the colours and stamping are fantastic. I feel creativity creeping up......
Ohhhh Lin - I am in love with the project. The colors, the textures, the technique.... and I am just amazed at how you did them and then cut them and put them in such perfect order to make a WONDERFUL creation. WOW - just seriously INCREDIBLE. j.
Just glorious!
Lucy x
really like the tiles idea rather than one whole canvas - really stunning xx
Wow, such a glorious canvas!!! I didn't have time so far to see and comment this gorgeous creation by Lin.. that's done and I don't regret it! Coco xx
Post a Comment