
Today was time to head into the shed for a bit of Arty play.
Fresco chalk acrylic paints with stencils, Portfolio Oil Pastels, and Lynne Perrella stamps were on my hit list along with our new slide-mount stamp and die set, and PaperArtsy Metal Card and a tag. It seemed to take ages, but that's how it is with me, as I work through the options, I faff about a lot....that's the enjoyable aspect of the process for me. I'm hope there's an idea here for you to try when you get a chance. First a little about the products used in this tag. Some FAQ may be answered for you.
PaperArtsy Dies
All our PaperArtsy dies are compatible with all die cutting systems out there, it's just a matter of getting the right 'sandwich'. If you have any spellbinder dies, then ours are similar in thickness to those, so it should be the same 'platform' recipe.
Metal Card
This is a product we released January 2011 after a long period of development. It's is a specially coated aluminium metal (shim) that has been adhered to black card. It was a very difficult thing to manufacture - the concept is that it takes all the effort out of the metal-tape-sandwich drama (metal sheet-humungo-ultra sticky tape-black card) ...and of course it's much cheaper. It's available in our shop, no one else in the world manufactures a product like this and we do it in 2 sizes: 12x12" packs for £6.63+VAT or 5x7" packs for £3.75+VAT -perfect to die cut.
As I mentioned, the surface has a coating, which is a very fine tooth that stops ink and paint from reticulating (pooling), so you will find it so easy to stamp onto this with staz-On, or paint with our Fresco Paints. And of course you can use metal tools with it to for creating indentations of the artsy variety.
TIP: when you die cut metal card, it's ideal to have a clean acrylic cutting platform ie no dents or blade marks, because these will transfer onto your soft metal. If yours is a well worn platform, then insert a sheet of smooth card against the metal when you cut to prevent marks transferring onto the metal. Also we generally suggest you die cut first, and then stamp the corresponding image because if you have bought your stamps pre-trimmed from us on EZ mount cling foam, then you will be able to line up your stamp and die cut shape really easily.
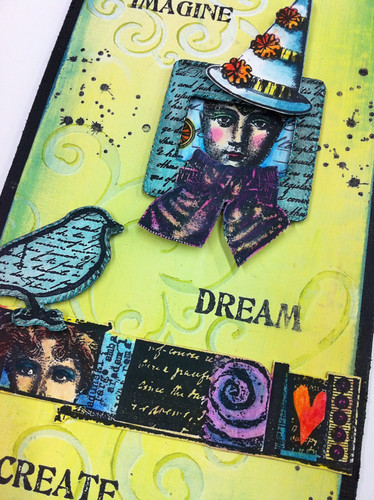
The Tag
- Die cut from metal card a slide-mount and small bird
- Use the brass brush from the TSS basic tool set to rough up the surface and edge with a texture wheel
- Paint both with Beach Hut Fresco Paint. I used 2 thin coats

- Stamp with archival jet black ink (not stazOn because you are stamping onto paint, not metal) a slide-mount image (I used script) and the small bird
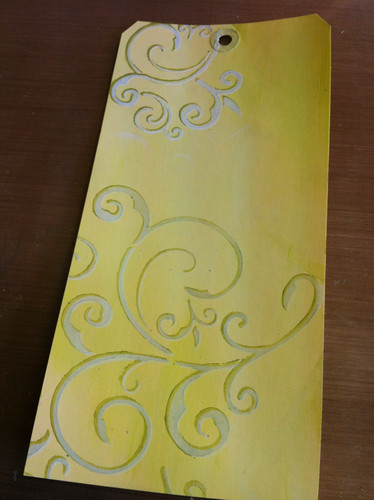
- Mix on your palette equal quantities of limelight and snowflake fresco acrylic paint and paint the tag all over. Dry and add to some areas 100% white and to others 100% limelight so that you get a contrasting background
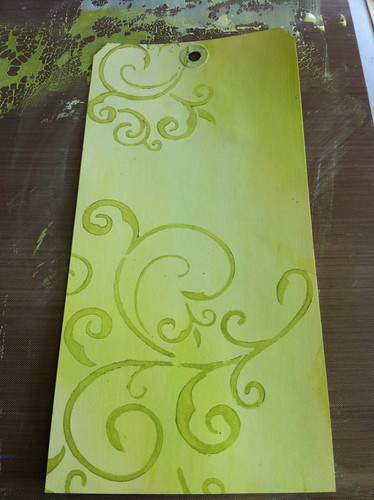
- Choose a scroll stencil and over a white area sponge limelight fresco acrylic through a small part of the pattern with cut and dry foam. TIP: don't use lots of paint, do a thin coat, then pattern-match and repeat for deeper green repeat for the lower part of the tag

- Mount the slide-mount over the face with sticky foam pads, position the hat and neck-tie over the top of the slide-mount. Place the small bird as shown
- Finish with stamping some small splatters from HPXT01 in black, and the words from HP1105 onto the tag, and mount to black card.
I really enjoyed my afternoon playing with these things. I have a few more techniques with the portfolios oil pastels to show you. They are a crazy animal - cos even though they feel like a really soft waxy crayon , and blend oh so easily, they are also like watercolours when you apply water to them. It's really weird. And because they are waxy, you can melt them with a heat tool, which opens up interesting options!
Have a great day, and don't forget the sale is on until January 22nd, up to 30% off your order depending on how much you spend.


6 comments:
Love it leandra, thanks for the hints and tips
Jeanette :)
Very beautifull tag, and what a beautifull colours and composition, I like the whole thing very much!!!
Maria
Stunning, you should make time to play more often!!
It's so great to see the blog up and running (fast and wild) again). Lovely. The tag is gorgeous -- may have to break down and place my order before I leave on holidays end of the week!
Sally xo
Thanks for a great tutorial Leandra! Any plans for some videos using the Portfolios too, pretty please?? xx
Wow! I am blown away with your tags. They are all so vibrant. I think I NEED these pastels! Thanks for showing and sharing some many ideas.. I feel a spend coming on!
Post a Comment