
"A touch of snow, lots of ice and cold winds had
me inking up one of the Winter Wonderlands plate. I loved the Ice Angel and wanted
to place her amidst silver, greens and blues".
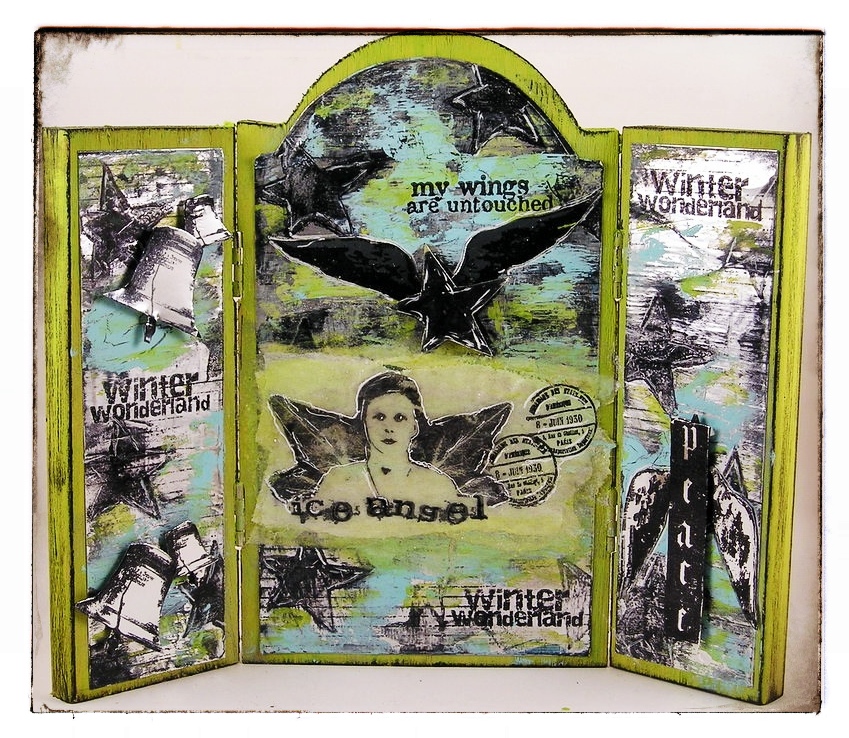
I started
with the Wooden Icon Triple as the base of my project and decided to add a
surface of Metal Card to the wood frame.

Trace center arch onto Metal Card.
Cut 1/8” from right and
left side and along the bottom. Cut two
pieces from Metal Card for sides of the arch.
Measure side panels and cut piece from Metal Card subtracting ¼ from the
measurement on the side and top.

Stamp the background stripes using Hot Picks Xtra01 - Backgrounds using StazOn ink over the metal panels.

Stamp stars From WW2 using Versamark randomly and heat
emboss with clear embossing powder.
 |
| Ink and the Dog- Winter Wonderland Plate 2 |
Stamp the WInter Wonderland words on each panel using
StazOn ink.

Smear black StazOn ink over surface of stars and
metal panels.
Paint surface of Wooden Icon Triple with Limelight Fresco Paint.
I attached the panels to the wood surface at
this point. "It would have been easier to leave them off the wood frame".

Smear Sky Fresco Paint to background over Crackle Glaze. Let dry. Add smears of Limelight Fresco Paint over surface. Apply black StazOn Ink around edges of wood icon.
Stamp "Ice Angel" using black StazON Ink onto Crackly Tissue Paper
I actually did this three times trying different
inks until I settled on black. I
attached each version onto the middle panel using glue behind the tissue
paper.

The rest of the project was stamping all the
images using black ink onto metal card,then cutting them out using
detail scissors.
Attach images using pop dots/tape to attach to
background. Outline images using a white gel pen to make the areas pop.
Come back tomorrow to see the other side of the project! Happy Stamping!
Suzz!
Leandra Says: Well this is a mysterious piece, so many things going on, I can't wait to see where you go with this!
Gillian Says: Lots of different elements to this project, stamping on the metal card adds that extra dimension to the background. The contrast of Sky and Limelight is very striking!
Want to play along with Suzz then click HERE to share your artwork and be in with a chance of winning some rubber!
Want to play along with Suzz then click HERE to share your artwork and be in with a chance of winning some rubber!


12 comments:
Oh, that looks fantastic! Wonder if I've got any metal card left...!! Looking forward to the other side.
Love this! Roll on tomorrow night so we can see the other side.
Thanks Suzz, for joining us as a Guest Designer. Metal is so hard to photograph, and love your idea coming up tomorrow! Itching for everyone to see that!!
Leandra
WOW How unusual and cool, love the background effect on the metallic card x
Stunning project Suzz ! Love the heat embossing on the metal card and the colour combo you've used is fab ! Sue C x
Fantastic project Suzz, can't wait to see the other side!
Alison x
Love it, Suzz! Metal is so fun to work with!
~Linda
great project and colour choice.
Love it Suzz! I would never have thought of embossing on metal. The colours are great and so is the background with the layering of stamped images. Plenty of depth too. I'm a day behind so off to check out the other side now.
Hugs
Lesley Xx
Great Suzz, what a really brilliant thing to do with the metal on card, I love that idea. great choice of stamps too, loving the paint over the top of the metal. Very inspiring. Michelle x
Love the limelight framing the metal card panels - gives great dimension already... and the stars are so dramatic!
Alison x
Wow stunning, I so love the arches, gorgeous :-) Kezzy xxx
Post a Comment