Showing posts with label PS288. Show all posts

Thursday, 20 July 2023

2023 Topic 7 : Art Dolls {by Renanta Peley} with Nicci Battilana stamps

Hi everyone! It’s Peley Renata here with you today and I have a fun project to share with you and perhaps to put you in early Halloween mood.

As I have never really felt good at modeling 3D shapes, or creating anything with clay, when the topic of the art dolls came up, I decided to make mine out of paper. I know that after those amazing projects and blogs that my crafty friends from PaperArtsy team created, this may seem like an easy breezy project, but stick with me and I promise it will be fun.


The quarterly topic of this month was “Transparency”, and I wanted to express my interpretation of it in a way to make a doll theatre where the dolls on strings could be moved by a hidden puppet master and where would be curtains, and we would never know what happens in the backstage, behind that fabric wall. With that idea in mind, I wanted to set a bit of a mysterious tone for my project. But now let me show you all the technicalities behind this.


As I previously said, the idea was to make a doll theatre, so when I started assembling my supplies, I knew I would like to work with a shadowbox (deep picture frame) and I knew just the right one. I bought mine once from Ikea for a project that I never ended up doing, but you can be more creative than me and create your own. Other items that I had in my mind at this point were a mixed media paper for the background, watercolors, but I also needed fabric for the theatre curtains and I knew it had to be in red to follow a more traditional image of a theatre. And of course, let’s not forget my chosen stamp sets and stencils from Nicci Battilana.


When choosing a color scheme for this kind of project, you can go two ways. You can create it in a bit darker, moody tone, or you can go and make it colorful and cheerful. I am a big fan of Halloween and I imagined making a project that could fit a home decoration for that occasion, but in my case my new project is already sitting on my wall. :)


The first step was to make a background and set the mood of the whole project. I chose to work with 200g/m2 (120lb) mixed media paper. For coloring, you can use inks, sprays, acrylics or like me: watercolors. I chose to work with watercolors because I had in my mind this lose, more organic look, with a bit of a vintage feel.


On the image above, you can see the first layer of color. I intended to make my colors uneven and I added some splatters. Also, I imagined how a stage light would make a brighter spot on the scene somewhere in the middle so the next step was to apply darker colors only towards the edges of the paper.


Hopefully here you can see what I meant. Now I know this doesn’t look great on its own, but later on it all comes together. Anyway, I still wasn’t done layering the colors and I still wanted to darken the edges up a bit, but for this time I used Ranger Distress Oxide Inks in Vintage photo, Ground Espresso and Black Soot colors.


With this, the base of my background was done but I wanted to add just a touch of spookiness to it with a bit of cobweb and a couple of spiders.

The spiderweb pattern comes from the PaperArtsy stencil PS288 and the spiders from PS286.


I wanted to make the spiderweb discrete, so I heat embossed it with half transparent but also shiny embossing powder. Truth to be told, this ended up being a bit too transparent so I added just a bit of white highlights with a Gell Roll pen to emphasize the web. And since I had embossing powders at hand, I also heat embossed a couple of spiders. To make the stuff more scary, one spider will be hanging just above one of the dolls heads (muahaha :D ).


At this point, I was happy with my background, so it was time to make my paper dolls. For that, there were a couple of things that I had to keep in mind, but you will soon see what I mean.

Now to the most fun part, the making of the paper dolls. The stamp sets that I picked for my projects are ENB07 and ENB09 by Nicci Battilana.


As you can see from the stamp sets, we have 2 heads, 2 bodies but only 1 set of arms and legs, but this is not a big issue. If you want to go simple just stamp the legs as they are and use them for both dolls, but I didn’t want to have the same patterns on the legs. One set of legs I stamped with Tsukineko VersaFine ink, but for the other one, I did a bit of a work around with brush markers. For the legs with the black leggings with skulls, I went only on the edges of the pattern with the brush markers, so I managed to stamp only the outer shape of the leg. The legs with the starry pattern were stamped with a blue brush marker, as I was planning to cover the design with darker blue colored pencil. And this all worked out in the end, as you will see.
Another thing that you might have noticed is that one of the dolls on the stamp set doesn’t have a lower body stamp, but that was really easy to draw. And I actually draw one skirt and one shorts since at start I wasn’t sure what I wanted to use.


When all the images were stamped (and drawn), I went onto coloring. This time I decided to work with colored pencils. I used Prismacolor Premier pencils and for blending, I used odorless mineral spirit and a blending stump. In case you are concerned about the toxicity of the odorless mineral spirits, you can blend the colors using brighter shades (such as white) or blender pencil as well.


After coloring and fussy cutting the stamped images, it was time to assemble the paper dolls. To attach some elements, I used a black thread, while for others brads. At the start, I used a simple brad on the neck, but later on, you will see that I changed it to a heart-shaped one as I imagined it could serve as a choker necklace.
At this point I had to think about my idea of a hidden puppet master, so while assembling the dolls, I also had to keep in mind to leave longer strings at the doll’s elbows and shoulders.


I repeated the whole process on the second doll, but this time I also attached the “plush” rabbit to one hand using a string.
To secure the dolls’ strings to the base paper, I used simple transparent adhesive tape on the back of my background paper. Also, I wanted to make sure my dolls don’t stick to the background and at the same time give them some more illusion of dimension, so I put 2mm thick foam tape on the back of the dolls, behind their head and main body area but I did not peel off the sticky layer since I still wanted to be able to move them.


Now I had my background and the paper dolls ready, so it was time to make the stage.


Do you remember how I told you at start that I am not good at making 3D shapes? Well, it turned out there is one more thing I am not good at. Using a glue gun! It’s such a messy work for me. I had glue strings all over the place and my fingers. One piece even glued to my hair, even though I have no idea how that happened. Anyway, let’s keep that between us and move on to the project. Here is the new batch of items which I prepared for the next stage of my project.


Since I don’t have a craft room, there are some supplies that I have to keep in the closet in the corridor, in my bedroom or behind the couch like my sewing machine. And as I was lazy to move the couch, I decided to use textile glue instead of sewing to make the edges of my fabric nice and tidy.


I know this might have been a lazy approach, and the sewing gets that lovely texture, but I think this worked out just fine in the end. So, let’s make those curtains now.

The curtains….ugh…I must admit I struggled with these. I wanted them to form a nice shape, but not to cover too much, but still look like curtain enough?! I know I might sound silly to you but guys it was easier said than done. Or maybe I am just a paper girl and clay and textile are just not my friends…. :D

Anyway, this Ikea shadowbox has an inner wooden frame that I took out and adhered my curtains using a glue gun. Also, just for some extra effect, I found these 2 tassels from my stash and attached them to the fabric. And I really loved how that turned out.


On the picture above, you can see the inner frame of the shadowbox that I mentioned, but also my messy glue gun work.

Now for the end, the last thing that I had to do is to assemble my frame and put together the whole project.


Oh, and look at that cute bat that I just placed there just for fun. :)


I have to admit, this was really fun for me to create. I enjoyed figuring out the ways to assemble the dolls, the color scheme of the project, how to make it all look more like a stage, but every project can have some difficulties. Either some medium not acting as you imagined, cutting fabric where you did not intend to, cat stepping in your paint, getting glue in your hair…but let’s leave all this “behind the stage” mishaps and enjoy the creative process because that’s what matters the most. In my opinion, when you enjoy the process itself, you will have better end results as well. And you might even pick up a fun anecdote to tell to your crafty friends. :)

Renata 💜


Just in case that you are curious to see the full crafting process with all the struggles and mishaps, there is a video available on my YouTube channel.

Friday, 24 September 2021

**NEW DESIGNER ** NEW PaperArtsy Products: Eclectica³ Nicci Battilana {September 2021}

Eclectica³ Nicci Battilana Collection
September 2021 New Designer Announcement
 

A note from Leandra:
We are absolutely thrilled to bring you the lovely Nicci as a new designer under the PaperArtsy umbrella. She is such a sharer of amazing content online across all socials; from her hand drawing classes, to video content, plus she's a self-published author with a wonderful Alice in Wonderland book of prompts and creative ideas. Nicci is an art teacher, so sharing and teaching is her happy place. There is often a dark spooky side to her art, so it seemed natural for us to launch with a Halloween theme for her first release.
 
Nicci will be along to share with you LIVE her new products and ideas over in our Facebook Group, PaperArtsy People shortly after this post publishes. I hope you can drop by for the live, or try to catch the replay. I'm sure you will enjoy meeting Nicci and hearing from her direct about her first release!
 
For the next 4 months, these stamps are only available EXCLUSIVELY from our approved stockists. Please check the list at the foot of this post to find a retailer online or geographically near you, it makes sense to order within your country where possible.
 
Hi everyone, Nicci here (www.nicci.ca) from Canada

I'm super excited to share with you my newest ... and FIRST... release for PaperArtsy. Three stamp sets and coordinating stencils.

What a perfect time of year for me to be joining Paper Artsy! Just days before the SPOOKY month is upon us...lol. I am so excited to share my first designs with you. YEAH!
If you are new to my work, you will find that I tend to lean towards the quirky side of art. It's kind of a splatter mix of big eyes, bright colours, & a dash of grunge encased in thick black lines...just like my eyeliner.. ha ha.
Most of my art creations are done in art journals these days (You may already even be a member of my facebook group 'Art Journal Junkies' or my personal fb group 'The Art Playground of Nicci Dot C A' ) I cannot wait to see how your creative juices flow with these new stamps and stencils in your journals, on your cards, your tags and even in your holiday decor!

  New Stamps
Price: RRP €21.92 +VAT
Size:5" x 6" (13 x16.5cm)
All stamps are individually trimmed onto cling foam, presented in a clear hanging bag
with a laminated storage/index sheet.

  
Eclectica³ Nicci Battilana Set 01 (ENB01)
 
This stamp set is my very first one and it just brings me sooo much joy! I have dreamt of having my own stamp line for years and years. I think I just need a moment to let this sink in...lol.

Halloween, brings to mind haunted houses, trick or treating and giggles with friends. I am not one for horror movies, so for me, Halloween is a time of childhood memories and having fun with family & friends. 
These stamp and stencil sets let me remember the past and create whimsy in the now!

This first page in my journal reminds me of a famous haunted mansion that gets a make-over every year at Halloween with bright colours and fun, less freaky, elements. That house has had me dreaming of rich damask wallpaper and portrait gallery walls. 
 

I always enjoy art journal pages that hold little secrets or fun movable pieces. In this close up, you may notice that our Witchy Cat, 'Bone Daddy', may not actually be stuck in that frame of bones...
 
 
I was actually contemplating on placing Bone Daddy's head on a wobble, but I was afraid that his wide brimmed witch hat, may get stuck in the bones...lol. So I saved the wobble for another page.
 

Eclectica³ Nicci Battilana Set 02 (ENB02)
 
The BIG REVEAL...lol.  
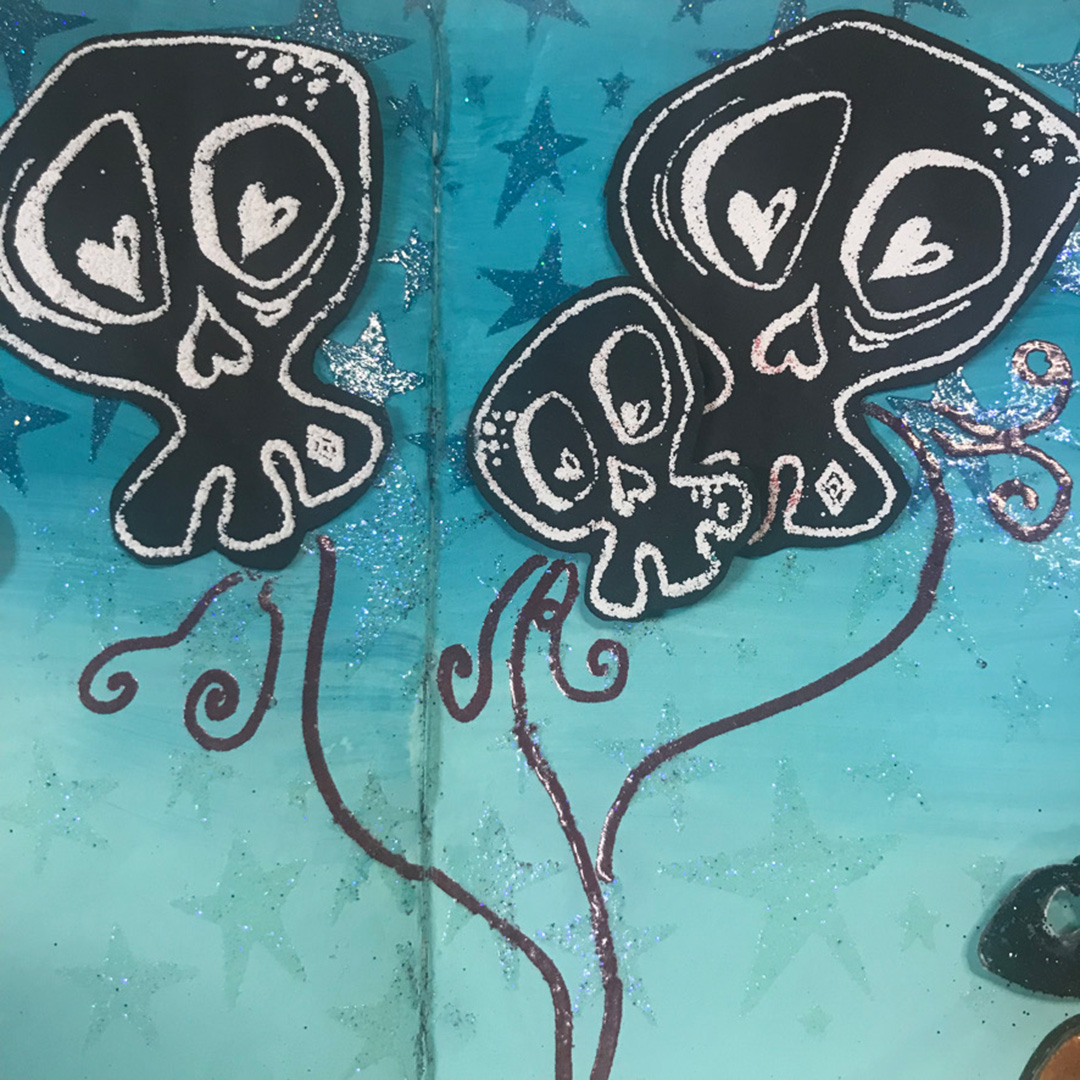
Bone Daddy is actually a 'mer-cat' out for a swim with his helium filled balloons. (Just to show you that you do not have to be dark and spooky to enjoy these Halloween themed goodies.) 
I LOVE Whimsy!
 

I embossed my skull balloons with WOW!'s 'White Puff' (WP01UH) embossing powder as I thought it added a fun element to the skull details.
 

These balloons make me think of another fun idea that you can use the skulls for. How about hanging home decor? I know some of you out there now have Halloween Trees. If you punch a small hole in the top of the skulls and add a little ribbon, these would make fabulous tree decorations !


Eclectica³ Nicci Battilana Set 03 (ENB03)
 
I have used this stamp set on sooo many areas of these journal pages. If you scroll back up, you will see that I used the damask stamp repeatedly on the first page & then the pumpkins, gravestone, cat and haunted house on these two tag samples.
 

Fun fact, the song 'Another One Bites the Dust' was played at my wedding years ago right after our ceremony...lol... a little tongue in cheek joke as we entered into the reception. I also added this Anhk to the gravestone, as my husband loves them. 😍
 
 
I think it would be fabulous to create a POP-UP page using the haunted house and the gravestones. If you create one, please share it in our facebook groups, as we would love to see it!
 

New Stencils
Large Size: 6.25" x 9.5" (16 x 24cm) Price: RRP €6.28 +VAT
  
PaperArtsy Stencil 286 (PS286)

I just love how my little spiders turned out on this stencil. You may notice that a couple of them have little skull shapes on their backs where you just need to add in the eyes 😉😉 .
 

I created this stencil, as I know that some Artists have a hard time with adding shading, therefore  I created these templates to lay overtop your stamps bones and small skull to help guide you. They are so fun & quick to use.
 

I did end up using that wobble after all, under this skull head. Wobble action pieces are great for animating parts of your projects and no one can resist giving them a little flick...lol.
 

PaperArtsy Stencil 287 (PS287)
 
I love this stencil! It is so useful, what with the variety of cats, the fabulous stained glass window and oh my stars, the stars!  I don't think we can ever have enough star stencils. NOTE: some of the stars do line up perfectly with the star stamps in set ENB02.
 

I actually used the stained glass window stencil on the cover of my journal, but I would love to try using it on some acetate next as a cut out window in a page.
 

Our little Back Alley Cat looks fabulous stamped in black ink and embossed with WOW clear hologram sparkle (WS12R). I am such a sucker for sparkles!


PaperArtsy Stencil 288 (PS288)
 
Bats, bats, they're everywhere! These spider webs are actually big enough to catch the bats...lol.
On this page I thought the bats would be a great background accent to my candy corn school of fish. NOTE: some of the bats do line up perfectly with the star stamps in set ENB03. 


You may even see a few spiders and a skull hidden in the purple background and stars in the green background. Would you swim in a river filled with candy corn?
 
 
Imagination is beyond amazing. That is what I love about creating with others and Teaching. We all have a river of this CREATIVE JUICE just flowing through us. Sometimes it gets blocked up, or runs a bit dry, but spending time with others, such as yourself gets that river flowing again or broadens the banks with new ideas and possibilities. I cannot wait to see what you all create and I hope that we can create together one day soon. Flow my little candy corn fishies! Go play!!!
 

~ ~ ~ ~ ~ ~ ~ ~ ~ ~ ~ ~

Hi everyone, Leandra here! So how much fun are Nicci's stamps!? I was itching to have a play with these beauties, and so happily I got to be Nicci's wing-woman for this release! 
  
Arched Window
This little guy is pretty funny, deffo the cool cat in town. The hat was a late addition, but if it fits the cat....
 

For the cat, I prepared an ombre green BG using Yellow Ochre and Pea Coat. The Pea Coat was also mixed with Buff to make the other softer blues under the eyes and on his chops/ tummy.
 
 
Love , love , love this stencil (PS287), I bumped with Navy under, then a mix of Buff and Vintage Lace on top and some watercoloury shading. The BG was a bit of a struggle to be honest, so I decided to journal with my hand-writing in both black and white to add some interest.
 
 
The background was stamped with the Gothic script phrase to make a easy Halloween-esque background to layer onto. Love how that works around the edges and could be used as wallpaper and more so easily.
 
 
She's a Gonna
Poor Erma, sadly no longer with us. This sample was supposed to be super-simple (not sure I can do that vibe) but then intention was there. However, painty fingers make accidental painty smudges - so I had to go into full on blobby (repair??) mode. I think its a bit of a mess behind the lamppost, but at a stretch, I'm sure you can see it was the spooky, misty shadows I intended all along! 
 

Nicci does have a 'star cluster' stamp on ENB02 that fits perfectly over a portion of the stars from the star stencil (PS287), but I didn't think enough in advance to do that (might be smart to use a stamp positioner). Next time! .... In the meantime... I really love those shadow cats from stencil PS287, simply stencilled in the Pea Coat navy blue Fresco here, but I love how Nicci embossed hers in sparkly black!
 
 
The texture in the torn 'embellishment' at the bottom left is infusions sprinkled into Grunge paste that I stamped with fine script (MN61) Actually its a sample I did at a show many years back, and kept squirreled away. I tore small sections kind of de-laminating the GP section from the card backing and glued it down with matte medium.
 
 
 The Bats are Swooping
I started this by masking off a 'moon' area, then brayered the shades of Blue and Purple (Electric Violet, Purple WIne, Pea Coat).
 

The background seemed to need a little extra, so again, my scribbled illegible handwriting came in handy, along with some starry-night splatter.
 

LOVE. THIS. HOUSE. Onto scrappy paper painted with Buff, Gold Rush and Vintage Lace, i added watery colour, it was quite important to accent those stones to get the old feel. I used the damask stamp to give an impression of a wrought iron gate in the background.
 
 
 ~ ~ ~ ~ ~ ~ ~ ~ ~ ~ ~ ~ ~

Thank you so much for joining me in my little Art Playground and welcoming me into the PaperArtsy world. I look forward to creating for and with you all!
Keep smiling & creating, 
Nicci

Socials...
Website: www.nicci.ca
Twitter: @niccidotca
Instagram: @niccidotca

Teaching Schedule:
Available Now 'A Journey Down The Rabbit Hole', my online art school, CLICK here for more information.
Please follow my socials to find out about upcoming classes at your local retail shops!

PaperArtsy Stockist List

Our stockists are your go-to  source for all PaperArtsy products, and we suggest that you also use the PaperArtsy People Facebook group to source a retailer in your country. Many are members of our FB group and will happily share links to their online stores.

Australia
Bev's Cross Crafts, Spreyton, Tasmania https://www.bevscrosscrafts.com.au/
Crafters Cupboard, Berwick, Victoria www.crafterscupboard.com.au
Memories on the Murray, Murray Bridge, SA  https://www.memoriesonthemurray.net/
Natalie May Scrapbooking, Dover Gardens, SA https://nataliemay.com.au/
Scrapbook Superstore & More South Penrith, NSW https://www.scrapbooksuperstore.com.au/
The Scrapbooker's Confetti Box, Swansea,NSW https://thescrapbookersconfettibox.com/
The Thread Studio, 6 Smith Street, Perth http://www.thethreadstudio.com/
The Scrapbook Store, North Perth,WA http://thescrapbookstore.com.au/ 
Time To Createwww.timetocreate.com.au

Belgium
Cart N Scrap Art, Antwerp, www.cartnscrapart.be
Créatelier Caracolle, Liège, www.createliercaracolle.be

Canada
Clipper Street Scrapbook Company, Langley, BC. www.clipperstreet.com
Paper Art Creations Inc, Leduc, Alberta, http://www.paperartcreations.com/
Scrapbook Centrale, Dollard Des Ormeaux, Quebec www.scrapbookcentrale.ca
Scrap Addicts, Edmonton, Alberta https://www.scrapaddicts.ca/
Scrap and Bean, Edmonton, Alberta http://scrapandbean.com/ 
Scrapbooking Fairies, Drayton Valley, Alberta https://www.scrapbookingfairies.com/
The Paper & ink Boutique, Calgary, Alberta https://www.paperandinkboutique.com/
The Scrap Yard, Calgary, Alberta, https://www.thescrapyardcalgary.com/ 

Denmark
Hobbyboden Scrapworld Samso www.hobbyboden.dk

France
Eirl Bancon Cartoscrap, Midi Pyrenees, www.cartoscrap.com
Fee Du Scrap, Saint Sébastien-Sur-Loire, https://www.feeduscrap.fr/
Horizon Créatif, Ste Jalle www.horizon-creatif.fr
Instant Créatif, La Possession, La Réunion, www.icreatif.re
Katzelkraft, Ingwiller http://www.katzelkraft.fr/en/
Kerudoc Creation, St Yvi www.kerudoccreation.com
Toutencolle, Dun sur Avon www.toutencolle.fr

Finland
Heidin Korttipaja, Istunmaki, www.korttipaja.fi/fi

Germany
Stempelbar, Berlin, www.stempelbar.de
Stempeloase Munich, Munich www.stempeloase.de
Stempelfee Shop, Hilden www.stempelfee-shop.de
Stempellaedle, Stuttgart, www.stempellaedle.de/shop

Greece
Scraps N Pieces, Kallithea www.scrapsnpieces.gr

Italy
Immagine SAS di Rapaccini, Rome, www.immaginelab.com
Il Negozio Della Mamma Di Cle, Torino, www.ilnegoziodellamammadicle.com
Marte Savona, Savona, www.martesavona.it
Pezze E Colori, Lissone, http://www.pezzeecolori.it/ 
Piccole Passioni, Siena, www.piccolepassioni.it

Japan
La Wadao, Odawara, Kanagawa, www.lawadao.com
Tiny Dots, Funabashi-shi, Chiba www.tinydots.shop-pro.jp

Netherlands
Doe@ding,Spijkenisse https://doeading.nl/
Hobbycompleet de Duif, Leeuwarden www.hobbycompleet.nl
Stampingcorner, Capelle Aan Den Ijssel www.stampingcorner.nl

Norway
Hobbygarasjen, Kopervik, www.Hobbygarasjen.no

Spain
Cien por Cien Manualidades, S.L., Bizkaia, Catalunya,  www.100x100manualidades.es
Ideas 10 Manualidades Y Scrapbook, Bilbao https://ideas10manualidades.com/
Marakiscrap, Tarragona, www.marakiscrap.com
Scrap & Papers Experiences, Barcelona, www.scrappapersexperiences.com
The Paradise Corner, Barcelona, www.theparadisecorner.com

Taiwan

United Kingdom
Amelia's Creative Crafts, Studley, Warwickshire  www.ameliascreativecrafts.co.uk
Art from the Heart, Harrogate, Yorkshire www.afth.co.uk
Blade Rubber Stamps, London www.bladerubberstamps.co.uk
Crafts at The Malthouse, Herstmonceux,  East Sussex, http://www.themalthouse.co.uk/
Fave Rave, Stourbridge, West Midlands www.shabbychicstencils.co.uk
Loobi Crafts, Leighton Buzzard, Bedfordshire, www.loobicrafts.co.uk
Papermaze, Ipswich, Suffolk https://www.papermaze.co.uk/ 
Stampers Grove, Springbank, Lilliesleaf, Melrose,Scotland www.stampersgrove.co.uk
That's Crafty
, Romford, essex www.thatscrafty.co.uk
The Artistic Stamper Craft Store, Faversham, Kent www.theartisticstamper.com
The Forget me not Kraft Kabin www.TheForgetMeNotKraftKabin.co.uk

USA
Artistic Artifacts, Alexandria, VA https://www.artisticartifacts.com/
Artistic Studio Creations, Fayetteville, Georgia www.facebook.com/ASCbyCrystal
Craftiness, Chatsworth, CA, https://www.craftinessonline.com/
Ephemera Paducah, Paducah, Kentucky www.ephemerapaducah.com
Everything Scrapbook & Stamps, Lake Worth, Florida www.everythingscrapbook.com
Frantic Stamper, Oregon www.franticstamper.com
Free Heart LLC, Denver, Colarado, http://www.freeheartllc.com/
Joggles, West Warwick, Rhode Island, www.joggles.com
PaperCraft Clubhouse, Westbrook, Connecticut, http://papercraftclubhouse.com/
Qingquing's Stamp Shop, Portland, Oregon
Runaway, Art & Craft Studio, NE Salem, Oregon http://www.runawayart.com/
Simon Says Stamp, Columbus, Ohio www. simonsaysstamp.com
The Ink Pad, New York, www.theinkpadnyc.com
Topflight Stamps, Irmo, South Carolina https://topflightstamps.com/

Our brand is only available from established stockists who are VAT/ GST/ sales tax registered and for whom product education is a core principle. We would rather supply a few hand selected stockists, than the greater masses. If you would like to apply to be a stockist, you can find our more about our supply criteria here. Please note we are not accepting new stockists until we are relocated into our new building here in France. Covid restrictions have slowed our progress somewhat, so we hope to be in by the latter part of 2021.

PaperArtsy Links
Facebook Group PaperArtsy People
Facebook Page PaperArtsy