Showing posts with label Fabric Journal. Show all posts

Sunday, 11 September 2022

2022 Topic 13 : Fabric {by Liesbeth Fidder-de Vos} with Scrapcosy stamps


Hi everyone, it's Liesbeth with you today, and I'm here to share with you my home-printed fabric using a selection of stamps designed by Scrapcosy!


I love to use fabric in many different ways! Not only for sewing, I also cover books with it and even make cards and other things with it! I'd love to show how to decorate your own unique piece of fabric. Enjoy the process of creating a large piece, it's so much fun, and use your fabric the way you choose!


Before I started I covered a big work surface with plastic because this technique is a delicious mess;-) (the plastic can be used multiple times).


A piece of white cotton fabric, not too thick, as big as possible! Mine was 90 x 60 cm. The best is to wash and iron it beforehand, so the ink, paint and glue will be well absorbed.


I always make the most decisions while creating...not before I start. So I think I'm gonna use this colours of Fresco Paint! PaperArtsy Chalk AcrylicsTerra CottaSlimedBananaGlass Blue and Smoked Paprika. It's important to use translucent paints as these five colours are.
I also searched for some matching colours of waterproof stamping ink. I used Tsukineko StazOn inks, but other coloured waterproof ink works well, like Archival!


These are the two PaperArtsy stamp sets I will use! Love them! I love the atmosphere and they're so detailed. With the stars and the beautiful borders they are perfect to use for this fabric!

Eclectica Scrapcosy 24 (ESC24) and Eclectica Scrapcosy 25 (ESC25)


Let's start stamping! I randomly stamped the entire fabric surface using the different stamps, starting with the branch (green), the moon (yellow) and a border (blue).


Here I made new decisions. I added red (wreath) and a darker blue (stars) and stamped the borders with brown. Sometimes I made a second print, the image is lighter then the first.


I continued stamping with some texts and another small border. Make sure you stamp the background stamps in all directions (not the texts).


I also used the stencils 266 PA Stencil - Large Size {by Scrapcosy} (PS266) and 264 PA Stencil - Large Size {by Scrapcosy} (PS264), they're matching with the stamps!


Using the Fresco Finish Slimed and a small sponge I stencilled the branch several times...


...and I did the same using Fresco Finish Banana and the stars.


And still..something was missing. So I stamped the good old PaperArtsy Hot Pick 1501 (HP1501) It's that wonderful large text, useful for everything! I stamped it, and just parts of it, here and there on the entire piece using black StazOn ink.


This is how the fabric looks now, it's time for some focal points!


Using black StazOn ink, I stamped the bigger stamps from both stamp sets several times onto white tissue paper.


I tore out the images (also added some images from the PaperArtsy printed tissue paper PT01) and cut out the moons. I spread the images over the fabric.


To glue the tissue scraps down I mixed half bookbinder's glue and half water; equal amounts. It needs to be thin! You can also mix every kind of white glue with water, or use Mod Podge. Glue everything on the fabric and be sure that every cm of the fabric is soaked by glue.


When everything was still very wet, I started to paint with watered down Banana paint. Just use your intuition and don't think too much ;-)


Continue this ,water color' painting with orange...


...and blue and some green. I lightly painted some of the images as well.


Using watered down Fresco Finish paint Gold, I splattered and painted and splashed beautiful spots and drops on the fabric. Now it's time to let it dry for a long time... I always give it a night to dry well.

 
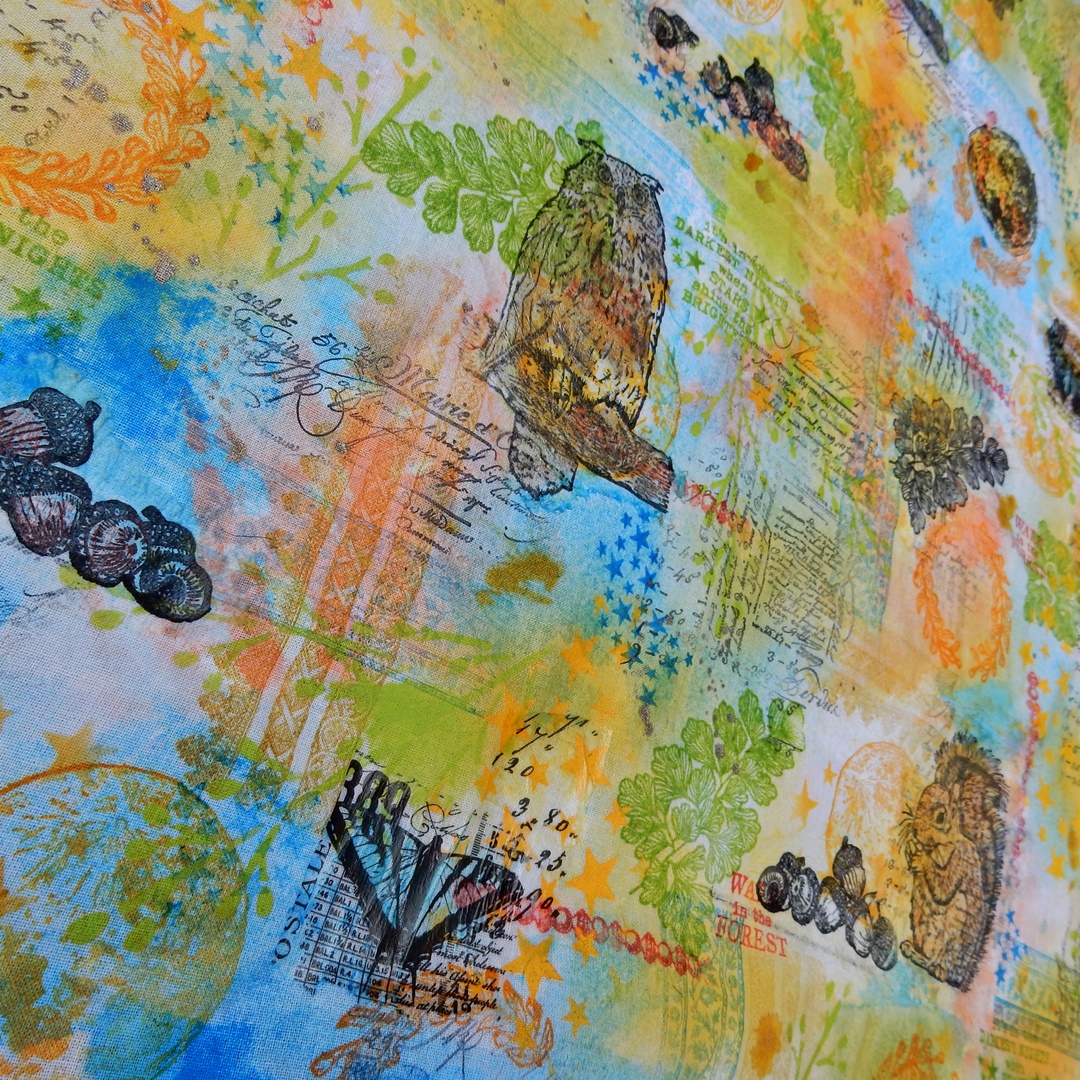
If dry, it can be peeled off the plastic and your own unique beautiful piece of fabric is ready!


The finished piece of fabric, the only one of its kind! Now you can make with it whatever you want.


Out of this piece of fabric I made a pouch, 3 cards and a book cover! This is the book cover:  I think a very nice and easy way without sewing. I used a ,dummy',  an empty book. Cut out a nice piece of your decorated fabric (5 cm taller on each side than the book)  Note there's a nice piece on the front.


Wrap it around the glued cover, press well. Start with the back, then the spine and finally the front.


Cut some fabric from the corners and spine, glue them and fold them to the inside as shown. At the spine I always cut off the fabric.

 
Finish off the insides with pieces of beautiful paper.


I love to use a white gel pen and a black fineliner for the finishing touch: on branches, acorns, around the stars, in the eyes etc.


The finished covered book, great to give as a present!
 

Some more examples showing how to use your home-made fabric.
Cards:


If you are a sewer, like I am!


And here in front...the left-overs! So I have the possibility to even make much more! What about...a bookmark...a wallet...??


This nice technique is something I've done many times before, and every time the result is so different, so exciting. So I recommend you to give it a try yourself to. You will have so much fun during the process. I'm looking forward to see what you come up with and what you make out of your own fabric! To me it was another adventure! Hope to see you next time, have a wonderful day!

Liesbeth

On 8/9 October I will teach 4 workshops (4 different stamping techniques) in Tampere, Finland. Read everything about it HERE. 

Tuesday, 6 September 2022

2022 Topic 13 : Fabric {by Jenny Marples} with Alison Bomber stamps


Hi everyone, it's Jenny Marples (Pushing The Right Buttons) with you today, and I'm here to share with you a method for creating book with fabric using a selection of stamps designed by Alison Bomber.


I'm often asked how the journals and books I draw in are created. Usually they are made with paper but increasingly that's changed to include fabric because it's easier to bind, more forgiving and stronger (since fabric doesn't tear). So for this project I'll show you how to make a simple book and include ideas for decorating the pages using Alison Bomber's latest stamp releases.


Start by selecting your pages; they can be of any size as long as they are all roughly equal and in multiples of four. Mine were cut from a cartridge paper (A2 in size, 220gsm/110lb) though you could use postcards, old envelopes, even those sheets of patterned paper you may have left over.


Having some colour/pattern on the paper is helpful because it will show through the layers of translucent paint you will then apply using tools of your choice. I started with PaperArtsy Fresco Finish Chalk Acrylic Paints in 'Autumn Fire', 'Scottish Salmon', 'Terracotta' and finally 'Peachy Keen'. Apply unevenly and with decreasing amounts of paint to allow the lower layers to peek through.


You may be happy to stop there but I wanted it to be more muted so dry-brushed 'Snowflake' PaperArtsy Fresco Finish Chalk Acrylic Paint over the top.


Finally scrape on 'Chalk' Fresco Finish Chalk Acrylic Paint in patches.


In case you are wondering why those lighter layers have been added here's one of the pages simply stamped with the first of Alison's stamp sets EAB26 - you can still see the colours but it also allows the stamped words to stand out.


Time to start filling some of your pages with images from Alison's beautiful stamp sets EAB24EAB25 and EAB26. With a decorative background already done you can afford to keep the stamping simple too.


To compliment the autumnal background use the PaperArtsy Fresco Finish Chalk Acrylic Paints previously mentioned with further brown, yellow and orange shades to add colour to the fruits and leaves. I went with 'Chocolate Pudding', 'Zesty Zing' and 'Tango'.


And here's where we start to get stitchy; think of your paper pages as pieces of fabric, sticking on scraps of gel printed tissue, Infusions dyed teabag paper, and bits of card before 'fixing them in place' with simple running stitches. I would recommend using embroidery thread (floss), Sashiko thread or others of a similar weight to make the stitches stand out.


With your remaining pages you may want to draw a few favourite buildings. Alternatively use gel printing to apply printed images or simply stick in some photos. Mine all have links to some of Shakespeare's plays set in Italy to fit with Alison's stamps.


Now you have your pages finished, time to turn them into a book.
 

Sort your stack of painted pages into the order you want them to be in your book. You will need two painted page on the front and back of each 'signature' so in total you will need four for the covers, followed by a further four for each signature.


With my 16 pages assembled, and taking away those selected for the covers, I had enough for three signatures (ie. 12 painted pages). Cut some cheap cotton calico fabric to fit the width of two of these pages leaving a border roughly ½ cm (¼ inch) around each painted page. You'll need further fabric signatures for each group of remaining pages, leaving the cover pieces to one side for now.
 

Sort through your fabric scraps to find bits that will compliment your painted pages. Cut them into small strips/blocks and use glue/gel medium to stick them around the outer edges of each page on the signature, leaving a small gap where the signature will be folded in half. Repeat on the reverse, adding offcut trims and lace for extra texture. I would recommend adding some extra fabric into the centres to support the painted pages which will be mounted on top.
 

Glue your painted pages onto the fabric signatures - you should have a little of the patchwork and lace beneath showing and the painted pages should roughly line up with each other in front and behind. Run some machine stitching around the edges to secure them in place and create a visual border to each page.
 

With all your signatures assembled and folded in half cut more cotton calico fabric long enough to wrap around it all from front to back. Be generous and remember, you'll be adding more fabric and painted pages to the inside of the covers so leave enough for them to fit. Fold the cover fabric in half and create a centre crease line.
 

Starting with your middle signature open secure it onto the cover fabric along the creased line using strong thread and a simple running stitch (as shown below).
 

Once your centre signature is in place you can repeat the process, working outwards to attach the remaining signatures. As the pages have some depth to them you'll need to allow a gap in between each line of stitching so they can lay flat when the finished book is closed.
 

With the pages now in place it's time to finish the covers, and the book.

Decorate the inside of the front and back covers using the same method used for the signatures, securing the painted pages with more machine stitching.


Everything is complete inside so now it's time to tackle the outside of the covers. Wrap lace (or old net curtain offcuts!) around the spine to disguise the stitching. Mount the final two painted pages onto cardboard before layering onto more fabric. The cardboard will add rigidity and strength to your covers whilst the fabric will echo the look of the pages inside. 
 

You'll see on the finished book I added some filigree metal trims to the front and back covers to imitate the look of clasps. You could also add a ribbon tie beneath your painted covers, attach charms to your spine and further embellish your pages at this stage. All of these additions would add to the tactile feel of the completed book.


So here is a flip through of my finished pages, with the first spread celebrating Shakespeare's 'The Merchant of Venice' and the iconic view of the Bridge of Sighs. Quite by chance the stitched page could represent one of the famous canals!


Keeping with the autumnal feel the rosehips have been transformed into physalis.


An Italian balcony was the obvious choice for Shakespeare's 'Romeo and Juliet'.


More autumnal fruit, this time with the blackberries becoming golden raspberries. The 'Persimmon Flower' pattern created with the stitching replicates a design seen on the Doge's Palace in Venice.


A view of Arsenale in Venice has been used for Shakespeare's 'Othello' - as a member of the Venetian militia this could have been his home port.


Acorns are traditionally a sign of Autumn and Nature's bounty. And can you spot any extra Shakespeare quotes in the Alison Bomber stamp sets you may already have that could fit?


For the final pages I chose a typical Italian street scene for Shakespeare's 'The Two Gentlemen of Verona' - something about that tower...


So now you have a jumping off point from which to create your own books using fabric with paper, your own collection of PaperArtsy Paints and of course Alison's beautiful stamps. Whilst you can make these any size you want I would recommend starting small with a maximum of three signatures so as not to feel overwhelmed by the number of pages you will need to decorate. And make sure to share your creations with us all in the PaperArtsy People FB group!

Jenny