Showing posts with label 2020 Topic 20. Show all posts

Saturday, 5 December 2020

2020 Topic 21 'O, Christmas Tree...' with EEV (by Amanda Pink)

  2020 Topic 21: Masterboards


You might be forgiven for thinking that so many masterboards in one topic would end up all looking quite samey. It's not turned out like that at all. Amanda wraps up our topic with a set of cards and tags that boast really painterly backgrounds and shiver with a beautifully cool atmosphere.
~ Keren.

Hi everyone, it's Amanda Pink (ink-a-pink) with you today, and I'd like to share with you the project/s I have created for the current Topic 'Masterboards'. 

I always seem to be on the last push when it comes to creating my own handmade Christmas cards and often end up resorting to shop bought ones so this topic was perfectly timed and offered me the ideal opportunity to create a couple of masterboards, which I then turned into backgrounds and trees that I used to make some Christmas cards. I couldn't resist making a few gift tags as well! 
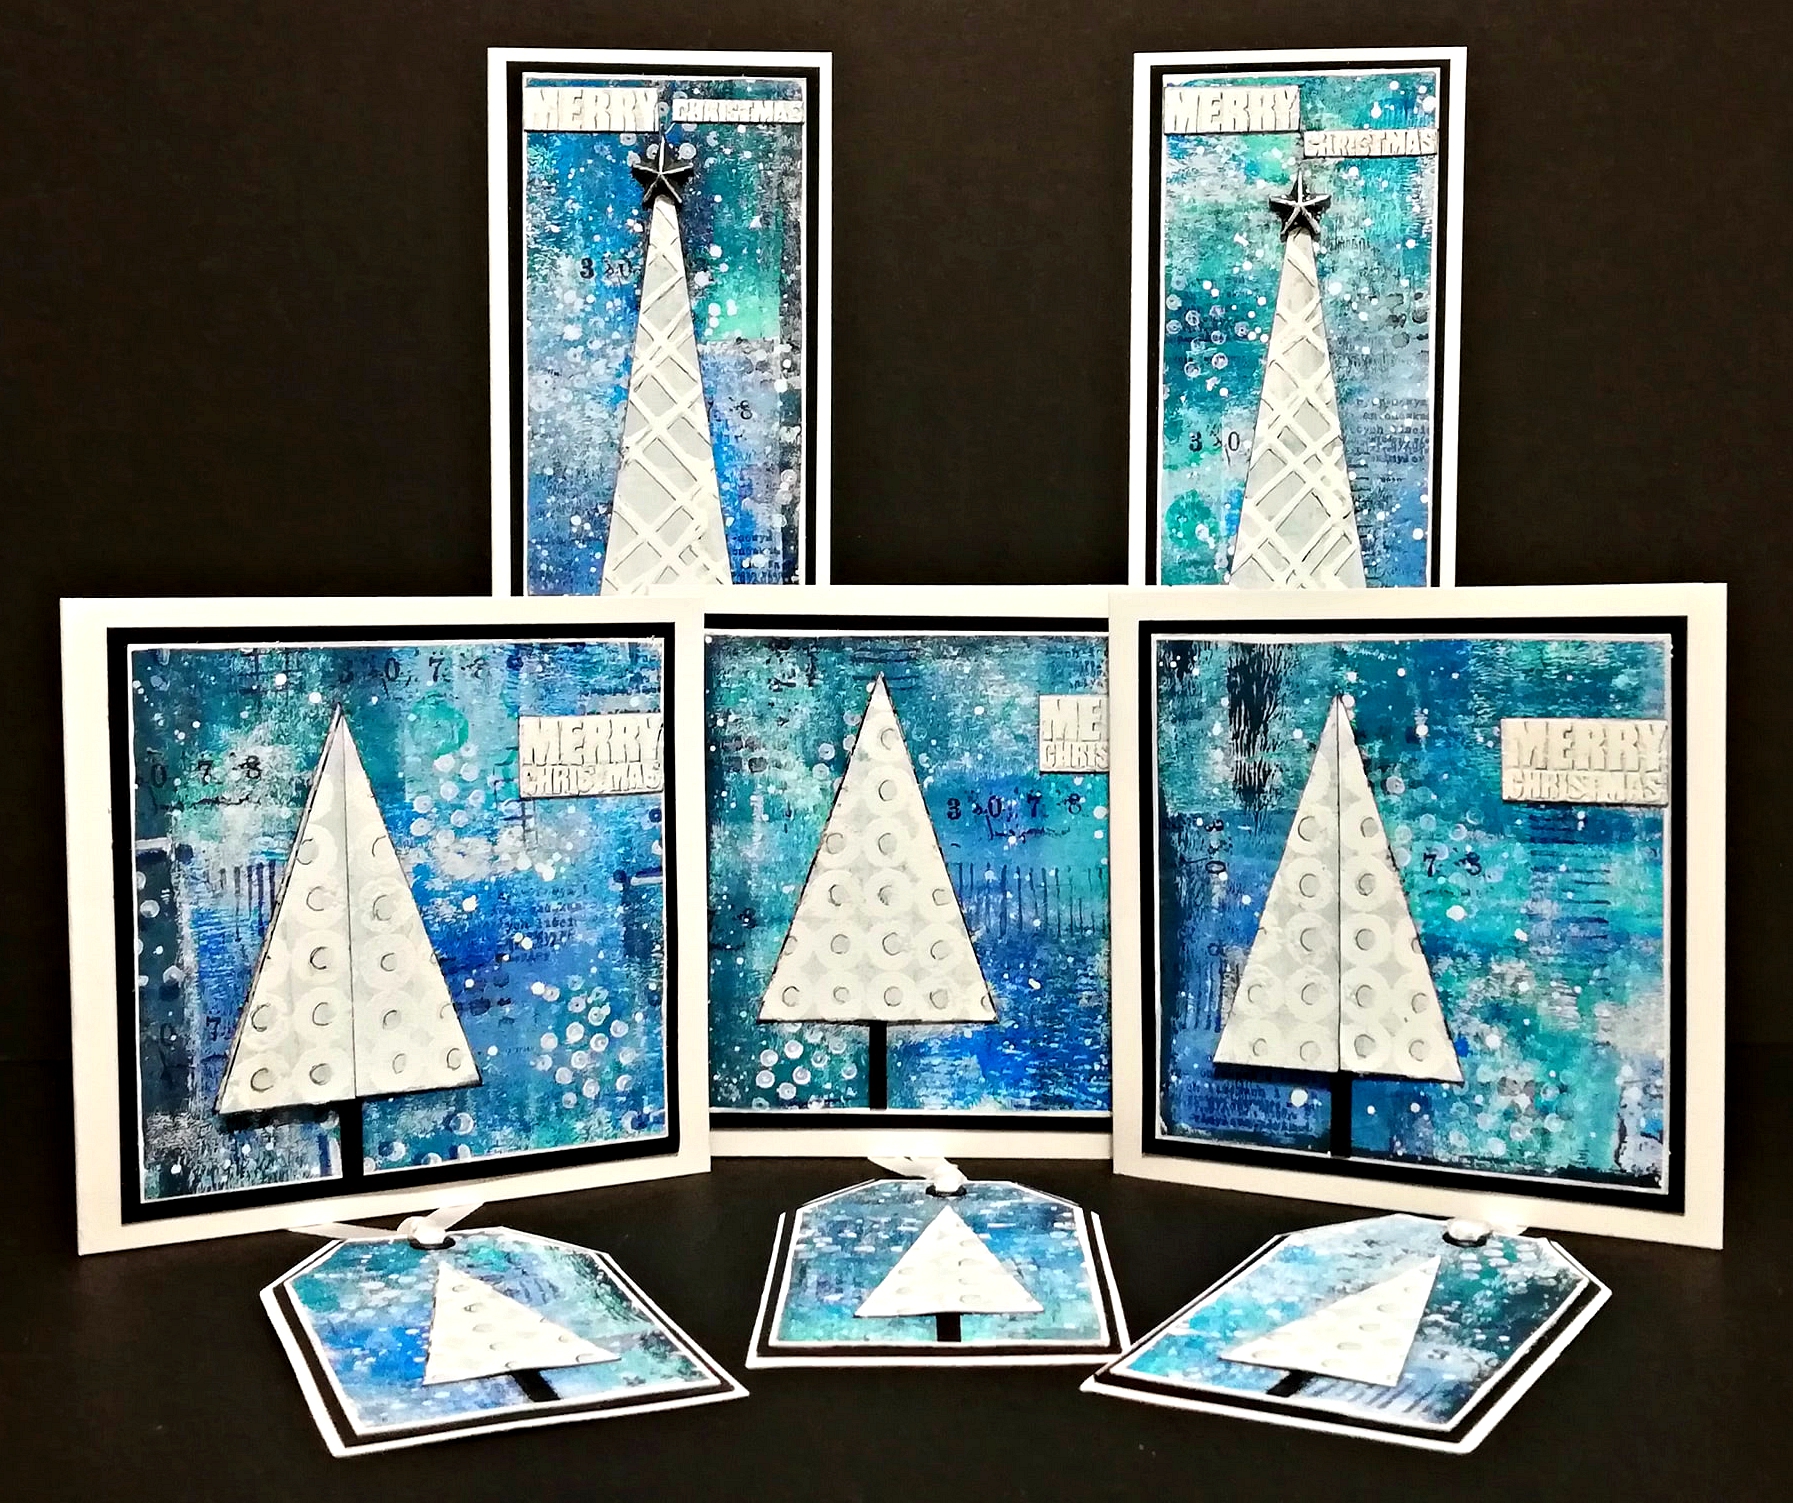

I chose to create with a more contemporary Christmas colour palette so used a few of the new PaperArtsy Fresco Finish Acrylic Paints: Cloudy, Azure and Crispy Blue along with Aquamarine, Midnight, Inky PoolGlass Blue and Snowflake.  I do love blues and whites together for Christmas.


To create the masterboard that became the backgrounds of the cards and tags I brayered a piece of Heavy Smoothy with the Frescos to build up layers and depth of colour.

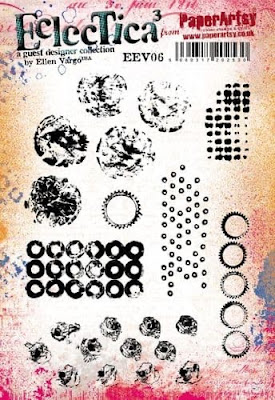
PaperArtsy have some fabulous stamps that lend themselves to masterboard creativity. I used stamps from the following stampsets: PaperArtsy Eclectica (Ellen Vargo) Collection EEV05 and EEV06


A very small part of the PaperArty Vintage I&D Collection (A6) Background (plate 5) plus PaperArtsy Minis MN108.


I stamped all around the board in either Archival ink (Cobalt Blue, Blue Violet, Garden Patina, Jet Black) or PaperArtsy Fresco: Snowflake


A few close ups may help you identify the stamps I used from Ellen Vargo's 2 stamp sets. Some are more obvious than others which I personally favour as it lets the eye seek them out! 


I only stamped part of the stamp design too. I just prefer a somewhat 'broken' impression for this kind of creativity. Helps prevent things getting 'over cluttered'.


To create the masterboard that I made into trees I again brayered a piece of Heavy Smoothy, (A4) with a couple of the Frescos mentioned above: CloudySnowflake and a touch of Inky PoolI wanted this masterboard to be much lighter than the other.


I then stamped and embossed a repeating circle design onto about half the masterboard using one of the stamps from EEV06.


I think this stamp is a favourite as the 'grungy' in me loves how some of the circles have an unfinished appearance.

The two masterboards were then made into cards and tags simply by cutting them up into backgrounds and trees.
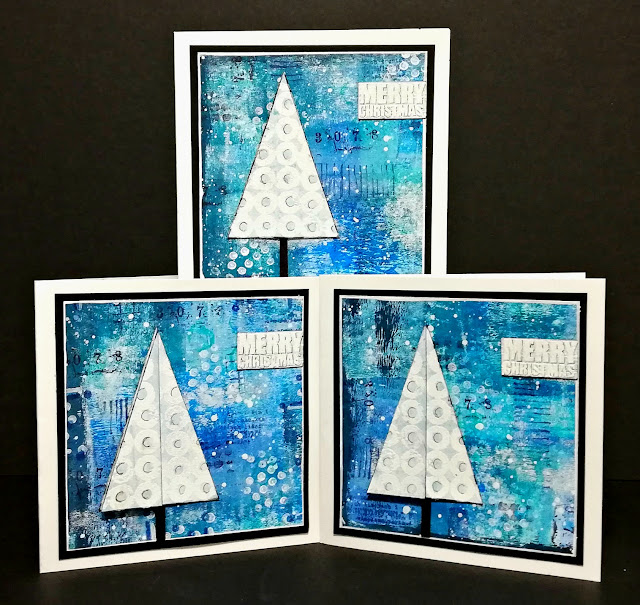

There's 3 small square cards.


The Triangle trees were cut out of the embossed masterboard. I freestyled the cutting but a triangle die could be used instead. On one of the cards I kept the tree one dimensional...


and on the other 2 cards I made one half of the tree two dimensional by adhering half a triangle to one side of the full triangle trees.


The dimension can be appreciated more when the cards are viewed at an angle.


I felt the cards needed a sentiment so I stamped and embossed the words 'Merry Christmas' onto the lighter masterboard using part of the word block stamp on PaperArtsy (Hot Picks) Collection (HPXM07).


There's also a trio of small gift tags.


No room for a sentiment on these but that's ok as I will be writing Christmas wishes on the reverse before hanging them on presents.

With some of each of the masterboards left I also created a couple of tall slim cards, well this style does seem to be 'on trend' at the moment, doesn't it?


I changed up the tree embossed stamping for these two, using the long 'interwoven' stamp on EEV05.
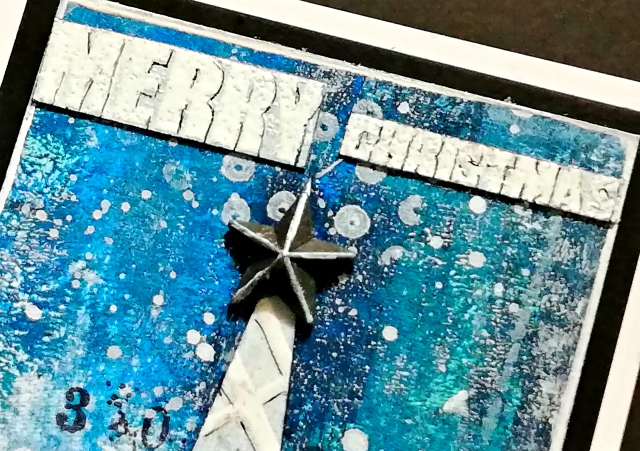

They were each topped with a metal star and the sentiment on these two cards was split in 2 to fit. 

It seems these are masterboards that just 'keep on giving' as believe it or not there's still  enough left to make another couple of small cards and tags!! 

Creating masterboards and turning them into cards and tags makes for happy, fun creativity. It enables you to create cards/ tags/ gift cards/ money wallets in batches very easily. Although your 'makes' will be similar they will also be unique to themselves as each of them will have been created with a different part of the masterboards.

It's very much a stress free activity. Just pick out some colours a few stamps and stencils and away you go. If its something you don't often do why not give it a go? Be warned though as if you are anything like me once you've created one masterboard you'll no doubt be keen to create another and another and .. 

Before I go I would like to wish you all a very Happy Christmas/Happy Holidays and however you may be celebrating the festive season this year take care and stay safe and well!

Thanks for joining me today/ tonight.
Keep on Creating 
Amanda
x

Blog: ink-a-pink
Facebook: Amanda Pink
Instagram: p1nkart
Pinterest: PinkArt

Saturday, 21 November 2020

2020 Topic #20 It's Beginning To Look A Lot Like Christmas with JOFY (by Miriam Grazier)

  2020 Topic 20: Mason Jars


Miriam's wintery scene won't leave you cold, but is sure to warm your heart with the cutest of snowmen gathered around her decorated Mason Jar. She's right that they'd make wonderful gifts if they're as lovely as hers.
~ Keren

Hi everyone, it's Miriam with you today, and I'd like to share with you a mason jar that I have altered to create a Christmas decoration for the upcoming festivities. 

Every year I love to create a new decoration to add to my Christmas displays at home.  It feels more personal to me.  I also love decorations that light up.  So this was a win-win for me.

With a second lock down announced for the UK I wanted something positive to look forward to.  Now that it is officially November I have turned my attention to Christmas in the hope that we will be able to safely meet with our families and celebrate what is my favourite occasion.


I loved altering the mason jar.  Straight away I knew that I wanted to use some of the amazing Christmas stamps that JOFY has designed.  They are always so fun to use.  The hardest decision was deciding which ones to use.


I stamped the snowflakes directly onto the mason jar using Snowflake Fresco Finish Chalk Acrylic Paint - the paint is so wonderful and is great to use on so many different materials, glass included.  In order to stamp onto the slippery surface I inked the stamp up with the paint and held it in my hand and pressed the jar into it.  This seemed to work really well for me.


If you didn't want to stamp onto the jar you could use some snowflake acetate and slip it inside the jar.


I stamped the images onto Smoothy card stock and then coloured them using Polychromo pencils.


The bottom of the jar was filled with cotton wool and some small glittered polystyrene balls.  I've had these in my stash forever and they were perfect for this.


It was at this stage I decided to add some lights to the jar.  I adhered the light switch to one of the snowmen using a glue dot.


I wanted to decorate the top of the jar and not leave it blank.  I added a small wood slice which I splattered with texture paste.  I then adorned it with small polystyrene balls and snowflakes from JM07.  I was so pleased with how this looked.  It really finished the ornament off.


I was excited for it to start getting dark outside so that I could turn the lights on in my mason jar.  I think I actually squealed as I was so happy with the end result.


The characters of the snowmen really made the difference to this project - they are so playful.

There are so many possibilities with mason jars and the festive season is the perfect excuse to create something unique.

I really hope that I have inspired you to create your own piece of festive decor.  It really did lift my spirits and give me something positive to look forward to.  I am planning on creating more to send to loved ones to remind them that they are in my thoughts.

Thank you for joining me this evening. 

Happy crafting!

Thursday, 19 November 2020

2020 Topic #20 Winterland with ESC (by Noguchi Etsuko)

2020 Topic 20: Mason Jars  


Etsuko's creation really does look like a miniature world. Creating a diorama is an absorbing activity and she has really made something special. You can just imagine the forest in real life with the pine smells and the deer running wild. Using Infusions really brings the image to life.
~ Keren

Hi everyone, it's Etsuko My favorite things with you today, and I'd like to share with you my Wonderland in Jar featuring with Raquel's (Scrapcosy) beautiful Christmas stamps.

I love to create diorama worlds in jars, boxes and tin cans. Sometimes they create a mysterious world. Soon it will be a great holiday season at the end of the year, so I made a winter wonderland in a jar.


First of all, I prepared a five inches regular similar Mason Jar and applied glass beads gel to the whole, leaving an oval window on the front. It takes a whole day and night to dry, then I dry-brushed it with white gesso.


I used Raquel stamp set ESC07, fluttered with infusions The SageOlive TreeGolden Sand and Sunset Beach on each Smoothy (Heavyweight) A4 white card then sprinkled with water. After papers dry I stamped with fir trees, hollies and reindeer.


Cut each material and attach it to make it look 3D using double-sided foam tape. I also added model flowers to it.


I stamped pine cones image on shrink plastic with Stazon Pigment Snowflake, and after they shrink I painted Fresco Pistachio from the back. I added beads to the pine cones and connected them with hemp twine to make a jar necklace.


Put the fir trees and reindeer elements in the jar. The cut holly was shaped and attached to the hem of the oval window with red embellishments, and the pine cones necklace was tied around the jar of the top. I painted Smoothy (Heavyweight) A4 white card with Fresco Evergreen, embossed with off white powder using ' Best Wishes for the Year Ahead' stamp, cut around words and make the banner, and attached to the lid painted with Evergreen.


Take a closer look inside through the window.


I put on the candle and approached it.


Other than the fact that it took all day and night to dry, it wasn't too difficult and finished smoothly. Why don't you make one of those jars to put lights in and place in the yard?

Thank you so much for visiting. Have a wonderful winter day.
Etsuko xxx


Blog: My favorite things
Facebook: Etsuko Noguchi
Instagram: Pixienest 
Pinterest: Etsuko N