Showing posts with label 2016 Topic 5. Show all posts

Saturday, 19 March 2016

2016 #5 Flower Troll {by Darcy Wilkinson}

2016 Topic 5: Art Dolls

Hi everyone, Darcy here to introduce my little troll buddy. I love Art Dolls and have always made them in some form or another. I think that goes hand in hand with my love of animated films. I was heavily influenced by the film Boxtrolls, if you haven't seen it then you must. They are cute trolls that live in boxes, and they take a name from whatever box they are in. 

So following that logic my troll should be called 'Seeds'


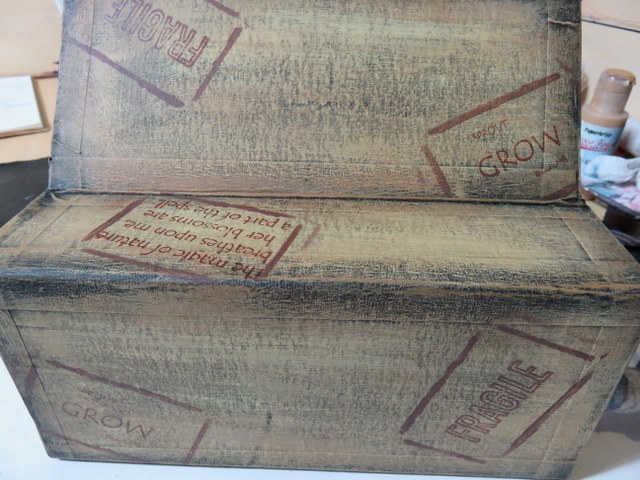
I began with an old box. I glued the lid shut and then used a craft knife to open the front side. I taped all the edges and painted the whole thing first with black and then with Toffee, Caramel and Haystack. 

Once painted I was able to stencil and stamp some old labels. I used words from EDY05, EDY07, EDY11, and ESN03

EDY05, 

Now for some legs. I glued cotton reels together and made some hands and feet from paper clay. These were all painted with Rose, China, London Night and Chalk. I also wrapped some self adhesive medical tape around the legs. 


I made both feet and hands double thickness for stability. Look at those toe nails lol


Next the eyes. I used the carboard inners from ribbon reels, covering them both inside and outside with previously made background papers. These form the goggles. The eyes are made with the poppy stamp from EDY19 onto text paper that was coloured with China. 

EDY19

Finishing touches to the eyes were liquid pearls. The paper eyes were strung into the goggles using clear nylon thread. 

I had a paper clay moustache just hanging around, as you do. so I popped that on too. He kinda looks like he's in disguise now with a fake 'tache . 


The front label required a bit of masking off.. I started with the haberdashery label from HP1211, I masked off the centre so that I just stamped the outer lines. Then I added the word SEEDS from ELB06, and POPPY from ELB23. Finally I stamped my poppy flower from EDY 19 and coloured this with Derwent Coloursoft pencils. Finishing again with liquid pearls. 


I used the wings from EDY17 and pressed them into paper clay, once dry these were painted with China, Rose and Chalk. I also painted some beads and wrapped those with more medical tape. 

 EDY17
The beads and paper clay hands were wired onto the sides of the box and the wings were glued behind. 


I gathered lots of old painted bits of paper and stamped the poppy lots of times. 


Cut out and layered up this stamp makes a really lovely flower , it works so well on so many different patterns and papers. I stamped the stem from the same plate and added these to wooden skewers. The pot is paper clay too, complete with cracks, this was painted simply with Brown Shed. 


A few final photos. 


I love how his packet of poppy seeds has grown and bloomed inside.. 


Monsieur Seeds, the secret poppy troll. 


I hope you like him, he was fun to make. You still have till tomorrow to link up your own art dolls. I look forward to seeing what you make. 
Darcy x

Twitter: Darcy UK

We would love to see how you interpret this Image Art Dolls  topic by linking what you make to our 2016 Challenge #5: Art Dolls, on this page HERE.
All of our bloggers love to see your twist on their ideas,  particularly if you were inspired directly by their post. 
All links go in the draw to win a £50 voucher to spend on products of your choice from the PaperArtsy online store. The Art dolls link will close 17:00 (London Time) Sunday, March 20th. The winner will be announced 2 hours later at 19:00.

Friday, 18 March 2016

2016 #5 Time to Grow {by Lauren Hatwell}

2016 Topic 5: Art Dolls

Hi everyone. It's Lauren here, and tonight I'd like to share a post about chipboard art dolls with you.
I love art dolls and stamping so this is one of my favourite techniques, because it allows you to elevate simple stamping and colouring to a really striking focal point for any project. You don't need anything fancy and you can customise it any way you choose. It's a method I go back to again and again and its perfect for the "assemblage" style of stamping I enjoy. 


Step One: Squiggly Ink stamps were one one of the very first series of PaperArtsy stamps I bought (from our very own Emma Godfrey as it happens) and I still love them. I've always thought the flying clock from Ding and Dong Plate 2 looked like a face with bunches so that was my starting point. First the fun bit. Stamp out, colour and cut out the pieces for my doll. The Crown is a Mini and the arms and legs were made with a curly bracket from Swirls and Curls 3. I've used Smoothy Card throughout. It's a lovely robust card and perfect for this sort of project.


Step Two: I like to lay down a layer of gel medium at this stage and construct the doll directly onto the next layer of card. When it's dry, cut out the complete doll. Repeat this process until you are happy with the thickness of the piece. I tend to go for 3-5 layers depending on what I'm making. Because the smoothy card is so sturdy I only needed three layers for my doll. Once the gel medium and the paper fuse together and dry thoroughly you get a really lovely board. 


Step Three: When I'm happy with the piece I will sand the sides to smooth them and coat the top and the sides of the piece with gel medium (I used a soft gel medium for this piece but if I want my brush strokes to show I'll use a heavier one)…


Step Four: Because this is a three dimensional piece, I coated the back of the whole piece with Slate fresco paint just to keep everything neat and tidy.


Step Five: I wanted to make a flower out of the Dragonfly stamp from Squiggly Ink Tops & Tails 2 so I stamped out four of the images and coloured them with Fresco Paints in shades of blue (Antarctic and Lake Wanaka) before assembling the flower. I painted a wooden skewer with Granny Smith Fresco Paint and used that as a stem. The leaves were made from the clock wings (or bunches) painted green.


Step Six: For the base, I coated a box with some canvas and painted it in various shades of green Fresco Paint (Guacamole, Hey Pesto and Granny Smith) to make it look like grass. I coated some offcuts of precious Smoothy card with Candy Floss Fresco Paint and stamped flowers from Squiggly Ink Tops and Tails 2 before cutting them out and putting a green flat packed pearl in the centre of each flower. I then stamped the Swirl from the same set randomly over parts of the grass to form a sort of vine or leaf for the flower before sticking the flowers in place and adding a phrase from Kim Dellow's recent release EKD01 which is already a favourite.


This is one of my favourite kinds of project. It's so lovely just losing yourself in a few favourite sets of stamps and coming up with something that you enjoy looking at which maybe speaks to you in some way. All it takes is a little bit of imagination and a few of your favourite PaperArtsy products, old AND new.
It's been lovely to be here again. Thank you for looking today. I hope you've enjoyed it.
Lauren Hatwell


Oh Lauren you are totally making me fall in love with Squiggly Ink. The clock does look like a face with bunches of hair, it's so fun to pick out those kinds of things. The flower made from the dragonfly is just aforable, I want to grow those in my garden. ~Darcy 

We would love to see how you interpret this Image Art Dolls topic by linking what you make to our 2016 Challenge #5: Art Dolls, on this page HERE.
All of our bloggers love to see your twist on their ideas, particularly if you were inspired directly by their post. 
All links go in the draw to win a £50 voucher to spend on products of your choice from the PaperArtsy online store. The Art dolls link will close 17:00 (London Time) Sunday, March 20th. The winner will be announced 2 hours later at 19:00.

Wednesday, 16 March 2016

2016 #5 Daisy Rabbit {by Hazel Agnew}

 2016 Topic 5: Art Dolls

Hi everyone, Hazel Agnew from Mellifluous Meanderings here.

I'd like to share with you this evening with a post about Art Dolls.

I chose to work on this topic because I have had a certain little creature hanging around naked in my craftroom for some time, and I wanted to dress her up. Also, I wanted another excuse to show off the wonderful new stamps by Lin Brown which were launched at the beginning of February. 


Step One: May I introduce you to Daisy Rabbit.She is quite a large calico rabbit that I purchased a few months ago from Hobbycraft. I began by painting her all over with fresco  Vanilla, and then sealing on top with Gel Matte Medium

Step Two: I was keen to stick to the colour scheme that Lin provided when I did samples for her stamp launch. I painted the soles of her feet with Hey Pesto, stamped a daisy on each one from ELB26...


...painted the daisy with Snowflake and added yellow centres with stickles. 

Next, using Leaf Green and Plum Archival ink, I stamped Daisy all over with leaves also from ELB26 and "tattooed" her arms with sentiments from ELB28...


Step Three: Next, using Fresco acrylics in Claret, Yellow Submarine, Toffee and Caramel, I created a patterned fabric on cotton using my brayer and some of Lin's new stencils...


 I then made a little pinafore dress for Daisy...


{edit from Leandra - As you do!!! LOL, did you do a Tabitha nose-twitch??? LOL}

Step Four: Next, I created a little daisy chain necklace using shrink plastic and painting the backs of the daisies with Fresco Yellow Submarine and Snowflake.


Step Five: I wanted Daisy to be a little different from the average rabbit, so I made a pony tail and a rabbit tail using some green wool....it was the kind that has lots of fibres and bits of fabric woven into it and I made a pompom and wired up her ponytail. I stitched both of these to each end! 


Step Six: Finally, I sewed buttons for eyes and glued on a fabric nose, dressed her in her best, with daisy chain and a few swanky beads and she was ready to meet her public!

So, this was another chance to play with the wonderfully versatile stamps from Lin Brown.  I must admit that it was not easy stamping directly onto a squashy animal, but, she didn't seem to mind and she is now totally unique. I hope that this might give you a few ideas about stamping onto fabric....maybe pencil cases or calico bags or to have a play making a daisy chain. Wouldn't really recommend the tattooing part though!

Thankyou for dropping by the PaperArtsy blog and for coming to meet Daisy. You can find details about her on my blog too. www.craftroomgran.blogspot.com. It has been a pleasure.

Hazel

Awww she is so flipping cute! I love her pony tail and her tail-tail...but the necklace!! And the stamps looks great I have no idea how you managed that onto such a squishy tummy, but it (and she) looks wonderful! She needs friends - you do realise this right??? Then she can have a tea party!!! Thanks Hazel for a delightful post! ~Leandra

We would love to see how you interpret this Image Art Dolls  topic by linking what you make to our 2016 Challenge #5: Art Dolls, on this page HERE.

All of our bloggers love to see your twist on their ideas,  particularly if you were inspired directly by their post. 

All links go in the draw to win a £50 voucher to spend on products of your choice from the PaperArtsy online store. The Art dolls link will close 17:00 (London Time) Sunday, March 20th. The winner will be announced 2 hours later at 19:00.

Monday, 14 March 2016

2016 #5 Art Doll {by Lucy Edmonson}

 2016 Topic 5: Art Dolls

Hi everyone Lucy from True Colours here.

Tonight I'd like to share with you a post about making an eclectic mixed media style art doll using clay, wire, wool, fabric, glass, and shrink plastic. I have used Frescos, including some of the new colours, and the glazes, and a couple of Ink and the Dog Minis: 'oldies but goodies'!

I love art dolls as there is no strict definition so they can be whatever you want them to be. I like mine to be three dimensional and free standing, and this time I've made my doll armless, to add to the quirky feel. I've also incorporated a found item: an iconic woman's torso-shaped glass perfume bottle which you will probably recognize, which made my doll quite feminine. I was aiming for the idea of a Victorian lady getting dressed in her bedroom, starting with her hooped skirt, and this aspect allowed the doll to stand on her own.


Step One: First of all paint the corset part of the bottle with two coats of Snowflake Fresco and then a coat of Matte Glaze to protect it from being scratched by the wire hoop later. Then paint the flesh with Blush and for the second coat mix in a little Pearl Glaze to give the skin a sheen. Once it's dry, use a little Pearl Glaze in places such as the collarbones. I found the skin looked a little 'flat' before I added this dewy layer. I also made some shrink plastic buttons using the button stamp from Hot Picks 1213 and StazOn Ink in Cherry Pink and added a little Pearl Glaze after shrinking to give a mother of pearl effect.

HP1213


I made the head with flesh coloured Fimo oven bake clay. I rolled it into a ball and then rolled it to a quarter of an inch thickness and pressed it into the face of the stamp Ink and The Dog Mini 10 which I had inked up with Onyx Black Versafine. I cut a notch out of the back at the neck to make it easier to glue to the body later.  I then baked it according to the instructions on the pack.

Mini 10

I then added a little Bubblegum to her lips, and mixed some with Pixie Dust for her cheeks,  a dot of Snowflake for her earring, a dot of Snowflake and a dot of China Blue on her eyes and a little Pearl Glaze on her cheeks and forehead.


To make the hoop frame for her skirt, which will also form the stand, I used 2 mm aluminium wire and I cut five lengths for the uprights and three pieces of descending sizes for the circles. I didn't join the smallest circle together at this stage as I want to join it tightly at the back of her waist at the end.


For her skirt I used a piece of white cotton fabric and Ink and the Dog Mini 67. I used Hey Pesto on the leaves and a mix of Pixie Dust, Bubblegum, and Bougainvillea on the flower. I hemmed it and stitched a piece of lace around the waist which had ribbon threaded through it so it could be gathered up. You could also use elastic (which I'd planned on doing before I found this in my stash!).


I wound some thick black wool around her head and into a bun and glued it and then used Golden Matte Medium to adhere the clay to the body as it's very strong. I left it overnight to set up. I then glued on some pearl beads and the shrink plastic buttons. I put together the wire hoop using pliers and wrapped a little adhesive lace around the wire where it touched the bottle as I was worried, maybe unnecessarily, about scratching it. Once I'd eased it into position I twisted the wire of the waistband piece of wire at the back, and the whole thing stood up on its own quite securely. To finish off, I tied the stamped fabric skirt in position.


I enjoyed making my doll SO much! I didn't expect the stamp to come out so well directly on the clay so that was an Oooh moment! My main problem was I had so many ideas, which I didn't want to cram into one doll - she was going to have a hat and boots! The result is, I am hoping to join in the challenge and use some of my other plans for some different dollies! There are so many different styles of doll you could make when you enter the challenge, but I hope you will give it a go and make one made up of many different parts. It's such fun!


Thank you for joining me this evening.


Lucy this is so beautifully created from her wire framed body to her woolen hair and her adorable vintage attire. Love the choice of Fresco colours used to create such a soft feminine look. Thank you for sharing your creativity with us. ~Gillian

We would love to see how you interpret this Image Art Dolls  topic by linking what you make to our 2016 Challenge #5: Art Dolls, on this page HERE.

All of our bloggers love to see your twist on their ideas,  particularly if you were inspired directly by their post. 

All links go in the draw to win a £50 voucher to spend on products of your choice from the PaperArtsy online store. The Art dolls link will close 17:00 (London Time) Sunday, March 20th. The winner will be announced 2 hours later at 19:00.

Sunday, 13 March 2016

2016 #5 Rainy Day Girl {by Clare Lloyd}

 2016 Topic 5: Art Dolls
Hi everyone Clare Lloyd here.
Tonight I'd like to share with you a little project I made using fabric.
The theme is Art Dolls and after pondering lots of ideas, I ended up decided whatever I made had to be useful and practical. I create lots of projects that end on in boxes and are never seen again. So this doll had to be something I could use or at least gift to someone.
Step One: Once I had stamped my rainy day girl image from ECL06 using Black Archival Ink, I decided to sketch a little more of her giving her arms, etc using a Pigma Fine Liner. Oh, by the way I am working on a scrap of curtain lining fabric. 


ECL06
Step Two: Then I shaded her in with water colour pencils (though I didn't actual use any water!) Plus also coloured a rough border in preparation for sewing.

Step Three: What next? Well, then I had to decide what the back of my art doll was going to look like. I stamped up the clouds from my latest launch ECL10 and they matched perfectly with my little raindrops from ECL06. Once again I coloured in the sky using coloured pencils.


Step Four: To make the raindrops pop a little I added a touch of Pearl Glaze to each of them and the glaze blended nicely with the blue water colour pencil. Then came the sewing together. She was stuffed with polyester wadding and some dried lavender.

Here is how the Pearl Glaze looked. Can you see the sparkle?


So there she is my useful rainy day smelly art doll...LOL!
Find me here on my BLOG, INSTAGRAM, TWITTER or even PERISCOPE

Aww what a cute little gift, I bet she smells wonderful. I can imagine the fragrance wafting into your art room everytime you open the door. This idea could work great for children if it was filled with dried beans or lentils as a bean bag.  I wonder if it could be a heat pad, the ones that you pop in the microwave.. what would happen to the pencil work, if anything? maybe something to try. Thanks Clare for sharing your sweet girl with us. ~Darcy 

We would love to see how you interpret this Image Art Dolls  topic by linking what you make to our 2016 Challenge #5: Art Dolls, on this page HERE.
All of our bloggers love to see your twist on their ideas,  particularly if you were inspired directly by their post. 
All links go in the draw to win a £50 voucher to spend on products of your choice from the PaperArtsy online store. The Art dolls link will close 17:00 (London Time) Sunday, March 20th. The winner will be announced 2 hours later at 19:00.