Showing posts with label 2015 Topic 5. Show all posts

Wednesday, 9 March 2016

2016 #5 PaperDolls {by Debs Wainwright}


2016 Topic 5: Art Dolls

Hi everyone Debs here. 
Tonight I'm sharing a paper doll and some clothes I have made. I still love dolls very much and creating this project, took me right back to childhood. I would sit for hours making new clothes for the paper dolls, I had cut from comics. Of course Art dolls come in many guises using a variety of materials from clay, cloth, glass, plastic and like mine tonight Paper.

My doll was die cut from one of Julie Nutting's dolls. I have used JOFY stamps to create my background, and the detail on the clothes. I have created three outfits, but to be honest I could have kept going and completed a whole wardrobe of clothes. Again, this appeals to my child within, and brings back so many memories of projects in school where fashion through the ages was always my choice. If I wasn't drawing and cutting them out I was stitching some for my Tressie doll, anyone remember her?


Step One: I made my background using a Grey/whiteboard 8x8 cut down, and Fresco Acrylic Paints in Teresa Green, Tinned Peas, Pixie Dust and Cherry Blossom. I used a piece of cut n dry foam and smooched the colours together; blending until I had the look I wanted. I then stamped and painted the flowers, using stamps from JOFY26. I used Fibralo water Soluable Pens to paint in the colours, giving them several coats. I activated the colours with a watered down Fresco Acrylic Paint in Chalk, which blended the colours lovely. Once dry, in a White Gell Pen I added some doodles and flowers and dots. To finish I added a couple of coats of spray Vanish to get a nice shine.


Step Two: I cut out the dolls x4, as I wanted to create a sturdy doll. I stuck them together and waited for the them to dry. I added colour to the doll with a mix of Gelatos and Caran D' Ache Neocolour II and Buff Fresco Acrylic Paint.


Step Three: Now that she was ready, yes I even gave her a name, Jackie! I moved on to her clothes. Her first outfit was stamped from the set that came with the doll. I stamped it twice and cut part of the frill off on one piece. I painted these with Fresco Acrylic Paints in Pixie Dust and Lavender both blended with Chalk. Then stamped my patterns using JOFY32 and JOFY33


Step Four: I cut a dress out by using the doll as a template. I gave it a coat of Fresco Acrylic Paint in Chalk and once dry, created using JOFY14 and 24. I coloured the pattern with the Fibralo Pens. I think the colours give a retro feel to this dress. You can see here that I have also given her some hair. I also painted some boots on her using Little Black Dress.


Step Five: For her final outfit I again used the doll as my template but went for something different. She had a dress, skirt and top, so this time I made trousers. I painted them with a mix of Concrete and Slate, and for pattern I chose the stitch line from JOFY26 and Fibralo water Soluble for the jumper.


I used repositioning glue so that I could put them on and take them off without damaging the doll, which worked well. My favourite outfit was the first. I love how Jo's details worked so well.

This is an easy project to do, and could be a fun thing to do with children, or if like me you are a child at heart you could create that wardrobe full of clothes! All with different wacky styles. I chose a flowered background, but of course you could choose what suits you. Or you could make several so that your doll has some variety. I would love to see what you come up with.

Thank you for joining me this evening, you can see more of what I create on my blog and on my Pinterest page. Take care for now hugs Debs xx

Wow Debs, I have seen a lot of the types of dolls that you dress around lately, and this is such a fun idea! I used to love doing this as a little girl, how cool to have a bespoke option!! ~Leandra

We would love to see how you interpret this Image Art Dolls topic by linking what you make to our 2016 Challenge #5: Art Dolls, on this page HERE.
All of our bloggers love to see your twist on their ideas, particularly if you were inspired directly by their post. 
All links go in the draw to win a £50 voucher to spend on products of your choice from the PaperArtsy online store. The Art dolls link will close 17:00 (London Time) Sunday, March 20th. The winner will be announced 2 hours later at 19:00.

Saturday, 21 March 2015

2015 #5 Deconstructed Dolly {by Darcy Wilkinson, PA Signature Designer}

2015 Theme 5: Deconstruction

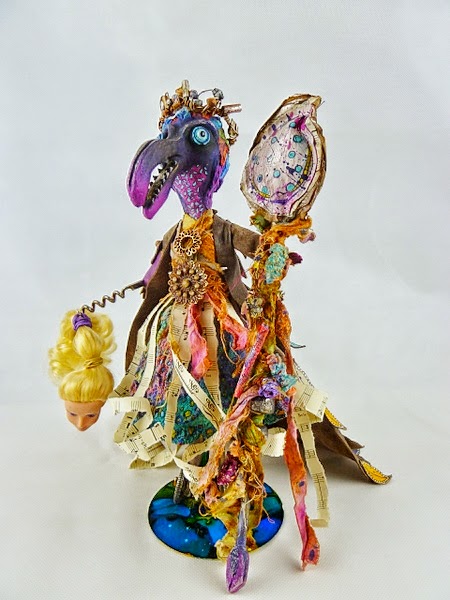
Hi everyone, Darcy here with what can only be described as a 'weird creation' having said that I totally love her. When I first saw the theme, my mind was racing.. ooo creation out of destruction, now what could I destroy? 

Meet Lupica!


I started out with a cheap (50p) doll from a charity shop. I removed the head and part of one arm. Then I drilled a space into the bit of arm that was left. 

I wound strong wire around the neck, creating a ball shape. I stuffed this with waste paper and then added more wire for the beak. This is known as a wire armature. 


I wrapped masking tape tightly around the head and beak. This gives a good solid base for the clay. I use an air drying clay, you could buy some or you could make your own. I use this recipe. While the clay was still wet I inserted beads for the eyes and some cardboard for the teeth. This was left to dry for a couple of days. 


Now to give her some hair/feathers.. I rolled out the clay and used the triangle leaf from EDY14, pressing it lightly into the clay and cutting out with a knife. 

EDY14

As the clay does start to dry quickly I added each leaf/feather as it was made. I attached them with a little white glue, leaving some flat and others with a little dimension. 


I painted some tissue paper with Bougainvillea and flicked on a little Caribbean Sea


Onto the tissue I stamped the grasses from EDY11

 EDY11
The tissue was then glued to the throat area. the insides of the tiny leaves had more Caribbean Sea added, and the surrounding area was blending into the face using Blueberry. More Bougainvillea was added to the beak, and some rings of Caribbean Sea were added around the eyes. 

The hair/feathers were painted in a selection of bright colours, each one edged with a darker shade of that colour. 


I sanded the remaining 'skin' on the doll and then painted her with French roast, before adding a little Treasure gold. I then took a toy bicycle and deconstructed that.. saving just the wheels. I cut off Dolly's feet, and added the wheels. I rubbed a little Treasure gold over the rims. 

At this point it was getting difficult to hold her up and work on her, so I bought a doll stand. When it arrived it was stark white, so I coloured it with alcohol inks. 


Now for some more destruction.. I found a cheap corkscrew. Don't be fooled by the word cheap, whilst only 50p this thing was so well made it took me almost 2hrs to take it apart! A saw and a drill were involved, this was deconstruction on an epic scale!

I popped the metal parts of the corkscrew, some jewellery and some strips of ripped cotton fabric(painted with Frescos) into a tray. I dabbed everything with Versamark and then added Rusting powder. I left this for a little while and then sprayed everything with diluted white vinegar. I kept spraying everything every 30mins or so until it all rusted beautifully. 


I wired part of the corkscrew into the drilled out arm, then I covered the join with a little more clay, and left it to dry. 


I thought it was about time she got some clothes on. I took a large piece of Tyvek, and blended Fresco paints over it, using the same colours as the hair. Onto this I stamped images from EDY13 and the border from EDY12

EDY13
I turned over the top and stitched in some gathers.. quite a lot, she is super skinny! I also did some free machine embroidery around the stamped images. Then I put the skirt on her and tightened it at the waist. 


Tyvek is flammable, and as such it melts and bubbles and warps in a really cool way. I used a heatgun holding it over one area at a time. The longer you heat the more it will melt, hold too long and you will get holes... which of course you might want. The emboidery makes the melting tyvek pucker up around the stitches. 


I wrapped some of the rusted fabric strips around her bodice, and then hand stitched some strips of music paper to the waistline. 


This is how she looks now.. I love all the loose threads. 


I felt she needed more feathers, but they in turn needed to be attached to something.. looking for a new substrate to work on I came across an old leather coat.. which I then deconstructed..

and reconstructed into a much,much smaller coat. 


EDY12
I painted more leather, first with Snowflake and then with Caribbean Sea, Tangerine Twist, Bougainvillea, Buff ,Prawn and Blueberry. Then I stamped the leaf from EDY12, I also stamped the smaller leaf from EDY13.


Using a hot glue gun I attached them to the coat, smaller ones at the top. I felt they were a little bright so flicked some more Blueberry over them all. 


I felt she was sort of mystical, and so needed a staff. I painted some fabric with Bougainvillea, then crackle glaze then Nougat. over this I stamped the large flower from EDY12

I then painted a second piece the same and used a mirror stamping method to achieve a reverse image. I then layered one piece of fabric, music paper some crunchy wax paper, some tissue paper, more waxy, more music paper and the reverse image fabric piece. 

These were all stitched together leaving a small gap at the bottom, I pushed in some polyester wadding, and also a length of wooden dowel. I then ripped back all the layers, closer to the stitching. 


I found some old beads, more deconstructed tyvek, it makes great beads. I also used the hand that was cut off at the start. I threaded more homemade beads onto wire and then added rusting powder to make a rusty tiara. 


Here is the staff all finished. The dowel was painted with Blueberry and Bougainvillea, I wrapped some more of the rusty fabric strips around the stick. I then added the tyvek beads and the hand. 

The top seemed too clean, I wiped it over with French Roast, and then flicked some Blueberry so it matches the flicks on the coat. 


Here is the back all finished.. 


The rusty tiara in place.. 


Watching you with her beady,birdie eye..


and if you were wondering what happened to the original head...


I had a blast making this, does it show? I was really pleased how the clay stuck to the doll body so well, I love how the clay leaves turned out. painting on leather was new for me, but that turned out great too and I will be doing that again. This was also the first time I had used the rusting powder.. seriously you  have to give that stuff a try. 

Darcy 
Blog - Art and sole
Twitter - Darcy_uk_
I will be on the PaperArtsy stand at Ally Pally 11th and 12th April. come and say hello. 

We would love you to join in with challenge #5: Deconstruction If you are inspired by any of our guests who blog with us over the fortnight, then please join in and link up your creativity HERE

All links go in the draw to win a voucher to spend on products of your choice from the PaperArtsy online store. The Deconstruction link will close 17:00 (London Time) Sunday, March 22nd, winner will be announced 2 hours later at 19:00.

Friday, 20 March 2015

2015 #5 Rusted Wall Hanging {by Lynne moncrieff}

2015 Theme 5: Deconstruction

Hi, Lynne Moncrieff (Adorn) here, joining you this evening with a wall hanging where many of the elements have been transformed with the use of Rusting Powder.  I first discovered this product in 2010 through a DT commitment.  Since then I have played with it many times, especially enjoying using this product to transform cotton fabric into something with texture and patina. The theme of deconstruction is carried throughout the wall hanging, including the way in which I made use of vintage book text for the focal stamped image and the treatment of embellishments.
(
For the rusting process work in a well ventilated area and protect your work surface as you will be working with vinegar which the rusting powder requires to be activated with. I find it useful to have the vinegar decanted into a spray bottle. Working from the centre of the fabric outwards, attach stencil with masking tape and with artist sponge brush apply Golden Gel Matt Medium to the stencil. 
You can either complete all of the stencilling before applying the Rusting Powder or as I do, add the Rusting Powder as I progress covering the fabric with the stencilled design.  Do not apply the vinegar until you have completed the full area of the fabric with the design. This photograph shows the Rusting Powder applied to the stencilled design. Remember to shake excess powder from the fabric before spraying vinegar.  At this point I leave overnight, allowing sufficient time for the activation process.


This is the end result.  There is an unpredictability to the outcome, which I like, as it is difficult to gauge the end result of the rusting, such as the depth of colour, etc.


At the time of preparing the fabric I also rusted a Tando Creative chipboard arch, Prima Wood Bellies Rulers   and Prima Resin Icons Black Keys and Padlocks.  


Now it is time to  commence with stamping.   The combination of the gold paint on the rusted chipboard arch added to the sense of faded decadence which I wanted to achieve.  MN96 was repeatedly stamped with Fresco Finish Old Gold by applying the paint with a sponge brush to the Mini stamp.

 MN96 


To continue the theme of deconstruction I stained vintage French book text with dissolved walnut ink crystals (or substitute with Distress Stain Walnut Ink). I wanted to play around with the stamped images from  LPC009 so I stamped  multiple times, with Staz-on Jet Black, onto pages which had been stained to varying degrees of depth with the walnut ink. The decorative script from  LPC032 was stamped in the same manner. On completion of the stamping I tore around each piece, sponging edges with Distress Ink Walnut Stain.

 LPC009
 LPC032


This photograph shows the built up layers of the fragmented stamped elements and the variation of the stained book pages when side by side.  


For the face area alone I collaged together six different pieces of stamping, creating a lovely variation in the colourways. Torn and curled scraps of Gothic book text were layered beneath the stamped elements.


Fragments of mica tile overlay areas of the stamped focal, bringing a glow and depth to those areas. The other elements I gathered together as I assembled the hanging were a beautiful length of vintage gold tassel trim, rusted tin wire and two Bezels.  Areas of the hanging were highlighted with  Treasure Gold Onyxite .  To allow the arch to hang I wrapped rusted wire around the rusted Prima key, prior to adhering the key to the top of the arch.  I then continued wrapping the wire to form a loop enabling the arch to be displayed.  

If you have not experimented with Rusting Powder then I hope this post will inspire you as the possibilities are endless and experimenting is half the fun! Just imagine how you can transform purchased embellishments or found items whether they be fabric, paper, wood or metal, etc. Or maybe you will look at your PaperArtsy stamps in a different light, fragmenting the stamped image and building up even the smallest of those layers. 
Lynne Moncrieff (Adorn

Wow so much gorgeous rusting, we adore the effect of the stencil rusting on fabric, so beautiful. Fantastic layering of torn paper and mica makes this a multi dimensional project.Thanks for sharing these great ideas ~Darcy

We would love you to join in with challenge #5: Deconstruction If you are inspired by any of our guests who blog with us over the fortnight, then please join in and link up your creativity HERE

All links go in the draw to win a voucher to spend on products of your choice from the PaperArtsy online store. The Deconstruction link will close 17:00 (London Time) Sunday, March 22nd, winner will be announced 2 hours later at 19:00.

Saturday, 14 March 2015

2015 #5 De-constructed Configuration Box {by Lin Brown PA signature Designer}

2015 Theme 5: Deconstruction

Hi, Lin here this evening to share a project with my take on deconstruction. What a fabulous topic this is. There is nothing I like more that de-laminating corrugated card, ripping pages out of an old dictionary to use in my work or altering a book. These are things that I have done many times before so for this project, I decided to re-purpose a Configurations Box, designed by Tim Holtz. The project still remains a box, but now it has a hinged lid in stead of a lift off lid and will probably be used to store jewellery.


If you are not familiar with Configuration boxes, this is how a new one looks. It has a lift off lid and contains lots of small boxes which you can lift out and rearrange in different configurations if you so wish. For this project, I will not be using the small boxes but will keep them as I have been known to reassemble them in other ways for other projects.


Step one: I used a sharp craft knife to cut away the two shorter panels from the sides of the lid.


Step two: I covered both the lid and base of the box with a selection of washi tape. Washi tape is not the stickiest of tapes, so I used a layer of Matt Medium over the top of the tapes to prevent them lifting.


Step three: Using Snowflake Fresco Finish paint, I stencilled some images over the box. I used PS001, PS002 and PS014 


Step four: I watered down some Caribbean Sea to paint a watery wash of colour over the whole box and dry brushed some Bougainvillea around the edges. Both of these colours are from my latest set of Limited Edition Fresco Finish Paints.


Step five: The box comes with a sturdy sheet of acetate which creates a nice window in the box. I used it to create my colourful panel in the lid of the box. It is important to use the correct ink when stamping on acetate, I used StazOn which in my opinion, is the best ink for stamping on shiny surfaces. 


Step six: After stamping the first image from ELB16 on the acetate, I stamped a couple of these on paper and used them as masks until I had stamped a complete row of the large flower.


Step seven: I repeated this technique with the small flower from the same plate of stamps until I had completely filled the acetate with flowers.


Step eight: Working on the back of the acetate, I used a small detail paintbrush to add some highlights to the images. At this stage, it always looks really messy but you just have to bear in mind that this is the back and it will not be seen.


Step nine: Start filling in the flowers with colour. Hey Pesto is my "go to" green.


Step ten: Bougainvillea next. This colour is a semi-opaque paint and required two coats to achieve good solid coverage.


Step eleven: Banana and Tangerine Twist finished the rest of the flowers off beautifully. Both of these colours are translucent and needed more than one coat to achieve the solid colour that I wanted.


Step twelve: I filled in the gaps with Caribbean Sea which is an opaque paint so only one coat required.


Look how amazing it looks from the front. It's really tricky photographing acetate but I hope you can see how the gold highlights bring it to life.


Step thirteen: I used some red line double sided adhesive tape around the edge of the window and carefully lowered my acetate panel into place. This is the view from the back of the panel.


Step fourteen: I added a decorative knob to make it easy to open the box. This one needed a hole punched through the box and a screw inserted in the back to hold it in place. I prefer this type, it's much stronger that gluing a handle in place.


Step fifteen: I lined the box with black felt.


Step sixteen: The final step was to adhere the lid to the box. I thought long and hard about which type of adhesive to use for this. Should I use red line tape which is pretty strong or use a wet glue which allows some manoeuvrability? I decided on the wet glue option and used Pinflair's bookbinding glue.....this is pretty strong stuff and worked a dream.


So there we have it, a bright new storage box with a hinged lid. I hope it inspires you to join in with the de-constructed challenge. Looking forward to seeing your entries.


Lin. 

Thanks Lin, this is a fabulous repurposed box. The stamping on the acetate is just genius and oh wow how does it pop. 

We would love you to join in with challenge #5: Deconstruction If you are inspired by any of our guests who blog with us over the fortnight, then please join in and link up your creativity HERE. 

All links go in the draw to win a voucher to spend on products of your choice from the PaperArtsy online store. The Deconstruction link will close 17:00 (London Time) Sunday, March 22nd, winner will be announced 2 hours later at 19:00.