Showing posts with label 2015 Topic 23. Show all posts

Tuesday, 22 December 2015

2015 #23 OMG she used Glitter! {by Leandra Franich}

 2015 Topic 23: Christmas Gifts and Cards


Hi everyone Leandra here,

I find Christmas stressy - don't get me wrong, I DO really look forward to it, because I love the family get together, and the chance to hunker down in the winter weather, nurture and provide for the family with good food, wine and Christmassy treats. I kinda wish that Christmas would stop there, job done! That would be bliss! It's the getting the right presents and making cards end of thing that can add to the stressy side of this time of year!

Hopefully most of you are at the tail end of things now, there might be a bit of wrapping up to do, or maybe even a few last minute cards to send. Well I'm here to help on that score! 

I dug out some masterboards and in ONE afternoon I made over 30 cards! YES! I think that is the most productive card making session of my life! I made another 20 Monday morning, so I've had a blast, and I do admit this has brought me well and truly into the Christmassy spirit of things!

But I do have a confession, this process might have involved glitter, and 'more is more' with glitter right?? Well it seems in the cold light of day, maybe I went a tad overboard, but it has been probably over 10 years since I used any! LOL ....so I might have been making up for lost time !! Oh, and word of warning - do NOT buy that glitter wrapping paper! Looks nice, but I have glitter EVERYWHERE! I am seriously thinking that we will be opening our presents OUTSIDE this year!!! haha - at least it has been mild!


So these cards are really basic, but so easy to make, and because the backgrounds are interesting, they look like you've put in a decent effort. Just start with a brayered masterboard background, mine are left overs from numerous previous things. I used 3 A4 sheets to make 30 cards!


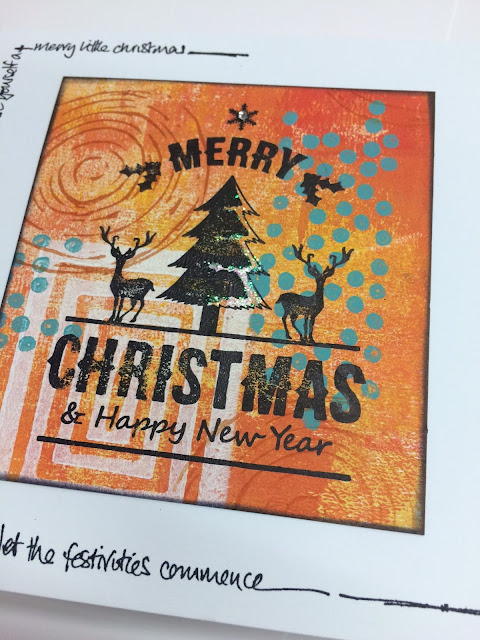
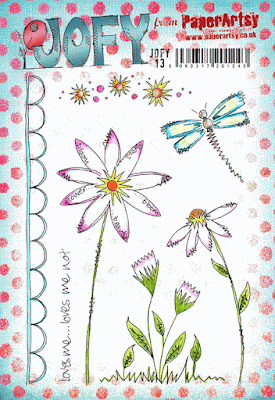
Tip: if the background is pale, then you can use fine detailed stamps like the JOFY stamp above, which was then painted with transluscent colours to make the image pop. You can find all the JOFY Christmas stamps here.


...But if the Background is bold, then just find a bold, dark stamp (the Xmas Hot Picks are ideal), stamp it in black and layer up - these are super, super fast! A teeny bling spot, and a dash of clear glitter glue on the snowy side of the tree, job done!


Step One: Make your brayered background. But you can stop at the 'brayered colour' step, you don't need to add lots of stamps as the sample below shows...this is just greens and blues brayered together. Takes 2 mins to do an A4 sheet like that. Baubles painted in gold and glitter.


This video is a reminder of the brayering technique, and I show you how to make this card in that video....


Step Two: Cut up your brayered BG into strips, and cut black matt layers to match. Find a stamp to fit, adhere to card, add glitter! On a larger card there was room for so more JOFY stamps to detail the edges.


Or perhaps a bit of a decoration across the top with paint to tie it in...


Sparkly crown anyone???


Step Three: Start adding some paint to your stamped masterboards - it might be transluscents, but I also added gold and glitter too!

But this sample was the glitter ramped up on overdrive...dot in the background on the plain card, on the lettering that is a 'Christmas' word stamp stamped directly onto the card and painted in Tango and Cherry Red...with glitter obvs!


Don't worry, I have already confessed on twitter to such rampant use of glitter, and promise not to over indulge again. Indeed the recipients of these cards will be shocked, not just to get a card from me in the first place, but one with glitter and hand made is a once in a decade occurrence!! I know, I am the worst Christmas-crafter in the world! But at least I am honest about it!!

{In my defense, we do only have 3 weeks until our biggest product release of the year and we have a LOT coming up to show you!!!}

Merry Christmas everyone, if I can find time to do cards...then YOU can too !! Nuff said!

Leandra 

Monday, 21 December 2015

2015 #23 Winter Gift Bag {by designer Sara Naumann}

 2015 Topic 23: Christmas Gifts and Cards

Hi everyone, Sara Naumann here, joining in with an easy way to create gift bags - whether that's for Christmas, or beyond. 

Here's the story: I was on a business trip and was (as we do) trying to juggle lots of things in preparation for Christmas. I thought I was being smart in buying some nice chocolates for my daughter's teachers while I was on my trip—but when I got home, I found the boxes had been damaged in transit. The contents were fine (it's hard to destroy wrapped chocolates!) but the boxes looked awful so I needed something to repackage them in. Enter the decorated gift bag.


Step One: For the tag: Lightly brayer a manila tag with Fresco Chalk Acrylic Paint (Guacamole).


Step Two: When the paint is dry, use black ink to stamp the bird from the Eclectica {Sara Naumann} Collection (ESN18)


Trim the tag so the branches are extending off either side. Use a stipple brush to spatter Fresco Chalk Acrylic Paint (Mermaid) and to edge the tag. Brayer a piece of bubble wrap with Fresco Chalk Acrylic Paint (London Bus), then press lightly on the tag. When the paint is dry, mat the piece onto black cardstock.


Step Three: Brayer white cardstock with Fresco Chalk Acrylic Paint (Guacamole) as before, then stamp the branch twice. Cut out the branches, leaving a narrow edge around the image.


Step Four: Brayer Fresco Chalk Acrylic Paint (Mermaid) onto a bag. Here I'm using brown wax paper bags I bought at the grocery store—you could do the same process on a plain brown paper bag. Fold over the top of the bag, then stamp Fresco Chalk Acrylic Paint (London Bus) with bubble wrap. Let dry, then stamp the sheet music image and script with black archival ink.


Step Five: Punch a hole in the folded-over top of the bag, then fill your bag. Thread with hemp twine to secure. Layer the two cut branches and the bird tag and add a button and ribbon bow as accents. 


I love how this little project can be used in so many situations. Here it really helped with my crushed-box dilemma, and I think you could definitely use the same little stamped bag as party favors or under-the-tree gifts. And since the ESN18 stamp set is designed to work well into the rest of the year, this could also be great for birthday gifts as well.

Thanks for joining me here today - I hope your holidays are full of fabulous memories, including at least one (or two!) really nice chocolates! :) 

When you get a chance, please join me over on my You Tube channel, at Studio SN for lots of fun crafting videos, or pop on by www.saranaumann.com. 

What a great way to solve your chocolate box problem Sara! I am sure your package will be the prettiest on the teachers desk that is for sure! Love the splatter on the bird! Have a wonderful Christmas and thanks for sharing with us! ~Leandra

Saturday, 19 December 2015

2015 #23 All Wrapped Up {by Designer Jo Firth-Young}

 2015 Topic 23: Christmas Gifts and Cards

Hieveryone Jo here, joining you this evening with a post about wrapping gifts using die cut gift boxes.  

I love die cutting - I like the ease (and speed) with which you can create a project and decorate it to make it your own by choosing different card-stock, colours and embellishments.  

The die I worked with for these projects creates a small square gift box (it comes as part of the Sizzix Big Shot starter kit) - the die folds to create a box and lid all in one.  It's a cute size (6.5cm) and I could imagine using it for for several gift giving variations at Christmas (or any other time of the year of course because, as a simple plain box, it's very versatile).

These box ideas could be used for any celebration and with any surface decoration or images but I've chosen the Christmas theme because its not long now!!

I've placed my boxes in 3 different festive gift giving situations:

1. Gift box
2. Table gift

3. Tree present


All boxes:  I die cut several boxes from kraft card, the die I used fits into an A4 sheet.  If you don't have a die cutting machine you can find a pattern for boxes on the internet, or you could make them using one of the Score-Boards on the market.

I decorated each box while flat and assembled when all paint and embellishments were dry - I used red line tape to glue the flaps/sides of the boxes because of its strength.


Box 1: Gift Box:  Snowballs and Snowflakes:


To decorate this box I stenciled circles onto the background using Metallic Glaze, and when these were dry stamped snowflakes with Jofy Mini 07...


...using Antarctic Fresco Paint along the bottom edge of the box sides and the all over the lid.


You can see in the picture above the glaze has caught the light in one panel, and hasn't on the others. If I use a glaze for stencilling, I often will add a second layer (eg snowflakes in this case) because the glaze is only seen when the box is tilted to the light, and so the pattern doesn't become too 'busy', whereas it might if it were 2 layer of paint and stamping.......I'm a less-is-more, clean-and-simple kind of crafter!

To decorate the box I punched 2 snowflakes and attached them, back to back, to the end of a length of bakers twine which I had tied parcel-style around the box.  I die cut a small tag, stamped snowflakes all over the front, and  'with love' greeting from JOFY19...


...over the top in black ink.  I edged the tag in Antarctic and tied it to the other end of the bakers twine.


Box Two: Table Gift:  Hearts and Stars:


Its nice to put a little present on each persons place setting at a table at Christmas - just something small, similar to favours at a wedding, and it can also work as a place marker so people know where to sit (if required).


I chose two similar designs from JOFY39 and JOFY40 - the twig star and heart to stamp on the sides of the box. I dropped the position down low to allow space for the box lid.


I painted the stars in Gold Fresco Finish and the spots in snowflake.  I stamped, cut out and joined together two scallop lengths from JOFY13


I painted parts of the design in Gold and Blue Oyster, and attached around the edges of the lid.


The table present needed a tag with an initial to identify each person's seat.  I chose to use the alphabet on JOFY21.


I stamped it onto a tag covered in book text and painted it in Blue Oyster to match the strip on the scallop border.  I added a matching tag embellished with a wood snowflake.


Now, I may have put my christmas trees up on 30th November, but I certainly haven't laid the table for christmas dinner yet, so I've mocked up a simple place setting to give you an idea of how the little box would look.


Box Three:  Tree Gift: 


Our family used to hang small token gifts on the Christmas tree to open on Christmas afternoon, I like this tradition as it delays the present unwrapping frenzy and gives people time to appreciate gifts already received.

I stamped snowflakes (JM07) over the entire box using Blue Oyster.  When dry I added Metallic Glaze onto the spaces and centres of the snowflakes.  I added the phrase 'let it snow' (EEG12

on each side of the box (archival black) and coloured inside the letters with a white gel pen.


To decorate the box I added a punched snowflake (as before) using 3D foam to the centre of the front of the lid lip.  I wrapped fine sisal string around this and added a gem.  

I tied a big satin bow around the box to seal it, and to hang it on the tree I tied on a length of sisal string.  The string is easily removed if you don't want to hang the present.


How lovely does it look on the tree!  Cute!

These boxes are simple but really effective - they are so versatile - you don't have to use them as gift boxes - you could use the same design, make 24 and use them as an advent calendar - using the numbers on JOFY22 as date markers... they have so many possibilities! (& I'm now thinking of flower images for birthdays, eggs and chicks for Easter!) But you don't have to use die cut boxes as I have here - try upcycling/recycling boxes you already have - add paint, stencils, and stamps and away you go.

I wish you all a very happy, fun and enjoyable festive season, and look forward to joining you again on the blog in 2016.

Jo

Blog: http://jofirthyoung.blogspot.co.uk/

Ohhhh I love how dinky these boxes are, a great size, and you certainly have had a lot of fun decorating them! I'm thinking as you have been such a good girl, perhaps Santa might be tempted to fill one with a perfectly sized jewelry treat!?! Merry Christmas Jo! ~Leandra

Friday, 18 December 2015

2015 #23 Christmas Frame {By Paula Pascual}

Hi everyone! My name is Paula Pascual and I am excited to be back at the PaperArtsy blog with a little project to gift in Christmas: a small frame perfect as a Christmas ornament.There is nothing more relaxing to me than the brayer paint technique. It's just so much fun, and perfect to create quick and easy backgrounds.


For this project I used: Eclectica³ {Lin Brown} Plate 10...


...and Fresco paints in Antarctic, Mermaid and Spanish Mulberry, and smoothy cardstock.


Step One: On a white piece of card I used the acrylic paint technique of using a brayer to cover the whole area. (see this video series from Leandra for variations on brayered paint backgrounds: Part 1, Part 2, Part 3, Masterboard)


Step Two: Once dried, I stamped the 'Noel' message from Lin Brown's set (ELB10) using Versamark ink so that I could then emboss it after.


Step Three: I sprinkled the embossing powder over it and tapped the excess off. I wanted some specks to remain to create a bit of a silver sparks though.


Then, I heat emboss it.


Step Four: Using a very very fine brush I coloured in the letters using Spanish Mulberry.


Step Five: On a separate piece of card I did the same brayer technique for another background and then I layered it, and added to a silver frame.


Of course, I could not stop there, so I made a Christmas card using the same techniques.


And used the left over card to create a tag for gift wrapping, simply stamp and emboss the snowflake, which is also from the same Lin Brown set.


I hope you like these ideas and have a go too.

Paula


Wednesday, 16 December 2015

2015 #23 Altered Gift Album {by Kate Yetter}

 2015 Topic 23: Christmas Gifts and Cards

Hello Everyone Kate (The Scrap Yard) here, joining you with an altered album that I will be using as a December Daily Album. 

I am using mixed media techniques in the background to create a textured cover. This idea would make a personal and useful special occasion gift album at this time of year too.


Step One: I gathered my supplies including several Fresco Finish paints, gesso, ribbon, and an album from the dollar store.


Step Two: With Eclectica {Sara Naumann} Set 18 (ESN18)...


I stamped my main images on cardstock and cut them out.


Step Three: After adding a layer of gesso to the cover, scraps of paper were glued in place.


Step Four: Another layer of gesso was added over the paper scraps to blend the cover together.


Step Five: A foam snowflake border was added to the front and back covers. FrescoFinish paint and Metallic Distress paint were dripped down the front of the cover.


Step Six: Stamping was added randomly to the covers in two different inks.


Step Seven: Lastly, the stamped images that were cut out were layered and glued to the front cover.


I really enjoyed the process of making this album. The color combination and bits of sparkle lend perfectly to the mood of these fabulous stamps. I hope you are encouraged to makeover a cheap item using paints, stamps and scraps of paper and tons of texture.

Kate

I love the simplicity and elegance of this Kate, it's a charming album. The paints have dried in beautiful pools, let you can still see the papers and texture of the layers. A beautiful composition! Thanks for sharing such a lovely recycling idea! ~Leandra