
Hi everyone, Gillian here with a project inspired by some of our featured Guest Designers projects this month and of course Mrs PaperArtsy herself doing a totes amazeballs job over on the PaperArtsy You Tube Channel. Where did January go ???
The PaperArtsy blog has been a hub of activity with amazing but completely different styled projects from all our designers .... Huge thanks to our Guest Designers! I hope you have enjoyed what has been shown so far!
The PaperArtsy blog has been a hub of activity with amazing but completely different styled projects from all our designers .... Huge thanks to our Guest Designers! I hope you have enjoyed what has been shown so far!

I have used this wooden shadow box and wooden block also from PaperArtsy which is perfect for altering with Fresco Paints

I started out by applying some Ferro through a stencil using a Palette Knife to create texture.

Any excess paste can simply be scrapped off at this stage prior to heat setting.


I then added some book text as inspired by Michelle's 1st project HERE using Fresco Satin Glaze as my adhesive.


Start applying thin layers of Fresco Paints to build up your layers.
Before applying the really dark shades of paint to accentuate the shadows, Leandra recommends applying translucent colours in medium tones, as this builds depth on the lighter base coat, and ultimately helps makes your textured areas "pop", so at this stage I applied some Limelight.


Again continue to build up your layers. Next came South Pacific ... its a deep blue-green, can I just say I LOVE this colour and need to use it more.


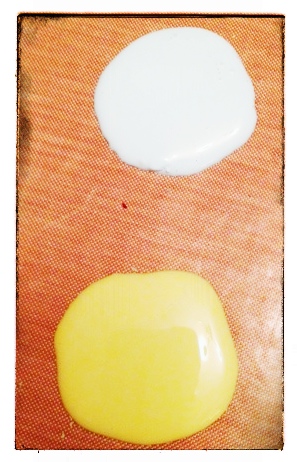
I have some of my fave colours watered down to use in these little Spray Bottles which gives a much softer look to your projects.
{see Leandra's footnote at the end of this post for more info on opaque sprays}
{see Leandra's footnote at the end of this post for more info on opaque sprays}
You need to dry with a heat gun before going any further, and they will take longer to dry than paint on its own as there is more water in the mix.

Next I used more watered down Fresco colours sprayed on ... Limelight, Beach Hut and Zesty Zing. Continuing to build up the layers.
Dry well, and then I've stamped Mini 44 in Nougat.
Dry well, and then I've stamped Mini 44 in Nougat.

To add some definition around the edges of the frame I have applied some Treasure Gold (Sapphire)

Then of course, once you start....you want even more Treasure Gold so (Sapphire and Rennaissance) was also applied over the textured areas.

and I finished with Mini 44 again, this time stamping in South Pacific.

So for the inside of the frame, it's all about the wooden block which was inspired by elements of Linda's post HERE ....
{I did at this point forget to take step by step pics duh!}
Basically I have used the same colours as above this time applied with Cut N Dry Foam, stamped Mini 44 and Mini 23 again in Nougat and South Pacific.
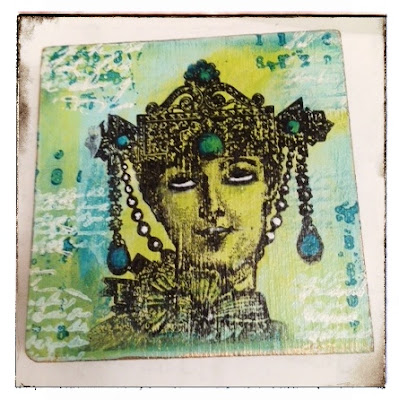
The image is from LPC013 which has been stamped using Archival Ink (Jet Black). I've then added the white detail using Snowflake to accent area's of the image. I love how she appears to be "rolling her eye"s ... not going to tell you what at Mrs PaperArtsy said LOL!!
{I did at this point forget to take step by step pics duh!}

Basically I have used the same colours as above this time applied with Cut N Dry Foam, stamped Mini 44 and Mini 23 again in Nougat and South Pacific.
The image is from LPC013 which has been stamped using Archival Ink (Jet Black). I've then added the white detail using Snowflake to accent area's of the image. I love how she appears to be "rolling her eye"s ... not going to tell you what at Mrs PaperArtsy said LOL!!


To brighten up the image and colours I applied Fresco Gloss Glaze.
Gloss glaze reflects light back to your eyes, so a matte colour, that looks soft, and a bit dull, suddenly looks much brighter, because that is how our eyes perceive it to be.
So, if you want your Frescos to look brighter, then just add gloss glaze!

Gloss glaze reflects light back to your eyes, so a matte colour, that looks soft, and a bit dull, suddenly looks much brighter, because that is how our eyes perceive it to be.
So, if you want your Frescos to look brighter, then just add gloss glaze!

I've then adhered the wooden block into the centre of the wooden shadow box .... genius combination Leandra and Mark!
{Leandra says: errrr, I think you are the genius there Gillian, I had no idea the block fitted in the frame! .... must order more blocks!....}
{Leandra says: errrr, I think you are the genius there Gillian, I had no idea the block fitted in the frame! .... must order more blocks!....}
I applied South Pacific to an Idea-ology word band highlighting the text "Embrace Imperfection" with Treasure Gold.


I hope you have enjoyed this project and remember you still have time to be inspired by Suzz projects this week to be in with a chance of winning some PaperArtsy rubber! Click HERE to link up!
Leandra comments: When
we first released Fresco paints just over 2 years ago, you may
distantly recall at that time, under the ArtsyCrafts banner, we also hosted Tim Holtz here in the UK for a massive 2 day consumer event.
 Almost
300 ladies went through classes with Tim or Lin Brown and I. Lin and I
create a new technique using watered down Fresco snowflake as an opaque
spray over the awesome Ranger Colour Wash Dye Sprays. Oh wow did the
ladies make some really cool opaque stains with the vibrant dye
sprays use on metal card. Of course, the colourfast dye mixes and mingles with the paint
to create stunning effects, pastel shades with a matte finish. And, once dry, you
have an awesome matte surface to stamp on! We also mixed the stains into the paint, added water, and tinted our papers to match in with the colour combinations.
Almost
300 ladies went through classes with Tim or Lin Brown and I. Lin and I
create a new technique using watered down Fresco snowflake as an opaque
spray over the awesome Ranger Colour Wash Dye Sprays. Oh wow did the
ladies make some really cool opaque stains with the vibrant dye
sprays use on metal card. Of course, the colourfast dye mixes and mingles with the paint
to create stunning effects, pastel shades with a matte finish. And, once dry, you
have an awesome matte surface to stamp on! We also mixed the stains into the paint, added water, and tinted our papers to match in with the colour combinations.
So,
along with Gillian, making paint sprays is also one of my favourite things too, and Frescos are perfect for the task! But why stop at snowflake....OMG the
combinations are ENDLESS.
You can so easily make your own:
- 2/3 fill your bottle with water
- add the paint on top of the water (this stops the paint sticking in the base of the bottle and helps it to mix with the water more easily)
- Shake well, and test your spray on paper towel
- Decide if you need more water, or more paint, or the addition of another colour! (eeek - such fun)
You can make these really thick or really thin, depending on your need and the project.
You can make opaque ones with the opaque paints, or more translucent if you want some warmth but not opacity.
Add an opaque to a translucent to make a more opaque version (snowflake and limelight for example!)
You can custom-mix colours of paint together to create new colours! (hint: try 50/50 Guacamole and Sky with a hint of South Pacific for a gorgeous duck egg blue)
So a big thanks to Gillian for this fantastic end of the month round up post. I can't believe we are starting February already. So much coming up this month, starting with another video from me tomorrow. A whole bunch of new PaperArtsy products are released this month as we head to the UK's largest Craft Trade show in a couple of weeks time, and of course a new round of stunning projects from our inspirational Guest Designers. Michelle is back to kick it all off on Sunday evening.


21 comments:
More fabulous inspiration - wonderful
Sam xxx
Fantastic frame and block, Gillian - just love the colours here (I'm mainly blues and greens at the moment... about to branch out though!) - and I've had a little go with spraying but this makes me want to do much more. Love the sound of the ColorWash games Leandra's talking about too!
Alison x
Simply gorgeous, Gillian! The colours are gorgeous. I have to go investigate the block now....
Fab ideas thank you so much. I remember the Tim Day so well it was fab and loved the things we made with you all. I have watered down some opaque paints to make them a bit more translucent for Suzz ATC challenge will post when it's dry!!!
What a fabulous project Gillian! I cannot wait to try out the paint sprays! BTW, take a look at the Blog Archive: 26 posts in January compared to 57 for the whole 2012. Keep up the good work!
Gorgeous project Gillian! Love those colours and the texture paste through stencil. Fab!
Absolutely gorgeous Gillian ! Love the colours and I'm so pleased you said be brave when you added the dark colour (that's when I get scared!) just goes to show how knocking it back really does do the trick ! Sue C x
Gillian, you have created the most stunning project here, the colours are amazing and the image is perfection - really love this. Thanks to Leandra too for the tips on making sprays - off to try that right now.
Absolutely STUNNING! I love it to pieces. And I must try the spray technique. TFS!
~Linda
Wow this is gorgeous, I can't wait to try these paint sprays xx
Gorgeous! Love the texture with the Ferro and the layers of paints. The opaque sprays is lovely!
Truly inspirational Gillian and I must get some bottles to make up the sprays.
hugs {brenda} x0x
A truly stunning project to end the month Gillian! So many great tips too...off to find me some spray bottles! ;o)
Alison xxx
Stunning project, I love the colours & the TG on the Ferro areas looks gorgeous. Thanks to everyone for a great month of inspiration & beautiful projects. I'm hoping to get a little time to play today, I want to try some of Suzz's ideas.
Fabulous stuff Gillian. Love everything about this project from the colours and texture to the gorgeous image (rolling eyes and all, lol). I actually bought this set of stamps with my goodies that came on Tuesday ;0) I so want that leafy mask though and each time I look it's never online. Guess it keeps selling out, lol! Need a couple of those blocks and frames too now as well. You enabler, you!
Hugs
Lesley Xx
Me again, I forgot to say thanks for the step by step photos. They're a really good help!
Hugs
Lesley Xx
gorgeous project, those colours are my favourites. I recently bought some more fresco paints, now I need yet more colours Lol I am really enjoying these projects,need to have a go myself x Lavinia
Well done Gillian on your project - love all the step-by-steps!! And thanks to Leandra for all her hints and tips - need to find time to play with paint more!
lovely project Gillian. I'm in heaven - so many people using my fave blue and green colour mix at the moment.
WOW WOW WOW really loving this frame it's amazing. Kezzy xxx
Love love love the texture on this Gillian! What a gorgeous make...WOW!~
Post a Comment