Showing posts with label Drying Retarder. Show all posts

Wednesday, 11 September 2024

2024 Topic 7: (Gel) Printing {by Martha Ponsanesi} on the PaperArtsy Blog


Hi everyone, it's Martha (@CraftingMartha) here with you today.
The past few months have been busy because I've been caught up with moving, and many things still need to be sorted out. In fact, some of them haven't resurfaced yet... you'll see later how I had to improvise with something.
There couldn't have been a more fitting topic to bring me back to my creative desk: (Gel) Printing!


Following the current theme, which is Nature, I immediately thought of JOFY’s floral-themed stamps and stencils, to create... flowers, of course! LOL.
Having moved into an apartment, I miss having a garden, so what better remedy than creating some super colorful flowers to brighten up my space?
Stay with me and I'll show you how I made my fabric using a Gel Plate, Stencils, Stamps and Fresco Finish Chalk Acrylic.


Since I planned to work on a Gel Plate, I focused more on stencils, choosing PS434 and PS435 along with the JOFY134 stamp set ( you can see the release blog post here https://blog.paperartsy.co.uk/2024/05/new-paperartsy-products-jofy-may-2024.html ), which I love because it has a bit of everything: flowers, leaves, dots, numbers... and of course, I used lots of Fresco Finish Chalk Acrylics, you already know I'm a colour addicted.
With various pieces cut from an old white cotton sheet, I'm ready to create my fabric.


I took an old white cotton sheet and cut it into several pieces.
My first    attempt at   printing on fabric wasn't the best.  I'm not sure if it was because I hadn't used a Gel Plate in a while and it seemed a bit dry, or because with temperatures still at 30°C, the paint was drying too   quickly, or maybe because   fabric isn't  as  smooth as paper. Either way, the first prints weren't very well-defined. Oddly enough, the results  were more satisfying when I cleaned the roller on the fabric LOL.

So, I decided to try using Fresco Finish Chalk Acylics along with the Fresco Finish Drying Retarder (FF112).....


....and this time the result met my expectations, here used with Fresco Finish - Tangerine Twist (FF92).


I played along with several of my favourite Fresco Finish Chalk Acrylic, such as Green Patina ( FF126 ), Cayenne( FF159 ), Mermaid( FF44 ), Slimed( FF137 ), Bubblegum( FF116 ), and I ended up with lots of lovely pieces of fabric.


As I mentioned before, by cleaning the roller I coloured other pieces of fabric which I cut into stripes and decorated using matching Fresco Finish Chalk Acrylic, here for example Lyly the Pink ( FF218 ) through the PS435 stencil....


.... and here stamping with JOFY134 Stamp Set.


The time has come to transform these pieces of fabric into petals, I wanted to find an alternative to the sewing machine, but the material at my disposal didn't allow me to do so, sewing and I in general don't really get along very well , then my sewing machine is small and underperforming, but the important thing is to be satisfied LOL.

I traced the shape of a petal on the various pieces of fabric and then cut it out.


I sewed the two parts of the petal, leaving a slit at the bottom, to put some padding.


To give more interest to my flowers I decided to stamp one of the five petals with the numbers of the JOFY134 Stamp Set

For the center of the flower, I tore some even thinner strips than the previous ones and then rolled them up and glued them.


And here are together all the pieces I need.


Trying to figure out how to assemble them.


To assemble the flower I decided to simplify the job and use hot glue... too bad I didn't remember which box the hot glue gun was in. So I used an alternative method, I melted the glue sticks with the embossing heat gun.


Thinking how to 'plant' my flower, I decided to use a glass tealight holder. To make it stand up I cut out two cardboard disks in different sizes, with a hole in the middle, into which insert a wooden stick as the stem. All coloured with Fresco Finish - Granny Smith ( FF1108 ).


This is my almost finished little glass jar.


The fabric stripes decorated in the previous step, were used to embellish the glass jar.


Ladies and gentlemen here are my fabric flowers.


I had fun creating them from scratch, decorating the fabric and then dedicating myself to sewing, which is not my strong point, but if someone else is like me, give it a go, you've seen that in the end you can get a nice result.

Have fun.
Martha xxx

Tuesday, 24 October 2023

2023 Topic 11: Monochrome {by Jenny Marples} with red & Alison Bomber stamps


Hi everyone Jenny Marples here with you today. I love working with a limited colour palette so the monochrome theme really resonates with me. During a visit to a beautiful walled garden I was drawn to the plants, flowers and fruits being grown in a range of red shades and tones. Immediately they reminded me of Alison Bomber's watercolour samples and I was itching to have a play.


With a personal preference for paint over ink I wondered if it would be possible to mix PaperArtsy Fresco Finish Chalk Acrylic Paints with something to make them react on paper like watercolours - turns out there is! It lead to me creating a double-sided accordion book featuring the berry stems and flowers, adding touches of typography throughout.


To start I picked a couple of Alison's stamp sets - EAB31 the Blackthorn Edition and EABF the Fodder Berry Edition - as these collage style sets have a great range of flowers, berries and script/ephemera to create focal points and backgrounds. Actually this is true of all of Alison's collage style sets so if you already have one/some you are already half way there. The PaperArtsy stencil PS394 proves to be useful in unexpected ways later in the project.


Sticking with the monochrome theme (and with thoughts of those red flowers in my head) I chose Fresco Finish Chalk Acrylic Paint in Blood Orange as my hero colour, adding Snowflake and Little Black Dress to create the different tones and Nougat and Sand for the neutral background on each page.


Time to start stamping your flowers and berries. Whilst it's important to use a permanent ink that won't react with water or bleed on your watercolour paper don't feel limited to picking black. Dark reds, plums, browns and even greys are a more subtle alternative.


Now for the magic ingredient, an acrylic paint extender (often called a flow medium/enhancer). There are many brands so it's important to follow the instructions on the bottle when you start to mix it with your paints. Mine needed diluting with a lot of water before it could be added to tiny amounts of paint in the palette. The aim is to make your paint thinner and with a slower drying time so it can move and sink into the watercolour paper. PaperArtsy do have a drying extender which they reccomend to use with frescos on gel paltes, or in hot climates to extend the drying time. I did not have a bottle to hand, but I am sure the same principles apply as explained below, in general, very little product is needed to notice an impact.


Start simply by mixing some 'flow water' with the Blood Orange paint, colouring the berries and flower centres in a precise way like me or in the more fluid, less accurate style we are accustomed to seeing with watercolour painting. I must admit I need to practice letting go a lot more in future! Notice that the addition of the water doesn't affect the pigment of the paint - a testament to the quality of Fresco Finish Chalk Acrylic Paints.
{Edit from Leandra - I have never thought to use it for this purpose! great idea!}


Now you have your Blood Orange red on the go separately mix some of the Little Black Dress and Snowflake paints so you can begin to create different tones. I combined the Blood Orange with the Snowflake to make a pale pink, layering it over the red in the centre of the flowers. You'll find you can layer colours without losing what has gone underneath (including the stamping) because the paints are no longer opaque.


Mixing the Blood Orange with the Little Black Dress gives you a much deeper tone (similar to Squid Ink Fresco Finish Chalk Acrylic Paint) for colouring the stems and adding shading to the berries.


Save what is left of that colour combination and add some of the Snowflake to get a mid-tone for painting the leaves. 


Painting these in multiples seems to speed up the process and give you plenty to choose from when you start to make your pages.


You'll see from the finished pages below how I've added pops of white to the berries with a white paint pen.


Adding tiny dots with the white paint pen can also look good on the flower stamens.


And now you've seen a small part of the finished book you are probably wondering how the rest of it came together.
 

Time to start creating layers and backgrounds on which to mount your painted flowers. I began by using up leftover paint from the flowers and berries to create an ombre effect on a separate sheet of watercolour paper. With the black at one end, the white at the other and the red in the middle you can then use the mixed ones in between, knowing they will naturally blend together. 


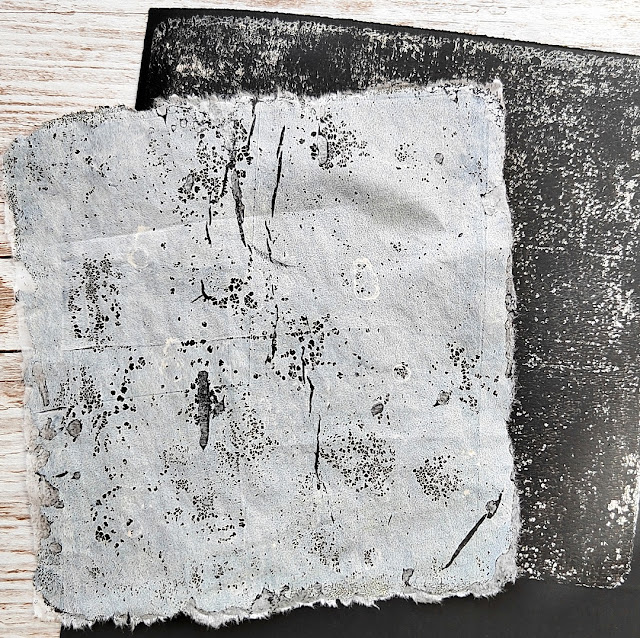
Now for an experimental background that turned out better than expected. Looking back over previous journals/books I noticed one way of making smaller flowers stand out is to put them on plain dark or light backgrounds. Whilst coloured card can work I wanted something with a more worn look. Try adding a thin layer of Little Black Dress paint to a gel plate removing a little with the brayer and allowing it to dry completely.


Then add a layer of Nougat paint over the top with a brayer, pulling a print using black card.


The resultant patchy looking results are perfect to use with scissors and for die cutting. Add extra interest by stamping and heat embossing some of the script/ephemera images from the two stamp sets using fine white embossing powder.
 

This process can also be done in reverse, covering the gel plate patchily with the Nougat paint before adding a layer of the Little Black Dress paint ready for pulling a print on white/ivory/cream card.
 

In the close ups of some finished pages you can see where both versions were die cut into tag and postage stamp shapes to act as contrasting layers beneath the watercolour berries and flowers.


Here you can see how the delicate black embossing looks on the pale background of the die cut postage stamp.


Since the process of creating these gel plate printed pieces of 'worn' card is so simple and effective it's worth making up batches to keep/use in future projects.


Now for the accordion book, beginning with the background papers for each of the pages. Stick torn scraps from different books and music manuscripts to a large sheet of thin paper (to fit with the typography theme) then blend the edges together with the Nougat, Sand and Snowflake paints. You can cut this up into pages or take it to another level by adding coordinating patterned gel plate prints.


The prints below were pulled on wet strength tissue using the same five paint colours and stamps from the two sets. Try stamping onto your gel plate with permanent ink in brown and plum before adding a layer of paint over the top. On others I brayered a layer of paint onto the plate, stamped into it, then let it dry before using a contrasting paint over the top to pull the print.


Cut your collaged paper into strips roughly 13cm/5 inches tall, gluing the strips together at the ends to create one continuous long piece. Tear your neutral coloured patterned tissue prints into small pieces and add to the paper, much like creating a quilt. Once done chop your long strip into 13cm/5 inch squares ready for mounting onto a long strip of calico fabric.


I just needed one last piece of contrasting patterned paper and this time went with a simple piece of card painted with the Blood Orange paint and over-stencilled with the Nougat paint. This was then ready to be die cut into tag shapes (picking up on a topic from earlier this month).


You'll see in the close ups from more of the finished pages how the Blood Orange stencilled tags layer together with the black embossed card to frame and contrast with the watercolour flowers.


It is also easier to see how the separate pages have been mounted onto the calico fabric, leaving a gap between each one to allow for the accordion action to work more easily when the book is closed. You can add to the quilted look by machine stitching around some of the blocks of paper/tissue.


You will by now have seen how I chose to cut around the watercolour flowers and berry branches, inking the edges before mounting them onto the pages. To help create a variety of layouts on each set of pages it is worthwhile cutting up your images, but this can leave you with a 'raw edge'. Easily disguise it by sticking another piece of the watercolour card underneath the raw edge before re-trimming to add back in the border.


You now have all the elements needed to build your collage pages and display your watercolour images. Don't be afraid to tear and cut up pieces to spread across two pages or to make them fit within a single page.


In the double-page spread below you'll see how I split a long die cut strip across the middle to help draw the eye from one side to the other.


Don't be afraid to cover up some of your layers as I have with the ombre effect watercolour paper. Here it acts as a graduated border beneath the die cuts.


And there are some other tips for adding finishing touches to your pages to enhance them.

Add extra stamping behind your layers to add to the overall design.


Hand stitching is a great way to add texture and detail to your collages. To get that 'random line' look try using your stencil as a guide.


Raid your stash to find bits and pieces that will add to the design - lace, metal filigree bits, tiny price tags...
 

... tiny scraps of fabric, self-adhesive pearls and washi tape have all been used on mine.


Finally the covers for the book makes use of the translucent quality of the Blood Orange paint in its acrylic form. Use the stencil again, this time with Grunge Paste, and when dry paint over the top. Sand back the raised areas to reveal the pale paste below, then apply a second coat of the same paint. The base layer will be deeper in colour than the raised areas, accentuating the design.


Assemble your accordion by applying the pages to calico base before adding the cover boards on the front and back. I also created a coordinating case using some of the leftovers from the pages.


Here's the finished accordion album with it's matching cover.


And here are the completed pages shown in full so you can see the different compositions on each spread. You'll also be able to see that I've taken one of the quotes from the stamp sets and added parts of it to each page in turn.


I was so pleased with how well the flow extender worked with Fresco Finish Chalk Acrylic Paints and will be practising using them in a looser style in future. And finding a way of creating 'worn' look card was an unexpected win. I hope you've also found some ideas here that will add to your list of creative techniques.

Jenny