A note from Leandra:
Are you ready for some delicious vintage vibes?? Raquel is here with lashings of vintage and lots of ideas too! There is nothing better than alphabet stamps and stencils - you cannot have too many!!
Raquel will be along to share with you LIVE her new products and ideas over in our Facebook Group, 'PaperArtsy People' shortly after this post publishes, and ... don't forget
These
stamps are available EXCLUSIVELY from our approved stockists. Please
check the list at the foot of this post to find a retailer online or
geographically near you, it makes sense to order within your country
where possible. Our retailers also endeavour to join the designer's live
to share their direct shopping links - this makes it super easy for you
to find a store with product in stock immediately.
Hi everyone, Raquel from scrapcosy here.
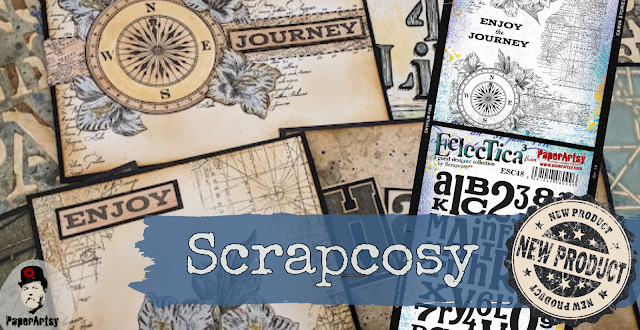
I'm thrilled to be here today! It's my newest release for PaperArtsy with 2 new stamp sets and 2 new large stencils. A release inspired on vintage maps, flowers and alphabet block stamps that I hope you enjoy as much as I do!
PaperArtsy Rubber Stamps
Price: RRP €23.00 +VAT
Size:5" x 6" (13 x16.5cm)
All stamps are individually trimmed onto cling foam, with a laminated storage/index sheet
Scrapcosy - A5 stamp set 48 {ESC48}
When I go to a flea market and I happen to find a place where they sell alphabet block wooden stamps, I just stare at all the letters and numbers of different formats and sizes all nicely put together in a tray, filling every spot. What a beautiful view! Well, this set was inspired by these occasions and with it I also meet my dream of designing an alphabet stamp set.
You know me, I love multipurpose things and having flexibility on my stamps so they can be used in different ways. Even if this stamp set comes as an entire block (for once the PaperArtsy elves didn't need to trim the world of rubber on one of my designs) you can use it as it is for a quick and beautiful background or you can stamp and cut away letters to later create your own titles, big words or sentiments for your projects.
This is the perfect stamp for when your mojo is low. If you don't know what to do, stamp a few of these blocks (same colour, different colour, etc), cut the letters apart and store them away for a future project.
THE BLOCK
This was my very first stamp with this stamp set. I used a pretty dry inkpad and I got a beautiful distressed look on the letters. I liked it so much that I just added a bit of ink to the background and framed it in black! This sample ended there!
Oh! The joy of looking at a background full of letters! I just can't resist it! As I couldn't resist to add Love in the block of letters.
Now, when I showed this one to Leandra, she gave me another idea that was inspired by this post by Mags Woodcock. She does it in a different way (check her post and look for the labels with the numbers inside in black and orange colours) than what I tried here. The dry inkpad leaves some rubber exposed, so before stamping, we can add an extra layer of paint on top of the rubber (I did it with the brayer, applied Blue Moon Fresco Finish Acrylic Paint) and then stamp on the paper this colour mix. I love the subtle effect I got here and it can be the perfect background for a scrapbooking page or a card.
HAPPY BIRTHDAY!
Then I went to create a simple birthday card. The background is just me using the leftover paint, ink and Just walnut mixed with water droplets that were on my desk surface after I did other samples you'll see below. I just smooshed my card agaisnt that dirty surface, dried it, added more sprayed Just Walnut and then on top I splattered some Baltic Blue Fresco Finish Acrylic Paint diluted in water to create the dark splashes.
Scrapcosy - A5 stamp set 49 {ESC49}
This stamp set is inspired by Vintage maps and flowers. I love maps and flowers, so I decided to bring these 2 together. Within the maps world, I also love compasses, so I was pretty excited when I finished designing the collage at the bottom. It's an instant focal point that you can use in a card or in a scrapbooking project. The 3 flowers on top, are the same type as the ones at the collage, but at a larger scale. These 3 can be used to complement the collage below or for a completely separate project. The map on the right and the hand-lettering on the left are perfect for backgrounds. This stamp set will pair really nicely with my latest book, Art Journal Vol 3: Voyagers, which is also about maps and the sea life in general.
And finally, it comes the sentiment, "Enjoy the journey" which is one of the phrases I live by. You can't wait till you reach your goals to feel happy or to feel satisfied, you should enjoy the process or the journey that takes you there. So even if you never get what you dream about, I think that by enjoying the little things in the day-to-day life, by appreciating what you have and by accepting who and how you are right now, you can find joy and happiness. I find that's so important!
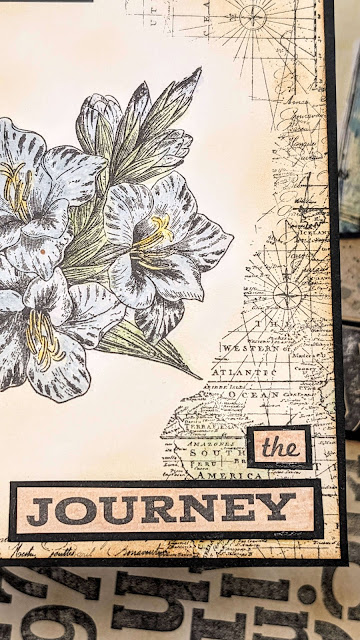
ENJOY THE JOURNEY
This was a very simple card to make, and it would be a great gift for that someone who needs to appreciate the present moment. To make this card I just stamped the flowers in the middle of the paper and then I framed them by stamping with the map and the handlettering on the edges. I added colour to the flowers and the map with Mattints (Shark, Fern and Glow) and then I added ink to the background.
And then I stamped and framed the sentiment in pieces, which I glued to the card.
THE COMPASS
I love fussy cutting, so I took a chance to create a slightly dimensional card, by stamping twice this collage and colouring, cutting and mounting it back.
I designed that washi-tape-like map ribbon precisely for this purpose: so I could add a title on top. Also, you could lay on top instead a real ribbon for texture, choose one as thick as the sentiment and it will also look great. I extended the washi tape on the other side of the compass by stamping it twice.
I love the compass. I
should have added a spinner on this card. I love to add interactive
details and that would have looked great! Maybe next time...
PaperArtsy Stencils {Large}
Price: RRP €6.58 +VATLarge Size: 6.25" x 9.5" (16 x 24cm)
Robust mylar designed to offer longevity, deep texture and easy clean up
PaperArtsy Stencil by Scrapcosy 436 {PS436}
Letter Block
The idea behind this design comes from the same place as the stamp set ESC48, the block letter wooden stamps at the flea markets. I wanted to also have the ability to create a dimensional design with the letters, using grunge paste. I've hidden some words at plain sight so it can directly be used to write Joy, Love, Moments, Life by masking the other parts of the stencil, or use it without masking anything for a quick and beautiful background.
GRUNGE LETTERS
After creating a beautiful brayer-painted background using the winning colour combination of Twilight, Buff and Niagara Falls, I added the entire design of the stencil using a dye ink in a sepia tone, which still lets me see the texture of the original background.
Then for the second layer I used Grunge Paste through the stencil just in some places, making sure each letter has some of the paste but also some places with no paste at all. That gives the look of a very grungy background. Once that was dry I added Just Walnut dissolved in water on top, to make the Grunge paste more aged and textured.
I left a magnet between the background and the paper that frames it. It is stick in a position that allows me to attach/remove this sentiment which I originally created for another card you'll see later below. When I saw how nice it looked on both cards I decided to use the magnet option since I couldn't commit to glue it to just one of them! I'll show this feature on the Facebook Live later.
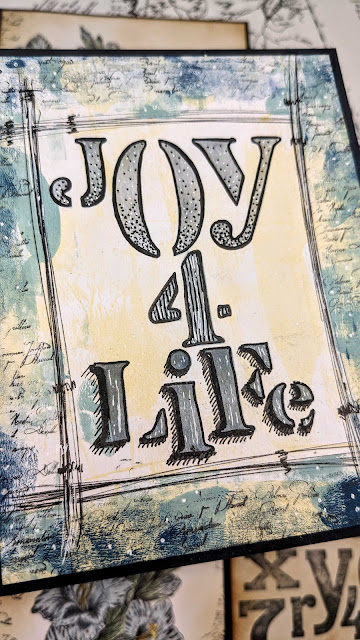
JOY FOR LIFE
Stencils can also be used with a pen, to give a more freehand appearance. That's what I did here. I created a card that is not vintage at all and I decided to try a few things I normally see Leandra doing: using the black pen and the white pen to create frames and marks, using the brayer to extend paint on the edges and stamping in black the delicate hand-lettering from ESC49.
I'm pretty proud of this one. It doesn't look perfect but I had lots of fun creating it. I got butterflies in my belly when I dared to go free with my hand to alter those stencilled letters, by adding the contour, the dots, the lines and the shadows to them, to get a different font style on each part of the sentiment. Of course I could have stick to one of these font styles, and the card would have looked neater, but I felt like experimenting with it.
PaperArtsy Stencil by Scrapcosy 437 {PS437}
This was a hard design to make. So intricate, so many lines and letters, it was a real challenge but it came out OK and I love how it can be used to create beautiful map backgrounds.
GRUNGY MAP
This card has the magnet hidden, so the sentiment (also having a magnet) can be moved to the GRUNGE LETTERS card. It looks great in both cards.
The background was made with paint and brayer, using the same colur combination as the next card below, very blue, but then I added some Golden Sands infusions on top and Just Walnut dissolved in water and it became too warm, it lost some of the blue it had before, so I added it back by adding some blue paint with an almost dry brush with vertical and horizontal light strokes, which also defined and highlighted the shape of the stencil even more.
BLUE SEA
That was all from me today! I hope you like the release and the samples I made with all these stamps and stencils. I had lots of fun myself. And it's exciting (and scary) to see that my next stamp set will be ESC50!
A HUGE thank you to the PaperArtsy crew for making these stamps and making all this creativity possible!
You can see more and visit me at
Instagram: https://instagram.com/scrapcosy/
YouTube: https://www.youtube.com/c/scrapcosy
Blog: https://scrapcosy.com/
Facebook: my profile https://www.facebook.com/raquel.burilloperez
YouTube: https://www.youtube.com/c/scrapcosy
Blog: https://scrapcosy.com/
Facebook: my profile https://www.facebook.com/raquel.burilloperez
And this is my Scrapcosy’s crafty party Facebook Group, for everything Scrapcosy.
Come and join me! Share all your creations with everyone in the group! https://www.facebook.com/groups/scrapcosygroup/
You can find all my books listed here, Including the new Art Journal Vol 3: Voyagers which ties up really well with this release, they are available in Amazon: https://scrapcosy.com/books/
Teaching Schedule:
I
will be teaching an online class on infusions soon, so if you
want to be the first one to know about it all, send me an email and I'll
contact you when the class is ready: scrapcosy@gmail.com
PaperArtsy Stockists
AustraliaBev's Cross Crafts, Spreyton, Tasmania bevscrosscrafts
Crafters Cupboard, Berwick, Victoria crafters cupboard
Hillbilly Scrappin, Nikenbah, QLD hillbilly scrapping
Memories on the Murray, Murray Bridge, SA memories on the murray
Natalie May Scrapbooking, Dover Gardens, SA natalie may
Scrapbook Superstore & More, South Penrith, NSW scrapbook superstore
The Scrapbook Store, North Perth,WA the scrapbook store
Belgium
Créatelier Caracolle, Liège, createlier caracolle
Canada
Clipper Street Scrapbook Company, Langley BC, Clipper Street Scrapbook Co
Scrapbook Centrale, Dollard Des Ormeaux, Quebec scrapbook centrale
Scrap Addicts, Edmonton, Alberta scrap addicts
Scrap and Bean, Edmonton, Alberta scrap and bean
The Paper & Ink Boutique, Calgary, Alberta paper and ink boutique
Denmark
Hobbyboden Scrapworld Samso hobbyboden
France
Emispheres Eurl Ruy Montceau,38300
Fée Du Scrap, Saint Sébastien-Sur-Loire, fee du scrap
Horizon Créatif, Ste Jalle horizon creatif
Instant Créatif, La Possession, La Réunion, i creatif
Katzelkraft, Ingwiller katzelkraft
Kerudoc Creation, St Yvi kerudoc creation
Page de scrap, Saint Pavace, page de scrap
Passion Scrap, Vieux-Conde, Passion Scrap
Scrap by Jo, Saint-Orens-de-Gameville, 31650 Scrap by Jo
Scrap Déco Home, Goutrens, www.scrap deco home
Toutencolle, Dun sur Auron toutencolle
Germany
Stempeloase Munich, Munich stempeloase
Stempelfee Shop, Hilden stempelfee shop
Netherlands
De Hobbystudio, Genemuiden, de hobby studio
Doe@ding,Spijkenisse doe @ ding
Hobbycompleet de Duif, Leeuwarden hobby compleet
Stampingcorner, Capelle Aan Den Ijssel stamping corner
Puerto Rico
Paper Boutique, Fajardi Paper Boutique
South Africa
Kcraft imports Ltd, Centurion 0014 kcraft
Spain
Cien por Cien Manualidades, Barcelona, 100 x 100 manualidades
Ideas 10 Manualidades Y Scrapbook, Bilbao ideas 10 manualidades/
United Kingdom
Amelia's Creative Crafts, Studley, Warwickshire amelias creative crafts
Art from the Heart, Harrogate, Yorkshire art from the heart
Crafts at The Malthouse, Herstmonceux, East Sussex, crafts at the malthouse
Countryview Crafts, Potton, Bedfordshire countryview crafts
Loobi Crafts, Leighton Buzzard, Bedfordshire, loobi crafts
Procraftynation Ltd, King's Lynn, Norfolk Procraftynation
Sir Stampalot, Peterborough, Cambridgeshire sir stampalot
Stampers Grove, Springbank, Lilliesleaf, Melrose,Scotland stampers grove
The Artistic Stamper Craft Store, Faversham, Kent the artistic stamper
The Forget me not Kraft Kabin, Rochford, Essex, The Forget Me Not Kraft Kabin
USA
Artistic Artifacts, Alexandria, VA artistic artifacts
Craftiness, Chatsworth, CA, craftiness
Everything Scrapbook & Stamps, Lake Worth, Florida Everything Scrapbook & Stamps
Frantic Stamper, Oregon frantic stamper
Free Heart LLC, Denver, Colarado, free heart llc
Joggles, Coventry, Rhode Island, joggles
PaperCraft Clubhouse, Westbrook, Connecticut, papercraft clubhouse
Runaway, Art & Craft Studio, NE Salem, Oregon runaway
Scrap-A-Latte, West Babylon NY scrap a latte
Scrapbook-N-Memories, Harrisonville Missouri Scrapbook N Memories
Simon Says Stamp, Columbus, Ohio simon says stamp
Topflight Stamps, Irmo, South Carolina topflight stamps
If you are interested in becoming a PaperArtsy stockist contact Dounia@paperartsy.com for more information
PaperArtsy Links
Facebook Group PaperArtsy People
Facebook Page PaperArtsy
Twitter twitter.com/paperartsy
Instagram instagram.com/paperartsy
Pinterest uk.pinterest.com/paperartsyhq
YouTube youtube.com/user/PaperArtsy


1 comment:
I love this release Raquel. Awesome collection
Post a Comment