Hi friends, it's Jayne Charlton from (The Craft Planet) coming to you from my art studio in beautiful West Cumbria (UK). I've been invited to create a guest 'with 3 things' post for PaperArtsy, in fact I am the first of 3 invited guest bloggers for this feature coming your way!
This feature on the PaperArtsy Blog is where 3 bloggers are sent 3 items in the post. We have no clue what PaperArtsy HQ is going to send us, and there is a slight variation (for example on this round we each were sent slightly different stamp sets) but generally 2 of the 3 things will be identical. It is quite exciting and I had a lot of fun creating with my mystery package.
As soon as my parcel was delivered I couldn't wait to open it and see my surprise items: a PaperArtsy Hot Picks Stamp set (HP1111) - which is fantastic because nautical, steampunk and botanical are right up my street - so many many possibilities; my mind was in overdrive! I named the darling fish Deena (short for Sardines).
With it was PaperArtsy Stencil PS106 designed by Scrapcosy that I find very nice, highly usable, really a stash must have.
Colourwise, my bundle included PaperArtsy Chalk Acrylic Paints in Verdigris and Marbles. I adore them and have used them lots already. They are a wonderful combo together so I'm off to a great start!
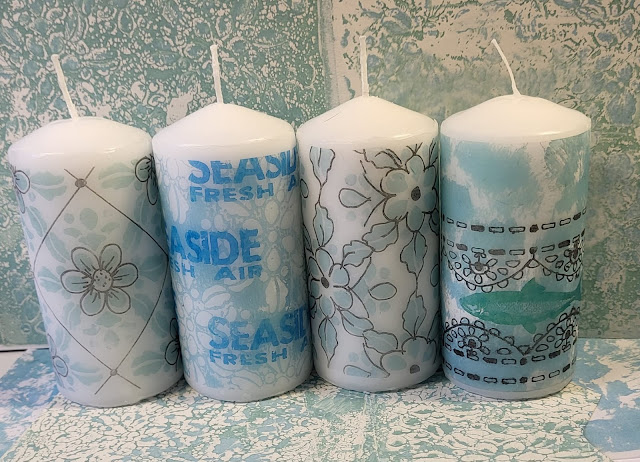
I like to create useful practical items, I enjoy upcycling, I love making things that will make the owner smile and this little make turned out to be no exception because with all of that in mind, I have made... candles! Let's take a closer look.
I've wanted to add some candles to my bathroom for a while so I grabbed some pillar candles, stared at my stencil, stamps and paints, and then back to my candles for about 15 mins whilst having numerous ideas and not being able to decide.
Then the idea hit me to test all the ideas I had and use a consistent colour scheme to pull them together. No need to choose! So I had the idea, however I decided to sleep on it for a few days, leaving all the items out on my desk to mull it all over. Just in case a better idea comes along... it didn't ( it never does; I have no idea why I procrastinate but I do)
So how do you put you designs on candles? I hear you ask. All will be revealed... But first, I gathered my supplies, as well as an array of coordinated VersaFine Clair ink pads, some PaperArtsy Smoothy and greaseproof paper, and my trusty gel plate, as the future Topic here on the blog is (Gel) Printing!
I started off by having a play session with the Scrapcosy stencil PS106. I had so much fun reverse stencilling, mono printing, drawing through with a fineliner pen and doodling. The paint colours are a perfect marriage, they blend together beautifully.
Just some very clean and simple doodles over the stencil design...
Then out came the stamp set, PaperArtsy Hot Picks HP1111 and some gorgeous colours in Versafine Clare ink (Nocturne, Paradise, Golden Meadow and Warm Breeze). This one ended a bit chaotic, busy and bright! Really loud !
I then toned it down for the next idea, mixing botanicals with nautical stamps over a reverse stencilled background.
I kept on playing and soon I had 4 stunning, colour coordinated but very different masterboard ideas. I printed the 'real' masterboards onto white TISSUE paper.
Once I had selected a section of the tissue design I liked, I wrapped it around my candle, and then wrapped the lot in greaseproof paper and held everything together nice and tight with a crocodile clip.
I then used a heat gun on my bundle until I could see wax starting to melt (watch your fingers those heat guns do get real hot and the clip is metal!)
You then simply unwrap the parcel and as if by magic, Ta Daaaa, your design is beautifully and seamlessly embedded into your candle. Seamless.
This is a nice and easy way to created unique homewares or one-off gifts for friends and family. Its also a great way to recycle old pillar candles that have seen better times. To clean up a old weary, dusty pillar candle or a tatty charity shop find, place it on a heat resistant plate and use the heat gun to lightly melt the exterior wax while rotating the plate (watch your fingers again!). Before the wax fully dries, polish the candle lightly with a piece of greaseproof paper. Its a perfect way to prep before adding your designs!
I hope I inspired you to try some candle decorating of your own!
Jayne
Facebook: The Craft Planet


4 comments:
Beautiful candles and fabulous idea 💡
Many thanks x
Fab u lous
Thankyou
Post a Comment