Monday, 21 July 2025

Memory Box with Tracy Scott Products {by Floss Nicholls}


Hi everyone, nice to be back with you again...It's Floss here with you today.

This year on the blog, we have free reign to do a deep dive into a PaperArtsy product ranges of our choosing. For this post I have been exploring Tracy Scott's products...it was not easy choosing which products to work with as she has so many beautiful designs!

Today I'm looking forward to sharing with you how I ended up using just two stencils, three paints, some tissue paper, glue and some thread to create a beautiful memory box.


I started off thinking that from enjoying making a recycled gift bag with a previous PaperArtsy project that I did not that long ago, how a packaging box revamp would be a fun thing to do too...I chose PaperArtsy Fresco finish chalk paints; Vintage Lace, Purple Wine, Prawn and Jade which are all Tracy Scott colours. A set of stamps, which I actually didn't end up using this time, and two stencils PS463 and PS234.


My first thing I like to do once I have chosen my colours is to create a colour wheel so I can see how well they work together and what other colours can be made by mixing them...


I started by using Jade, Prawn and Purple Wine...they created some great muted colours which I tend to prefer to the brighter colours...however, Vintage Lace has got to be one of my absolute favourite colours that PaperArtsy produces and so I created a second set of mixing replacing the Prawn with the Vintage Lace...I painted these around the edges of the wheel as a comparison. I was happier with this selection. I also like to mix an equal amount of all three shades together for an overall outcome which you can see at the base of the page.


I opened the box out flat and started by 'rough painting' the surface using Vintage Lace. I did it this way as I wanted the box to have an uneven painted finish rather than it being all flat and even.  I like texture and surface discrepancies.  I laid the stencils and colours out in front of me as I was starting so that I could get a feel for what might happen next.  I like to work intuitively and let things evolve, I do think that having the supplies out around you lets things happen more naturally.
 

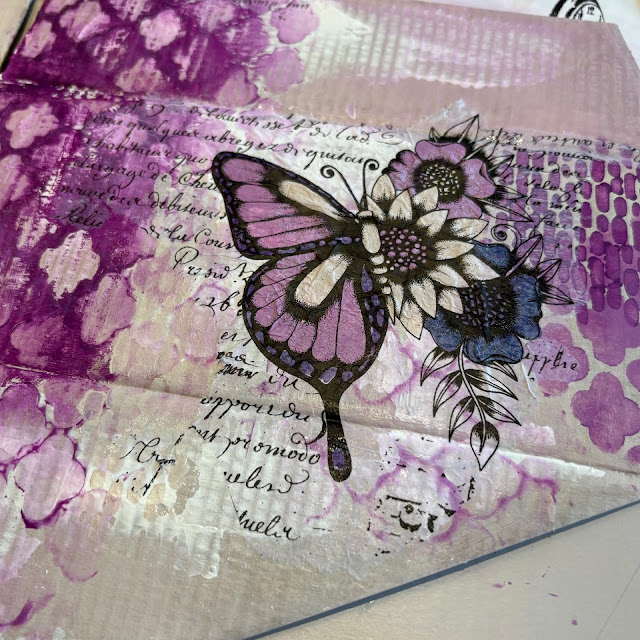
I also love text. I decided that the text would be good to have randomly positioned on the box and so I painted Vintage Lace over the text areas on Tracy Scott tissue paper.

I
I then painted some of the detail in the flowers and butterfly...using the mixed colour palette.


I liked leaving some 'white space in the little hexagons...I'm sure this little section was to come in handy somewhere on the box...


I started using the stencils PS234 and PS463 to add some pattern to the box...I enjoy layering the stencil designs over one another to create more interest.

I own about 9 white pens...they do drive me a little bit nuts when they don't flow nicely...it really is crazy how one can be working one day and not the next! I have had this conversation with so many creatives...anyway, I found one that worked and outlined the little cloud shapes from the PS234 stencil to make the shape pop a little...I smeared some gesso onto the blank spaces as I wanted to distress areas of the box too.


To make it distressed, I painted the Purple Wine fresco finish paint onto the box and whilst it was still wet, applied the stencil over the paint and wiped it back using a wet wipe...this incidentally leaves a fantastic residue on the stencil that when you flip the stencil over and wipe it again will give you a fun ghost like texture...which you should spot on another area of the box...

I decided that parts of the Tracy Scott tissue would look rather beautiful on the box, especially as I was able to paint the reverse and thought those designs would work well with the size of the box too...I let the design fall over the fold score line of the box to allow the base of the box to have pattern and texture on it too.


I continued adding tissue over the distressed and stencilled areas of the box...I softened the edges of where the tissue meets the box using a sponge dipped in the paint so that parts of the tissue became diffused.  I started looking at the stencil shapes and thought that PS463 leant itself to adding stitching!


I colour matched my thread to the Purple Wine but instead of matching a thread to Vintage Lace I found a thread that was similar to Tracy Scott Sunshine, which I thought could be considered a complementary colour as it may sit opposite on the colour wheel...I thought it looked good anyway!

I used my awl to make small holes top and bottom of some of the stencil shaped areas and set about adding thread...


It wasn't until I uploaded the photos that I realise I have missed a little stitch! I must go back and add that in...

I glued the little tab joining the sides together and folded the base shut bringing the 'overspill' designs together on the base which I really liked...

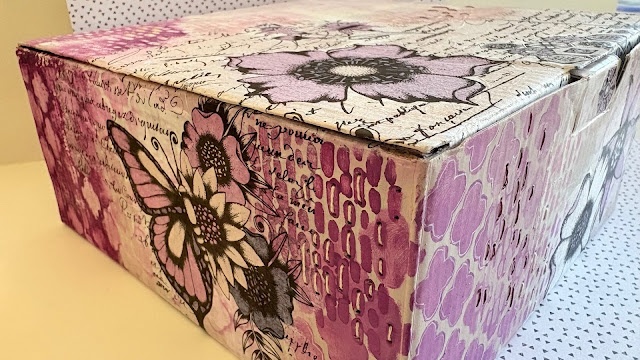
Take a look at each side...and the top and lid interior...have you got a favourite side? I have...I wonder if it's the same as my favourite?


The front...

The back...


and the sides...


and of course the lid...


The inside of the lid was fun too...


I lined the box plain but I do think that it would be more fun to line it with another pattern but something quite simple...if I do I will post it on my social media pages...

I hope you enjoyed reading the blog as much as I did making my memory box...please tag me if you try anything similar.

Much love Floss x x x


Instagram: Floss


Newsletter coming out soon with new class list in East Sussex UK for August dates...

No comments: