

Hi everyone! Raquel here from scrapcosy. Welcome to my latest release! This one is really special for me, I just passed the 50 stamps mark! I can't believe it! I felt like celebrating this milestone, so I went for one of my favourite themes: flowers, flowers and flowers! Inspired by floral patchwork fabrics, embroidery designs, botanical illustrations and pattern elements combined with my original handwritten poem and some vintage ephemera, I'm bringing you my version of spring at its best. One of my favourite releases so far! I hope you like these too. Let's get started!

Red Rubber Stamps (A5 set)
Price: RRP €23.00 +VAT
Size:5" x 6" (13 x16.5cm)
All stamps are individually trimmed onto cling foam, with a laminated storage/index sheet.
Scrapcosy Set 50 (ESC50)

Every time I see a patchwork fabric with roses I can’t help it, I stop by, I admire it and if I fall in love I need to buy it… It doesn’t matter if I don’t have a project in mind, I’ll just collect it and whenever I come across those fabrics in my boxes or drawers I just feel happy and a smile comes to my face. And if the fabric is amaaaazingly beautiful, then I buy 3 pieces: One for me, one for my mum and one for my aunt (the aunt that made me the patchwork quilt that inspired an entire release a couple of years ago). I feel like I need to share that beauty with the world!
So this is probably why this time I decided to create a design similar to those patchwork fabrics. A stamp set that will let you create your own roses pattern or focal points. I drew it in 2 sizes so it can be a huge roses bouquet that you can decorate with the small flower twigs or use the ready made small one, in case you work at a smaller scale.
And to pair the illustrations, I added a stitch-like stripe, a small sentiment that reads enjoy the moment and part of my poem that appears in ESC51, this time in a typewriter font. I love how the sentiment turned out, by combining those 3 very different fonts (one of them is my handwriting!)). I liked it so much that I repeated that format for the sentiment as well in the other 2 stamp sets.
Now let’s see some inspiration with them.
The mattress pattern
This was the very first sample I made for the release. My first idea was to stamp in blue to create some sort of mattress fabric, and colour everything in blue as well, but it looked a bit boring and I changed my mind color-wise half way through. Although I don’t particularly love the colour combination that I ended with (now I would have stamped all in dark brown instead) I loved the pattern I created and I love to see the big illustration right there in the middle, so I wanted to share it anyway, so you see one possible composition.

I loved the pattern so much that I didn’t know where to place the sentiment. I didn’t want to cover anything! So I ended placing it in one of the corners.

The patchwork fabric
This time I wanted to create a pattern working on the corners of the card and creating a white space inside so I could stamp my sentiment directly on the paper. I wanted a deep rich colour for the flowers so selected some Mattints (Glow, Fern and Lady Bug) and with a very loaded brush I went over all the images very, very generously.
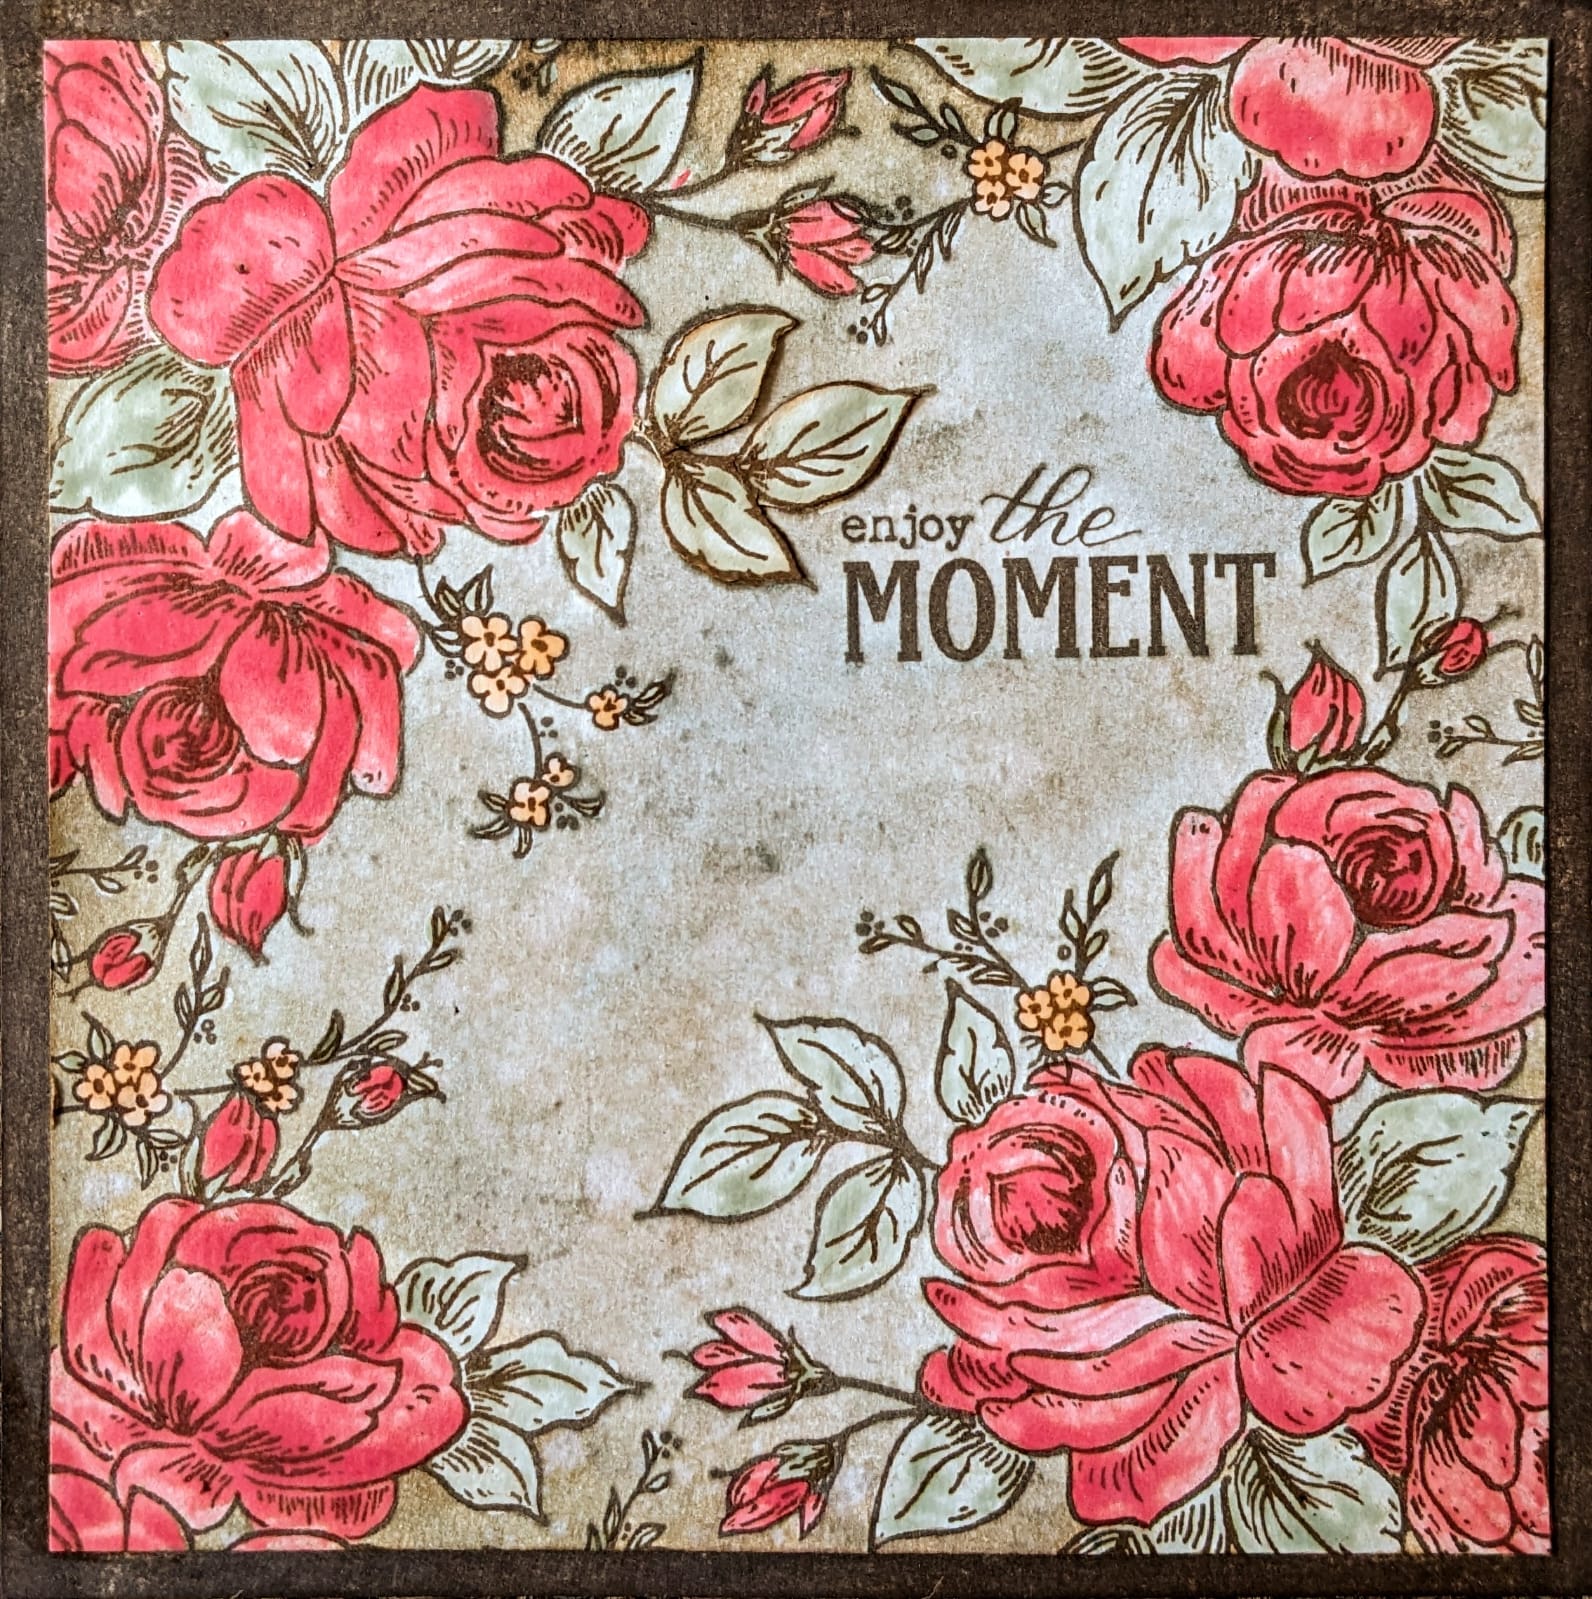
That let me create some shadows once the Mattint dried completely matte. It looks like they’ve been water coloured instead. And once they are sealed, I went with diluted Infusions Green Man all over the white background.

I had a happy accident when I stamped the top left bouquet, the leaves were not perfectly stamped, so instead of repeating all the pattern again, I stamped the leaves separately, fussy cut them and glue them on top. And guess what, I love this card even more now! I would now repeat the same design but I would fussy cut all the roses and leaves and stick them on top to add more dimension. Can you notice the difference between the leaves?

The bookmarks
Last week it was a very special day in my region: Sant Jordi (Saint George), on 23rd of April, it’s the international day of the book and for us also the day of the rose. The tradition says there was a fierce dragon that was going to eat the princess but Sant Jordi the knight appeared, killed the dragon and from the blood of the dragon a rose came out, he gifted the rose to the princess and she kissed him.
In Catalonia the tradition was that boys gave roses to girls and girls gave books to boys, but that was unfair! So we now girls get the rose AND a book, what the heck! LOL… It should really be a bank holiday but we haven't got there yet, so everyone goes out to the street at some point of the day, during work or after work to the different book stalls and roses stalls, and most of the time is warm and sunny day. Definitely, one of my favourite days of the year!

Anyway, all that to say that I felt like creating bookmarks and specially this one with the rose, inspired by this tradition. I fussy cut the rose in heavy smoothy paper and shaped it so it has lots of volume.

I know a bookmark having volume is not ideal, but I don’t mind… you should touch this rose! I drew a couple of lines with a fine liner in brown to turn it into a standalone rose and rearranged the leaves into a shape that I liked.

I stamped the sentiment and the poem underneath to bring the book side of the tradition into the bookmark

In this other sample I stamped the small rose bouquet in the middle.

And I used part of the stitched stripe to delimit that middle zone and separate the title from the poem.

The final bookmark on this set is a very simple, yet pretty, design using the small twigs or branches leaving a gap in the middle to stamp the sentiment.

The twigs can even be joined to make them longer and fill in larger areas. A trick: stamp the element in a clear plastic with Archival ink so you can see how it looks before stamping and so you get the right alignment.

I love how this one turned out too! The vibrant yellow is again the Mattint Glow, applied with a very heavily loaded brush. And for the background more Green Man infusions diluted in water.

And another picture of this one. Sorry, not sorry… Sometimes the simplest designs are the most beautiful ones. Striking and very quick to make.

Scrapcosy Set 51 (ESC51)

I was looking for inspiration in a vintage embroidery book that I inherited from my husband’s grandma’s aunt. This great-aunt was an artist in oil painting, embroidery, sewing, knitting, work with leather (pyrography), glass painting, spoke French and more other things that probably didn’t fit in her business cards that I happen to have. I didn’t know her personally (I wish I had), she died a long time ago, we would have been very good friends. I have a lot of her treasures because when my husband’s grandma (I feel she was my grandma too) passed away, we had to go through her belongings and we found so many things she had kept from her. My husband’s aunt (again, my aunt…) also has some of her treasures and sometimes she gives them to me (more on that subject on ESC52 intro) because both of us love these things and she loves sharing too.
Well, back to the embroidery book: I found a very beautiful composition with daisies which kick started this design. I wanted a similar design so I drew it and then I thought it would be nice to have it in an extended version and also with a line, so I kept on drawing, editing and all, and then at some point I realised I had a garden full of flowers! So that inspired me writing a poem. As you know, English is not my mother tongue, so after a couple of drafts and with the help of Leandra and Alison Bomber (my saviours! Thanks so much, ladies!) the poem was good to go, so I wrote it with a quill, in 2 different formats, since it’s not exactly meant to be read, it’s supposed to add texture and elements into your compositions. Like the mini dots I included at the bottom.
Additionally I added that vine and other little elements that can be used to create beautiful patterns as you will see. You’ll need to be brave, though, since some of these patterns require cutting the rubber stamps into smaller pieces!
Within the garden
The design of the line is great to create a square card like this one.

I’ve completed the design with the flower bouquet in the middle and the sentiment.

I fussy cut the design and mounted it on a background created with the poem and the mini dots. And that background has a frame again decorated with the mini dots.

I loved this blue-brown colour combination that much that I wanted to reuse it for the rest of the samples too!

The poem
I wanted to create also a sample where the poem could be read in full, so I created like a book layout with a space for the illustration.
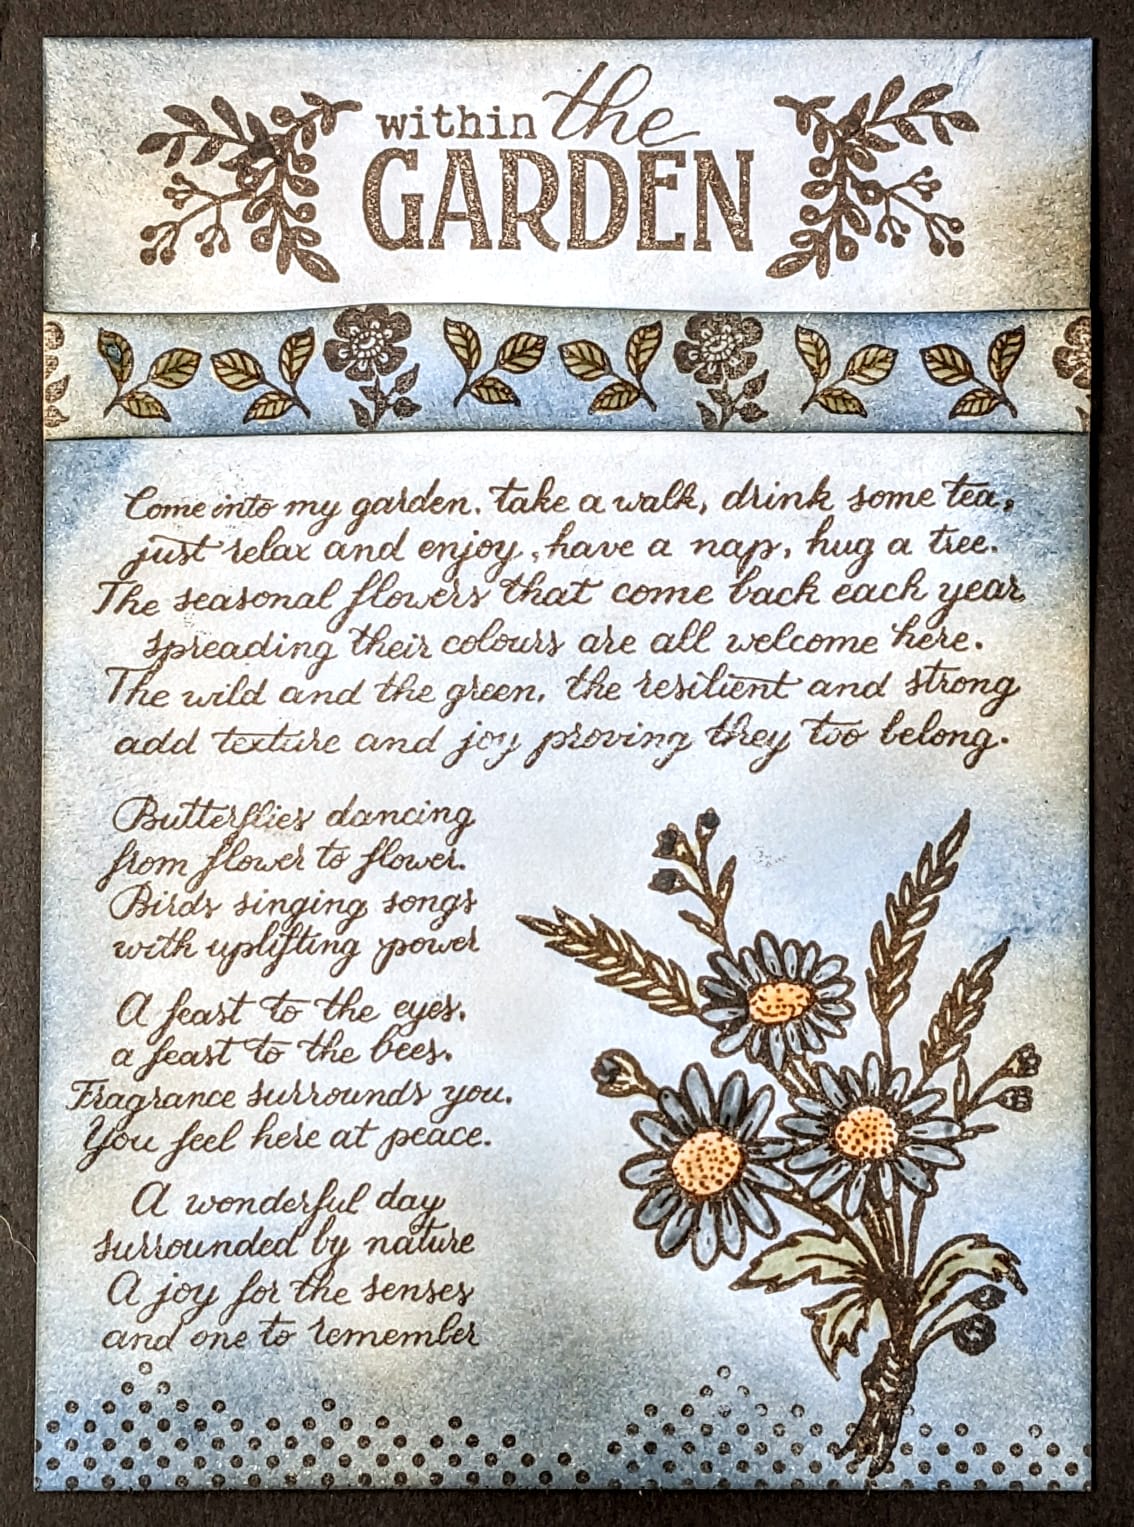
I created a ribbon with 2 of the small elements to divide the title from the poem. And with other little elements I decorated each side of the title in a symmetric way.

Here are other couple of examples of patterns that you can get with the little elements.
If you don’t dare to trim them further, the ones that are side by side of the landscape poem can be repeated to create a pattern like this:

And if you trim them all, you can be as playful as you want, here’s another sample. And once these patterns are created you just need a sentiment in the middle for a quick and beautiful card. Consider stamping each element in a different colour for a more cheerful pattern.

The garden bookmarks
Again, I felt like creating bookmarks. This set is specially good for small projects like these.

The flower design with the line creates a beautiful separation, for a more dramatic result

The flower design without a line allows for a more organic look

And in this third design I just wanted to show you how you can use the vines to create like a diamond shape pattern where you can stamp a small element in each centre, in this case the mini flower. If you just stamp the vine it looks odd, but once you stamp the flower the design lands beautifully.

Scrapcosy Set 52 (ESC52)

I love a peony. I illustrated this flower inspired by a watercolour illustration on a botanical book. Then my (husband’s) aunt gifted me a wooden box that belonged to her great-aunt (that artist I mentioned in the previous stamp set) which has an engraved flower. It’s so beautiful! I needed to share it, so I drew my version of it and I’m not entirely sure which flower it is. Do you recognise it? It looks to me like a magnolia, but I think it’s something else because the branch is long and the flower in the box is painted in light pink. I decided to pair these beautiful flowers with other elements I love: a butterfly, sentiments and vintage ephemera. It’s a very useful and complete set. I love it all!
One with Nature
These flowers are really easy to fussy cut. I coloured them again with Mattint Lady bug (light touch this time) and Mattint Fern for the leaves, and repeated Green Man Infusions for the background. On this first sample, the stencil PS468 is featured in that background, used with Grunge Paste. More about that later.

I did the same thing with this other card, but instead I used PS470 stencil. I'll give more details about this sample later on. I'll just say for now that I love both this flower and this background!

Follow your dreams
This empty frame is perfect to either stamp a sentiment or the butterfly. Or in this case, if you cut the frame, you can enlarge it and fit both the butterfly and the sentiment on top, which covers the cut.

It’s a very cute little card layered upon different backgrounds. The grungy one is featuring PS469, which you'll see later. I love it!


PaperArtsy Stencils {Regular}
Price: RRP €5.64 + VAT
Regular Size: 6.5" x 7" (16 x 18cm)
Robust 250 micron mylar designed to offer longevity, deep texture and easy clean up
PaperArtsy Stencil 468 (PS468) by Scrapcosy

I love that PaperArtsy lets us design large stencils. That lets me fit more than one pattern on each of them. For this one I wanted a similar element from ESC51 that could be repeated all over. I chose a bended mini branch and I combined it with the triple dots. And since I love dots, I added a dotted background too.
One with Nature
As you’ve seen before, these 2 patterns combine really well together. I love using grunge paste through the stencil. It adds a very grungy look, specially when you pour in watered infusions and let them rung through. This is again Green Man infusions

For the bottom part I did the same technique but I applied 2 layers of watered infusions (dry first layer and apply the next one for a more intense colour). When working on a grunge pasted design and then applying infusions and water, make sure you don’t touch the grunge paste until it dries again, otherwise you may ruin the beautiful pattern! I wish I had divided the 2 stencil sections with a lace, but I had already glued the flower when the idea came out, so maybe next time...


This is a very useful set. These 3 designs can be repeated over and over to create bigger backgrounds and the dots part can be combined with one of the other 2 to create another pair of different backgrounds. Combine grunge paste with ink or 2 different ink colours to get many different variations with just one stencil.
Find Peace inside you
Here I combined the 4 petal sort of flower in blue with the dots in brown. Imagine those dotes in grunge paste instead to add more texture and volume.

The background was so vibrant that I decided to keep it very visible by just placing a couple of butterflies from ESC52 and the ribbon on ESC50 with the sentiment on top.

Follow your dreams
You’ve seen this sample before. I love the background you can get with this design when you apply grunge paste through the stencil, let it dry and then add watered infusions on top.

If the design doesn’t stand out, it’s because you need a more concentrated colour. Add another layer of infusions!

PaperArtsy Stencil 470 (PS470) by Scrapcosy

I wanted to create a design full of flowers that could be used either as a stencil or as a mask. And I paired it with a second design that is more grungy, based on stitches that resemble circles and then I thought of adding more stitch like designs on each side, that could help creating borders.
Flower background
When I created this background I didn’t want to cover it! It’s so beautiful! So I decided to take the flower from ESC52 and place it on one side so the design could still be admired.
Same with the sentiment, down left, so it covers as little as possible but at the same time it helps grounding the flower.

I love how this little card turned out. You can repeat it over and over and just by changing the colours of the infusions or the flower it would look completely different.

Enjoy the moment
Here I just used the stencil with distress inks to create an interesting and deeper background. I used blue ink for the flower part and brown ink for the stitch section at the bottom.

Here the circles actually resemble X’s. Since I used this time distress inks for the background, I flicked and spayed some water to create some texture on the background and I also stamped pieces from the poem in ESC51 for the same purpose.


That was all from me today. I hope you liked the release and I hope you make beautiful things with these stamps and stencils. I would love to see and share your creations, so make sure you tag me on social media if you use them!
An a HUGE thank you to the PaperArtsy crew, as always, for making these stamps and making all this creativity possible!
You can see more and visit me at...
Instagram: https://instagram.com/scrapcosy/
YouTube: https://www.youtube.com/c/scrapcosy
Blog: https://scrapcosy.com/
Facebook: my profile https://www.facebook.com/raquel.burilloperez
YouTube: https://www.youtube.com/c/scrapcosy
Blog: https://scrapcosy.com/
Facebook: my profile https://www.facebook.com/raquel.burilloperez
And this is my Scrapcosy’s crafty party Facebook Group, for everything Scrapcosy.
Come and join me! Share all your creations with everyone in the group! https://www.facebook.com/groups/scrapcosygroup/
You can find all my books listed here, they are available in Amazon:
PaperArtsy Stockist List

Our stockists are your go-to source for all PaperArtsy products, and we suggest that you also use the PaperArtsy People Facebook group to source a retailer in your country. Many are members of our FB group and will happily share links to their online stores.
Australia
Bev's Cross Crafts, Spreyton, Tasmania bevscrosscrafts
Crafters Cupboard, Berwick, Victoria crafters cupboard
Hillbilly Scrappin, Nikenbah, QLD hillbilly scrapping
Memories on the Murray, Murray Bridge, SA memories on the murray
Natalie May Scrapbooking, Dover Gardens, SA natalie may
Scrapbook Superstore & More, South Penrith, NSW scrapbook superstore
Austria
Stempel Wunderwelt, Wilhering, stempel wunderwelt
Belgium
Cart N Scrap Art, Antwerp, cart n scrap art
Créatelier Caracolle, Liège, createlier caracolle
Canada
Boutique Scrapbook Tendance Inc, Quebec, Qc, scrapbook tendance
Clipper Street Scrapbook Company, Langley BC, Clipper Street Scrapbook Co
Glitter & Ink, Belleville ON Glitter & Ink
Paper Art Creations Inc, Leduc, Alberta, paper art creations
Re.defined, Kentville, NS, redefinedforyou
Scrapbook Centrale, Dollard Des Ormeaux, Quebec scrapbook centrale
Scrapbook Centrale, Dollard Des Ormeaux, Quebec scrapbook centrale
Scrap Addicts, Edmonton, Alberta scrap addicts
Scrap and Bean, Edmonton, Alberta scrap and bean
Scrapbooking Fairies, Drayton Valley, Alberta scrapbooking fairies
The Paper & ink Boutique, Calgary, Alberta paper and ink boutique
Denmark
Hobbyboden Scrapworld, Samso hobbyboden
Finland
Korttipaja, Istunmaki Heidin Korttipaja
Klemmarikellari, Turku Klemmarikellari
Piia Paper, Kittilä, Piia Paper
France
Emispheres Eurl Ruy Montceau,38300
Fée Du Scrap, Saint Sébastien-Sur-Loire, fee du scrap
Horizon Créatif, Ste Jalle horizon creatif
Katzelkraft, Ingwiller katzelkraft
Kerudoc Creation, St Yvi kerudoc creation
Le Grenier des filles, Pierre Benite
Page de scrap, Saint Pavace, page de scrap
Passion Scrap, Vieux-Conde, Passion Scrap
Scrap by Jo, Saint-Orens-de-Gameville, 31650 Scrap by Jo
Toutencolle, Dun sur Auron toutencolle
Germany
Papier & Feder, Owschlag, papier & feder
Stempeloase Munich, Munich stempeloase
Stempelfee Shop, Hilden stempelfee shop
Stempellaedle, Stuttgart, stempellaedle
Tue Was Di Liebst, Bayern, Tue Was du Liebst
Greece
Decoupage, Vergina
Italy
Pezze E Colori, Lissone, pezze e colori
Piccole Passioni, Siena, piccole passioni
Piccole Passioni, Siena, piccole passioni
Japan
La Wadao, Odawara, Kanagawa, la wadao
Tiny Dots, Funabashi-shi, Chiba tiny dots
Netherlands
De Hobbystudio, Genemuiden, de hobby studio
Doe@ding,Spijkenisse doe @ ding
Hobbycompleet de Duif, Leeuwarden hobby compleet
Stamptable, Roosendaal, Stamptable
Norway
Hobbykunst, Oslo, hobbykunst
Puerto Rico
Paper Boutique, Fajardi Paper Boutique
South Africa
Kcraft imports Ltd, Centurion 0014 kcraft
Spain
Cien por Cien Manualidades, Barcelona, 100 x 100 manualidades
Ideas 10 Manualidades Y Scrapbook, Bilbao ideas 10 manualidades/
La Sonrisa Creativa, Valencia, la sonrisa creativa
Les Coses de Raquel, Barcelona
Scrap & Papers Experiences, Barcelona, scrap papers experiences
United Kingdom
Art from the Heart, Harrogate, Yorkshire art from the heart
Crafts at The Malthouse, Herstmonceux, East Sussex, crafts at the malthouse
Countryview Crafts, Potton, Bedfordshire countryview crafts
Loobi Crafts, Leighton Buzzard, Bedfordshire, loobi crafts
Procraftynation Ltd, King's Lynn, Norfolk Procraftynation
Sir Stampalot, Peterborough, Cambridgeshire sir stampalot
Stampers Grove, Springbank, Lilliesleaf, Melrose,Scotland stampers grove
The Artistic Stamper Craft Store, Faversham, Kent the artistic stamper
The Forget me not Kraft Kabin, Rochford, Essex, The Forget Me Not Kraft Kabin
USA
Artistic Artifacts, Alexandria, VA artistic artifacts
Artistic Studio Creations, Fayetteville, Georgia Artistic Studio Creations
Craftiness, Chatsworth, CA, craftiness
Everything Scrapbook & Stamps, Lake Worth, Florida Everything Scrapbook & Stamps
Frantic Stamper, Oregon frantic stamper
Free Heart LLC, Denver, Colarado, free heart llc
Joggles, Coventry, Rhode Island, joggles
Messy Papercrafts, Temecula CA Messy Papercrafts
PaperCraft Clubhouse, Westbrook, Connecticut, papercraft clubhouse
Roadtique Boutique, Hilton NY
Runaway, Art & Craft Studio, NE Salem, Oregon runaway
Scrap-A-Latte, West Babylon NY scrap a latte
Scrapbook-N-Memories, Harrisonville, Missouri Scrapbook N Memories
Simon Says Stamp, Columbus, Ohio simon says stamp
Topflight Stamps, Irmo, South Carolina topflight stamps
If you are interested in becoming a PaperArtsy stockist contact Dounia@paperartsy.com for more information
PaperArtsy Links
Facebook Group PaperArtsy People
Facebook Page PaperArtsy
Twitter twitter.com/paperartsy
Instagram instagram.com/paperartsy
Pinterest uk.pinterest.com/paperartsyhq
YouTube youtube.com/user/PaperArtsy


No comments:
Post a Comment