Saturday, 17 September 2016

NEW PA PRODUCTS {by Kay Carley}

Hi Everyone, Leandra here with some amazing new stamps by Designer {Kay Carley}...

Kay has been a very busy lady this year with her TV commitments, teaching AND designing, plus we see her gorgeous work featured in magazines regularly. 

I am sure you will be thrilled to see another flower set that works so well with her earlier release this year, AND a wonderful Christmas themed set too!

So lets take a closer look at the actual stamps...


I'll hand over now to Kay who will introduce her new products, and share with you a few ideas. Enjoy and don't forget to leave us your comments!

~ Leandra

Hi everyone, Kay here to show you my newest stamps designed for PaperArtsy.

As you can see from the photos above I have designed another flower sheet to add to my first two sheets from earlier this year. This time the stamps are based on poppies and daisies with some useful extra elements like the sprig of bobbly flowers a couple of smaller butterflies and some tiny flower heads which can be stamped onto the grass if you wish to make a small flower border. The stamps on this sheet have been sized so that they can easily be used in conjunction with my first two releases and have purposely been designed with straight stems so that the stems can be bent and positioned onto your stamping block before stamping out therefore increasing their versatility for different compositions.


I personally love snowflake stamps so when asked to do a winter based stamp sheet I just had to do one with lots of snowflakes on it! Again, I wanted them to be versatile so I have designed them in all different sizes so that they can easily be layered to create stunning snowflake backgrounds plus I have added two different sized curved garlands which can be repeatedly stamped to create layers of hanging garlands to suspend the snowflakes from. To do this I have included two straight dotty based stamps - I also had in mind that they could double up as stems (which again have been designed 'straight' thus allowing them to easily be manipulated and bent to the left or right or even 'wiggled) so that you can turn the snowflakes into snowflake flowers by stamping the dotty lines as stems and adding the snowflakes on top of them! I am sure that as you are all SO creative that you will find lots more you can do with this sheet too!!


Project One: Enjoy Every Moment

Tonight we start with an 8x8" card (using EKC03) which would also look great as a framed picture.


Step 1: Background
Using a damp sponge wedge, I dabbed and scribbled Guacamole, Zucchini, Limelight and Blue Glass Fresco Finish paint over a 7x7" Smoothy card panel then lightly dabbed watered down Snowflake Fresco Finish paint over the panel to 'knock' the colour back a bit. 

Next I sponged Snowflake around the edges of the panel and then used it through Lin Brown's PS001 Stencil.


I added some layers of stamping using the leafy sprig stamp with Archival Leaf Green, the grass stamp with Archival Fern Green and the flower stamps with Archival Jet Black.


Step 2: Feature
I then painted all the imagery using Fresco Finish paints in Snowflake, Yellow Submarine, Tango, Cherry Red, Little Black Dress and Hey Pesto and added a white butterfly by stamping and embossing the larger of the two butterflies using VersaMark and White Detail embossing powder and painting with Snowflake, Blue Glass, Yellow Submarine and Little Black Dress.


Step 3: Embellishing
I really like to add 'layers' to my stamping to create depth to a composition so I added more of the leafy sprigs - this time in black ink and afterwards stamped and embossed the bobbly flowers with Gold Twinkle embossing powder to add both depth and sparkle. I nearly always like to add some 'shadowing to my imagery which I chose to do with a mixture of green Distress Markers and as you can see, after creating a painted panel to stamp my words, I chose to add colour to them using some of the Fresco colours that I had chosen to paint my flowers with.


I embellished the panel even further after mounting it onto a card blank by adding some Diamond glitter glue and a couple of gold gems!


Extra Notes: This was my very first play with these stamps and I am really looking forward to creating more things with them. I especially want to see what the poppies will look like in pinks and lilacs and I really want to create a set  of framed flower compositions using all three of my flower stamp sheets!


Project Two: Let It Snow!

Next up is a 7x7" card using my snowflake based stamp sheet (EKC04) combined with Darcy's PS031 stencil which was just perfect to add a background of hanging chains! (Thanks Darcy!!)


Step 1: Background
I began by doing my 'normal thing' of dabbing and scribbling some Fresco Finish paint onto Smoothy card with a damp sponge wedge - this time the colours I chose were Moonlight and Dolly Mix. Then I randomly stamped the largest snowflake using Cloud White VersaMagic and the slightly smaller snowflake with Spring Pansy VersaMagic. I stencilled the 'hanging chains' using Darcy's PS031 stencil using Eggplant and then Dolly Mix and stamped the 'garlands' using Bougainvillea and Amethyst Fresco Finish paints. I masked off the bottom section of the card and sponged on Eggplant Fresco Finish and heat set it, then moved the mask down a bit and sponged over watered down Dolly Mix and Moonlight Fresco Finish paints.


Step 2: Feature
Along the base of the panel I stamped the snowflake swirl and repeatedly stamped the small solid flower along the Eggplant strip using VersaMagic Cloud White. Then I stamped and embossed more garlands using a Silver Twinkle embossing powder. (Unfortunately this did mean that I lost some of the detail especially when I used it for the snowflakes.) As I knew that I would be using the Silver Twinkle embossing powder for my snowflakes I realised that they wouldn't stand out from the background like they would if I'd gone with a dark colour so to help them be more prominent I positioned the snowflake stamps in turn onto the panel and lightly drew around them in pencil and then painted this 'rough snowflake' in with Moonlight to 'block out' the background. After heat setting I stamped and embossed my snowflakes and chains and  painted them with Bougainvillea, Eggplant and Beach Hut Fresco Finish paints. To blend where I had blocked out some of the background I dabbed watered down Dolly Mix around the embossed snowflakes.


Step 3: Embellishing
After looking at the colours I decided that I didn't like the Amethyst coloured garland so instead I dotted Bougainvillea and Eggplant over it which I liked much better. To 'balance' the panel I stamped and embossed the words along the base with the same Silver Twinkle embossing powder and then lightly painted over the letters using the same colours as used for the snowflakes. Next my white gel pen came out to play to add to the chains and also some doodled lines.


Once again I shadowed around all my main imagery this time using a Weathered Wood Distress Marker. (It's amazing how this makes a difference!) Plus to finish it off I just had to add a tiny little border of Beach Hut along the base of the panel and then applied touches of Stardust glitter glue!


Extra Notes: Although I liked that my snowflakes sparkled with the use of the Silver Twinkle embossing powder I was rather disappointed that I lost a lot of the detail of the snowflakes so when I next have a play with this sheet I will need to think of a 'twinkly/sparkly' alternative but I haven't decided what that is yet!!


I really hope that this has given you some inspiration as to how these stamp sets can be used and I would love to see what marvellous ideas and creations you come up with and  produce using these two brand new sets.

Kay x

My upcoming teaching gigs...

You can find Kay on...
Facebook: https://www.facebook.com/kaycarley.designer/
Twitter: https://twitter.com/carleycards
Instagram: https://www.instagram.com/kay.carley/
Blog: http://kaycarley.blogspot.co.uk


The sparkly princess, Kay has come up trumps again with these great stamp plates. We have been trimming these beauties like loonies so that our stockists could have these ready for you to buy from them this week, and I was itching to know what Kay would conjur up!

Love those chain garlands for snowflakes, and can see how a bit of clear glitter glue will add just the right accent to them! And the flowers have so many stamps on the plate, you will love creating wildflower gardens I am sure!

All these stamps are available now from your favourite PaperArtsy stockist, as you know,  we urge you to support your local independent retailer.

Below is a list of the retailers who have already got these new releases in stock ready for you to buy NOW!

Enjoy! And well done Kay!

~Leandra

PaperArtsy Stockists around the world with our newest stamps are....

United Kingdom
Artist Trading Post, Powys, Wales.
Artworks, Nottingham.
BellaCraftsEastleigh, Hampshire.
Birds in the Barn, Marks Tey, Essex.
Blade Rubber Stamps, Bloomsbury, London.
Clacton Arts and Crafts, Clacton-on-Sea, Essex.
Countryview CraftsPotton, Bedfordshire.
Craftylicious, Bury St Edmunds, Suffolk.
Crafty Ideas, Studly, Warwickshire.
Keep On Crafting, Bury St Edmunds, Suffolk.
Loobi Crafts, Leighton Buzzard, Bedfordshire.
Out of the BlueChipping Sodbury, Bristol.
Papermaze, Ipswich, Suffolk.
Rowantree CraftsCarnforth, Lancashire.
Simply Craft, South Glamorgan, Wales.
Stampers Grove, Edinburgh.
That's Crafty, Romford, Essex.
The Artistic Stamper, Faversham, Kent.
The Craft Barn, Merstham, Surrey.
The Craft Den, March, Cambridgshire.

Continental Europe
Expression-Hobby, Marcinelle, Belgium.

Kerudoc Creations, St Yvi, France
Toutencolle, Dun Sur Auron, France.

Stempelfee-Shop
, Hilden, Germany.
Stempeloase Munich, Munich, Germany.

Marte, Savona, Italy

Creafine
Papendrecht, Netherlands.
Bianca's Toko, Drenthe, Netherlands.
Hobbycompleet de Duif, Leeuwarden, Netherlands.
Leuke Stempels, Nijverdal, Netherlands.

Cien por cien Manualidades
, S.L, Barcelona, Spain
Manu Tam, Madrid, Spain.

Big Time Stempel
, Gockhaisen, Switzerland.

USA/ Canada
Artistic Studio Creations, Fayetteville, Georgia.
Frantic Stamper Inc, Eagle Point, Oregon.
Kept CreationsWhitman, Massachusetts.
Scrap and BeanAlberta, Canada. 
Simon Says Stamp, Columbus, Ohio.
Vintage in KC, Johnson, Kansas.

UAE
Paper Lane, Dubai, UAE.

Asia/ Pacific/ Africa
Tiny Dots, Chiba, Japan.

Mandy's Cards, 
Taipei, Taiwan

Crafters Cupboard Pty Ltd,Berwick, Victoria, Australia.

Scrapbook Studio
Jeffreys Bay, South Africa.
Stencil Art, Gauteng, South Africa.

Friday, 16 September 2016

2016 #17 Abstract Flower Garden {by Anneke de Clerck}

 2016 Topic 17: Making Marks
Hi everyone Anneke here.   
I'm happy to be back here tonight with a post about "Making Marks". For this topic I've created a spread in my Art Journal using some of my favorite supplies such as Grunge Paste, Fresco Finish Chalk Acrylics and Kim Dellow stamps. During the process I'll show you a few ways to add marks. I worked with a skewer, paint markers and stamps but I did the stamping without ink or paint... 
I love making marks, it's a simple way to add interest to my spreads!
Let's get started.


1. Making marks with a skewer
I started by applying an even layer of Grunge Paste to the pages with my palette knife. I randomly scratched vertical lines into the paste with a wooden skewer.


2. Making marks with stamps
Next I pressed several stamps into the wet paste. I used stamps from the EKD 01 and  EKD 02 set. Love this "stamping without ink" technique :) 

EKD 01
EKD 02 
I did one page at a time and let everything air dry before moving on to the next page. I wanted to avoid messing up the finished (wet) page while working on the other.


I continued by coloring the spread with Fresco Finish Chalk Acrylics Mermaid, Nougat, Buff and Snowflake. I prefer to paint with my fingers but of course you can use a flat brush if you like.


Next I added a layer of glaze to the spread. I put a puddle of Fresco Finish French Roast on my palette, mixed it with the same amount of Golden Acrylic Glazing Liquid. I applied this mixture to the spread with a big flat brush.


I let this layer sit for a few minutes, then wiped it back with baby wipes. I used a lot of wipes in order to remove most of the paint. Love the way the glaze seeped into the carved lines. This technique highlights all the marks I've made beautifully.


3. Making marks with paint markers.
I added details to the spread with a big white paint marker. I stamped rows of rectangles with the marker.


I used smaller acrylic markers to put on contrasting orange and fuchsia marks.


I decorated the spread with a collection of flowers from the EKD 01 stamp set. I stamped the flowers on Ranger watercolor paper using Archival Ink Jet Black and colored them with Ripe Persimmon and Picked Raspberry Distress Ink using a water brush.


I did some black stamping randomly.


To finish the spread off I added details with a black fineliner and a white pen.


I hope you enjoy playing in your Art Journal as much as I do. In my opinion an Art Journal is the perfect medium to try things out, to exercise, to experiment...without worrying to much about the outcome.

For this spread I worked on/in Grunge Paste but you could easily replace this by modeling paste, heavy gesso or even a thick layer of paint. 
As the PaperArtsy stamps are perfectly cut out (the cuts follow the shape of the image) and the rubber is deeply etched they are perfect to use for this mark making = stamping without ink technique. Just make sure to rinse your stamps immediately after using them on Grunge Paste, paint or gesso.
Stamping in wet Grunge Paste can't go wrong. Not happy with the result? Take your palette knife, apply a fresh layer of paste and start all over.

So pick your favorite mark making tool/technique and join the challenge. I would love to see what you come up with! 

Thanks for stopping by!
Anneke
Pinterest :anneke1
Instagram :somefiddlingonthekitchentable
Facebook :anneke.declerck

Thanks for joining us Anneke, I love the ink-free stamping. Grunge paste is just the perfect medium for mark making. The French Roast in the marks highlights them brilliantly and makes a great backdrop for the bolder focal images. ~Darcy

We would love to see how you interpret this Making Marks topic by linking what you make to our 2016 Challenge #17: Making Marks, on this page HERE.
All of our bloggers love to see your twist on their ideas,  particularly if you were inspired directly by their post. 
All links go in the draw to win a £50 voucher to spend on products of your choice from the PaperArtsy online store. The Making Marks link will close 17:00 (London Time) Sunday, Sept 18th 2016. The winner will be announced 2  hours later at 19:00.

Wednesday, 14 September 2016

2016 #17 Inky Cards {by Ruth Mescall}

 2016 Topic 17: Making Marks

Hi everyone Ruth here.

Tonight I'd like to share with you this evening a post where I've made marks using black ink, mixed media paper and some different tools, before dipping my fingers in paint to make even more marks. The results can be used in anything from journalling, inspiration for faces, encaustic backgrounds or as in this post creating some rather unique cards. The backgrounds are something it's best to make several of in one session and I experimented by using a variety of mixed media paper I had in my stash including watercolour paper. 


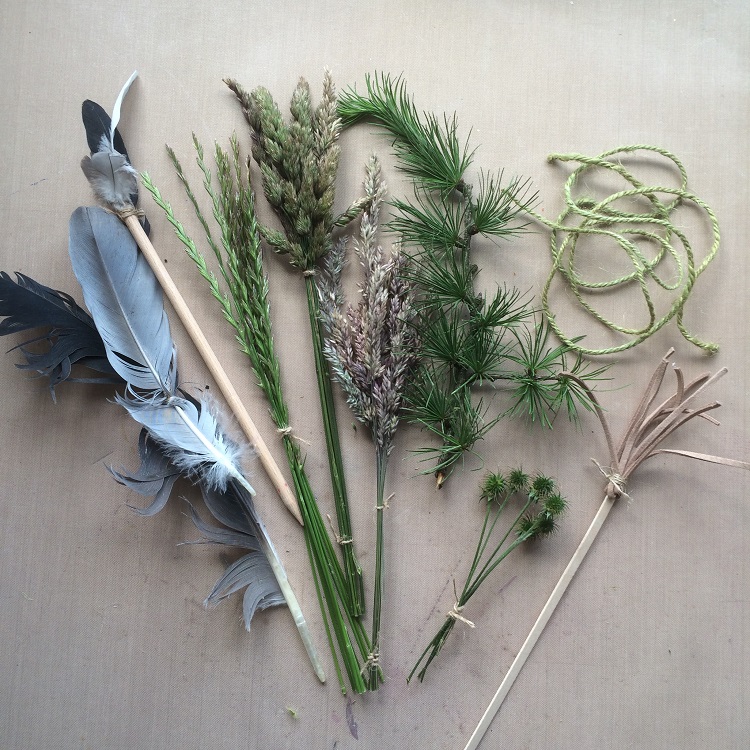
I've been inspired by some recent posts and videos I've seen using natural elements tied together like grasses and feathers and also string and twine. Once you have created your 'tools' dip them in india ink and if you feel brave, close your eyes and use your non dominant hand to drag, splash or pounce across the paper! It's really as simple as that, the results vary enormously and that is when the fun begins in looking at the potential in them.

 Sara Naumann's designs are great for this as they have  a main image and great grungy background images that go so well with this technique. I couldn’t decide which cards not to share with you so at the risk of it being a few photos longer than normal I’m sharing all 4.


Step One: These were my original tools and it’s probably a good idea to just try out on some spare paper how much ink they take and therefore leave on the paper before you ‘play’.


Step Two: My favourite tool however was eyelash thread of which the results are below. I think the left looks a bit 'treeish' and I can see a nose and eyelash and therefore the beginning of a face in the one on the right. I decided to save the one on the right but trimmed down some other pieces as the basis for cards. 


Step Three: If there is too much black for you to work with there are a couple of ways to minimise it. On this card I have a cross type background and I’ve used my fingers to swipe Fresco Chalk Acrylic Paint in Teresa Green and Granny Smith across before using Carribean Sea and a touch of Inky Pool through  stencil PS026, I’ve also splattered some paint as well.


Step Four: I added some text paper and decided to go a little purple by using some of the Crayola Slick Stix though the stencil before swiping with a damp wipe to blend the colours. I stencilled Winter Green through the 3 leaf shape of stencil PS027 onto a piece of Smoothy stamping card before stamping the same image from ESN20 with Gold and cutting out. Further circles were added with a gold pen and stamping the dots stamp form the plate in Snowflake. I used sparkly gold embossing powder for the words and added a little frantage to the background for some bling.


ESN20

Step Five: I used text paper again on this one as it is another way of minimising the black. This time I used a credit card to swipe paint across the card but using tiny amounts of three colours of green at the same time, Teresa Green, Granny Smith and Sage


Step Six: To finish I used even smaller amounts of Lilac and Lavender and the tip of a serrated plastic knife. Using the same technique as before I’ve stencilled the leaves from PS027 in Snowflake before stamping the corresponding image from the stamp plate in White Fire. The sentiment is embossed in gold, and I've added a little white frantage and some doodled lines around the edges.


Step Seven: The ink marks on this had a more stippled effect from using grasses and would be great as a cosmos background for the star stamp from ESN13. Although difficult to see, I stippled Pearl Glaze through the dots of stencil PS026 and added some sparkly embossing powder to it. The circles are stamped with Blueberry that had been mixed with Metallic Glaze to give a gorgeous luscious shiny blue paint. I used the same techniques as in the previous example to add some bling and texture before gold embossing the text stamp on the background and the star on black card.


ESN13

Step Eight: This last one I’m sharing was really the first one I made. The background is made with drops of black ink and then some acrylic red ink drops splashed on a handmade paper. I wasn’t going to use it but once I started to look at the stamps and what might work best with the backgrounds I realised the hearts from ESN11 fitted perfectly over the red splashes and left a lovely black splash for the text stamp.


 ESN11

Step Nine: You’ll notice some paper will give a lovely torn edge and I matted them all on black card before mounting on Kraft cardstock. I find it works better as mixed media paper tends to be off white. Hard to pick a favourite but I do like a bit of bling so I’ll share this close up.


The beauty or joy of this process are the lovely surprises you get such as images you might see in the marks or as in the last card the magic of a stamped image fitting the background perfectly…truly unique as I'm sure you couldn’t repeat this and get the same results if you tried. I hope you might be inspired to make some marks and maybe try different ink colours and other tools I haven’t even thought of. Ruth x


I love the tools you have used for this post Ruth!! Nothing is safe around you!! But what a great way to start on a blank page!!! Thanks for the wonderful inspiration, I'm sure we'll be dripping , scratching and splatting non stop this week! ~Leandra

We would love to see how you interpret this Making Marks topic by linking what you make to our 2016 Challenge #17: Making Marks, on this page HERE.

All of our bloggers love to see your twist on their ideas,  particularly if you were inspired directly by their post. 

All links go in the draw to win a £50 voucher to spend on products of your choice from the PaperArtsy online store. The Making Marks link will close 17:00 (London Time) Sunday, Sept 18th 2016. The winner will be announced 2  hours later at 19:00.

Tuesday, 13 September 2016

PaperArtsy we'll be {Crafting at Ally Pally} this weekend!

Hi all, Leandra here with an informational post to remind you that the UK's biggest stamp-specific show is happening this weekend at Ally Pally. That's Alexandra Palace up on a fabulous North London hill looking down on London city itself. A fabulous spot!

Our stand is going to be jam packed with Crafting goodness galore.

We have NEW PRODUCTS...

Of course we will have all our latest stamp releases from..

Everything Art

Kim Dellow

Jo Firth-Young (Flowers and Christmas)

Linda Brown

Seth Apter

Emma Godfrey

Tracy Scott

...and our new product announcement for this Saturday....(you'll have to wait for that!)

Plus we have loads of other products on our stand, for example: 
  • Stencil Girl
  • Crafters Workshop and 
  • Donna Downey stencils, 
  • Gels and mediums from Golden, Prima, Ranger, Dreamweaver, 
  • Tim Holtz and Finnabair embellishments, 
  • Lots of crafting tools of the trade, 
  • Wonderful Watercolours, 
  • Blingy rub ons from Christine Adolph, 
  • Seth Apter products from Impression Obsession, Spellbinders, Stencil Girl Products and of course 
  • All things PaperArtsy....
We have DEMOS...
Leandra and Emma will be demoing in the main, but of course, you should expect some guests dropping by too!. Expect lots of ideas with paints, gelli plates, of course stamps. We also have lots of Donna Downey stencils watercolour products, and our own infusions. 

Then there will also be Seth's new paints, and we were so inspired by Seth Apter's visit last weeeknd that we will deffo show you ideas with his product line as we have his stamps, dies and stencils to share with you!

We have Make and Takes...
All the Make and Takes over the weekend will be run by Kim Dellow (www.kimdellow.co.uk) and she will be covering lots of different techniques using lots of different products.

Saturday Morning: Autumn-Inspired Wood Block
Play with Fresco paints, Lin Brown's new stamps and Christine Adolph adhesive rub-ons/ foil to make an autumn-inspired home décor piece....

Saturday Afternoon: Cute Tape Dispenser
Decorate a wooden tape dispenser with Tracy Scott and Kim Dellow stamps and add layers of colour with Fresco paints, a bright and useful item for your workdesk...

Sunday Morning: City-Living Canvas
Get grungy with layers and a Seth Apter-inspired canvas board using all of his latest stamps and stencils with Fresco paints....

Sunday Afternoon: Take Note!
Make a bright and beautiful notebook by decorating a mini, wooden-covered notepad with paints and stamps from Emma Godfrey, Kim Dellow, JoFY and maybe even someone else that you haven’t seen yet *wink*.

Crafting at Ally Pally is this coming weekend, Saturday September 17th 10:00-17:00, and Sunday September 19th, 10:00 - 16:00. 
Venue: Alexandra Palace. 
More details here.

We hope to see you there!

Leandra

Monday, 12 September 2016

2016 #17 Make Your Mark Tote and Journal {by Lynne Moncrieff}

2016 Topic 17: Making Marks


Hi everyone, Lynne Moncrieff here this evening (Adorn) to share a project featuring mark making. 

Knowing I would be working with JOFY stamps, I thought it would be fun to root out some items from around the home that would mimic the style of the stamps. Instead of the markings being stand-alone, I wanted them to blend with the stamping so that looking at the final project, it is not obvious which elements are from mark making and which are rubber stamped. 

As stamping onto fabric has always been a favourite of mine, I was keen to make some marks onto a canvas tote but of course, a tote requires something to be toted around in it, so why not a Journal.

This tutorial features mark making with paint alongside conventional stamping with ink, on a tote with a matching journal.


Step One: After selecting a journal which would be a good size to pop into the canvas tote, I set about gathering items for some mark making, such as:- paint bottle lid, corrugated cardboard, used gift card....


Step Two: With a foam brush, I applied Fresco Finish Chalk mixed with fabric medium to the tote, in a very random fashion. By working in a random fashion it provides a lovely textural quality. 


Step 3: I should point out that along the way, I added to my mark making stash! This was a piece cut from a silicone baking sheet. After mixing Antarctic and French Roast with fabric medium, with a foam brush I applied the paints to the mesh before "stamping" onto the tote. It's a little bit messy on the hands but what is messy hand or two amongst art friends!


Step 4: Mark making continues, using the Frescos mentioned above:- dipping a bottle lid to create individual and linked circles, paint applied to corrugated cardboard provides a lovely textural effect and the blunt end of a bamboo skewer dipped into paint adds a scattering of small dots.


Step 5 Time to incorporate the JOFY14 stamps. With Staz-on Jet Black ink, I stamped small circles and mesh onto the tote, stamping the small circles inside the bottle lid circles.

JOFY14

Step 6 To complete the tote, the word Journal was stamped, with Staz-on, onto a piece of calico, fraying the edges and stamping the JOFY36 mesh before adhering to the tote with Golden Matte Gel Medium. If you have a sewing machine you could machine stitch the label to the tote. Lay the tote aside for the moment.

JOFY36

Step 7 Onto the Moleskine journal, dry-brush Chalk and Nougat with a large foam brush.


Step 8 Dip the bottle lid into paint, "stamping" to create linked circles. Leave to dry for a moment before stamping, with Staz-on, the JOFY small circles. Continue by dipping the blunt end of the bamboo skewer into the paints, gently dabbing the paint to the centres of the JOFY circles. Further decorate the cover by stamping the JOFY mesh stamp and create a border to the cover by dipping the edge of plastic gift card into paint.

Just to add that at times, I "stamped off" paint from the mark making tools before "stamping" onto the tote or journal because the paint was too heavy for the application I was seeking.


Step 9 To finish the cover, stamp Journal onto a piece of kraft painted with Chalk, adding a dot of Antarctic to centre of O. Flip the journal over to add similar markings as for the front cover.


Some of the initial items I gathered did not actually make an appearance onto either the journal or tote however I enjoyed the process of deciding which items would offer the best markings for the project. I now intend to keep a designated box for such items. I hope this tutorial has you seeking out mark making items, you might find it becomes a little bit addictive as you will no doubt unearth a plethora of items from around the home and garden where you can source items from Mother Nature:- leaves, dried flowers, seed pods, etc. Experiment by attaching any suitable items to a brayer. My project is a practical one but consider abstract style wall art, pattern making for backgrounds and of course, remember to be inspired by your PaperArtsy stamp collection as you seek to incorporate them into your mark making art.

Thank you for taking the time to visit this tutorial.

Wishes,
Lynne

Oh I like these Lynne, the neutral shades are just beautiful. I too have a bag of lids and other mark making tools, so useful and freeing to use them. The stamps that you chose work brilliantly with the background marks. Often the smaller and background stamps in sets get overlooked in favour of the bigger more focal images but here you have utilised the supporting stamps really nicely. ~Darcy

We would love to see how you interpret this Making Marks topic by linking what you make to our 2016 Challenge #17: Making Marks, on this page HERE.
All of our bloggers love to see your twist on their ideas, particularly if you were inspired directly by their post. All links go in the draw to win a £50 voucher to spend on products of your choice from the PaperArtsy online store. The Making Marks link will close 17:00 (London Time) Sunday, Sept 18th 2016. The winner will be announced 2 hours later at 19:00.