
2016 Topic 17: Making Marks
Hi everyone Ruth here.
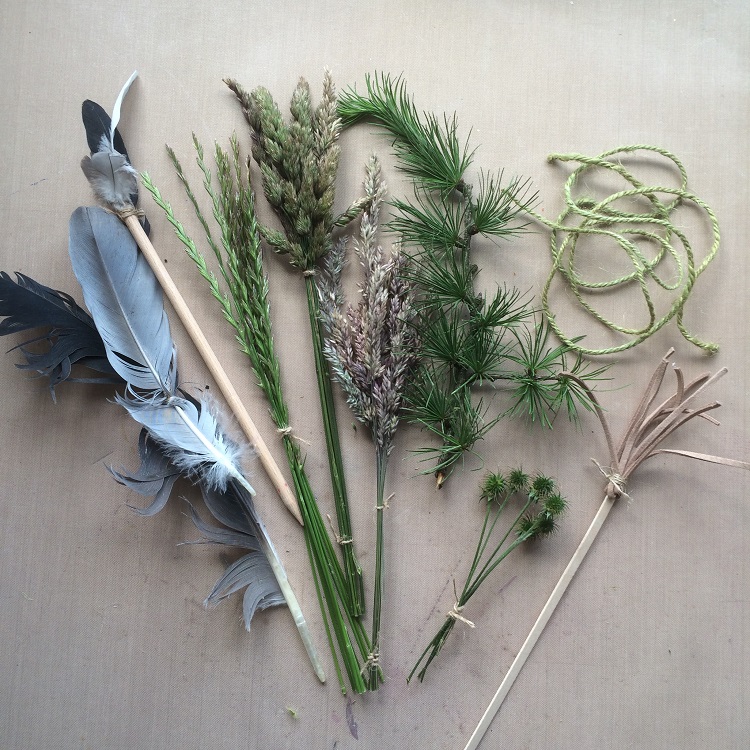
Tonight I'd like to share with you this evening a post where I've made marks using black ink, mixed media paper and some different tools, before dipping my fingers in paint to make even more marks. The results can be used in anything from journalling, inspiration for faces, encaustic backgrounds or as in this post creating some rather unique cards. The backgrounds are something it's best to make several of in one session and I experimented by using a variety of mixed media paper I had in my stash including watercolour paper.
Sara Naumann's designs are great for this as they have a main image and great grungy background images that go so well with this technique. I couldn’t decide which cards not to share with you so at the risk of it being a few photos longer than normal I’m sharing all 4.

Step Two: My favourite tool however was eyelash thread of which the results are below. I think the left looks a bit 'treeish' and I can see a nose and eyelash and therefore the beginning of a face in the one on the right. I decided to save the one on the right but trimmed down some other pieces as the basis for cards.

Step Three: If there is too much black for you to work with there are a couple of ways to minimise it. On this card I have a cross type background and I’ve used my fingers to swipe Fresco Chalk Acrylic Paint in Teresa Green and Granny Smith across before using Carribean Sea and a touch of Inky Pool through stencil PS026, I’ve also splattered some paint as well.

Step Four: I added some text paper and decided to go a little purple by using some of the Crayola Slick Stix though the stencil before swiping with a damp wipe to blend the colours. I stencilled Winter Green through the 3 leaf shape of stencil PS027 onto a piece of Smoothy stamping card before stamping the same image from ESN20 with Gold and cutting out. Further circles were added with a gold pen and stamping the dots stamp form the plate in Snowflake. I used sparkly gold embossing powder for the words and added a little frantage to the background for some bling.
 |
| ESN20 |

Step Five: I used text paper again on this one as it is another way of minimising the black. This time I used a credit card to swipe paint across the card but using tiny amounts of three colours of green at the same time, Teresa Green, Granny Smith and Sage


Step Seven: The ink marks on this had a more stippled effect from using grasses and would be great as a cosmos background for the star stamp from ESN13. Although difficult to see, I stippled Pearl Glaze through the dots of stencil PS026 and added some sparkly embossing powder to it. The circles are stamped with Blueberry that had been mixed with Metallic Glaze to give a gorgeous luscious shiny blue paint. I used the same techniques as in the previous example to add some bling and texture before gold embossing the text stamp on the background and the star on black card.
 |
| ESN13 |

Step Eight: This last one I’m sharing was really the first one I made. The background is made with drops of black ink and then some acrylic red ink drops splashed on a handmade paper. I wasn’t going to use it but once I started to look at the stamps and what might work best with the backgrounds I realised the hearts from ESN11 fitted perfectly over the red splashes and left a lovely black splash for the text stamp.
 |
| ESN11 |

Step Nine: You’ll notice some paper will give a lovely torn edge and I matted them all on black card before mounting on Kraft cardstock. I find it works better as mixed media paper tends to be off white. Hard to pick a favourite but I do like a bit of bling so I’ll share this close up.

The beauty or joy of this process are the lovely surprises you get such as images you might see in the marks or as in the last card the magic of a stamped image fitting the background perfectly…truly unique as I'm sure you couldn’t repeat this and get the same results if you tried. I hope you might be inspired to make some marks and maybe try different ink colours and other tools I haven’t even thought of. Ruth x
I love the tools you have used for this post Ruth!! Nothing is safe around you!! But what a great way to start on a blank page!!! Thanks for the wonderful inspiration, I'm sure we'll be dripping , scratching and splatting non stop this week! ~Leandra
We would love to see how you interpret this Making Marks topic by linking what you make to our 2016 Challenge #17: Making Marks, on this page HERE.
All of our bloggers love to see your twist on their ideas, particularly if you were inspired directly by their post.
All links go in the draw to win a £50 voucher to spend on products of your choice from the PaperArtsy online store. The Making Marks link will close 17:00 (London Time) Sunday, Sept 18th 2016. The winner will be announced 2 hours later at 19:00.
.png)


17 comments:
I love this post Ruth, you've used some amazing things to make your marks!
I love the concept but throwing India ink around also scares me! The mix of black ink and embossing looks great, all beautiful cards Ruth.
Fabulous mark making, Ruth and how superb your backgrounds look with these lovely stamps! These are unique and beautiful! Love them! xx
Fantastic mark making on the backgrounds & the finished cards are lovely.
Crikey Ruth you have really got me thinking with this post. What amazing results you got making marks with some more unusual "paint brushes". Really impressive. Lx
These are fabulous Ruth - great mark making!!
Great explanations, fab ideas, and lovely makes Ruth.....love them. Xx
I think these cards are so lovely! love how you've made such interesting marks but have retained the white space. very lovely
Love your backgrounds, awesome cards!
Fab results. Love the heart card! 😊
Beautiful organic shapes and movement from your natural mark-making tools, Ruth. These are fantastic, right from the naked mark-making with the eyelash thread (?!) - and definitely a face in the one on the right. It looks to me like a wonderfully gnarled old tree god to go with the tree on the left! - all the way to the finished cards. Brilliant inspirational post.
Alison x
Wow! Ruth these are all stunning!! I adore your technique, thank you so much for sharing it with us. I adore creating in this free style, and never fail to see what emerges. It is fun, inspirational and for me personally, very satisfying.
I love how you have used your tools to create such interest and agree Sara's stamps were a perfect choice. Debsxx
Absolutely stunning makes Ruth, a really fantastic way to create very organic artwork
Hugs
Donna xx
How fantastic and so inspiring Ruth x I love the way you have taken the ink and tools to create such unique backgrounds. Each one looks fantastic and the stamps are really showcased.
Might just give this a try as my mojo has gone and this just might encourage him to return
Thank you for sharing this wonderful and inspirational post
Annie x
Fabulous cards Ruth, love all the different things you've experimented with and the effects are wonderful ! Sue C x
Fantastic cards Ruth! Fabulous idea and gorgeous completion. I love the star card the gold embossing is very elegant. xx
Wow, I am blown away by your cards, Ruth!! Love all of the techniques, and thank you so much for the step-outs - so inspiring!! I am in the midst of moving for the next few months - so living vicariously through everyone posting makes - yours is especially fabulous and one I will bookmark! xxx Lynn
Post a Comment