2021 Topic 2: A Pocketful of Sunshine {by Carol Fox}
Oh
what a fab colour palette this is to work with, a wonderful way to use
cool and warm shades, and all of them are beautiful chalky soft-bright colours, not full on translucent bright, so its easy to build those gorgeous layers. Love it! Makes me think of spring just around the corner! And not only
those backgrounds but lovely pockets full of Lovely tags!!
Creating a bundle of items like this is a great way to experiment with
backgrounds, layers and colours, and then at the end everything ties in!
~ Leandra
~ Leandra
Hi everyone, it's Carol with
you today, and I'd like to share with you a pocket tag folder. I have
used bright sunshine colours as I am hoping to be able to go down to
Cornwall this year and I always keep a record of what we do each day,
(how far we walk and coastal paths/beaches visited). I have a sprocket
printer for my camera as I love to keep a photo record too. I have left
the front of my tags fairly flat and plain with this in mind to be able
to add photo's and ephemera too and pop written details on the back. I
have added some stickers and washi made with left over scraps too and a
few decorated paper clips for bulkier items. So I hope this year to come
back with an organised little booklet instead of a purse rammed full of
carpark tickets with scribbled notes on the back.
The finished folder measures approximately 27 x 17 cm and will hold 6 tags comfortably.
I folded a piece of music paper to make a large pocket and stenciled along the bottom folded part using SeaGlass fresco Paint and Stencil PS218 (available exclusively from PA stockists).
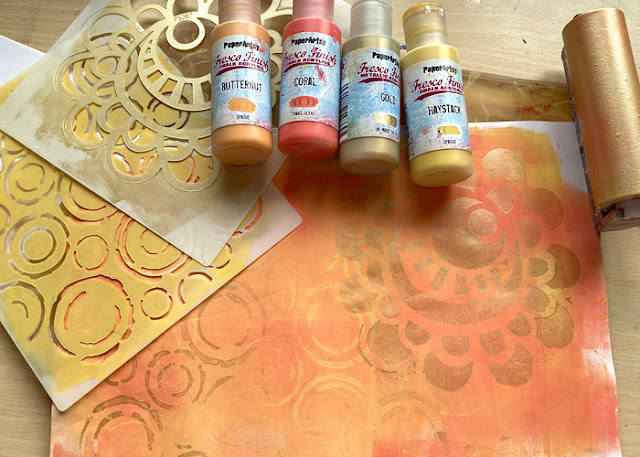
For the back I coloured a piece of copier paper used Fresco Paints in Butternut, Haystack and Coral on my gel plate. Adding a bit of shimmer with Gold and Stencils PS087 and PS203.
Once
I had stitched my back and front papers together I decided I did not
like the pale blue paint and it needed something stronger, so I went
over the stenciled area with the three colours previously used, mixing
as I stenciled to achieve a mottled effect. I did leave some of the blue
showing as a slight shadow in some areas.
I coloured my ribbon tie with Coral Fresco Paint. Swirling it around on my craft mat in the watered down paint.
Once the Coral Paint was dry on my ribbon I added Haystack and Little Black Dress to it through Stencil PS218.
I stenciled and stamped onto the two folded flaps of my book using Seaglass Fresco Paint with Stencil PS202 and Stamp set ESN10 with Black Archival ink. I finished with the word from Stencil PS218 and Little Black Dress Fresco Paint.
My
tags for the pockets I coloured on my Gel Plate and finished them
with Stenciling and stamping, using the same paints and stencils as
before. The only additions to these was the lovely shell stamp set by
Sara Naumann ESN48 and ESN49 which are both from her latest release. (available exclusively from stockists, list here)
I
just wanted to show an extra picture of this tag as I absolutely love
this stamp set, and I was very pleased that I could more or less find
exact matching pencils from my set for the colouring of the sea shell,
so it just stood out enough but still remained part of the background.
I stamped the back of my tags using elements from ESN49
I used up my scraps of ribbon, leftover bits from my Gelli print and stamped odd words from ESN03 and ESN49 to make stickers, washi tape and clips to hold things in place.
I used up my scraps of ribbon, leftover bits from my Gelli print and stamped odd words from ESN03 and ESN49 to make stickers, washi tape and clips to hold things in place.
The
words I put through my sticker maker and the gelli print I added DST to
the back, so they all fold inside my tag book ready to be used.
I
like the way this tag book turned out, it's a bit like a cross between a
journal and a scrapbook. It will be a nice little holiday memory to
have. This one will hold about 6 tags comfortably but the size can
obviously be changed to suit.
This could
be themed: for example for a hen do. it would make a nice memento for
any occasion with photo's added to it. Either way have fun playing
around with ideas.
I can be found at the following places.
Carol x
Blog: http: //gingernonutsbits.blogspot.com/
Facebook: https://www.facebook.com/GingersAlteredBits/
Instagram: https://www.instagram.com/gingernonuts/
Pinterest: https://www.pinterest.co.uk/gingernonuts/
Blog: http: //gingernonutsbits.blogspot.com/
Facebook: https://www.facebook.com/GingersAlteredBits/
Instagram: https://www.instagram.com/gingernonuts/
Pinterest: https://www.pinterest.co.uk/gingernonuts/


What a fun post. Love the colors and the stencils. Thanks for the inspiration.
ReplyDeleteAbsolutely love this wallet full of pockets and tags - wonderful, uplifting colours!
ReplyDeleteAlison x
How wonderful. Fabulous project Carol.
ReplyDeleteAbsolutely fantastic project Carol!!
ReplyDeleteWhat a great idea Carol! I love the colour combinations you have put together for this project ~ Stef
ReplyDeleteThis is truly gorgeous Carol! I have these stamps you’ve inspired me beyond measure. Great design!
ReplyDeleteI love this project so much Carol! WhT a fabulous design and painty background.
ReplyDelete