

A note from Leandra:
I'm super excited, because not only is it an Alison release, but she also has got lots of new colour combinations within her art, and that makes me very very happy! Yes summer does exude colour, and how totally stunning do these samples look loaded with colour!
Alison will be along to share with you LIVE these new products and ideas over in our Facebook Group, 'PaperArtsy People' shortly after this post publishes, and ... don't forget
These stamps are available EXCLUSIVELY from our approved stockists. Please check the list at the foot of this post to find a retailer online or geographically near you, it makes sense to order within your country where possible. Our retailers also endeavour to join the designer's live to share their direct shopping links - this makes it super easy for you to find a store with product in stock immediately.
Hello all, Alison here, and I'm thrilled to be sharing three new stamp sets and three new stencils with you today... and things are getting floral! There are, of course, botanicals and ephemera to enjoy, but with a slight twist on the usual collections (and I'm using the word "twist" deliberately!). There are two flower sets, a whole set of amazing advertising ephemera, and of course lots of lovely words to go with them.
You'll know that I love imperfections so - rather than perfect blooms - our flowers are at that point of final summer loveliness, with decay just around the corner. I'm fascinated by the twisting shapes the petals start to form as they "go over". On each flower set, there are more sketches than usual, exploring that twistiness and imperfection - echoing pages in an art journal where you try to capture a single subject from a number of angles. And I'm also playing with scale so that, given the different size sketches on each plate, you can create depth and distance.
I can't wait to share the ephemera set with you. In the live launch, I'll be showing you some of the real magazines from around 1900 from which I sourced these brilliant adverts. And the ones I've selected for the set are all to do with either words (pens, typewriters) or pictures (cameras, art supplies)!
Of course, the stencils are designed to coordinate with the new imagery, as well as with all the previous botanical sets. They allow you to build layered foliage backgrounds, meadows and fields for the flowers to grow in - though they also work beautifully by themselves.
Enough talking, let's take a look at what I've been making so that you can see these new beauties in action!
Red Rubber Stamps (A5 set)
Price: RRP €23.00 +VAT
Size:5" x 6" (13 x16.5cm)
All stamps are individually trimmed onto cling foam, with a laminated storage/index sheet.
Eclectica Alison Bomber Set 48 (EAB48)


Poppy Portrait
Don't adjust your sets... this is me coming at you with a project using red! With this Summer Poppies Edition, I'm thinking of Welsh Poppies, Californian Poppies and even Shirley Poppies, so you can explore shades of coral, pink and yellow, but for this first portrait, I've embraced the traditional red of the field poppy. The flower heads are painted with layers of Fresco Finish Chalk Acrylic in Cherry Red and London Bus, with Ladybug and Squeezed Mattints adding an extra glow.

You'll see more of it later, but I brought in one of the new stencils for the poppy foliage here (yes, I had the combination in mind when I designed them!). And the poppy heads are wonderful for cutting out so that you can layer them to create dimensional movement - capturing that look of petals dancing in the summer breeze.
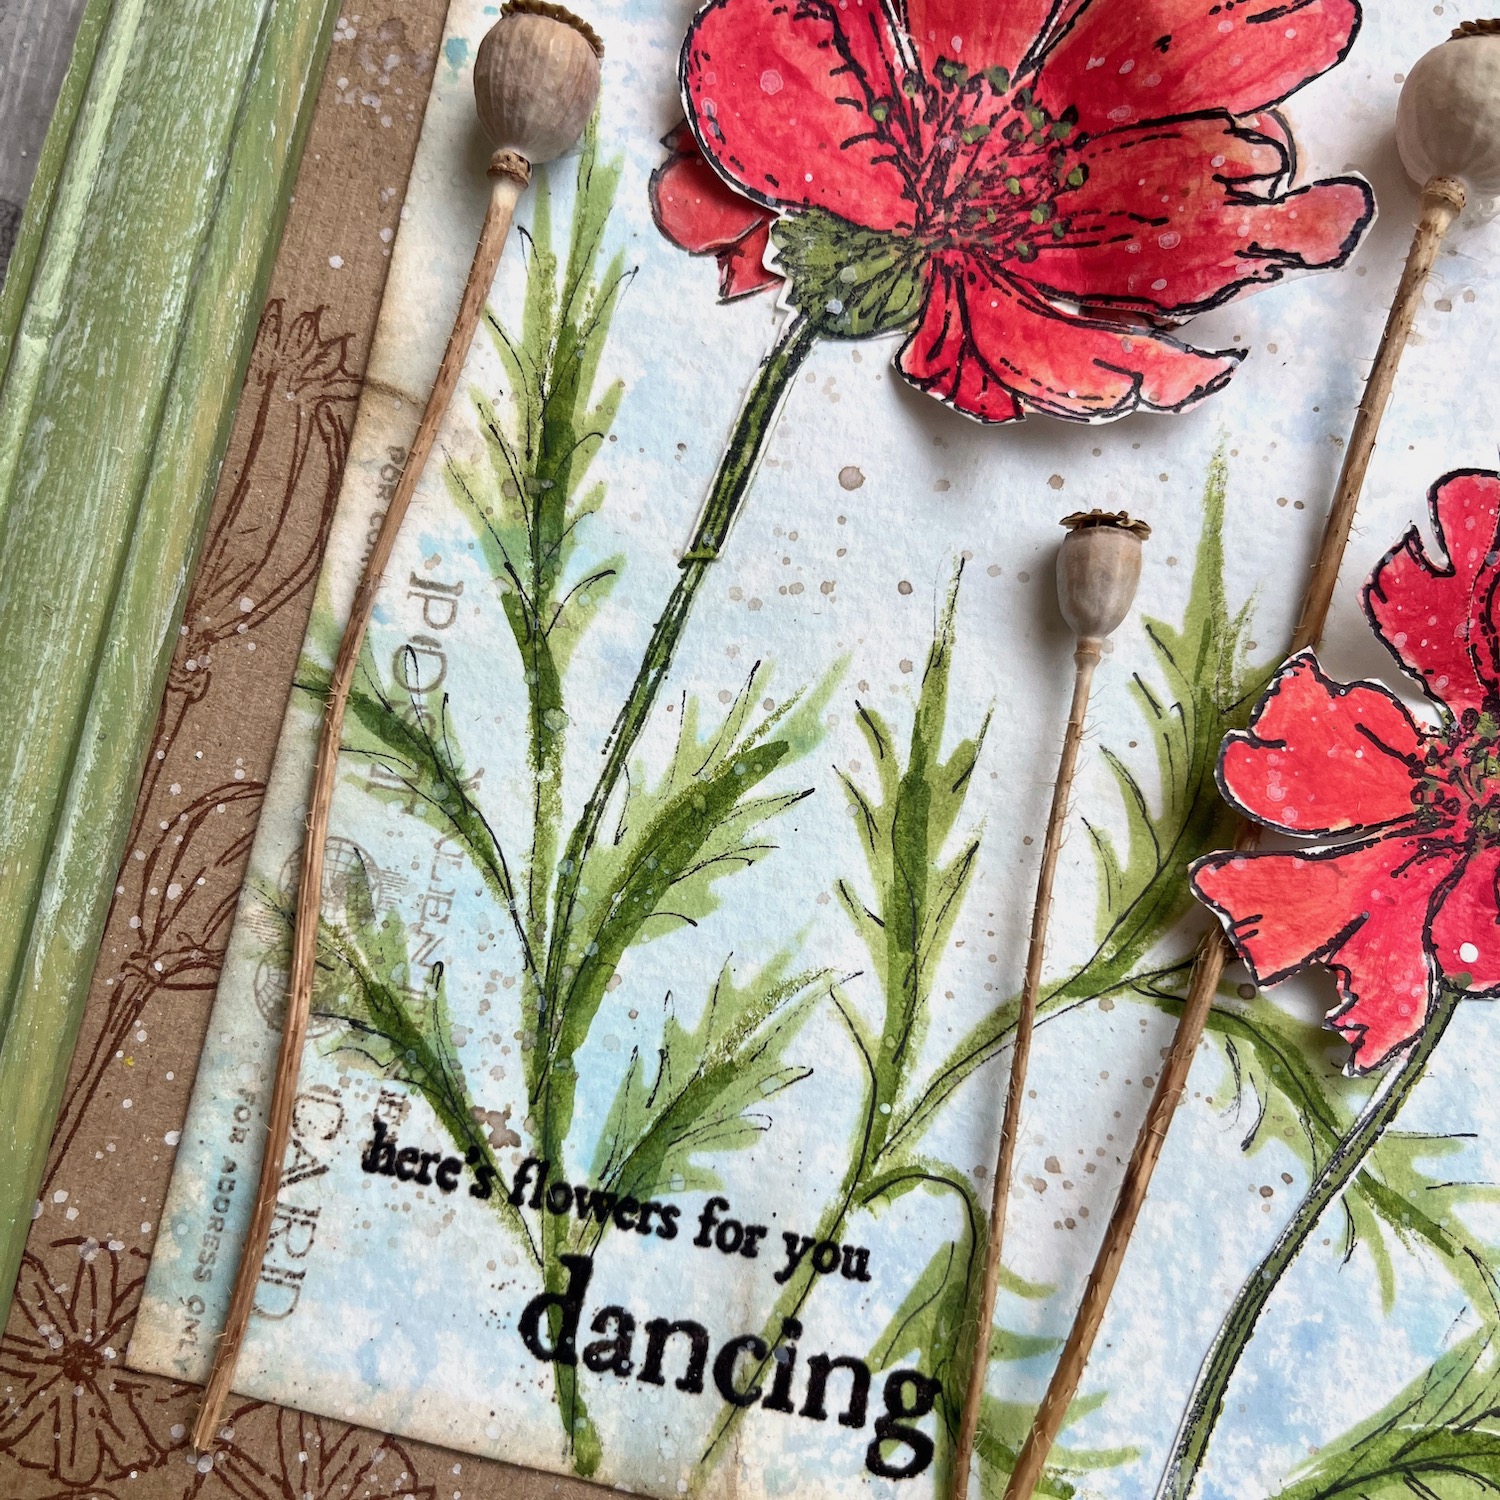
There are small ephemera elements on each flower set. It won't have escaped your notice that I love a bit of postage memorabilia, which adds vintage detail to the background. Did you spot the poppy seed heads from one of my older sets, EAB37 Poppy Edition, in the matted kraft layer? And of course I painted the cheap wooden frame to match, using Fresco Finish Chalk Acrylics in Tinned Peas and Granny Smith with Snowflake dry-brushed over the top.

Ghost Flowers
In case you're suffering "colour-shock", don't worry... it's perfectly possible to play with these stamps using my favourite blues and browns too. Would you like proof? Take a look at these Ghost Flowers... I'll be sharing the technique for these in my upcoming Mini Live in the PaperArtsy People Facebook Group very soon, so watch out for that. If you like, you can craft along to create the misty magic of these subtle blooms.

We won't make the complete card in that session, but the panel is very simply layered over white card, with the words embossed in Primary Bark by Wow. "Here's flowers for you" is from Shakespeare's The Winter's Tale, but it comes from the part of the play set not in winter in Sicily, but in summer in Bohemia (so that's perfect for me, geographically!), and the "dreamy and magical light" is a seasonal fragment from Henry Wadsworth Longfellow's poem Evangeline.

Although I don't often make cards, when I do I can't resist creating a coordinating envelope. (You'll have to watch the live to see the decorated flap on the back of the envelope.) Matching stationery sets were a minor obsession of mine when I was a child. I don't suppose they even exist any more in this age of digital communication.

Sketchbook Poppies
Just a quick peek into my "sketchbook", with my usual first play with new stamps - stamping the entire plate in one go so that I can see what I've designed come to life. With all three large words visible, it also gives you a chance to feel the positivity I'm aiming for with my word choices for these summertime sets.


Eclectica Alison Bomber Set 49 (EAB49)

Coneflower Postcards
I was in two minds about the name of this plate. I have beautiful white/green coneflowers in the garden, but I know them as Echinacea. Then I figured I don't want to give people something so tricky to pronounce, and nor do I want to type that word repeatedly... so Coneflowers Edition it is! These were top of my list on the "twistiness" front. In the live, I'll share my first watercolour painting of a coneflower. It was painted from life - a completely decayed stem, brown and twisted and sculptural and completely beautiful. In fact, I think I may still have the stem itself, even more decayed several years on!

I mentioned in the introduction the idea of playing with foregrounds and backgrounds using the differently sized stems and flower heads. That's part of what I started to do with these postcards, and in order to put some flowers "behind", I cut masks of the two large flower heads out of tracing paper.

You can use any kind of paper to make your masks, but I find that tracing paper is thin enough not to leave a gap when you stamp, and has the advantage of allowing you to see really precisely when you're in exactly the right spot. I'm planning to base one of my regular YouTube videos around this technique soon - so keep your eyes peeled there.

And you'll see I'm really making the most of the postage ephemera with these postcards. I used the postcard "topper", and extended the centre line with a fine marker to create the look of a traditional postcard, divided for text and address - though all of mine is filled with flowers, of course!
I tinted the postage stamps with a few layers of Fern Mattint, which is such a simple way to give them the look of a real postage stamp. And of course the transparent Mattint leaves all the amazing detail of the image completely visible. I love the two sketched profiles on this Czech stamp - so unusual. It was issued in 1956 in commemoration of the 200th anniversary of Mozart's birth.
I tinted the postage stamps with a few layers of Fern Mattint, which is such a simple way to give them the look of a real postage stamp. And of course the transparent Mattint leaves all the amazing detail of the image completely visible. I love the two sketched profiles on this Czech stamp - so unusual. It was issued in 1956 in commemoration of the 200th anniversary of Mozart's birth.

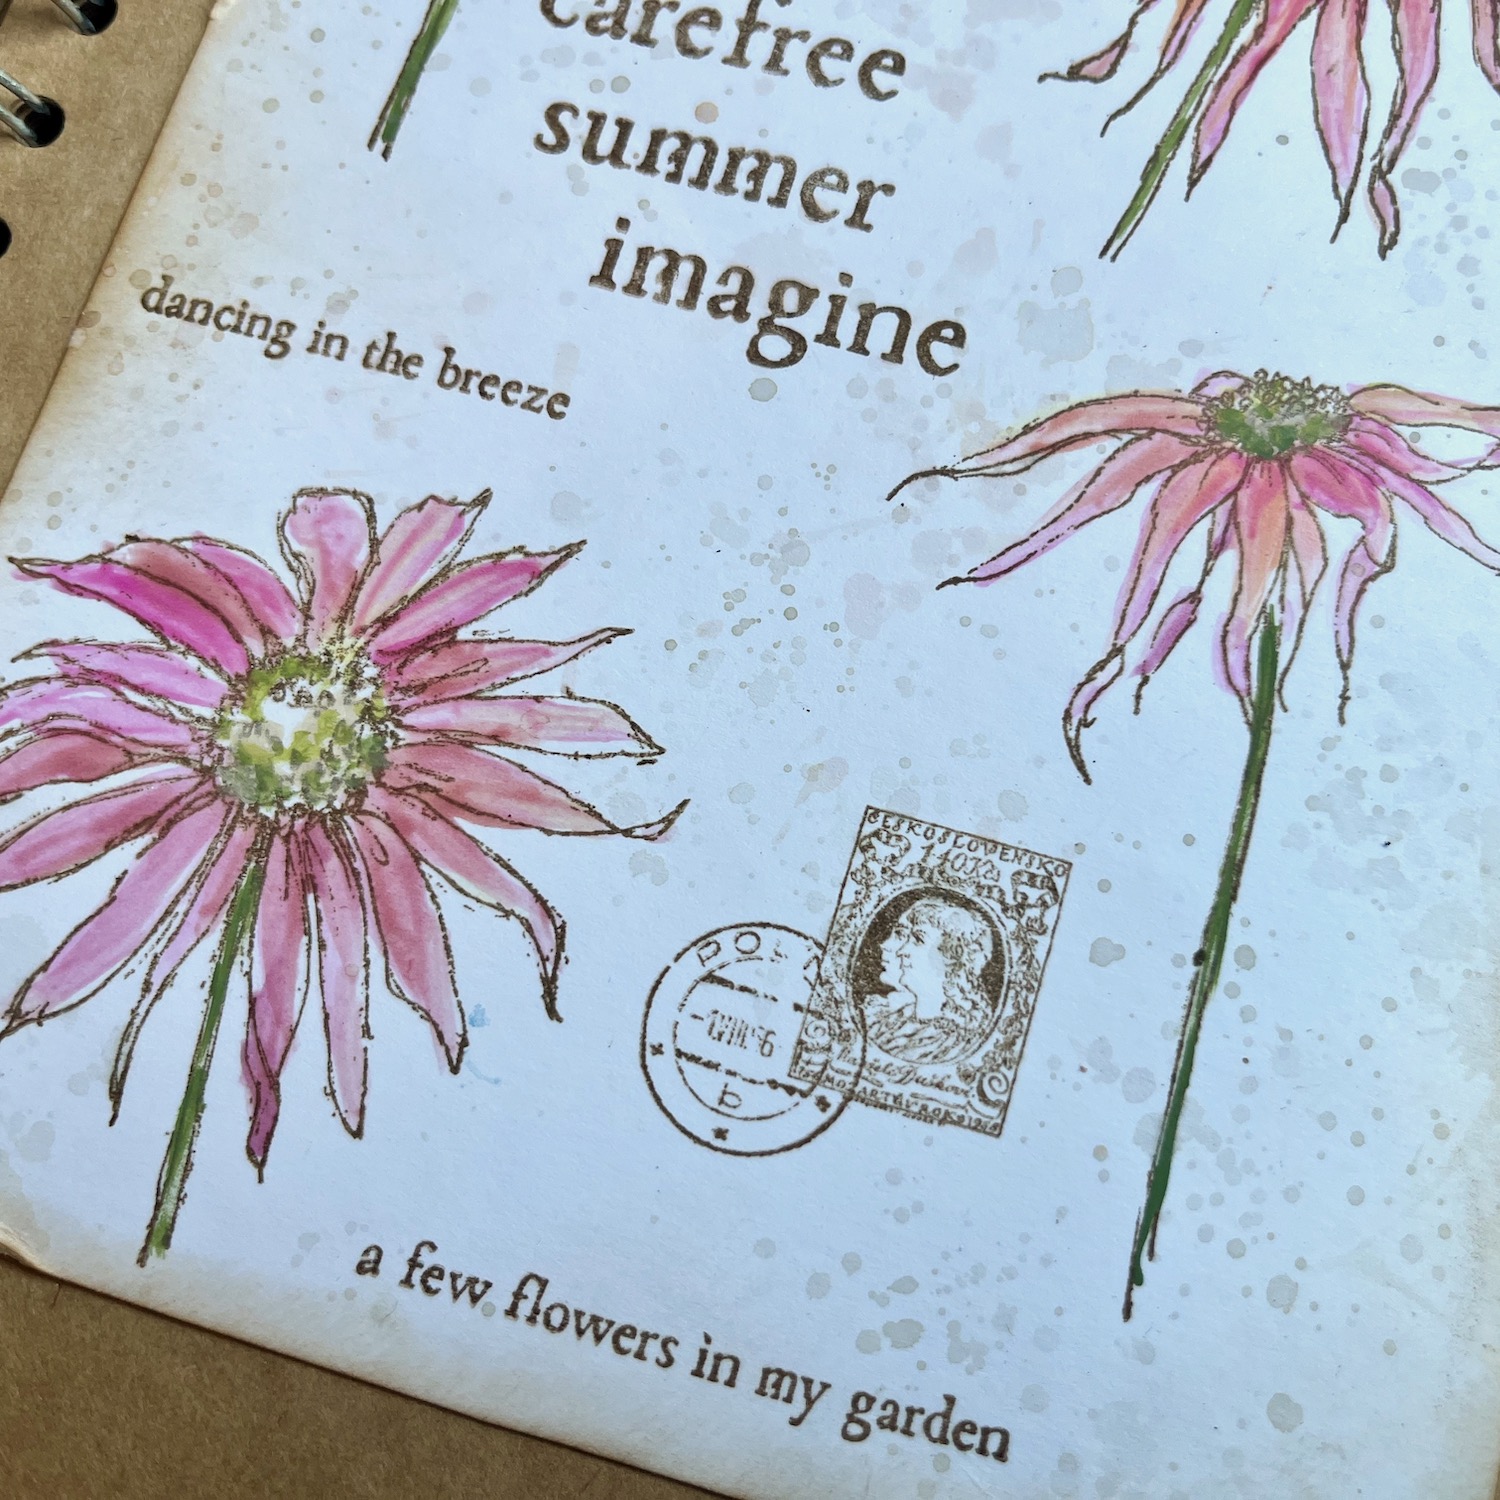
Dancing Daisies
Although coneflowers come in all kinds of bright and beautiful colours (you can go with pinks and oranges and rusts and yellows... just google for images of coneflowers for loads of colour inspiration), my first love will always be the white ones. The centres of the ones I have in the garden start out completely green and then "ripen" to yellow, and the petals also start with a tinge of green before turning fully white - it's a lovely unfurling. As well as white coneflowers, I love that these stamps can also double as a kind of generic daisy-type flower, so they will be really flexible in your summer projects.

Here they are very simply stamped against a summery sky of ink splotches, capturing the carefree essence of "dancing in the breeze" - a phrase William Wordsworth applied to a host of daffodils in his famous poem, but which applies equally well in this case, I think! And again, in one of those rare card appearances, there's a coordinating envelope to accompany the dancing daisies...

Sketchbook Coneflowers
Let's take a quick look inside the sketchbook again, this time for the coneflowers. Given that my art journal is where these designs really started, it seems right they should end up back in a journal! The fragment "with a few flowers in my garden" is by Lope de Vega. The full quote is, "With a few flowers in my garden, half a dozen pictures and some books, I live without envy." Words to live by...

Again, in choosing the larger words, I've tried to find a trio that would be full of light and positivity - important things at the moment. And I think the words work beautifully with those quirky, spontaneous, carefree twisty petals... don't you agree?
Eclectica Alison Bomber Set 50 (EAB50)

Altered Peg Advertising
Obviously, the main joy of a good piece of ephemera is being able to combine it into other projects, adding that special vintage touch. But I wanted to see if I could come up with some ways of letting these ephemera shine all by themselves, starting with these jumbo wooden pegs. Again, these will be coming up in a YouTube episode soon, so you'll be able to see the full process, but it's really very simple.

I took the pegs apart, gave them a coat of Snowflake Fresco Finish Chalk Acrylic - learning some lessons about sanding my surfaces along the way! Then, using various Archival Ink colours, I stamped some of the adverts from this new set. They have really arresting fonts and lettering design as well as some great imagery, and I think these pegs will make brilliant embellishments for 3D projects of all kinds.

The Writing's on the Wall
I also thought that some of these adverts would work beautifully as posters - anyone with a dollshouse, take note! I'm pretty sure a version of these posters will be putting in an appearance in my mother's dollshouse museum, Small Worlds, some time soon. There's already an artist's studio, but I think she needs to create a miniature photo atelier or studio!

The brick texture background is made by spreading some Grunge Paste through the Tim Holtz Bricked stencil. I like to keep it as a rough coat, so that you can still see the book pages glued on in the background. Then I painted my wall with Fresco Finish Chalk Acrylics in Stone, Taupe and Baltic Blue, as well as using some Distress Crayons to build texture.

I love how the Photograph Apparate advert looks like enamelled metal when you stamp it in Night Sky Archival (like those French house number signs). I'll definitely give it a glossy topcoat in future if I want to to create a "metal plate" advertisement.
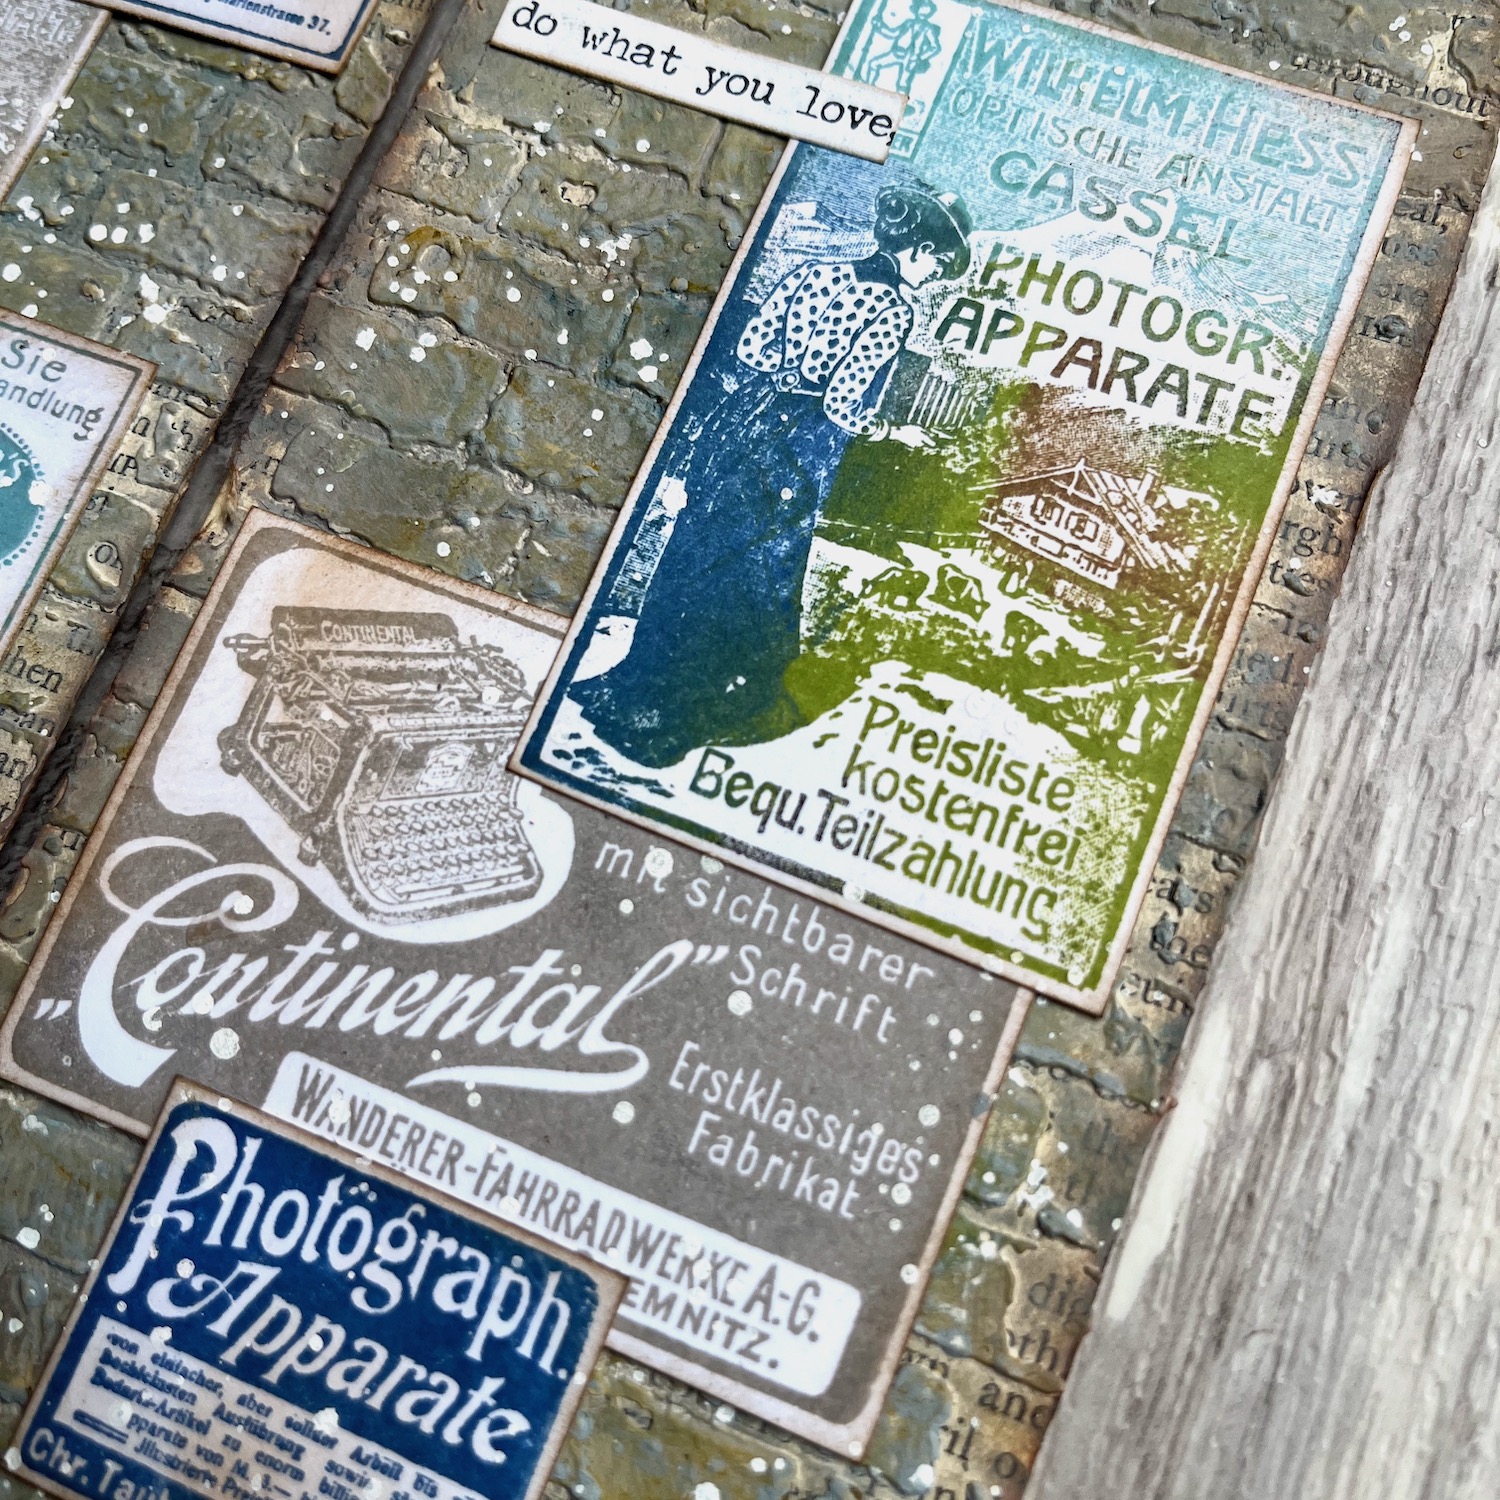
And although I really enjoy the multi-coloured stamped versions, I think these adverts look equally good in monochrome. I can't wait to start using them in projects of all kinds.

Mattinted Ephemera
I did do a first stamping of the whole plate in one go of these too (of course!), but rather than stick it into the journal, I'm keeping these to cut out and use as soon as possible. Or maybe I'll even use the whole sheet as a background, exactly as it is. Laid out like this, it looks just like one of the advertisement pages straight out of the old magazines - as you'll see if you watch the live launch video!

I used Ash and Shark Mattints over some of these adverts to give them that old paper look. I absolutely love the subtle vintage tint you get, without losing a scrap of detail from the imagery. (Do bear in mind that since I stamped these while they were all still on the card backing they come on, rather than on a firm grid block, it's not the best possible stamping in the world across the whole plate... that's my fault, not the stamps' fault. They're completely perfect down to the finest detail when you stamp them with good technique!)

PaperArtsy Stencil 471 Grassy (PS471)

Midsummer Meadow
You may have noticed I've got a bit of a thing for meadow grasses and wildflowers! This stencil adds a couple of grassy stems to the mix which are perfect for layering to create a soft focus meadow background into which you could "plant" some poppies, or coneflowers, or indeed any of the umbellifers from previous sets.

But here they are without any additional stamping - other than a couple of words from the new stamp sets, capturing that summer sunshine glow of warmth - and I think they look amazing just like this.

This is one stem per tag, using a blending tool through the stencil with Wild Honey and Frayed Burlap Distress Inks, over a background of mainly Scattered Straw... but of course, you can combine the two stems for a more detailed, complex look.


Lovely Leaves
Leafy foliage is one of my great delights. Long before I started doing any gardening, I always had house plants (many house plants). One Ficus Benjamina that I've had ever since university is now in my bedroom... tree sized! The little leaves on this stencil are based loosely on ficus foliage, and they're great for adding soft, delicate leafiness to a background.

You can use the whole stem, or you can use one sprig at a time, just to add a few leaves around the edge of a project. Here I've paired them with the EAB42 Winter Grasses, as their long stems reminded me of each other. And the poetry fragments come from the new EAB48 Summer Poppies and EAB49 Coneflower Editions. (I have to confess these were photographed in a rather "dreamy and magical light"... those are dappled shadows falling on the lower part of the tags, rather than extra Pumice Stone inking around the edge!)

This tag pair is so simple, but really lovely, I think (hence the name, Lovely Leaves!). I sponged Stormy Sky Distress Ink through the stencil, and stamped the grasses in Night Sky Archival, all over a gessoed layer of the gorgeous new Script Printed Tissue, a wonderful wordy way to create vintage detail in any background.

PaperArtsy Stencil 473 Pointy Leaves (PS473)

Dancing Foliage
The pointy leaves on this stencil were really designed with poppies in mind, but they'll work just as well for lots of wildflowers (dandelions, for one... so I can see it working really well with some of my earlier umbels sets) or on their own to give some extra foliage texture in any background. Of course, as well as the poppy flowers in the new Summer Poppies Edition, there are also the poppy seedheads from EAB37 Poppy Edition to pair them with...

I love the energy of the pointy leaves, especially with some added scribbly pen detailing. I think it's going to be really useful how you can layer and tilt the leaves to create really bushy foliage around your stems, whether they are poppies in bloom, poppy seedheads, umbellifers, or whatever you want to sketch yourself!

This is actually one of a trio of cards (yes, I know, more cards!) I created using the new stencils with older stamp sets. You'll have to wait for the live and for some Instagram posts to see these other cards in more detail, but it was great fun combining them in different ways.

And speaking of combining things, here are just a couple more quick looks at projects combining the new stamps and/or stencils together...
A Greyer Shade of Pale
Let's be honest, these pale, delicate tags were probably a reaction to dealing with all those reds earlier in the post! But I love the subtle neutrals here (mostly Old Paper and Speckled Egg Distress Inks and Oxides) which really allow the detail of the sketches to shine when you look close up. A touch of white ink, applied with a dip pen, adds subtle highlights to draw the eye.

And it also allows the ephemera to have a moment in the spotlight. The postcard toppers are great added vertically for textural detail.

And the Mozart postage stamp as well as the space-for-a-stamp stamp both give me great delight as elements to add vintage detail to any background.

Words and Pictures
The finale today is a journal page centred on a woman fascinated by different ways of expressing her love of nature... whether through visual or verbal mediums. Is that sounding at all familiar?!

You can see the foliage and grasses in the background - the new stencils layered over the Script Printed Tissue again, with a layer of gesso to soften the tissue first.

And then the Tim Holtz Paper Doll is surrounded by advertisements for writing machines, typewriters, and pens - in case she would like to write poems or books about the natural world - and for paints as well as photographic equipment - in case she decides she would rather capture the magic of nature in pictures, one way or another.

I can certainly empathise with her dilemma, which is why I'm so thrilled to have these new stamp sets - full of both words and pictures - to share with you, so that we can all celebrate nature's glorious summer in as many different ways as possible.
You can see I've already been having a lovely time creating with these new designs, and I can't wait to hear what you think of them. I'm looking forward to seeing what creative journeys they take you on - it's always a joy to watch them transform in other people's hands. I hope you'll love them as much as I do.
As always, a HUGE thank you to the whole PaperArtsy crew for making these stamps and stencils, and for your support, collaboration and friendship on this creative journey. And thank you to all of you for your company here, there and everywhere that I share my work. Happy crafting, all!
Alison xx
You can see more and visit me at...
Instagram: Words and Pictures @w0rdsandp1ctures and Bohemian Home @b0hem1anh0me
YouTube: Words and Pictures
Website: Words and Pictures
Blog: Words and Pictures
Facebook: Words and Pictures
I'm in Germany at the end of September, as part of the Crop am Rhein (Crop on the Rhine) weekend of workshops. I'm teaching a day of classes on Saturday 27th September, and the lovely Barbara Haane of Scrap Impulse will be teaching the Sunday 28th classes. My workshops will definitely involve playing with these new designs, as well as plenty of other PaperArtsy products. You can book for either day or for both, and there's a special crafters' rate at the hotel overlooking the beautiful Rhine river. If you would like to know more, email me at wordsandpictures@alisonbomber.com
PaperArtsy Stockist List

Our stockists are your go-to source for all PaperArtsy products, and we suggest that you also use the PaperArtsy People Facebook group to source a retailer in your country. Many are members of our FB group and will happily share links to their online stores.
Australia
Bev's Cross Crafts, Spreyton, Tasmania bevscrosscrafts
Crafters Cupboard, Berwick, Victoria crafters cupboard
Hillbilly Scrappin, Nikenbah, QLD hillbilly scrapping
Memories on the Murray, Murray Bridge, SA memories on the murray
Natalie May Scrapbooking, Dover Gardens, SA natalie may
Scrapbook Superstore & More, South Penrith, NSW scrapbook superstore
Austria
Stempel Wunderwelt, Wilhering, stempel wunderwelt
Belgium
Cart N Scrap Art, Antwerp, cart n scrap art
Créatelier Caracolle, Liège, createlier caracolle
Canada
Boutique Scrapbook Tendance Inc, Quebec, Qc, scrapbook tendance
Clipper Street Scrapbook Company, Langley BC, Clipper Street Scrapbook Co
Glitter & Ink, Belleville ON Glitter & Ink
Paper Art Creations Inc, Leduc, Alberta, paper art creations
Re.defined, Kentville, NS, redefinedforyou
Scrapbook Centrale, Dollard Des Ormeaux, Quebec scrapbook centrale
Scrapbook Centrale, Dollard Des Ormeaux, Quebec scrapbook centrale
Scrap Addicts, Edmonton, Alberta scrap addicts
Scrap and Bean, Edmonton, Alberta scrap and bean
Scrapbooking Fairies, Drayton Valley, Alberta scrapbooking fairies
The Paper & ink Boutique, Calgary, Alberta paper and ink boutique
Denmark
Hobbyboden Scrapworld, Samso hobbyboden
Finland
Korttipaja, Istunmaki Heidin Korttipaja
Klemmarikellari, Turku Klemmarikellari
Piia Paper, Kittilä, Piia Paper
France
Emispheres Eurl Ruy Montceau,38300
Fée Du Scrap, Saint Sébastien-Sur-Loire, fee du scrap
Horizon Créatif, Ste Jalle horizon creatif
Katzelkraft, Ingwiller katzelkraft
Kerudoc Creation, St Yvi kerudoc creation
Le Grenier des filles, Pierre Benite
Page de scrap, Saint Pavace, page de scrap
Passion Scrap, Vieux-Conde, Passion Scrap
Scrap by Jo, Saint-Orens-de-Gameville, 31650 Scrap by Jo
Toutencolle, Dun sur Auron toutencolle
Germany
Papier & Feder, Owschlag, papier & feder
Stempeloase Munich, Munich stempeloase
Stempelfee Shop, Hilden stempelfee shop
Stempellaedle, Stuttgart, stempellaedle
Tue Was Di Liebst, Bayern, Tue Was du Liebst
Greece
Decoupage, Vergina
Italy
Pezze E Colori, Lissone, pezze e colori
Piccole Passioni, Siena, piccole passioni
Piccole Passioni, Siena, piccole passioni
Japan
La Wadao, Odawara, Kanagawa, la wadao
Tiny Dots, Funabashi-shi, Chiba tiny dots
Netherlands
De Hobbystudio, Genemuiden, de hobby studio
Doe@ding,Spijkenisse doe @ ding
Hobbycompleet de Duif, Leeuwarden hobby compleet
Stamptable, Roosendaal, Stamptable
Norway
Hobbykunst, Oslo, hobbykunst
Puerto Rico
Paper Boutique, Fajardi Paper Boutique
South Africa
Kcraft imports Ltd, Centurion 0014 kcraft
Spain
Cien por Cien Manualidades, Barcelona, 100 x 100 manualidades
Ideas 10 Manualidades Y Scrapbook, Bilbao ideas 10 manualidades/
La Sonrisa Creativa, Valencia, la sonrisa creativa
Les Coses de Raquel, Barcelona
Scrap & Papers Experiences, Barcelona, scrap papers experiences
United Kingdom
Art from the Heart, Harrogate, Yorkshire art from the heart
Crafts at The Malthouse, Herstmonceux, East Sussex, crafts at the malthouse
Countryview Crafts, Potton, Bedfordshire countryview crafts
Loobi Crafts, Leighton Buzzard, Bedfordshire, loobi crafts
Procraftynation Ltd, King's Lynn, Norfolk Procraftynation
Sir Stampalot, Peterborough, Cambridgeshire sir stampalot
Stampers Grove, Springbank, Lilliesleaf, Melrose,Scotland stampers grove
The Artistic Stamper Craft Store, Faversham, Kent the artistic stamper
The Forget me not Kraft Kabin, Rochford, Essex, The Forget Me Not Kraft Kabin
USA
Artistic Artifacts, Alexandria, VA artistic artifacts
Artistic Studio Creations, Fayetteville, Georgia Artistic Studio Creations
Craftiness, Chatsworth, CA, craftiness
Everything Scrapbook & Stamps, Lake Worth, Florida Everything Scrapbook & Stamps
Frantic Stamper, Oregon frantic stamper
Free Heart LLC, Denver, Colarado, free heart llc
Joggles, Coventry, Rhode Island, joggles
Messy Papercrafts, Temecula CA Messy Papercrafts
PaperCraft Clubhouse, Westbrook, Connecticut, papercraft clubhouse
Roadtique Boutique, Hilton NY
Runaway, Art & Craft Studio, NE Salem, Oregon runaway
Scrap-A-Latte, West Babylon NY scrap a latte
Scrapbook-N-Memories, Harrisonville, Missouri Scrapbook N Memories
Simon Says Stamp, Columbus, Ohio simon says stamp
Topflight Stamps, Irmo, South Carolina topflight stamps
If you are interested in becoming a PaperArtsy stockist contact Dounia@paperartsy.com for more information
PaperArtsy Links
Facebook Group PaperArtsy People
Facebook Page PaperArtsy
Twitter twitter.com/paperartsy
Instagram instagram.com/paperartsy
Pinterest uk.pinterest.com/paperartsyhq
YouTube youtube.com/user/PaperArtsy