A note from Leandra:
Raquel has knocked it out of the park with this release. There is so much packed into these spring-summer feeling stamps, I just know you won't want to miss her live reveal! She has a front-door for any season, flowers in bottles, stencils that offer endless combinations, stamps that are super playful and very interactive ... all her samples are just to die for!! Her imagination has run wild with this release and you are going to LOVE it!
Raquel will be along to share her new products and ideas over in our facebook Group, PaperArtsy People shortly after this post publishes. I hope you can drop by for the live, or try to catch the replay. it's nice to hear direct from the designer about the new release and put the face to the name!
For the next 4 months, these stamps are only available EXCLUSIVELY from our approved stockists. Please check the list at the foot of this post to find a retailer online or geographically near you, it makes sense to order within your country where possible.
Hi everyone! Raquel here from scrapcosy. I'm super excited to share with you my newest release for PaperArtsy with 3 stamps and coordinating stencils.
This release is inspired by the frontage of houses in London and the Cotswolds, botanicals, vintage bottles and vintage labels. These designs are hand drawn images that will let you play for hours, creating scenes or bouquets to your heart's content. I had so much fun using these that time just flied. My creativity and inspiration increased with each new sample I created. I've included tons of examples and it may be the release where I've fussy cut the most. I can't help it! I could have masked many things but I love the freedom of arranging all the elements and the feeling of volume I get at the end.
A good tip for this release: on a low mojo day, stamp, colour and cut each image 4 times and store them in a box (or give them as a gift to another paper lover). The day you decide to play with the cut outs beautiful and quick projects will come out of them. It will be an extra dose of happiness for the day, I'm sure. You can create different seasonal scenes for the door by changing the decorative elements and the colour palette. You can create beautiful cards with a vase, a flower and a short sentiment. Just mask the vase and stamp on top for a super quick project.
Before I start I'd like to show you some of the real life elements that appear on the release (see pic below): the bottles, one of the vintage labels and the dried flowers. Fun fact, I used these dried roses, or rather an actual picture of that bouquet, to draw the roses that appear on ESC39 and ESC41, which also appeared in a miniature version in ESC33 a while back. Apart from these vintage beauties, I've included other drawings I've made from pink pepper collected from my new home's garden, an eucalyptus branch I got for Christmas and some imagined flowers and elements. I hope you like it all!
Price: RRP €23.00 +VAT Size:5" x 6" (13 x16.5cm)
All stamps are individually trimmed onto cling foam with a laminated storage/index sheet.
BE STRONG, BE BRAVE
I loved creating that bouquet! I especially love the pink pepper branch, which is so decorative! Although from now on I will also see them as berries... This specific combination of branches is my favourite of this set I think. And the vintage label is gorgeous! I guess that's why it appears in the other set too in different sizes... I just can't get enough...

But as you can see, you can play with the fussy cut elements and create other combinations. This is me playing before creating the sample. Doesn't this one look beautiful too?
THE ROSE
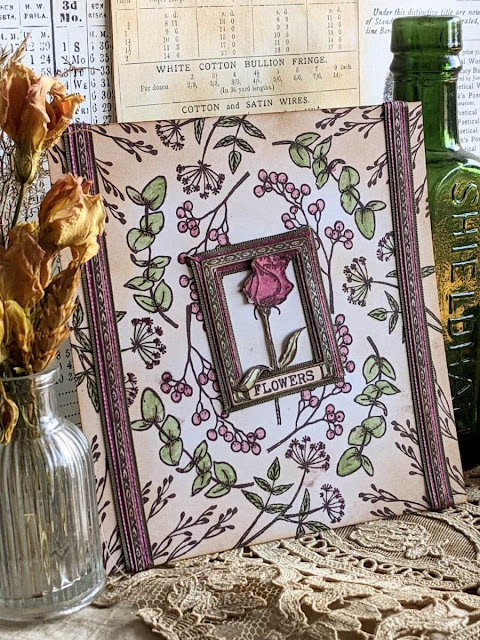
I was not planning to create this sample, it just became. I wanted to do some patterned papers with all the botanical elements and I decided to create like a circular pattern and when I saw the rose in the middle, it was calling for a frame, so I did that. But I let it breathe out of the frame. It almost seems is saying hi! :)
I decorated the frame and the long stripes at left and right with 2 ribbons in pink and green and I love the result! I just cut the word 'Flowers' and glued it on the space of the frame. That space/label will fit all the words in this set.
Using this same concept, you can frame any of the other botanical elements from this set or even from ESC41. It would also work really well with ESC30.
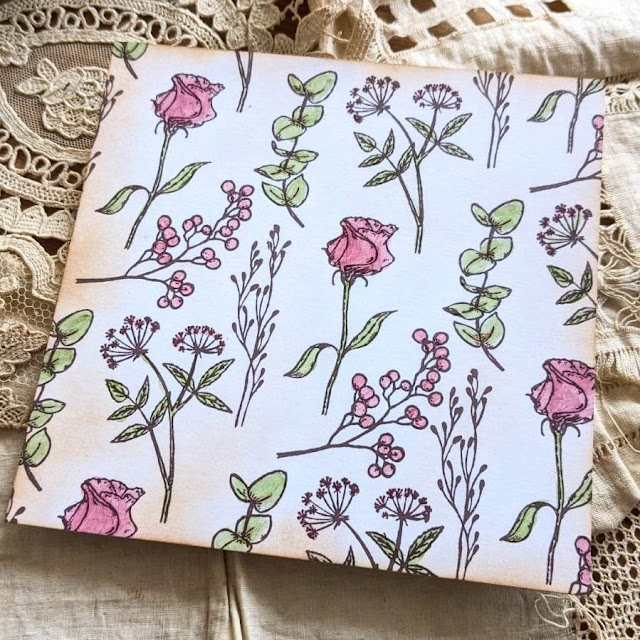
And then I continued exploring the pattern world and I created this background very easily. Since I used the same colours and botanical elements it seems part of a collection, so these 2 could be directly used as covers of a journal or a notebook instead of cards. I was tempted to create a folder to store all the samples in the release with these 2!
Since we have 3 nice bottles, why not creating a pattern paper with these as well? I tried with a flat finish by just painting with one coat of satin glaze mixed with infusions and also with a 3D look, by adding glossy accents on top, they look like glass! Which one do you prefer?
I chose 3 colours for the glass of the bottles, but you could go monotone and even add an extra bottle for a flower in the middle of the paper.
The Cotswolds cottage
When I decided to design ESC40 the first decorative element that popped into my head were the wisteria flowers. In my trips to the Cotswolds I could see wisteria over all the doors - so beautiful in spring! And our neighbours downstairs also had one in my first home in the UK which would grow towards our living room window and would frame our view of the garden. One season it grew to a point where it invaded our living room, entering through the gaps on the Victorian windows... I must admit I secretly let it grow further a few days before telling my partner that we had a new plant-based guest in the house. The curtain was covering my secret, but at some point the secret became too big! I loved the idea of getting it indoors but we had to cut it eventually...
But this cottage sample didn't end up here, it really got a revamp. You know, the inspiration hits home and you just have to try the idea of the roof made of many brick stamps. And, OMG, then I had that (literal) lightbulb moment and I got goosebumps when I could install that lantern! The light arrived at the cottage!
I couldn't end up there, that door needed to be open! I thought the inside of the cottage would be the perfect place for the sentiment to be.
The sentiment comes from words in the next stamp set and they are the perfect fit. Maybe I just made it a bit on purpose... LOL. And it glows, because it has a strip of LED around.
Summer vibes
For this one I've used also the stencil PS375 that you will see a bit further below for the brickwork. It's a more fresh and clean look for a house, particularly with the light colours and that bunting.
If you want to change the vibe so it's less fresh, you can add rusty car infusions and water on top and the bricks will get a nice orange look. Add the pumpkins instead of the round topiary bushes and a few autumn leaves instead of the bunting and the house is now going to give an autumn vibe! It's so much fun to create your scene! I love how they look from up close, they seem real houses!
Winter holidays
Now we go to wintertime, but a clean and simple effect. Instead of getting a Christmas scrapbook paper, I decided to create stripes using the grass strip, stamped up and down, almost touching, in green and red and they look beautiful! The steps have space to let you stamp some words, again from ESC41.
I'm a messy crafter, so the card is almost 100% clean because I cut the stripes apart and glued them on top, otherwise my fingerprints would be everywhere adding hints of colour, not only on the steps of the door...
In addition to the hidden grass-garland you have other winter elements that I used here, the wreath, onto which I stamped the dots on top by way of baubles, the mistletoe and the pine shaped trees (you can stack 3 overlapped and they will really look like a Christmas tree, but I went for the simple version here).
Dream
This sample is from a bigger project that I've made for PS376 and I think it includes all elements from ESC41 except 2. I think they all work really well together and they are so playful.
I just used 2 main colours, but if you swap pink for blue or for yellow, or for any other colour that combines well with green, you would get a completely different result but it would still work nicely. I'm really happy with this sample!
Believe
Here I paired the 3 roses together. I love how they look in the same vase!
The frame that fits the vintage label (from ESC39) is actually a pocket and the vase is stored inside. I liked it so much that I thought it would be a pity to glue it permanently and not be able to see it. There are more samples for this stamp set, but you'll see them at the very end, as part of stencil PS376.
Minibook of sample backgrounds
A background stencil use is pretty simple: to create backgrounds. To show you how to use it, I prefer to give you variations of it rather than a finished embellished sample, so you get the idea of it on your own. This stencil is a 4 layer stencil. The 4 patterns can be used at the same time or combined as you want. So I've created a mini-book with my 18 patterns, but I'm sure there are many more.
Here are 16 of the patterns.

Some of the pages are folded as an accordion.
And here is the book disassembled. I just opened the rings I used to bind it
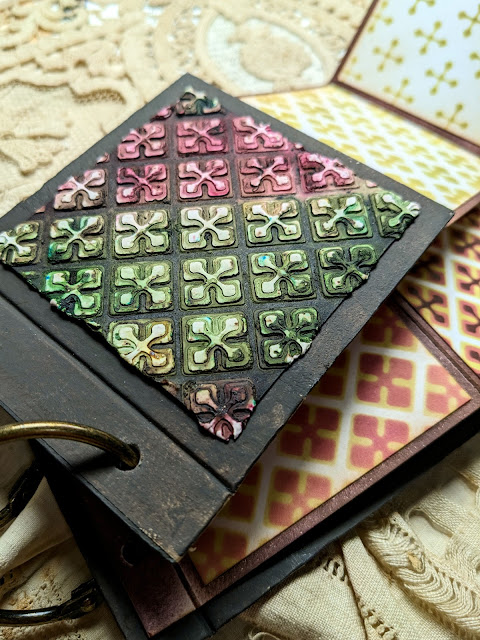
For the covers I went with Grunge paste and I layered all the shapes in order, from top to bottom, so the biggest one is underneath and the final one, the dots layer, sits on top. It looked like this before, and I loved it, so I saved this piece and I made a second one so I could keep this one plain. Look at the shadows! Aren't they gorgeous?
On the second sample with Grunge Paste I did what I was originally planning to do. I used lots of infusions and spritzed on top with water. I love how intense this looks!
I just used Raspberry and Emerald Isle infusions. They are packed with colours! The back cover is almost the same but I didn't do the dots layer. It also looks fantastic to me, grungy, and I love it.
If this is too dark for you, less infusions and lots of water will do a nice job as well. I went heavy on infusions on purpose, though.
I'll show you some close ups of the patterns. The basic shapes are on the left and the build up layers on the right
You could use each pattern separately.
In this case for the final layer (dots) I decided to place the dots on the ends of the crosses, so I repeated them 4 times in gold paint. They look gorgeous!
PaperArtsy Stencil 375 (PS375)
Home Sweet Home
This stencil can be a great pair to the ESC40 stencil, so you can add leaves and vines and bricks to the walls of the house. But for this sample, I just used the stencil with inks and I love how vibrant it turned out.
I wanted the word 'Home' to be special so I used gold paint to light up the word with the second layer of dots. I used a similar concept (gold on brown) on the edges of the card, so it looks like a brickwork border.
PaperArtsy Stencil 376 (PS376)
Patterned circles - affirmations
I wanted to create a sample that would show you the possibilities of the stencil, but I didn't want to make another book of samples as for PS374, so I went for this interactive option where I can show you the patterns first...
...and then place the botanical cluster- arrangements so the samples come to life before your eyes...
How do we get from pizza-shape elements to full circle patterns, you may ask? Well, you need to use the circle close to the pattern you want to repeat and that's the centre of your stencil. Now just turn it roughly 60 degrees or until the shapes perfectly align.
For the hexagon one, the easiest way, though, is first to do a pizza slice in the middle so you have a few hexagons of reference, then you can start the circle and ensure that the hexagons overlap.
The leaves one is a bit more loose and forgiving, no need to 100% match since there is some space between the leaves.
The diamonds, make sure to overlap the ends of each pizza slide, but be kind with yourself if it doesn't look perfect on the first attempt. Although don't worry, this is supposed to be a background so any small mistake will be covered by what you add on top.
Same applies to the mosaic. It's really possible that the last slice is either too close or too far away from the rest. Practice makes perfect. I'm sure you can tell from my sample where did the slices start or end, but I'm sure you didn't notice on the sample I made for ESC41, right? By the way, this pattern would look awesome in Grunge Paste! A great pavement!
The circles should be reasonable easy to align. The last row needs to be overlapped with the next slice. Of course I could have created 6 different full stencils and don't give you too much work, but then you may miss the chance to create something as the next sample, which was the main purpose of this stencil.
And let me show you first the finished cards. You've seen the first one of these 2.
I love this one, with 3 pepper branches (I'm so tempted to call them berries!) it looks like one of those ikebana arrangements. I thought it would match the sentence pause, breathe, repeat, to take things easy...

These 2 are also beautiful, with lots of blue tones and the label wording in big size from ESC41
And I couldn't help it, I had to add some pink pepper that I had sitting on the table...

I love the sentiment, 'today is when you play, enjoy'. Giving you permission to have fun!
This one is also really cheerful, and so is the sentiment that I chose. They are all ground for a reason, because they actually need to be part of a movable paper element that spins with the brad, so I couldn't let any element on it's own. They all form part of a cluster.
The postage stamps are so useful. They are the nice element that adds a finishing or a balancing touch.
I love the organic symmetry I got in this one card, by combining the wider bottle with the narrower postage on one side and the opposite on the other side.
See how everything unfolds
A botanical spin
When I was designing this stencil and the concept of making circle patterns I suddenly remembered a project that my friend Monica Palomero (monique delafressange on Instagram) made once and I went and ask her if I could do a sample inspired in her work. She gave me her blessing and so this was born in my mind and it turned out even better in reality than I imagined. Monica's project was simpler than mine; a vase and one watercoloured flower on each position, it was beautiful. I went in the 'more is more' direction...
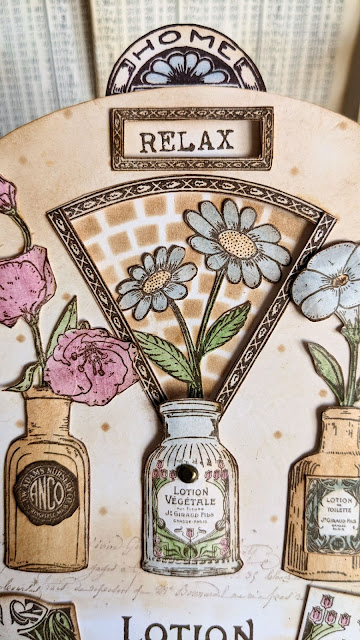
The way it works: the middle flower/branch and the stencil behind will change when you spin the 'HOME' semicircle, and so the word will change. The background circle is very easy to make, just stencil all the top part of PS376 and done.
We start with RELAX...
...SLEEP
...DREAM
...CRAFT
...EAT
...REPEAT - The perfect cycle for me, not necessarily in that order though :)
I'm just in love with this one
See the video with the spinner working
That was all from me today! I hope you liked the release. I would love what you do with these stamps and stencils, so please tag me on social media if you share your work so I don't miss it.
Socials:
YouTube: https://www.youtube.com/c/scrapcosy
Instagram: https://instagram.com/scrapcosy/
Facebook:
- This is my profile: https://www.facebook.com/raquel.burilloperez
- And this is my FB group for everything Scrapcosy (Scrapcosy’s crafty party). Come and join me! Share all your creations with everyone in the group! https://www.facebook.com/groups/scrapcosy/
PaperArtsy Stockist List
Our stockists are your go-to source for all PaperArtsy products, and we suggest that you also use the PaperArtsy People Facebook group to source a retailer in your country. Many are members of our FB group and will happily share links to their online stores.
Australia
Bev's Cross Crafts, Spreyton, Tasmania https://www.bevscrosscrafts.com.au/
Crafters Cupboard, Berwick, Victoria www.crafterscupboard.com.au
Memories on the Murray, Murray Bridge, SA https://www.memoriesonthemurray.net/
Natalie May Scrapbooking, Dover Gardens, SA https://nataliemay.com.au/
Scrapbook Superstore & More, South Penrith, NSW https://www.scrapbooksuperstore.com.au/
The Scrapbooker's Confetti Box, Swansea, NSW https://thescrapbookersconfettibox.com/
The Scrapbook Store, North Perth,WA http://thescrapbookstore.com.au/
Time To Create, www.timetocreate.com.au
Time To Create, www.timetocreate.com.au
Belgium
Cart N Scrap Art, Antwerp, www.cartnscrapart.be
Créatelier Caracolle, Liège, www.createliercaracolle.be
Canada
Clipper Street Scrapbook Company, Langley, BC. www.clipperstreet.com
Paper Art Creations Inc, Leduc, Alberta, www.paperartcreations.com/
Scrapbook Centrale, Dollard Des Ormeaux, Quebec www.scrapbookcentrale.ca
Scrapbook Centrale, Dollard Des Ormeaux, Quebec www.scrapbookcentrale.ca
Scrap Addicts, Edmonton, Alberta www.scrapaddicts.ca/
Scrap and Bean, Edmonton, Alberta scrapandbean.com/
Scrapbooking Fairies, Drayton Valley, Alberta www.scrapbookingfairies.com/
The Paper & ink Boutique, Calgary, Alberta www.paperandinkboutique.com/
The Scrap Yard, Calgary, Alberta, www.thescrapyardcalgary.com/
The Scrap Yard, Calgary, Alberta, www.thescrapyardcalgary.com/
Denmark
Hobbyboden Scrapworld Samso www.hobbyboden.dk
France
Eirl Bancon Cartoscrap, Midi Pyrenees, www.cartoscrap.com
Fée Du Scrap, Saint Sébastien-Sur-Loire, www.feeduscrap.fr/
Horizon Créatif, Ste Jalle www.horizon-creatif.fr
Instant Créatif, La Possession, La Réunion, www.icreatif.re
Katzelkraft, Ingwiller www.katzelkraft.fr/en/
Kerudoc Creation, St Yvi www.kerudoccreation.com
Le Grenier des filles, Pierre Benite
Page de scrap, Saint Pavace, www.pagedescrap.fr/
Scrap Déco Home, Goutrens, www.scrapdecohome.fr/
Toutencolle, Dun sur Auron www.toutencolle.fr
Finland
Heidin Korttipaja, Istunmaki, www.korttipaja.fi/fi
Piia Paper, Kittilä, www.piiapaper.com/fi
Germany
Stempelbar, Berlin, www.stempelbar.de
Stempeloase Munich, Munich www.stempeloase.de
Stempelfee Shop, Hilden www.stempelfee-shop.de
Stempellaedle, Stuttgart, www.stempellaedle.de/shop
Greece
Scraps N Pieces, Kallithea www.scrapsnpieces.gr
Italy
Immagine SAS di Rapaccini, Rome, www.immaginelab.com
Il Negozio Della Mamma Di Cle, Torino, www.ilnegoziodellamammadicle.com
Marte Savona, Savona, www.martesavona.it
Pezze E Colori, Lissone, www.pezzeecolori.it/
Piccole Passioni, Siena, www.piccolepassioni.it
Piccole Passioni, Siena, www.piccolepassioni.it
Japan
La Wadao, Odawara, Kanagawa, www.lawadao.com
Tiny Dots, Funabashi-shi, Chiba www.tinydots.shop-pro.jp
Netherlands
De Hobbystudio, Genemuiden, www.dehobbystudio.nl/
Doe@ding,Spijkenisse doeading.nl/
Hobbycompleet de Duif, Leeuwarden www.hobbycompleet.nl
Stampingcorner, Capelle Aan Den Ijssel www.stampingcorner.nl
Norway
Hobbygarasjen, Kopervik, www.Hobbygarasjen.no
Spain
Cien por Cien Manualidades, Barcelona, www.100x100manualidades.es
Ideas 10 Manualidades Y Scrapbook, Bilbao ideas10manualidades.com/
Marakiscrap, Tarragona, www.marakiscrap.com
Scrap & Papers Experiences, Barcelona, www.scrappapersexperiences.com
The Paradise Corner, Barcelona, www.theparadisecorner.com
Sweden
Butik Elva, Staffanstorp, www.butikelva.se
Taiwan
Mandy's Cards, Taipei www.facebook.com/mandy.card.77
United Kingdom
Amelia's Creative Crafts, Studley, Warwickshire www.ameliascreativecrafts.co.uk
Art from the Heart, Harrogate, Yorkshire www.afth.co.uk
Crafts at The Malthouse, Herstmonceux, East Sussex, www.themalthouse.co.uk/
Loobi Crafts, Leighton Buzzard, Bedfordshire, www.loobicrafts.co.uk
Papermaze, Ipswich, Suffolk www.papermaze.co.uk/
Stampers Grove, Springbank, Lilliesleaf, Melrose,Scotland www.stampersgrove.co.uk
The Artistic Stamper Craft Store, Faversham, Kent www.theartisticstamper.com
The Forget me not Kraft Kabin, Rochford, Essex, www.TheForgetMeNotKraftKabin.co.uk
USA
Artistic Artifacts, Alexandria, VA www.artisticartifacts.com/
Artistic Studio Creations, Fayetteville, Georgia www.facebook.com/ASCbyCrystal
Craftiness, Chatsworth, CA, www.craftinessonline.com/
Everything Scrapbook & Stamps, Lake Worth, Florida https://everythingmixedmedia.com/
Frantic Stamper, Oregon www.franticstamper.com
Free Heart LLC, Denver, Colarado, www.freeheartllc.com/
Joggles, Coventry, Rhode Island, www.joggles.com
PaperCraft Clubhouse, Westbrook, Connecticut, papercraftclubhouse.com/
Qingquing's Stamp Shop, Portland, Oregon
Runaway, Art & Craft Studio, NE Salem, Oregon www.runawayart.com/
Simon Says Stamp, Columbus, Ohio www. simonsaysstamp.com
Topflight Stamps, Irmo, South Carolina topflightstamps.com/
If you are interested in becoming a PaperArtsy stockist contact Dounia@paperartsy.com for more information
PaperArtsy Links
Facebook Group PaperArtsy People
Facebook Page PaperArtsy
Twitter twitter.com/paperartsy
Instagram instagram.com/paperartsy
Pinterest uk.pinterest.com/paperartsyhq
YouTube youtube.com/user/PaperArtsy


No comments:
Post a Comment