Sounds
like Ellie created these flower-filled pieces in her garden - well the beautiful backgrounds at least, and what a perfect setting too! She
explains the method at the foot of the post, how she selected from 70+
options I'll never know! Just remember, these stamps are available from PaperArtsy stockists, a list of which you will find at the foot of yesterday's announcement by Kay. ~Leandra
Hi everyone, it's Ellie from PAPER-STAMPS-COLOR with you today
Kay Carley's stamps are gorgeous.. I've used the new product to enhance the beauty and versatality of them. A book of art journal pages... a concertina type of book to which I can add new pages later easily, just by adding a connection of folded paper.
Kay Carley's stamps are gorgeous.. I've used the new product to enhance the beauty and versatality of them. A book of art journal pages... a concertina type of book to which I can add new pages later easily, just by adding a connection of folded paper.
If you want to know what techniques I have used : I made a description at the end of this blogpost. It's easy, and easy to recreate similar pages too!
Page 1 : with the EKC29 stamp set and PS152 stencil.
I used the marks from the household wrap on the page to create a 'torn' edge and fill that part with script and some fussycut flowers.
I used the marks from the household wrap on the page to create a 'torn' edge and fill that part with script and some fussycut flowers.

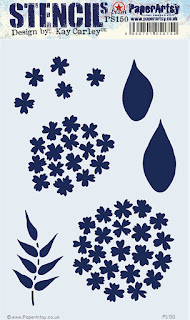
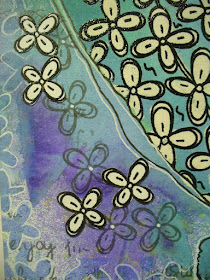
Page 2 : with the EKC27 stamp set and PS150 stencil.
Same as on the first page: I used the marks from the household wrap on the page to create a 'torn' edge and fill the 2 parts of the page with the different size of flower stamps.
Same as on the first page: I used the marks from the household wrap on the page to create a 'torn' edge and fill the 2 parts of the page with the different size of flower stamps.

Page 3 : with the EKC28 stamp set and PS151 stencil.
This has a background created with a acrylic block on top of the paper when drying... it created a whitish border and also some lighter and darker spots of inks.
This has a background created with a acrylic block on top of the paper when drying... it created a whitish border and also some lighter and darker spots of inks.

Page 4 : with the EKC30 stamp set and PS153 stencil.
This also has a background created with an acrylic block on top of the paper when drying... it created some lighter and darker spots of inks.
This also has a background created with an acrylic block on top of the paper when drying... it created some lighter and darker spots of inks.
That's it... four pages full of color and beautiful images!
Now for some more eye candy and close-ups:
How did I make these pages?
It was a sunny day when I created colorful backgrounds with colorwash and glimmer mists, which are waterbased inks. So I made these backgrounds outside, in our garden.
I wet the paper in a bucket of water first, then sprayed it, and optionally covered it with an acrylic block or household wrap and let them dry on the grass in the sun.
This was a very fun part: creating 76 backgrounds all A5 size.
I chose four in similar colour groups, to use for art journal pages, ..
Stamp the images with a black ink (Versafine black Onyx black) and heat emboss with clear embossing powder. Take away color within the images with bleach. Sponge an 'edge' to every page with the stencils, by masking off the middle of the page. Doodle around with a white acrylic marker, stamp and fussycut the smaller flowers in the sets, and assemble the pages as shown. Also stamp the text and add that to the pages.
You might want to add some color to the bleached images, but I chose not to.
Depending on the inks and the paper used, the images will not be white, but a hue of color will remain, which adds to the versatality of this technique.
Thanks for joining me today, I had fun using the new product...
... I hope you have a creative week.
Ellie Knol
Blog: http://elliecreahoekje.blogspot.nl/ http://ellieatcs.blogspot.nl/
Owner of : https://www.facebook.com/groups/DutchArtJournal/
Facebook: https://www.facebook.com/profile.php?id=100008479362838
Pinterest: https://nl.pinterest.com/ellieknol/


Gorgeous samples, fabulous colours!
ReplyDeleteWow... Fabulous samples.....
ReplyDeletebeautiful Ellie :)
ReplyDeleteAbsolutely beautiful Ellie :)
ReplyDeleteTHANKS so much..
ReplyDeleteFabulous creativity , Ellie . You have showcased Kay's stamps in such a fabulous way . Tfs x
ReplyDelete