Hi there everybody ,
Elizabeth here again for a quick project . This project was inspired
by nothing more than wanting to make something pretty using some of
the new PaperArtsy goodies !
I decided to
decorate a wooden frame and to create a stamped and stencilled
background for some embellishments .
To start with I painted the
frame using Nougat Fresco Finish paint. I also painted a piece of
smoothy heavy weight stamping card with Nougat paint and cut a piece
of this to fit into the aperture of the frame ( keep the rest for
later ).I then stencilled the paper using Stencil PS006 and
Mushroom paint . There are various ways of applying colour through a
stencil – I used cut and dry foam with a small amount of paint on
it to avoid paint seeping under the stencil . I stencilled the fern
leaves randomly over the painted paper and then dried the paint .
Next I stencilled several flowers from PS003 starting with a dark colour made from a mix of Taupe and Pansy and then a lighter colour made by adding Nougat to the mix. The last stencil , PS001, was used to add random dots with Snowflake over the paper .
To add to the
background I stamped the butterfly and script from HP 1301 using Egg
plant Adirondack Pigment ink .
 |
| HP1301 |
I stamped the whole image on the right
side and parts of the image on the left. Finally I made two glazes
by mixing matte glaze with paint to colour the edges of the paper .
The turquoise colour was a mix of Beach Hut and Mushroom and the
dark blue was the same mix with Eggplant added. These colours are
used on cut and dry foam to distress the edges of the paper ( in
exactly the same way as using ink ) . By adding matte glaze to the
paint it becomes much more translucent . I used the same two colours
to glaze the edges of the frame . I mixed an even darker blue, using
Pea Coat and Squid Ink, to paint around the outside of the frame .
I decided to add a
little dimension and colour to the butterfly image . I painted
stripes of Pea Coat, Beach Hut and Eggplant onto the piece of
painted card and stamped the butterfly over this once the paint was
dry . I used two extra images to give the butterfly added height ;
cut them out and shape the card before adhering them using
dimensional glue.
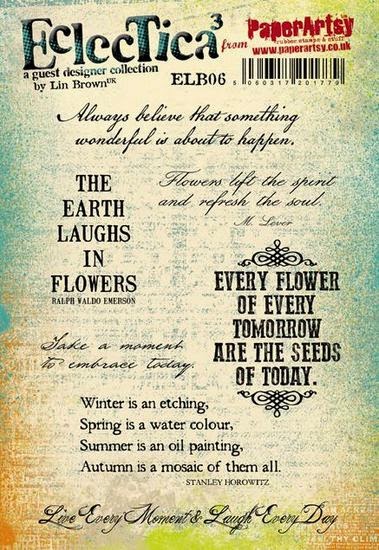
The face from HP1303 and the words from ELB 06 were stamped onto some painted card. I then painted a little colour onto the face and glazed a little blue
around the words.
 |
| HP1303 |
I found some chipboard flourishes and an oval
frame in my stash and painted them with the very dark blue paint and
then stuck the face into the oval frame .
At this point I decided on a little sparkle and rubbed some Treasure Gold over the dark paint ( White Fire and Aquamarine ) .
Finally I stuck
everything in place as shown and added some flowers, lace and flat
backed pearls to finish the project .
 |
| ELB06 |
Well that’s all for this
evening . I hope you enjoyed this little project and I will be back
again soon .
Elizabeth.
A huge thanks to Liz from all at PaperArtsy HQ. Liz always manages to create elegant beauty to her projects and this is no exception. We love the background of stencils, building up the colours gently has created the perfect base for the focal images.
If
you would like to join in our weekly challenge with any of this
week's guests who have blogged since Sunday night, then
join in to link up your creativity HERE you will go in the draw to
win PA stamps of your choice! You need to link your entry
by17:00 (London time) Sunday 29th June2014


Gorgeous layers of colour on the background, a beautiful project!
ReplyDeleteLovely background! xxx
ReplyDeleteThat's so beautiful!
ReplyDeleteLove the stencilled background and the subtle colouring that you chose. Like the idea of painting stripes and then stamping over. The finished piece has real class. I love it! Xx
ReplyDeleteThat's fabulous, I love the background and the colours on the butterfly are just gorgeous.
ReplyDeleteOh Elizabeth I really love your frame. It has so inspired me to have a go!
ReplyDeleteLiz's projects are always breath-taking and this one is a delight! I love what you did with that butterfly and the flower sentiment looks wonderful with the project. Julie Ann xxx
ReplyDeleteOh this is stunning! I love the frame and the colours on that and the background are just gorgeous. The HP1303 has now hit the top of my wish list.... I just love that beautiful face!
ReplyDeleteHugs
Lesley Xx
The painting queen at work! Love how you mix glazes from opaques. Awesome !!
ReplyDeletej'ai adoré le fond avec les pochoirs, la carte au final est magnifique, au plaisir de te retrouver
ReplyDeleteFab Frame, love your butterfly and the colouring !!
ReplyDeleteOh what a pretty frame you created. Love the stamping and romantique result !!!
ReplyDeleteThank you for a great tutorial as well.
Hugs from SPAIN
I think I need this set of stamps, love the colouring on the face x
ReplyDeleteAbsolutely gorgeous!
ReplyDeleteLucy x