
"I’m
back for another tag tutorial. I think they’re fun and sometimes quicker than a
larger project. So here we go"!
.JPG)
.JPG)
Start
by cutting a tag from the Smoothy White Stamping Card using the Tim Holtz Tag die. Then add
some Mustard Seed Distress Ink in the middle with a blending tool or Cut-n-Dry Foam.

Then add inks to the top corners with several colors of Orange Distress Inks…here I used Spiced Marmalade, Wild Honey, and Rusty Hinge.

Last add Ripe Persimmon highlights the edges.


Then add inks to the top corners with several colors of Orange Distress Inks…here I used Spiced Marmalade, Wild Honey, and Rusty Hinge.

Last add Ripe Persimmon highlights the edges.

Then
going to the bottom of the tag, I started with Iced Spruce, then Evergreen
Bough, and Seedless Preserves on the edges for contrast. Yummy!!!!


Now
that we have our base, we going for the next layer which is Eggplant FrescoPaint sponged onto the "Script" stamp from Ink and the Dog 08. Stamp it 4 or 5
times around the tag.
ID08


ID08
I
wanted some nice contrast so I stamped the Ink and Dog house stamp with JetBlack Archival Ink onto the Smoothy White Stamping Card and embossed with fine black powder.
Trim the house. Now we’re going to paint in areas of the image. The bright white
paper really makes the Fresco Paints pop. I started with Smoked Paprika in 2
corners and shaded with Brown Shed.


As its drying I can wipe away any
paint that gets on the black embossed sections with a baby wipe.

Then
the Pumpkin Soup was added in the other 2 corners and shaded with Brown Shed
again. Hey Pesto was painted on the other areas and various places on the
faces. The roof is colored with Eggplant.

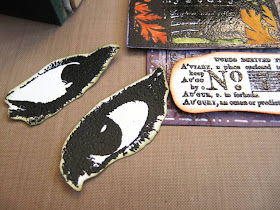
Now
we start stamping on the white Smoothy Stamping Card with the "Eyes See Everything", the
"No. Script" stamp, and the "Eyes" from Ink and Dog 08. Emboss and cut them out. I added some
Distress Inks around the edges of the 3 cutouts using a green an orange and a
purple.

I
stamped the "No." stamp on the bottom of the tag….but when I laid it out it was
too dark.

So we have to improvise here. I got out the Snowflake paint
and stamped around the bottom area that was dark using the Hot Pick 1107 edge
stamp. OK, still needing something, so I added a few of that same stamp with
Sepia Archival Ink. Still wanting a bit more contrast…..so I added the little
rectangle stamp from ID 05 with Jet Black Archival Ink. The last thing on the
tag was adding some white pen stitching around the edge.


You get the
placement of these stamps by laying out your cutouts on the tag where you want
them and seeing the areas that need more stamping.
I
used foam tape to add the cutout pieces to the tag.

Then I cut a piece
of black chipboard about ¼ “larger than the tag. Next I added Score-Tape to the
back of the tag, and glued the 2 together.

I punched a hole with my Japanese Screw Punch
since I’d used foam tape and would’ve scrunched “the Eyes” phrase if I’d used
the Crop-a-dile. (Live and learn.) Last you add a bow; here I used a hand-dyed
ribbon.
Your Friend In Art!
Linda!
Gillian Says: The bold colours and images make this a fab tag, Love it Linda!
Leandra Says:This
is kind of different. Not your average piece, rather quirky, but I love how it
turned out. Always fun to cut pieces out and add in layers.
Gillian Says: The bold colours and images make this a fab tag, Love it Linda!
To join in with Linda's creativity, simply click HERE to upload/share how you have been inspired to play along.
Love it! Love how you coloured the house, and how you stamped with the Eggplant,
ReplyDeleteLucy x
What a fantastic tag, Linda! I love all the distress colours you used on your base tag,just scrummy; and the cut out pieces give so much depth in layers.
ReplyDeleteIt's gorgeous. I love the colours & the layers look great.
ReplyDeleteThat ink and the dog house /shrine style stamp has always been one that I really rate. Funny you love it too! Thanks Linda
ReplyDeleteBold, Bright and Brill x
ReplyDeleteSuch fabulous colours, and fab, funky design - I so love stamping with Fresco paint - brilliant results!
ReplyDeleteAlison x
Wow such a gorgeous tag, I really love the stamps you used, think I shall need them lol. :-) Kezzy xxx
ReplyDeleteLove all the layers of stamping & the raised images, great tag Linda! x
ReplyDeleteLove the stamps you have used on your brilliant and fun tag.
ReplyDeletethis is totally amazing the background is fantastic and then all those layers make this a real amazing piece of art wonderful
ReplyDeleteRia
Love it. I need to get some of that fine embossing powder. It looks great
ReplyDeleteWhat a fabulous combination of stamps, colouring products, and your amazing creativity. I love the colours you have used and the layers of stamping and embossing. Thanks so much for the step by step tutorial. You have both inspired me and made me think...and not just about what I want to add to my wish list :)
ReplyDeleteLinda Cain rocks and she most certainly did with this beautiful tag!
ReplyDeleteLinda, you are a master of using color! This tag is just an example of your color "magic" mixed with the perfect accent color touches (White stitching and the eyes). The eyes stamp, "Take Another Look", is one of my Paper Artsy stamps! Love it!
ReplyDeleteLove all the layers of colours and stamping in the tags background trace x
ReplyDeleteCe mélange de couleur distress est fabuleux. comment avez-vous coloriez le toit de la maison?
ReplyDeleteCe tag est magnifique!
Love the background colouring and the layers of stamping, inspiring !
ReplyDeleteLoving this tag Linda !
ReplyDeleteVery cool tag!! Wonderful background colours - fab layering! Having just finished a black and white project, I'm reaching for colour! Thanks for the inspiration Linda!
ReplyDeleteA wonderful tag again from Linda, and I love these warm colors again !!! I made a tag from her first tutorial the last week she was back, but it was too late to enter the challenge... Maybe I can share it here today, just to honor Linda... http://scrapcocofolies.canalblog.com/archives/2013/03/09/26602933.html
ReplyDeleteHope I can participate just in time for the current challenge, but nothing is less certain boohoo ! :) Coco x
Thanks everyone! Get ready for day 2!!!
ReplyDelete~Linda