Hi everyone, it’s
Peley Renata with you today, and I am here to share with you a fun project that I made using a bunch of little paper scraps, trinkets that I had laying around and some gorgeous stamps designed by Elizabeth Borer.
As the topics “Shrine” and the theme “Tracks” came, they left me with a lot of thinking to do. But as you know, sometimes it is enough to have one thought, object or an image to start up the creative engine. For me, that spark was the stamps from Elizabeth Borer. With these stamps in my mind, I got an idea about how to incorporate both of the topics in a single project.
As a child, but also in my adulthood I always enjoyed the concept of fairies, these magical and beautiful creatures that are here around us just hidden out of plain sight. Weather they are mischievous, kind and elegant, or joyous child shaped little creatures, I just always wanted to be the lucky one to find them. So, the idea behind my project was to make a box which will contain some little tracks and clues to finding fairies.
Sometimes when I work on a project, the whole process might look a bit chaotic for others, as I don’t always start from the obvious starting point. It was so in this case as well, but I will do my best to sort out my mess of thoughts for you.
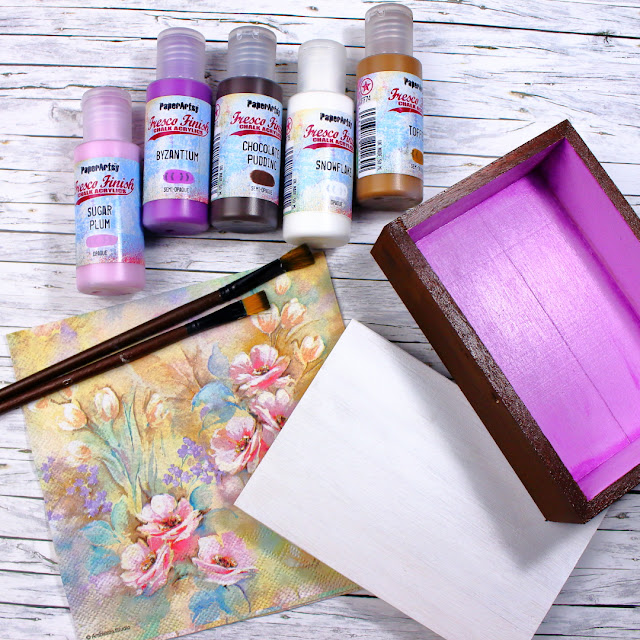
As the idea to make a box containing fairy related items started to formulate, it was time to start scavenging in my “one day I might need this for something” box. I have two of such boxes and they contain so many various goodies. I have some paper flowers that I bought, some old book pages, tea-stained book pages and papers, acetate from various packaging, bill envelopes, metal charms, some stickers, cut-outs, little glass bottles, pebbles, printed vellums, pieces and bits of who knows what, etc. And after some rummaging, here are a few treasures I found, together with the PaperArtsy products that I have picked out.
Of course, this isn’t all. As the project was developing, I was going back to my supply box and slowly adding some bits. But when it comes to my choice of PaperArtsy Fresco Finish Chalk Acrylics, I imagined my box to be feminine and elegant with a vintage touch, so I thought that with this color choice, I can express just that.
To be honest, I mostly feel comfortable with doing art journal pages, but everyone says it’s good to step out of the comfort zone from time to time, so that’s what I decided to do. And to do that in the best way, I felt like I need a bit more inspiration, so I first went onto coloring and stamping my faeries. At this point, I knew that I wanted my box and its content to have a somewhat vintage feel, so I decided to stamp the images from the Elizabeth Borer stamp sets
EEB04 and
EEB06 on a tea-dyed paper. For coloring the images, I have used Prismacolor Premier Colored Pencils.
I bet it’s because all the holidays that we had lately, but in my recent projects I felt a need to implement some gold accents. And you know what? In fairy and magic world, I felt gold is even more needed. Anyway, I used Windsor & Newton Ink in gold color and added just a tiny detail to the fairies’ hair. Something like golden hair straws.
With all my fairies stamped and colored, I felt my inspiration kick in and I was ready for the next steps of my project.
As I previously said, the idea was to make a box full of little fairy-related items, but what kind of box that is going to be is something entirely up to you. At the very start of my creative journey, I was doing decoupage, so I still have some pretty wooden boxes in my stash, just waiting for me to get inspired. And one of those I am going to use for this project. But truth be told, you don’t need a wooden box for this project at all. Anyway, reusing some old household items, recycling or upcycling is a much more rewarding feeling. You can repurpose and redecorate an old box that you have but don’t like any more, use a tin, plastic or a cardboard box. Or why a box at all? It can be a small textile sack or a pocket. I know that all of you reading this blog have that spark of creativity and can find some other solutions and containers for such purpose.
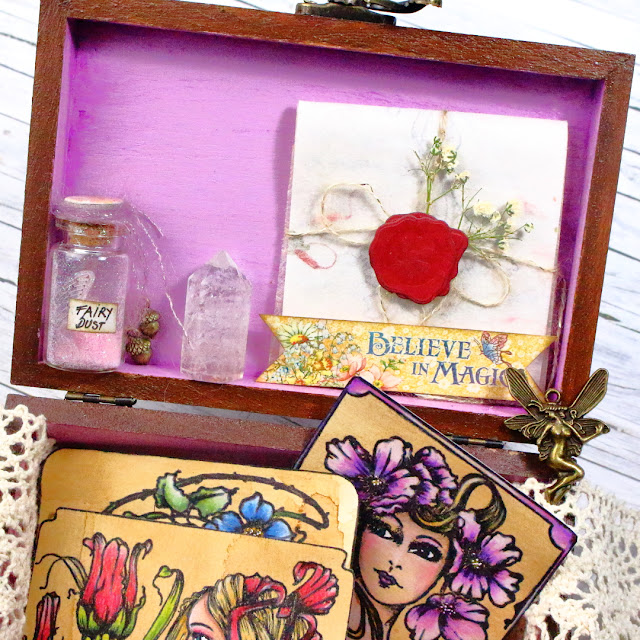
Also, as you can see on the image below, I noticed that I will have enough space for some more trinkets, as my box wasn’t that small, so I gathered a few more items that fit my fairy clues box concept. I won’t use all of them but most, as you will soon see.

When I started doing mixed media, I didn’t have the habit of keeping the original packaging of my products, so I can’t tell you where I got some of these items. For instance, I truly don’t recall where I got those paper flowers, but if you look to the left of my image, right under the box you can see a real little white flower that I had pressed in a book. It’s a wild flower that I got from my daughter. She gave it to me as a “cheer up” when I was feeling sad, so I felt that if I incorporate it in my project, it will always remind me of that moment. Anyway, the point of this story is that you don’t need paper flowers, as I think that home pressed flowers look even better for projects like this one. I just feel sorry that I don’t have any more. Lesson learned, I guess. Next spring, I go for a flower picking and pressing séance. 😊
Anyway, with all of these supplies gathered, it was time to make the container for them. I took my plain wooden box, removed the hinges and lock from it, in order to paint it easier and neater. My box was wood, an absorbant surface, so I went straight for applying the acrylics dirct to the wood, this is fine for Fresco paints as they are a multi surfacce paint. But it is quite common to use a primer first if you choose to work with a non-porous surface like tin or plastic, otherwise your paint might peel off after a while. But PaperArtsy paints will cope going direcct onto those surfaces, especially the opaque colours, being a chalk paint they grab onto most surfaces very easily, even metal, plastic and glass!
As mentioned, I wanted my box to be feminine, so for the inside of the box I chose two lovely purple-pinkish shades. The colors of my choice were PaperArtsy Fresco Finish Chalk Acrylics –
Sugar Plum (FF114) and
Byzantium (FF152).
I first painted two layers of the Sugar Plum and put Byzantium on the inside edges of the box. For the outside of the box, I used Paper Artsy Fresco Finish Chalk Acrylics -
Toffee (FF74) and
Chocolate Pudding (FF42). I was mixing these two acrylics directly on the box. While painting these, I thought to place some floral motifs on the top of the box. Once again, I went back to my decoupage days and decided to decorate my box with a paper napkin. In order to make the motif on the napkin as vibrant as possible, I painted the top of my box with PaperArtsy Fresco Finish Chalk Acrylic -
Snowflake (FF15), as the beautiful napkin paper is rather translucent.
You have to be careful in case you decide to try adhering the napkin, as you have to be aware that usually napkins are made of three very thin layers of paper, and you must remove two unprinted layers and adhere only the top layer with the desired motif.
After the napkin was adhered, I went all over the box with a glossy decoupage lacquer. PaperArtsy gloss glaze would also work for this step. Now my box was done, and it was time for the most fun part of assembling the clues on finding faeries.


.jpg)
.jpg)
.jpg)


No comments:
Post a Comment