
2019 Topic 16: Stamp Carving

Dounia has got some really clever carved images tonight. An absolute belter of an idea for a multi stamp technique and some gorgeously autumnal vibes to match!
Hi everyone, it's Dounia with you today, and I'd like to share with you a few ideas to get started with carving your own stamps. I was introduced to stamp carving when quite young by my mom, and I love being able to bring my ideas to life. I am aware that seeing only the gorgeous results from your favourite crafters can make the process a bit intimidating, so in this post I hope to show you a few cheap, easy and progressive projects to help you get your feet wet.

First: materials. Nowadays lots of substrates specifically for stamp carving can be found in art and craft stores but in the end, they are all some sort of rubber. What else is made of rubber? (tyres but that's not really practical...) Erasers! The rectangular, white, crisp type are very cheap and quite resistant (and more durable than potatoes...). Of course they are rather small but to begin it is simpler to work on limited surfaces. They can be carved using only a very sharp scalpel, but for ease of use, especially if you're doing curves, a small carving tool is a lot of help.

Now for inspiration. I find a good way to start is to make "companion pieces" to stamps you already own. Ellen Vargo's collection is perfect for that: they are carved style stamps themselves so you know it's doable, and the simple geometric shapes are both easy to cut and always useful!

I recommend something with straight(ish) lines to begin with. I chose the alternating stripes from EEV03 and made a square version from a small piece of eraser. I stamped it regularly during the carving to make sure the cuts were deep enough. The ink also stains the surface of the eraser, contrasting with the white carved parts, which makes it easier to see what you are doing!
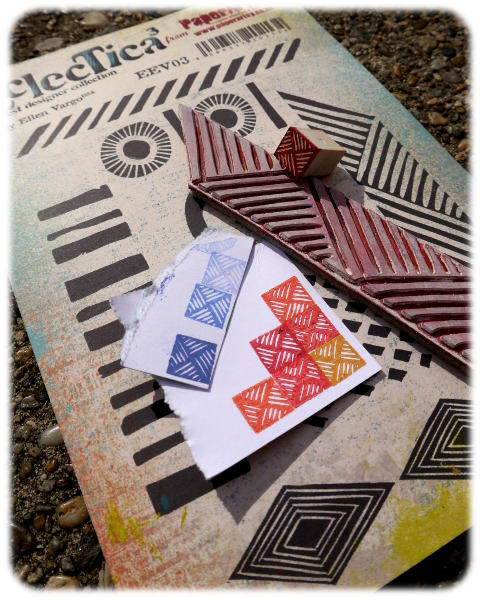
I love repeating geometric stamps, it creates a whole new design! Here I used my tiny stamp to create a border, alternating colours. The original Ellen Vargo stamp also makes an appearance as a subtle counterpoint.

This project was a great opportunity to play with the new Fresco Paint colors. I love warm and fall colors so I was overjoyed with the new reds and corals. I used four of them in this project, Cayenne, Scottish Salmon, Red Lipstick and Blood Orange, to create both harmony and variationu. It was also a great way for me to discover the different hues.


For the border, I mixed them all with a bit of Sand to increase opacity and tone them down for a fall look but the leaves display the full vibrancy of the translucent paints. I love the way it makes them pop from the background.

After straight lines, I tackled curves. I again took inspiration from EEV03, focusing on the round spiky stamps. On the plate, they quite look like eyes but I decided they were flowers and made smaller versions, with a few alterations for fun!

I can now make a bouquet! As these stamps have simple shapes, they are easy to fussy cut and layer, to add depth and colour variation.

I love the new green Fresco paint Lawn. I really think it is the perfect colour for young vibrant grass and leaves. The flowers are also in Cayenne and Red Lipstick (I told you I love red!) with a bit of Haystack for the center. Blue Oyster completes this clean and fresh palette. I love how they all stand out against the white frame.


Another idea is to maximise the use of your eraser. It has 6 sides, why only use one? You can create a continuous design along several sides, like a square pattern brayer. The little manipulated photo below shows all four sides of mine:

You can stamp a continuous design by inking the top side each time you turn the stamp, or ink them all once and let the pattern gradually fade away. Even if practising a couple of times makes it more consistent, the result is rarely perfect but I think it is part of the charm of this device!

With a big pattern like that, I like to mix colours for variation. I added Elephant Fresco paint to my favorite palette of warm colours and splotted them randomly on the stamp. The result is full of lovely subtle half-tones.


Once you've exercised with geometric shapes, you can tackle more complex patterns. For example, I have started a series of detail stamps inspired by Lynne Perella's long collage stamp in LPC033:


Stamp carving is a fun way to create custom pattern and images. Trying it on erasers removes the stress of cost and size. Finding inspiration in already existing stamps helps you discover what works and what doesn't. I really find it a great first step before (if you like it) advancing to big rubber blocks. I hope this post inspires you to test it!
Stay creative!
Love your carvings and the results look wonderful
ReplyDeleteThese are brilliant Dounia... Great idea!
ReplyDeleteOh my goodness, this is incredibly clever, Dounia!
ReplyDeleteLucy x
Stunning your carving stamps and lovely cards. xx
ReplyDeleteSuch a insightful and interesting post about stamp carving and how to DIY , Dounia . Each one of your cards is absolutely fabulous and love that hey all differ in style . Thank you so much for sharing and inspiring x
ReplyDelete