Loving
the brayered background Jenny has cleverly created for this post, it
almost looks dry-brushed the effect is so perfectly frosty! Brilliant to
set off these lovely new stamps by Kay!
These stamps were announced on the blog yesterday, and we have been shipping them to our stockists for the past 2 weeks ready for you to snap up! So to find a stockist near you, check out the foot of this post here. ~ Leandra
These stamps were announced on the blog yesterday, and we have been shipping them to our stockists for the past 2 weeks ready for you to snap up! So to find a stockist near you, check out the foot of this post here. ~ Leandra
Hi everyone, it's Jenny Marples with you today sharing some Christmas cards made with Kay Carley's brand new releases. There is so much to love about Kay's new designs; there's the hand drawn style with images that are perfect for colouring in, the wonderful sentiments that will work across all three sets, the coordinating stencils that give you the option for adding texture and shading, and the sizes of the stamps which will work equally well on cards, tags, journal pages and even your own handmade wrapping paper.
I opted to make a set of Christmas cards and began by creating a background for them all by brayering White Fire, Venice Blue, Cloud 9 and Seaglass Fresco Finish paints onto a 12 inch square piece of PaperArtsy Smoothy Card.
For
this first one I stamped the holly branches from EKC32 over the
background and coloured in the leaves, berries and stems with Glaze Gel
Pens for a shiny, translucent look. The snowflakes come from the same
stamp set and were embossed with white embossing powder.
In this close up you'll see that I stamped and cut around the words, combining ones from EKC32 and EKC33 to create a whole phrase.
For this next card I had fun combining the trees in set EKC31 with the coordinating stencil PS161. After stencilling Taupe Fresco Finish paint through the tree shapes and adding some white Gel Pen snow to the branches, I stamped the largest of the trees three time across the front. These ones were painted in Mushroom and Cloud 9 Fresco Finish Paint to make them stand out against the darker ones, and with more snow added, a wintry scene appeared.
After adding an embossed crescent moon into the night sky I stamped the present and bauble images from set EKC31 with London Bus and Lawn Fresco Finish paints, over-stamping them with black ink to add in the detail. As for the previous card I stamped the words from set EKC32, cut around them and added a little brown ink to the edges before popping it in place.
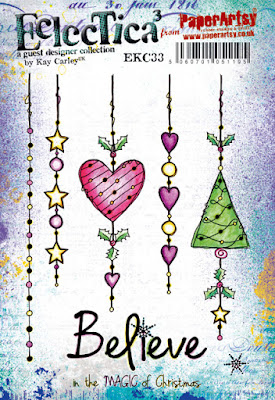
The third card combines set EKC33 with the coordinating stencil PS163. Cleverly, the stencil has been designed to allow you to miss a string or two of baubles in order to leave space to stamp the dangling tree, ball and star designs. I added a little glitter to the paste when stencilling them to add an extra twinkle.
I had so much fun creating the scene in this final card, stamping and painting the two sizes of tree in set EKC31 using Taupe and Mushroom Fresco Finish paints. To stop them seeming to 'float' in mid air a little Koala Fresco Finish paint was added to the base of each and then drawn out to create the shadows on the ground. After lightly stamping the snowflakes a few dots of a coordinating Metallic Gel Pen were applied to coordinate with the background.
The snowman was painted with Cloud 9 Fresco Finish paint, with the Seaglass shade used to create shadows along the edges. His scarf and hat were painted with more London Bus and Lawn Fresco Finish paint and a white Gel Pen was used to add highlights to them. I used an orange Glaze Gel Pen to give his carrot nose some colour and shine. The words for this one came from the same set and you may just be able to pick up from the photo below that I used a little glue to apply thin lines of glitter onto the snowy ground.
Kay
Carley's new Christmas designs are perfect for the festive season and
I'm sure you'll have a ball making lots of things with them. And
remember, stamps and stencils are not just for Christmas! You could try
putting blossom or leaves on the trees to change the seasons and use the
hearts for Valentines, wedding and anniversary cards. What other things
can you think of? I'm sure there are lots more.
Thanks for joining me today, I hope you have a creative week.
Jenny x
Blog: http://pushingtherightbuttons.blogspot.com/
Facebook: https://www.facebook.com/jenny.marples.73
Pinterest: https://www.pinterest.co.uk/jennymarples73/


Thanks for sharing Jenny. I particularly like the gorgeous wintery scene you have created.
ReplyDeleteLovely projects. Loving the new release
ReplyDeleteBeautiful projects Jenny, loving those colours on your backgrounds
ReplyDeleteGorgeous Christmas cards Jenny, lovely work with Kay's fabulous new release. xx
ReplyDeleteWow fabulous cards Jenny loving the stamps
ReplyDeleteMaggieH
Jenny, you have done a sterling job of showcasing Kay's new Christmas stamps and stencils . Your cards are absolutely fab x
ReplyDeleteDelightful work with Kay's lovely new stamps, Jenny - that icy background is amazing, and I love that it works horizontally and vertically. The bauble forest is fab!
ReplyDeleteAlison x
I especially love this background Jenny. It could be used for so many wintry projects! Stef x
ReplyDelete